2015 MERCEDES-BENZ E-CLASS COUPE park assist
[x] Cancel search: park assistPage 228 of 345

Display messages
Possible causes/consequences and
M
MSolutions J
Release parking Release parking
brake brake You are driving with the parking brake applied. A warning tone also
sounds.
X Release the parking brake. J
Check brake fluid Check brake fluid
level level There is insufficient brake fluid in the brake fluid reservoir.
In addition, the red Jwarning lamp lights up in the instrument
cluster and a warning tone sounds.
G WARNING
Braking efficiency may be impaired.
There is a risk of an accident.
X Pull over and stop the vehicle safely as soon as possible, paying
attention to road and traffic conditions. Do not continue driving
under any circumstances.
X Safeguard the vehicle against rolling away (Y page 150).
X Consult a qualified specialist workshop.
X Do not top up the brake fluid. This does not correct the fault. #
Check Check
brake
brakepad
padwear
wear The brake pads/linings have reached their wear limit.
X Consult a qualified specialist workshop. G
Inoperative
Inoperative One or more main features of the Mercedes-Benz Contact system are
malfunctioning.
X Consult a qualified specialist workshop. Collision Preven‐
Collision Preven‐
tion Assist Plus tion Assist Plus
currently unavaila‐ currently unavaila‐
ble ble
See
SeeOwner's
Owner's Man‐
Man‐
ual
ual COLLISION PREVENTION ASSIST PLUS is temporarily inoperative.
Possible causes:
R the radar sensor system is temporarily inoperative, e.g. due to elec-
tromagnetic radiation emitted by nearby TV or radio stations or
other sources of electromagnetic radiation
R the system is outside the operating temperature range
R the on-board voltage is too low
Once the causes listed above no longer apply, the display message
goes out.
COLLISION PREVENTION ASSIST PLUS is operational again.
If the display message does not disappear:
X Pull over and stop the vehicle safely as soon as possible, paying
attention to road and traffic conditions.
X Safeguard the vehicle against rolling away (Y page 150).
X Restart the engine. Collision Preven‐ Collision Preven‐
tion Assist Plus tion Assist Plus
inoperative inoperative COLLISION PREVENTION ASSIST PLUS is temporarily inoperative due
to a malfunction. Adaptive Brake Assist may also have failed.
X Consult a qualified specialist workshop. Display
messages
225On-board computer and displays Z
Page 239 of 345

Display messages
Possible causes/consequences and
M
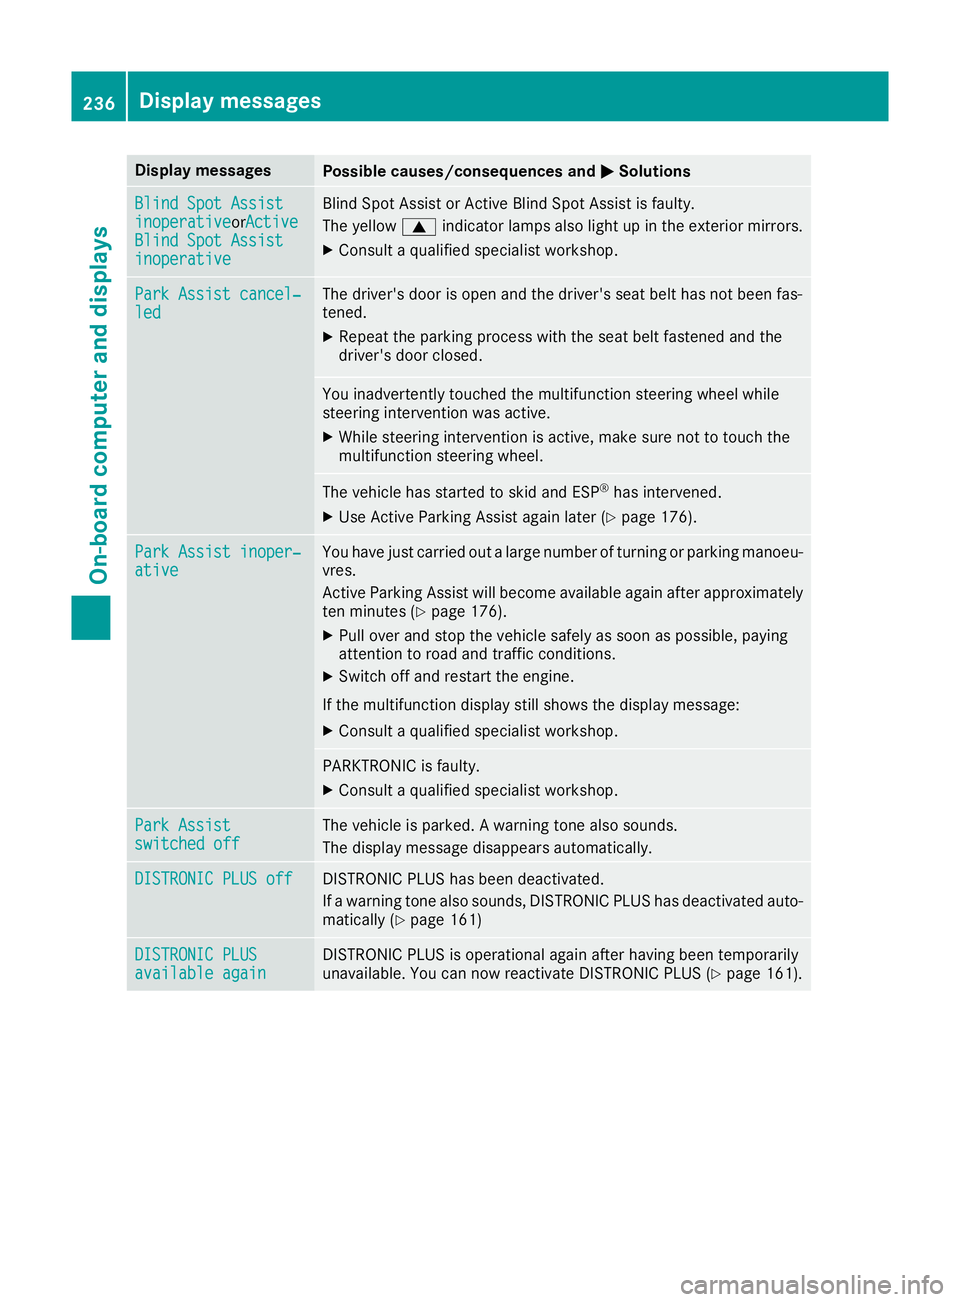
MSolutions Blind Spot Assist
Blind Spot Assist
inoperative inoperativeorActive
Active
Blind Spot Assist
Blind Spot Assist
inoperative inoperative Blind Spot Assist or Active Blind Spot Assist is faulty.
The yellow 9indicator lamps also light up in the exterior mirrors.
X Consult a qualified specialist workshop. Park Assist cancel‐
Park Assist cancel‐
led led The driver's door is open and the driver's seat belt has not been fas-
tened.
X Repeat the parking process with the seat belt fastened and the
driver's door closed. You inadvertently touched the multifunction steering wheel while
steering intervention was active.
X While steering intervention is active, make sure not to touch the
multifunction steering wheel. The vehicle has started to skid and ESP
®
has intervened.
X Use Active Parking Assist again later (Y page 176).Park Assist inoper‐ Park Assist inoper‐
ative ative You have just carried out a large number of turning or parking manoeu-
vres.
Active Parking Assist will become available again after approximately ten minutes (Y page 176).
X Pull over and stop the vehicle safely as soon as possible, paying
attention to road and traffic conditions.
X Switch off and restart the engine.
If the multifunction display still shows the display message:
X Consult a qualified specialist workshop. PARKTRONIC is faulty.
X Consult a qualified specialist workshop. Park Assist Park Assist
switched off switched off The vehicle is parked. A warning tone also sounds.
The display message disappears automatically. DISTRONIC PLUS off
DISTRONIC PLUS off DISTRONIC PLUS has been deactivated.
If a warning tone also sounds, DISTRONIC PLUS has deactivated auto-
matically (Y page 161) DISTRONIC PLUS DISTRONIC PLUS
available again available again DISTRONIC PLUS is operational again after having been temporarily
unavailable. You can now reactivate DISTRONIC PLUS (Y
page 161).236
Display
messagesOn-board computer and displays
Page 306 of 345

R
It is important that you observe the descri-
bed order of the battery terminals when
connecting and disconnecting a battery.
R When jump-starting, make sure that the
battery poles with identical polarity are
connected.
R It is particularly important to observe the
described order when connecting and dis-
connecting the jump leads.
R Never connect or disconnect the battery
terminals while the engine is running. G
WARNING
Battery acid is caustic. There is a risk of injury. Avoid contact with the skin, eyes or clothing.
Do not breathe in any battery gases. Do not
lean over the battery. Keep the batteries out
of the reach of children. Immediately rinse off
battery acid thoroughly with plenty of clean
water and seek medical attention at once. H
Environmental note Batteries contain pollutants.
It is illegal to dispose of them with the household rubbish.
They must be collected sep-
arately and disposed of in anenvironmentally responsible
recycling system. Dispose of batteries in an
environmentally responsible
manner. Take discharged
batteries to a qualified spe-
cialist workshop or to a col-
lection point for used batter-
ies.
! Have the battery checked regularly at a
qualified specialist workshop.
Observe the service intervals in the Service
Booklet or contact a qualified specialist work- shop for more information. !
Always have work on the batteries carried
out at a qualified specialist workshop. Should
it, in exceptional circumstances, be abso-
lutely necessary to disconnect the 12-volt
battery yourself, please observe the follow-
ing:
R secure the vehicle to prevent it from rolling
away.
R switch the ignition off.
R first, disconnect the negative terminal, fol-
lowed by the positive terminal.
Vehicles with automatic transmission: the
transmission is locked in position Pafter dis-
connecting the battery.
After the work has been completed, firmly
reinstall the battery and the cover of the pos- itive terminal.
Comply with safety precautions and take pro-
tective measures when handling batteries. Risk of explosion
Fire, naked flames and smoking are
prohibited when handling the bat-
tery. Avoid creating sparks.
Battery acid is caustic. Avoid contact
with the skin, eyes or clothing.
Wear suitable protective clothing, in
particular gloves, an apron and a
face mask.
Immediately rinse acid splashes off
with clean water. Consult a doctor if necessary. Wear eye protection.
Keep children away.
Observe this Owner's Manual.
For safety reasons, Mercedes-Benz recom-
mends that you only use batteries which have
been tested and approved for your vehicle by
Mercedes-Benz. These batteries provide
increased impact protection to prevent vehicle Battery (vehicle)
303Breakdown assistance Z
Page 307 of 345

occupants from suffering acid burns should the
battery be damaged in the event of an accident.
In order for the battery to achieve the maximum possible service life, it must always be suffi-
ciently charged.
Like other batteries, the vehicle battery may
discharge over time if you do not use the vehicle. In such cases, have the battery disconnected ata qualified specialist workshop. You can also
charge the battery with a charger recommended
by Mercedes-Benz. For more information,
please contact a qualified specialist workshop.
Have the battery charge checked more fre-
quently if you use the vehicle mainly for short
trips or if you leave it standing idle for a lengthy period. Consult a qualified specialist workshop
if you wish to leave your vehicle parked up for a
long period of time.
When you park the vehicle, remove the key if you do not require any electrical consumers. The
vehicle will then use very little energy, thus con- serving battery power.
If the power supply has been interrupted, e.g. if the battery was discharged, you will have to:
R set the clock. Information on setting the clock
can be found in the Digital Owner's Manual.
On vehicles with a multimedia system, the
time is set automatically.
R reset the function for folding the exterior mir-
rors in/out automatically, by folding the mir-
rors out once (Y page 103). Charging the battery
G
WARNING
During charging and jump-starting, explosive
gases can escape from the battery. There is a risk of an explosion.
Particularly avoid fire, naked flames, creating
sparks and smoking. Ensure there is sufficient
ventilation while charging and jump-starting.
Do not lean over a battery. G
WARNING
Battery acid is caustic. There is a risk of injury. Avoid contact with the skin, eyes or clothing.
Do not breathe in any battery gases. Do not
lean over the battery. Keep the batteries out
of the reach of children. Immediately rinse off battery acid thoroughly with plenty of clean
water and seek medical attention at once. G
WARNING
A discharged battery can freeze at tempera-
tures below freezing point. When jump-start-
ing the vehicle or charging the battery, gases can escape from the battery. There is a risk of
an explosion.
Allow the frozen battery to thaw out before
charging it or jump-starting.
! Only use battery chargers with a maximum
charging voltage of 14.8 V.
! Only charge the battery using the jump-start
connection point.
The jump-starting connection point is in the
engine compartment (Y page 305).
X Open the bonnet.
X Connect the battery charger to the positive
terminal and earth point in the same order as
when connecting the donor battery in the
jump-starting procedure (Y page 305).
If the indicator/warning lamps do not light up at
low temperatures, it is very likely that the dis-
charged battery has frozen. In this case, you
may neither charge the battery nor jump-start
the vehicle. The service life of a battery that has been thawed may be reduced. The starting char-
acteristics may be impaired, especially at low
temperatures. Have the thawed battery
checked at a qualified specialist workshop.
Never charge a battery still installed in the vehi-
cle unless a battery charger unit approved by
Mercedes-Benz is being used. A battery charger unit specially adapted for Mercedes-Benz vehi-
cles and tested and approved by Mercedes-
Benz is available as an accessory. This device
permits charging of the battery in position. Con-
tact a Mercedes-Benz Service Centre for infor-
mation and availability. Read the battery charg- er's operating instructions before charging the
battery. 304
Battery (vehicle)Breakdown assistance
Page 308 of 345

Jump-starting
For the jump-starting procedure, use only the jump-starting connection point, consisting of a pos- itive terminal and an earth point, in the engine compartment. G
WARNING
Battery acid is caustic. There is a risk of injury.
Avoid contact with the skin, eyes or clothing. Do not breathe in any battery gases. Do not lean over the battery. Keep the batteries out of the reach of children. Immediately rinse off battery acid
thoroughly with plenty of clean water and seek medical attention at once. G
WARNING
During charging and jump-starting, explosive gases can escape from the battery. There is a risk of an explosion.
Particularly avoid fire, naked flames, creating sparks and smoking. Ensure there is sufficient
ventilation while charging and jump-starting. Do not lean over a battery. G
WARNING
During the charging process, a battery produces hydrogen gas. If a short circuit occurs or sparks
are created, the hydrogen gas can ignite. There is a risk of an explosion.
R Make sure that the positive terminal of a connected battery does not come into contact with
vehicle parts.
R Never place metal objects or tools on a battery.
R It is important that you observe the described order of the battery terminals when connecting
and disconnecting a battery.
R When jump-starting, make sure that the battery poles with identical polarity are connected.
R It is particularly important to observe the described order when connecting and disconnecting
the jump leads.
R Never connect or disconnect the battery terminals while the engine is running. G
WARNING
A discharged battery can freeze at temperatures below freezing point. When jump-starting the
vehicle or charging the battery, gases can escape from the battery. There is a risk of an explosion.
Allow the frozen battery to thaw out before charging it or jump-starting.
! Vehicles with a petrol engine:
avoid repeated and lengthy starting attempts. Otherwise, the
non-combusted fuel may damage the catalytic converter.
If the indicator/warning lamps do not light up at low temperatures, it is very likely that the dis-
charged battery has frozen. In this case you may neither jump-start the vehicle nor charge the
battery. The service life of a battery that has been thawed may be reduced. The starting charac-
teristics may be impaired, especially at low temperatures. Have the thawed battery checked at a
qualified specialist workshop. Jump-starting
305Breakdown assistance Z
Page 309 of 345

Do not use a rapid charging device to start the vehicle. If your vehicle's battery is discharged, the
engine can be jump-started from another vehicle or from a second battery using jump leads.
Observe the following points:
R The battery is not accessible in all vehicles. If the other vehicle's battery is not accessible, jump-
start the vehicle using a second battery or a jump-starting device.
R Vehicles with a petrol engine: only jump-start the vehicle when the engine and exhaust system
are cold.
R Jump-starting may only be performed using batteries with a nominal voltage of 12 V.
R Only use jump leads that have a sufficient cross-section and insulated terminal clamps.
R If the battery is fully discharged, leave the battery that is being used to jump-start connected for
a few minutes before attempting to start. This charges the empty battery a little.
R Make sure that the two vehicles do not touch.
Make sure that:
R The jump leads are not damaged.
R Non-insulated parts of the terminal clamps do not come into contact with other metal parts while
the jump leads are connected to the battery.
R The jump leads cannot come into contact with parts which can move when the engine is running,
such as the V-belt pulley or the fan.
X Firmly depress the parking brake.
X Manual transmission: depress the clutch pedal fully and shift to neutral.
X Automatic transmission: shift the transmission to position P.
X Make sure the ignition is switched off. All indicator lamps in the instrument cluster must be off.
When using the key, turn the key to position 0in the ignition lock and remove it (Y page 132).
X Switch off all electrical consumers, e.g. rear window heating, lighting etc.
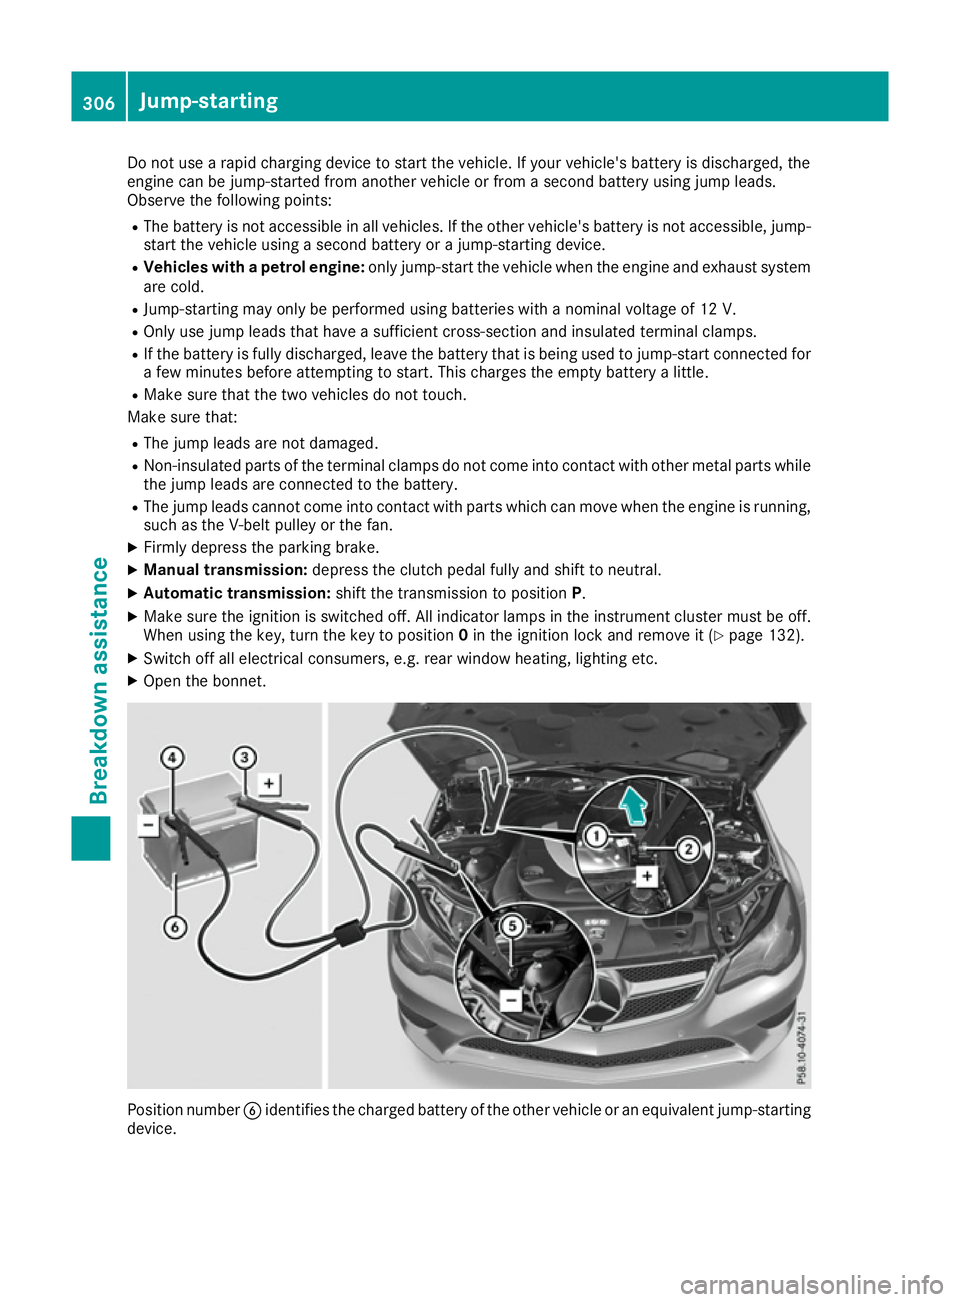
X Open the bonnet. Position number
Bidentifies the charged battery of the other vehicle or an equivalent jump-starting
device. 306
Jump-startingBreakdown assistance
Page 312 of 345

X
Remove cover :from the opening.
X Screw in the towing eye clockwise as far as it
will go and tighten it.
Vehicles with a trailer tow hitch do not have a
bracket at the back for the screw-in towing eye.
Connect the towbar to the trailer tow hitch
(Y page 202).
Removing the towing eye X
Loosen the towing eye and unscrew it.
X Position cover :on top of the bumper and
press it in at the bottom until it engages.
X Place the towing eye in the vehicle tool kit. Towing the vehicle with both axles on
the ground
It is important that you observe the safety
instructions when towing away your vehicle
(Y page 307).
X Turn the key to position 2in the ignition lock.
X When the vehicle is stationary, depress the
brake pedal and keep it depressed.
X Vehicles with manual transmission:
depress the clutch pedal fully and engage
neutral.
or X Vehicles with automatic transmission:
shift the transmission to position N.
X Release the brake pedal.
X Release the parking brake.
In order to signal a change of direction when
towing the vehicle with the hazard warning
lamps switched on, use the combination switch as usual. In this case, only the turn signals for
the desired direction flash. When you reset the
combination switch, the hazard warning lamps
start flashing again. Towing the vehicle away with the rear
axle raised
! Vehicles with automatic transmission must
not be towed with the rear axle raised. The
car/trailer combination may otherwise
swerve or even overturn.
! The ignition must be switched off if you are
towing the vehicle with the rear axle raised. Intervention by ESP
®
could otherwise dam-
age the brake system.
X Switch on the hazard warning lamps
(Y page 108).
X Move the front wheels to the straight-ahead
position.
X Turn the key in the ignition lock to position 0
and remove the key from the ignition lock.
X When leaving the vehicle, take the key with
you.
When towing your vehicle away with the rear
axle raised, it is important that you observe the
safety instructions (Y page 307). Transporting the vehicle
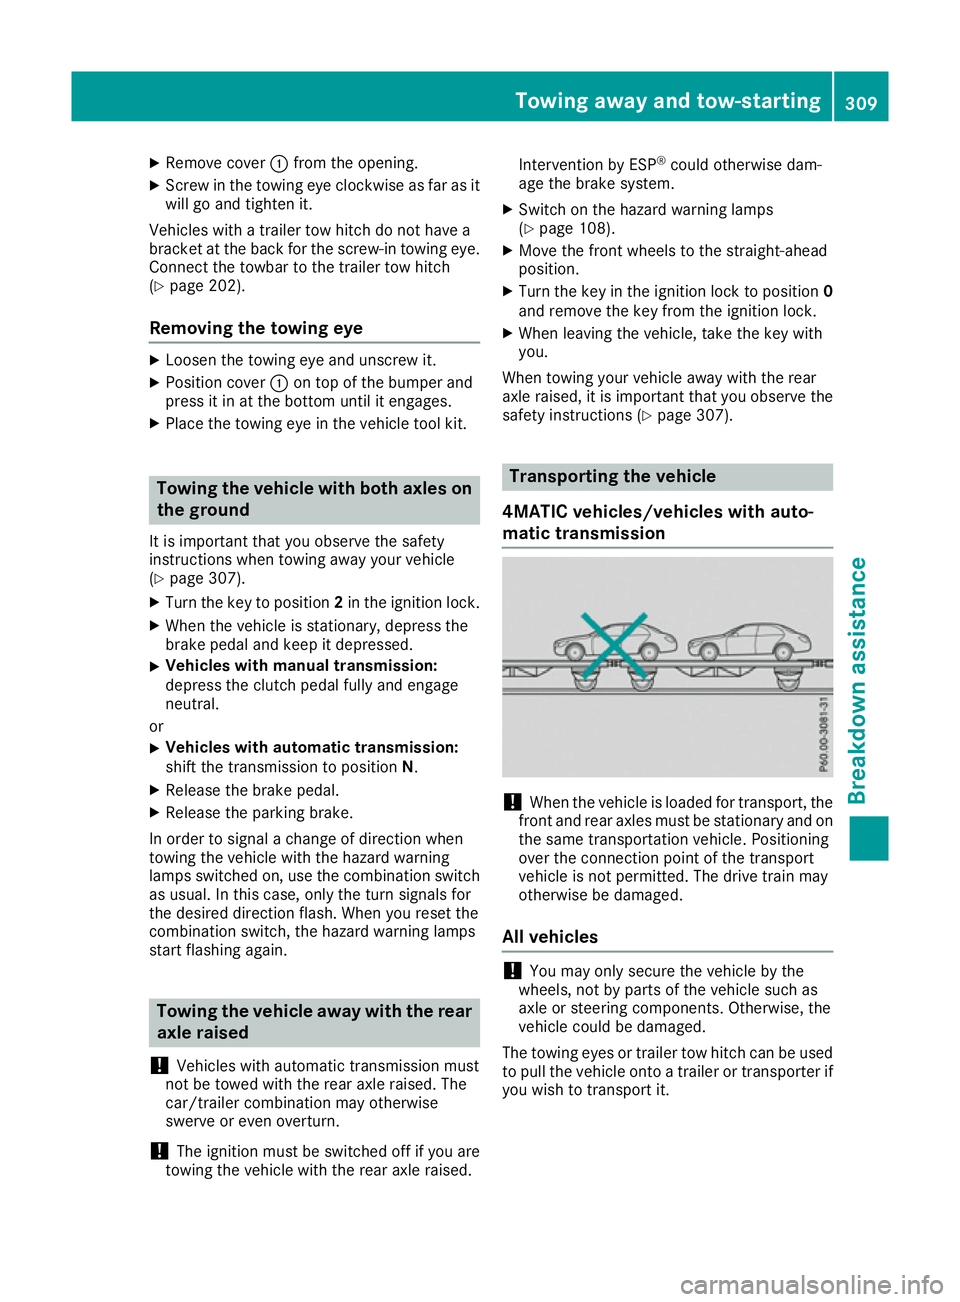
4MATIC vehicles/vehicles with auto-
matic transmission !
When the vehicle is loaded for transport, the
front and rear axles must be stationary and on
the same transportation vehicle. Positioning
over the connection point of the transport
vehicle is not permitted. The drive train may
otherwise be damaged.
All vehicles !
You may only secure the vehicle by the
wheels, not by parts of the vehicle such as
axle or steering components. Otherwise, the
vehicle could be damaged.
The towing eyes or trailer tow hitch can be used to pull the vehicle onto a trailer or transporter if
you wish to transport it. Towing away and tow-starting
309Breakdown assistance Z
Page 313 of 345

X
Vehicles with manual transmission:
depress the clutch pedal fully and engage
neutral.
X Vehicles with automatic transmission:
turn the key to position
2in the ignition lock.
X Shift the automatic transmission to position
N.
As soon as the vehicle is loaded: X Prevent the vehicle from rolling away by
applying the parking brake.
X Vehicles with manual transmission:
depress the clutch pedal fully and engage first
or reverse gear.
X Vehicles with automatic transmission:
shift the automatic transmission to position
P.
X Turn the key to position 0in the ignition lock
and remove it.
X Secure the vehicle. Notes for 4MATIC vehicles
! Vehicles with 4MATIC must not be towed
with the front or rear axle raised; otherwise,
the transmission may be damaged.
If the vehicle has transmission damage or dam-
age to the front or rear axle, have it transported on a transporter or trailer.
In the event of damage to the electrical sys-
tem
If the battery is defective, the automatic trans-
mission will be locked in position P. To shift the
automatic transmission to position N, you must
provide power to the vehicle's electrical system in the same way as when jump-starting
(Y page 305).
Have the vehicle transported on a transporter or
trailer. Tow-starting (emergency engine
starting)
! Vehicles with automatic transmission must
not be tow-started. The transmission may
otherwise be damaged.
i You can find information on "Jump-starting"
under (Y page 305). Before tow-starting, the following conditions
must be fulfilled:
R the battery is connected
R the engine has cooled down
R the exhaust system has cooled down
When tow-starting, it is important that you
observe the safety notes (Y page 307) and the
legal requirements in each respective country.
X Switch on the hazard warning lamps
(Y page 108).
X Fit the towing eye (Y page 308).
X Secure the rigid towing bar or the towing
rope.
X Depress the brake pedal and keep it
depressed.
X Turn the key to position 2in the ignition lock.
X Depress the clutch pedal fully, engage second
gear and continue to keep the clutch pedal
fully depressed.
X Release the brake pedal.
X Tow-start the vehicle.
X Release the clutch pedal slowly, do not
depress the accelerator pedal while doing so.
X When the engine has been started, immedi-
ately depress the clutch pedal fully and shift
to neutral.
X Pull over at a suitable place and stop the vehi-
cle safely, paying attention to road and traffic
conditions.
X Depress the parking brake.
X Remove the rigid towing bar or towing rope.
X Remove the towing eye (Y page 309).
X Switch off the hazard warning lamps. Electrical fuses
Important safety notes
G
WARNING
If you manipulate, bridge or replace a faulty
fuse with a fuse of a higher amperage, the
electric cables could be overloaded. This may result in a fire. There is a risk of an accident
and injury.
Always replace faulty fuses with specified new fuses of the correct amperage. 310
Electrical fusesBreakdown assistance