2015 MERCEDES-BENZ E-CLASS COUPE roof
[x] Cancel search: roofPage 57 of 345

Forward-facing child restraint system
If you secure a child in a forward-facing child
restraint system on the co-driver's seat, you
must always move the co-driver's seat as far
back as possible. The base of the child restraint system must lie fully on the co-driver's seat
cushion. The backrest of the child restraint sys-
tem must lie as flat against the co-driver's seat
backrest as possible. The child restraint system may not touch the roof or be put under strain by
the head restraint. Adjust the angle of the seat
backrest and the head restraint position accord- ingly. Always make sure that the shoulder belt
strap is correctly routed from the seat-belt
extender on the co-driver's seat to the shoulder
belt guide on the child restraint system. The
shoulder belt strap must be routed forwards
from the retracted seat-belt extender for the co- driver's seat.
Always observe the information about suitable
positioning of the child restraint system
(Y page 55) as well as the child restraint sys-
tem manufacturer's installation and operating
instructions. 54
Children in the vehicleSafety
Page 58 of 345

Problems with automatic child seat recognition
Problem
Possible causes/consequences and
M
MSolutions The PASSENGER AIR
BAG OFF indicator lamp
on the centre console is
lit. A special Mercedes-Benz child restraint system with a transponder for
automatic child seat recognition has been fitted to the front-
passenger seat. The front-passenger front airbag has therefore been
disabled as desired. G
WARNING
There is no child restraint system fitted to the front-passenger seat.
Automatic child seat recognition is malfunctioning, for example due to
electronic devices on the front-passenger seat.
There is a risk of injury.
X Remove electronic equipment from the front-passenger seat, e.g.:
R laptop
R mobile phone
R a card with a transponder, such as a ski pass or access pass
If the PASSENGER AIR BAG OFF indicator lamp remains lit, the front- passenger seat may not be used.
X Consult a qualified specialist workshop. When you switch the
ignition on, the
6
restraint system warning lamp lights up and/or
the PASSENGER AIR
BAG OFF indicator lamp
does not light up briefly. G
WARNING
Automatic child seat recognition is malfunctioning.
Do not install a child restraint system on the front-passenger seat.
It is recommended that you fit the child restraint system to a suitable rear seat.
X Consult a qualified specialist workshop.
X Please also refer to the notes about the restraint system warning
lamp (Y page 228). Suitable positioning of the child
restraint system
Introduction Only child restraint systems which are approved
in accordance with the ECE standard ECE R44
are permitted for use in the vehicle.
For certain child restraint systems in weight cat-
egories II or III, this can mean that the area of
use is restricted. The maximum size setting of
the child restraint system is not possible due to possible contact with the roof.
"Universal" category child restraint systems can
be recognised by their orange approval label and the text "Universal". Example: approval label on the child restraint
system
"Universal" category child restraint systems can
be used on the seats indicated with U, UF or IUF according to the tables "Suitability of the seats
for attaching belt-secured child restraint sys- Children in the vehicle
55Safety Z
Page 59 of 345

tems" or "Suitability of the seats for attaching an
ISOFIX child restraint system".
Semi-universal child restraint systems are indi-
cated by the text "semi-universal" on the
approval label. These can be used if the vehicle and the seat are listed in the child restraint sys-
tem manufacturer's vehicle model list. For more
information, contact the child restraint system
manufacturer or visit their website.
If it is absolutely necessary to fit a child restraint system to the front-passenger seat:
X Always pay attention to the instructions under
"Child restraint system on the front-
passenger seat" (Y page 52).
There you will find instructions on how to cor- rectly route the shoulder belt strap from the
vehicle seat-belt extender or belt outlet to the
shoulder belt guide on the child restraint sys-
tem (Y page 54).
X Move the front-passenger seat as far back as
possible and into the lowest position.
X Move the backrest to an almost vertical posi-
tion.
The entire base of the child restraint system
must always rest on the seat cushion of the
front-passenger seat. The backrest of the
forward-facing child restraint system must, as far as possible, be resting on the backrest of
the front-passenger seat. The child restraint
system must not touch the roof or be put
under strain by the head restraint. Adjust the
angle of the seat backrest and the head
restraint position accordingly. Also observe
the child restraint system manufacturer's
installation instructions. 56
Children in the vehicleSafety
Page 61 of 345

Suitability of the seats for attaching ISOFIX child restraint systems
If you use a baby car seat of category 0 or 0+ or a rearward-facing child restraint system of category
I on a rear seat, you must adjust the driver's or front-passenger seat so that the seat does not touch the child restraint system.
Always observe the notes in the "Child restraint system" section (Y page 48) and the child restraint
system manufacturer's installation instructions.
Legend for the table:
XI SOFIX position that is not suitable for ISOFIX child restraint systems in this weight category
and/or size category.
IUF Suitable for forward-facing ISOFIX child seat securing systems that belong to the "Universal" category which are approved for use in this weight category.
IL Suitable for ISOFIX child restraint systems as recommended; see the "Recommended child restraint systems" table (Y page 58).
The manufacturer will also recommend a suitable ISOFIX child restraint system. For this, your
vehicle and the seat must be listed in the child restraint system manufacturer's model list. For more information, contact the child restraint system manufacturer or visit their website. Weight category Size category Equipment Rear seat left,
right Carry-cot
F ISO/L1 X
G ISO/L2 X
0
up to 10 kg
up to approximately 6 months E ISO/R1 IL
0+
up to 13 kg
up to approximately 15 months E ISO/R1 IL
D ISO/R2 IL
C ISO/R3 IL
I
9 to 18 kg
between approximately 9 months
and 4 years D ISO/R2 IL
C ISO/R3 IL
B ISO/F2 IUF
B1 ISO/F2X IUF
A ISO/F3 IUF
The child restraint system must not touch the roof or be put under strain by the head restraints. If
possible, adjust the head restraint position accordingly. Also observe the child restraint system
manufacturer's installation instructions. Recommended child restraint systems
General notes Always observe the information in "Child restraint systems on the front-passenger seat" (Y
page 52)
and in "Suitable positioning of the child restraint system" (Y page 55).
You can obtain further information about the correct child restraint system from any Mercedes-Benz
Service Centre. 58
Children in the vehicleSafety
Page 63 of 345

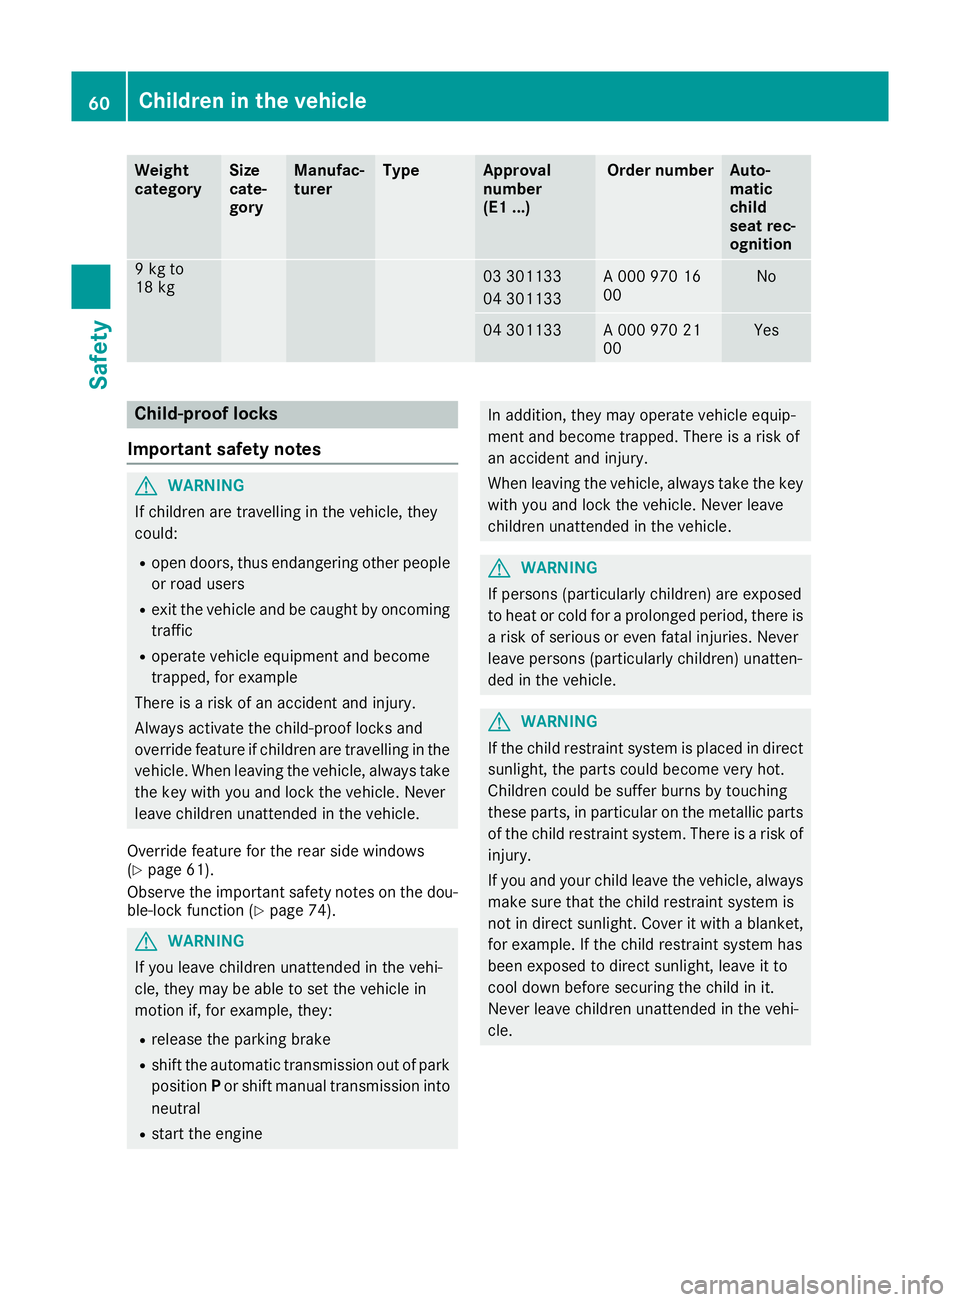
Weight
category Size
cate-
gory Manufac-
turer Type Approval
number
(E1 ...) Order number Auto-
matic
child
seat rec-
ognition
9 kg to
18 kg
03 301133
04 301133 A 000 970 16
00 No
04 301133 A 000 970 21
00 Yes
Child-proof locks
Important safety notes G
WARNING
If children are travelling in the vehicle, they
could:
R open doors, thus endangering other people
or road users
R exit the vehicle and be caught by oncoming
traffic
R operate vehicle equipment and become
trapped, for example
There is a risk of an accident and injury.
Always activate the child-proof locks and
override feature if children are travelling in the vehicle. When leaving the vehicle, always take the key with you and lock the vehicle. Never
leave children unattended in the vehicle.
Override feature for the rear side windows
(Y page 61).
Observe the important safety notes on the dou-
ble-lock function (Y page 74).G
WARNING
If you leave children unattended in the vehi-
cle, they may be able to set the vehicle in
motion if, for example, they:
R release the parking brake
R shift the automatic transmission out of park
position Por shift manual transmission into
neutral
R start the engine In addition, they may operate vehicle equip-
ment and become trapped. There is a risk of
an accident and injury.
When leaving the vehicle, always take the key with you and lock the vehicle. Never leave
children unattended in the vehicle. G
WARNING
If persons (particularly children) are exposed
to heat or cold for a prolonged period, there is a risk of serious or even fatal injuries. Never
leave persons (particularly children) unatten-
ded in the vehicle. G
WARNING
If the child restraint system is placed in direct sunlight, the parts could become very hot.
Children could be suffer burns by touching
these parts, in particular on the metallic parts
of the child restraint system. There is a risk of injury.
If you and your child leave the vehicle, always
make sure that the child restraint system is
not in direct sunlight. Cover it with a blanket, for example. If the child restraint system has
been exposed to direct sunlight, leave it to
cool down before securing the child in it.
Never leave children unattended in the vehi-
cle. 60
Children in the vehicleSafety
Page 76 of 345

Priming
X
Make sure that:
R the side windows are closed
R the panorama sliding sunroof is closed
This will prevent false alarms.
X Make sure that:
R the doors are closed
R the boot lid is closed
Only then is the interior motion sensor
primed.
X Lock the vehicle with the key or KEYLESS-GO.
The interior motion sensor is primed after
approximately 30 seconds.
Switching off X
Unlock the vehicle with the key or KEYLESS-
GO.
or X Insert the key into the ignition lock.
The interior motion sensor is automatically
switched off.
Deactivating X
Remove the key from the ignition lock.
X Press button :.
Indicator lamp ;flashes several times in
rapid succession.
X Lock the vehicle with the key or KEYLESS-GO.
The interior motion sensor is deactivated.
The interior motion sensor remains deactivated until:
R the vehicle is unlocked again and
R a door is opened and closed again and
R the vehicle is locked again To prevent a false alarm, deactivate the interior
motion sensor if you lock your vehicle and:
R people or animals remain in the vehicle
R the panorama sliding sunroof remains open
R the side windows remain open
i UK only:
your vehicle is equipped with a
double-lock function. The doors cannot be
opened from the inside if the vehicle has been
locked with the key or with KEYLESS-GO
(Y page 81). Deactivate the interior motion
sensor before you lock the vehicle. The doors
can then be opened from the inside after the
vehicle has been locked from the outside.
Observe the "Important safety notes"
(Y page 80). Protection against theft
73Safety Z
Page 89 of 345

Convenience opening feature
General notes You can ventilate the vehicle before you start
driving. To do this, the key is used to carry out
the following functions simultaneously:
R unlock the vehicle
R open the side windows
R open the panorama sliding sunroof and the
roller sunblind
R switch on the seat ventilation for the driver's
seat
The convenience opening feature can only be
operated using the key. The key must be in close
proximity to the vehicle.
The "convenience opening" feature is also avail-
able when the vehicle is unlocked.
Convenience opening feature X
Press and hold the %button until the side
windows and the panorama sliding sunroof
are in the desired position.
If the roller sunblind of the panorama sliding
sunroof is closed, the roller sunblind is
opened first.
X Press and hold the %button again until the
panorama sliding sunroof is in the desired
position.
X To interrupt convenience opening: release
the % button. Convenience closing feature
Important safety notes G
WARNING
When the convenience closing feature is oper- ating, parts of the body could become trapped
in the closing area of the side window and the
sliding sunroof. There is a risk of injury.
Observe the complete closing procedure
when the convenience closing feature is oper-
ating. When closing make sure that no parts of the body are in the closing area.
Proceed as follows if someone is trapped: With the key:
X Release the &button.
X Press and hold the %button until the side
windows and the sliding sunroof or the pano-
rama sliding sunroof open again.
With KEYLESS-GO: X Release the sensor surface on the door han-
dle.
X Pull the door handle immediately and hold it.
The side windows and the sliding sunroof or
the panorama sliding sunroof open.
General notes When you lock the vehicle, you can simultane-
ously:
R close the side windows
R close the panorama sliding sunroof
On vehicles with a panorama sliding sunroof,
you can then close the roller sunblind.
Using the key X
Vehicles without KEYLESS-GO: point the tip
of the key at the door handle on the driver's
door.
X Vehicles with KEYLESS-GO: the key must
be in close proximity to the vehicle.
X Press and hold the &button until the side
windows and the panorama sliding sunroof
are fully closed.
X Make sure that all the side windows and the
panorama sliding sunroof are closed.
On vehicles with a panorama sliding sunroof:
X Press and hold the &button again until the
roller sunblind of the panorama sliding sun-
roof closes.
X To interrupt convenience closing: release
the & button.
Using KEYLESS-GO The driver's door and the door at which the han-
dle is used must both be closed. The key must beoutside the vehicle. The gap between the key
and the corresponding door handle should not
be greater than 1 m. 86
Side windowsOpening and closing
Page 90 of 345

X
Touch recessed sensor surface :on the
door handle until the side windows and the
panorama sliding sunroof are fully closed.
i Make sure you only touch recessed sensor
surface :.
X Make sure that all the side windows and the
panorama sliding sunroof are closed.
On vehicles with a panorama sliding sunroof: X Touch recessed sensor surface :on the
door handle again until the roller sunblind of
the panorama sliding sunroof closes.
X To interrupt convenience closing: release
recessed sensor surface :on the door han-
dle. Resetting the side windows
If a side window can no longer be closed fully,
you must reset it.
X Close all doors.
X Turn the key to position 1or 2in the ignition
lock.
X Pull the corresponding switch on the door
control panel until the side window is com-
pletely closed (Y page 85).
X Hold the switch for an additional second.
If the side window opens again slightly: X Immediately pull the corresponding switch on
the door control panel until the side window is completely closed (Y page 85).
X Hold the switch for an additional second.
X If the corresponding side window remains
closed after the button has been released, the
side window has been reset correctly. If this is
not the case, repeat the steps above again. Side windows
87Opening and closing Z