2015 MERCEDES-BENZ E-CLASS COUPE display
[x] Cancel search: displayPage 260 of 345
Adjusting the volume
X
Turn the qcontrol knob.
The volume is adjusted:
R for the currently selected media source
R during traffic or navigation announcements
R in hands-free mode during a phone call
Switching the sound on/off X
Press the 8button on the control panel.
If the audio output is switched off, the status
line will show the 8symbol. If you switch
the media source or set the volume, the sound
is automatically switched on.
i Navigation messages will be heard even if
the sound is muted.
Functions The multimedia system has the following func-
tions:
R Radio mode
R Media mode with media search
R Sound systems
R Navigation system
COMAND Online: navigation via the hard drive
Audio 20: navigation via SD card
R Communication functions
R Vehicle functions with system settings
R Favourites functions
Controller The controller in the centre console lets you:
R select menu items on the display
R enter characters
R select a destination on the map
R save entries
The controller can be:
R turned 3
R slid left or right 1
R slid forwards or back 4
R slid diagonally 2
R pressed briefly or pressed and held 7Back button You can use the
%button to exit a menu or to
call up the basic display of the current operating mode.
X To exit the menu: briefly press the%
button.
The multimedia system changes to the next
higher menu level in the current operating
mode.
X To call up the basic display: press the%
button for longer than two seconds.
The multimedia system changes to the basic
display of the current operating mode. Favourites
Calling up and exiting favourites X
To call up: press theòbutton on the con-
troller.
X Select a favourite, e. g. Vehicle Vehicle.
The favourites are displayed.
X To exit: press the òbutton again.
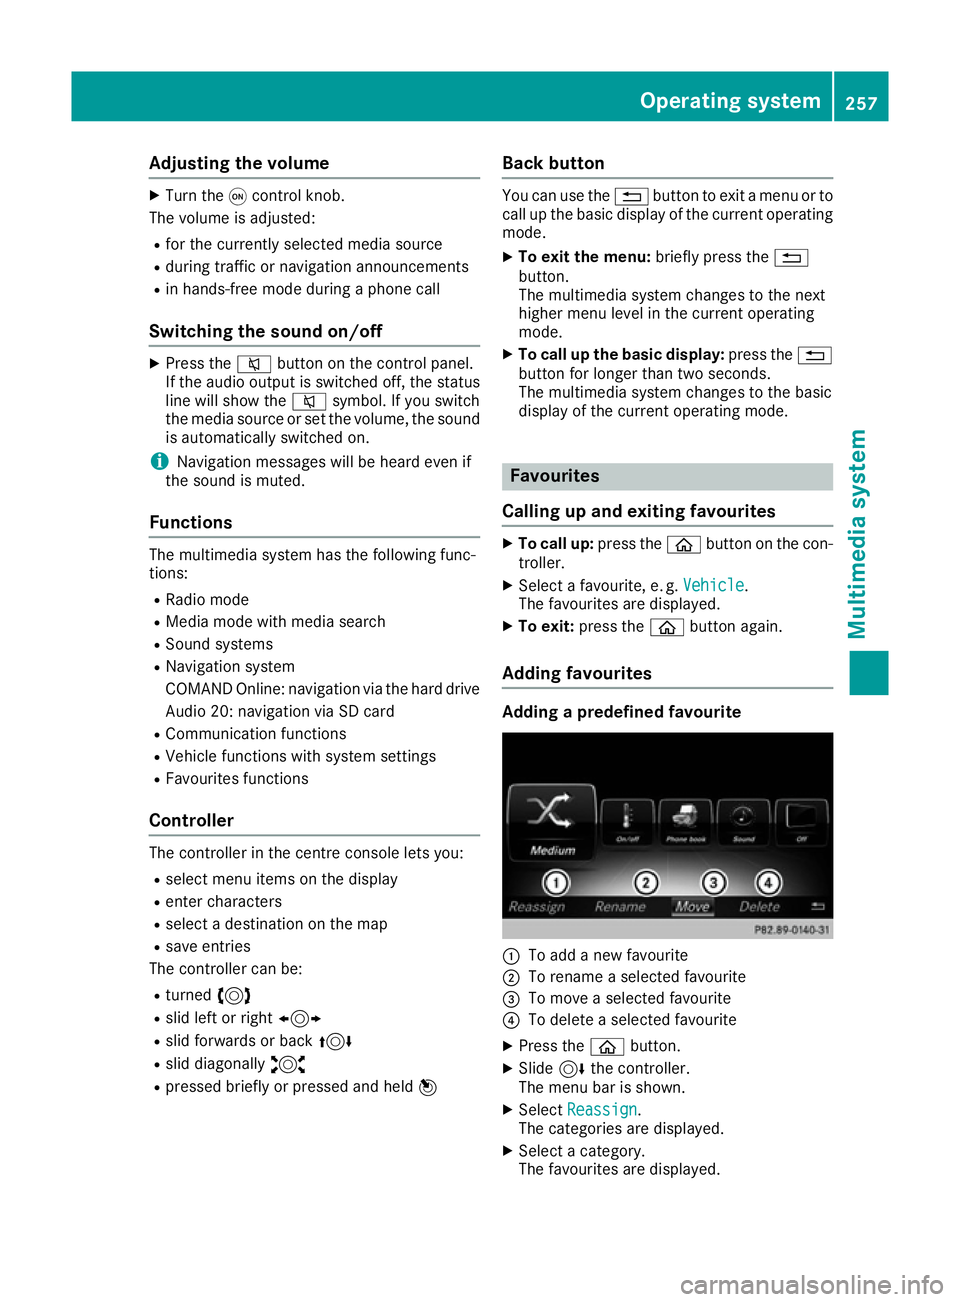
Adding favourites Adding a predefined favourite
:
To add a new favourite
; To rename a selected favourite
= To move a selected favourite
? To delete a selected favourite
X Press the òbutton.
X Slide 6the controller.
The menu bar is shown.
X Select Reassign
Reassign.
The categories are displayed.
X Select a category.
The favourites are displayed. Operating system
257Multimedia system Z
Page 261 of 345
X
Select a favourite.
X Add a favourite at the desired position.
If a favourite has already been added at this
position, it will be overwritten.
Adding your own favourite
X Select Vehicle
VehicleQ Climate control
Climate control.
X Press and hold the òbutton until the
favourites are displayed.
X Add a favourite at the desired position.
If a favourite has already been added at this
position, it will be overwritten. Navigation mode
Important safety notes G
WARNING
Operating the integrated information systems and communications equipment in the vehicle
while driving will distract you from traffic con-
ditions. You could then lose control of the
vehicle. There is a risk of an accident.
Only operate these devices if road traffic con-
ditions permit. If you are unsure about the
surrounding conditions, pull over to a safe
location and make entries only while the vehi-
cle is stationary.
You must observe the legal requirements for the country in which you are currently driving whenoperating the navigation system.
General notes Correct functioning of the navigation system
depends, amongst other things, on GPS recep-
tion. In certain situations, GPS reception may be
impaired, there may be interference or there
may be no reception at all, e.g. in tunnels or
multi-storey car parks.
Audio 20 is equipped with Garmin ®
MAP PILOT
(see the manufacturer's operating instructions).
The Garmin ®
MAP PILOT operating instructions
are stored on the SD memory card as a PDF file. The SD card box contains a quick guide.
The following descriptions apply to navigation
with COMAND Online. Further information can
be found in the Digital Owner's Manual. Selecting a route type and route options Multimedia system:
X Select Navi NaviQNavigationNavigation.
The map displays the current vehicle position.
X Slide 6the controller.
X Select Options
OptionsQ Route settings
Route settings .
Notes for route types:
R Eco route
Eco route
R Dynamic route
Dynamic route
Traffic reports on the route for the route guid-
ance are taken into account.
R Dynamic route only after request Dynamic route only after request
You can decide whether or not current traffic
reports should be taken into account for route
calculation.
R Calculate alternative routes
Calculate alternative routes
Different routes are being calculated. In order
to do so, instead of Start Start, select the menu
item Continue
Continue .
Notes for route options:
R Use toll roads
Use toll roads
The route calculation includes roads which
require you to pay a usage fee (toll).
R Use vignette roads Use vignette roads (not available in all
countries)
The route calculation includes roads which
require you to pay a time-based fee (vignette). A vignette allows temporary use of the route
network, e. g. 10 days or 1 year.
Entering an address Multimedia system:
X Select Navi NaviQNavigationNavigation.
The map displays the current vehicle position.
X Slide 6the controller.
X Select Destination
DestinationQ Address entry
Address entry.
Enter an address, e.g. as follows:
R town or postcode, street, house number
R country, town or postcode
R town or postcode, centre
R street, town or postcode, junction
X Select Town
Town.
The town in which the vehicle is currently
located (current vehicle position) is at the top.
Below this, you will see locations for which
route guidance has already been carried out. 258
Operating systemMultimedia system
Page 262 of 345
X
Enter the town.
The Gsymbol: the location is contained on
the digital map multiple times.
X To switch to the list: slide5the control-
ler.
X Select the location.
If available, the postcode is shown. If there
are different postcodes available for the loca- tion, the corresponding digits are displayed
with an X
X.
X Enter the street and house number.
The address is in the menu.
Further options for destination entry:
R search for a keyword
The keyword search finds destinations using
fragments of words.
R select the last destination
R select a contact
R select a POI
You can search for a POI by location, name or
telephone number.
R select destination on the map
R enter intermediate destination
You can map the route to the destination
yourself with up to four intermediate destina- tions.
R select travel guide destination (only available
for selected European countries)
R select destinations from Mercedes-Benz
Apps
R select geo-coordinates
Calculating the route Prerequisite: the address has been entered and
is in the menu.
X Select Start StartorContinue
Continue.
The route is calculated with the selected route
type and the selected route options.
If route guidance has already been activated,
a prompt will appear asking whether you wish to end the current route guidance.
X Select Yes
Yes orSet as intermediate des‐ Set as intermediate des‐
tination
tination.
Yes Yes cancels the current route guidance and
starts route calculation to the new destina-
tion.
Set as intermediate destination
Set as intermediate destination adds
the new destination in addition to the existing destination and opens the intermediate des-
tinations list. Connecting the mobile phone
Requirements For telephony via the Bluetooth
®
interface, you
require a Bluetooth ®
-capable mobile phone. The
mobile phone must support Hands-Free Profile
1.0 or above.
Multimedia system:
X Select Vehicle VehicleQSystem set‐ System set‐
tings
tingsQ Activate Bluetooth
Activate Bluetooth .
X Activate Bluetooth ®
O.
Mobile phone:
X Activate Bluetooth ®
and, if necessary, Blue-
tooth ®
visibility for other devices (see the
manufacturer's operating instructions).
The Bluetooth ®
device names for all of one man-
ufacturer's products might be identical. To
make it possible to clearly identify your mobile
phone, change the device name (see the man-
ufacturer's operating instructions).
If the mobile phone supports the PBAP (P hone
Book Access Profile) and MAP (Message
Access Profile) Bluetooth ®
profiles, the follow-
ing information will be transmitted after you
connect:
R Phone book
R Call lists
R Text messages and e-mails
i Further information on suitable mobile
phones can be obtained on the Internet at:
http://www.mercedes-benz.com/
connect
Searching for and authorising a mobile
phone Before using your mobile phone with the multi-
media system for the first time, you will need to
search for the phone and then authorise (con-
nect) it. Depending on the mobile phone, author- isation takes place by means of Secure Simple
Pairing or by entering a passkey. The multimedia
system automatically makes the procedure that is relevant for your mobile phone available. The
mobile phone is always connected automati- Operating system
259Multimedia system Z
Page 263 of 345
cally after authorisation. Further information on
using a mobile phone with the multimedia sys-
tem (see the Digital Owner's Manual).
If the multimedia system does not detect your
mobile phone, this may be due to particular
security settings on your mobile phone (see the
manufacturer's operating instructions).
Only one mobile phone can be connected to the multimedia system at any one time.
Searching for a mobile phone
Multimedia system:
X Select Tel/
Tel/ ®QConnect Connect
device deviceQSearch for phones Search for phonesQStart Start
search
search.
The available mobile phones are displayed.
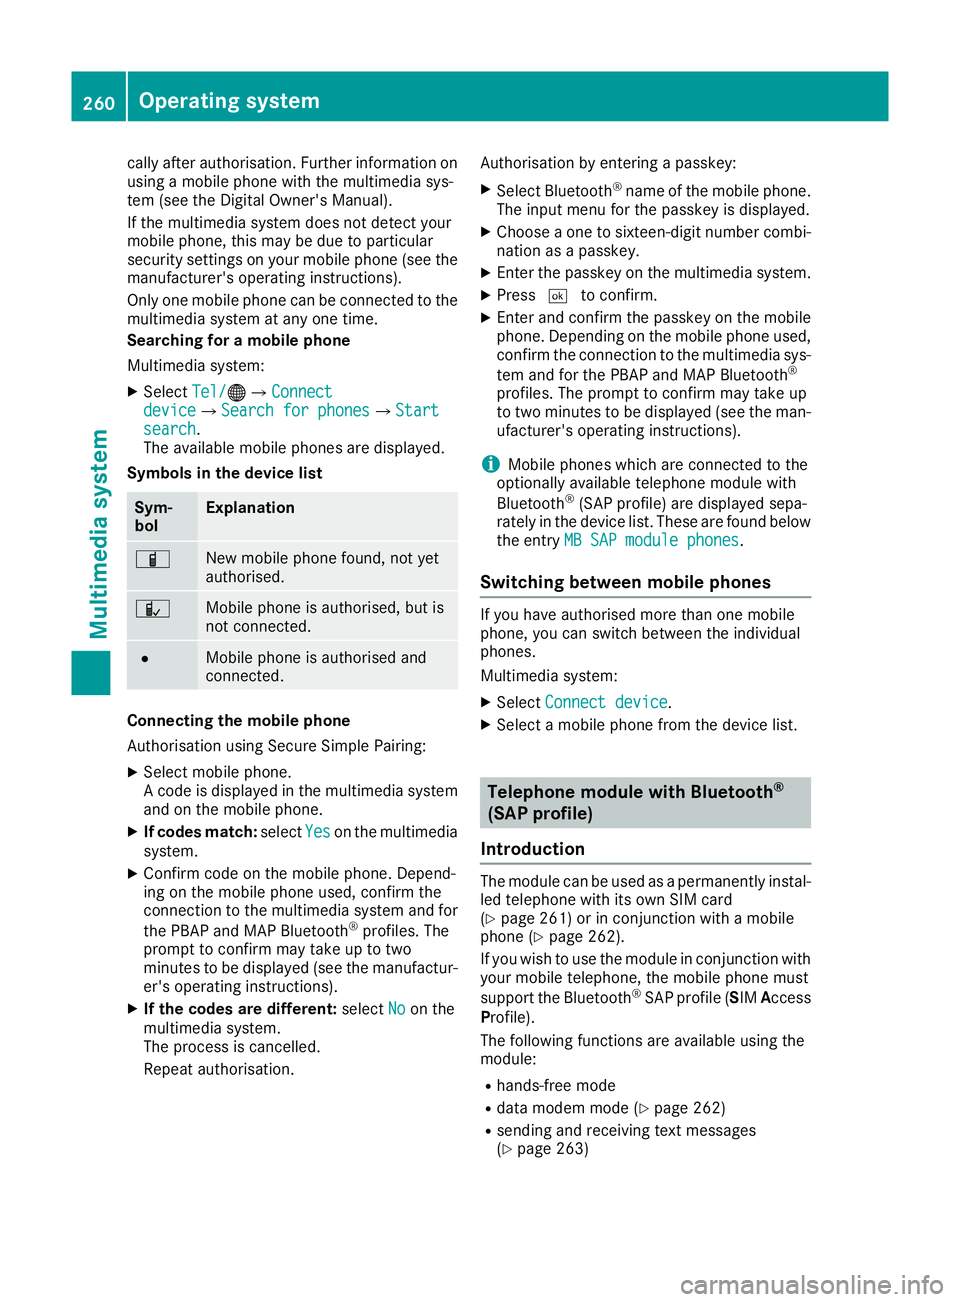
Symbols in the device list Sym-
bol Explanation
Ï
New mobile phone found, not yet
authorised.
Ñ
Mobile phone is authorised, but is
not connected.
#
Mobile phone is authorised and
connected.
Connecting the mobile phone
Authorisation using Secure Simple Pairing:
X Select mobile phone.
A code is displayed in the multimedia system
and on the mobile phone.
X If codes match: selectYes Yeson the multimedia
system.
X Confirm code on the mobile phone. Depend-
ing on the mobile phone used, confirm the
connection to the multimedia system and for
the PBAP and MAP Bluetooth ®
profiles. The
prompt to confirm may take up to two
minutes to be displayed (see the manufactur-
er's operating instructions).
X If the codes are different: selectNo
No on the
multimedia system.
The process is cancelled.
Repeat authorisation. Authorisation by entering a passkey:
X Select Bluetooth ®
name of the mobile phone.
The input menu for the passkey is displayed.
X Choose a one to sixteen-digit number combi-
nation as a passkey.
X Enter the passkey on the multimedia system.
X Press ¬to confirm.
X Enter and confirm the passkey on the mobile
phone. Depending on the mobile phone used,
confirm the connection to the multimedia sys-
tem and for the PBAP and MAP Bluetooth ®
profiles. The prompt to confirm may take up
to two minutes to be displayed (see the man- ufacturer's operating instructions).
i Mobile phones which are connected to the
optionally available telephone module with
Bluetooth ®
(SAP profile) are displayed sepa-
rately in the device list. These are found below
the entry MB SAP module phones MB SAP module phones.
Switching between mobile phones If you have authorised more than one mobile
phone, you can switch between the individual
phones.
Multimedia system:
X Select Connect device Connect device.
X Select a mobile phone from the device list. Telephone module with Bluetooth
®
(SAP profile)
Introduction The module can be used as a permanently instal-
led telephone with its own SIM card
(Y page 261) or in conjunction with a mobile
phone (Y page 262).
If you wish to use the module in conjunction with
your mobile telephone, the mobile phone must
support the Bluetooth ®
SAP profile (SIM Access
Profile).
The following functions are available using the
module:
R hands-free mode
R data modem mode (Y page 262)
R sending and receiving text messages
(Y page 263) 260
Operating systemMultimedia system
Page 266 of 345

Text messages
Requirements
The module is connected with the mobile phone
(Y page 262) or is being used in the SIM card
mode (Y page 261).
Activating/deactivating text message
downloading from the mobile phone Dial number Function
00080 Text message down-
loading is deactiva-
ted.
00081 Text message down-
loading is activated.
For further information on receiving text mes-
sages when using the telephone module (see
the manufacturer's operating instructions).
Charging a mobile phone X
Slide cover ;on the module in the direction
of the arrow and remove it.
X Connect the mobile phone with a USB data
cable to USB socket :. Media mode
General notes If you wish to play external media sources, the
default display must already be turned on. Fur-
ther information on media mode (see the Digital
Owner's Manual). The following external media sources can be
used:
R Apple ®
devices (e.g. iPhone ®
)
R USB devices (e.g. USB stick, MP3 player)
R CD
R DVD (COMAND Online)
R SD cards
R via devices connected by Bluetooth ®
i Information on the single CD/DVD drive or
DVD changer (see the Digital Owner's Man-
ual).
Using the device list Multimedia system:
X Select Media
MediaQ Devices Devices.
The available media sources will be shown.
The #dot indicates the current setting.
X Select the media source.
Playable files are played back.
Inserting/removing SD memory card Important safety notes
G
WARNING
SD memory cards are small parts. They can be swallowed and cause asphyxiation. This
poses an increased risk of injury or even fatal injury.
Keep SD memory cards out of the reach of
children. If an SD memory card is swallowed,
seek immediate medical attention.
! If you are no longer using the SD memory
card, you should remove it and take it out of
the vehicle. High temperatures can damage
the card.
Inserting an SD memory card
The SD card slot is on the control panel.
X Insert the SD memory card into the SD card
slot until it engages. The side with the con-
tacts must face downwards.
Ejecting an SD memory card X Press the memory card.
The memory card is ejected.
X Remove the memory card. Operating system
263Multimedia system Z
Page 272 of 345
display in the instrument cluster. A warning
tone also sounds.
X Move the driver's or front-passenger seat
back if necessary.
i If you do not need the through-loading fea-
ture, you should always engage the rear seat
backrests. This will prevent unauthorised
access to the boot from the vehicle interior. Securing a load
Lashing eyelets General notes
Observe the following notes on securing loads:
R observe the loading guidelines (Y page 265).
R secure the load using the lashing eyelets.
R distribute the load on the lashing eyelets
evenly.
R do not use elastic straps or nets to secure a
load. These are only intended as an anti-slip
protection for light loads.
R do not route lashing materials across sharp
edges or corners.
R pad sharp edges for protection.
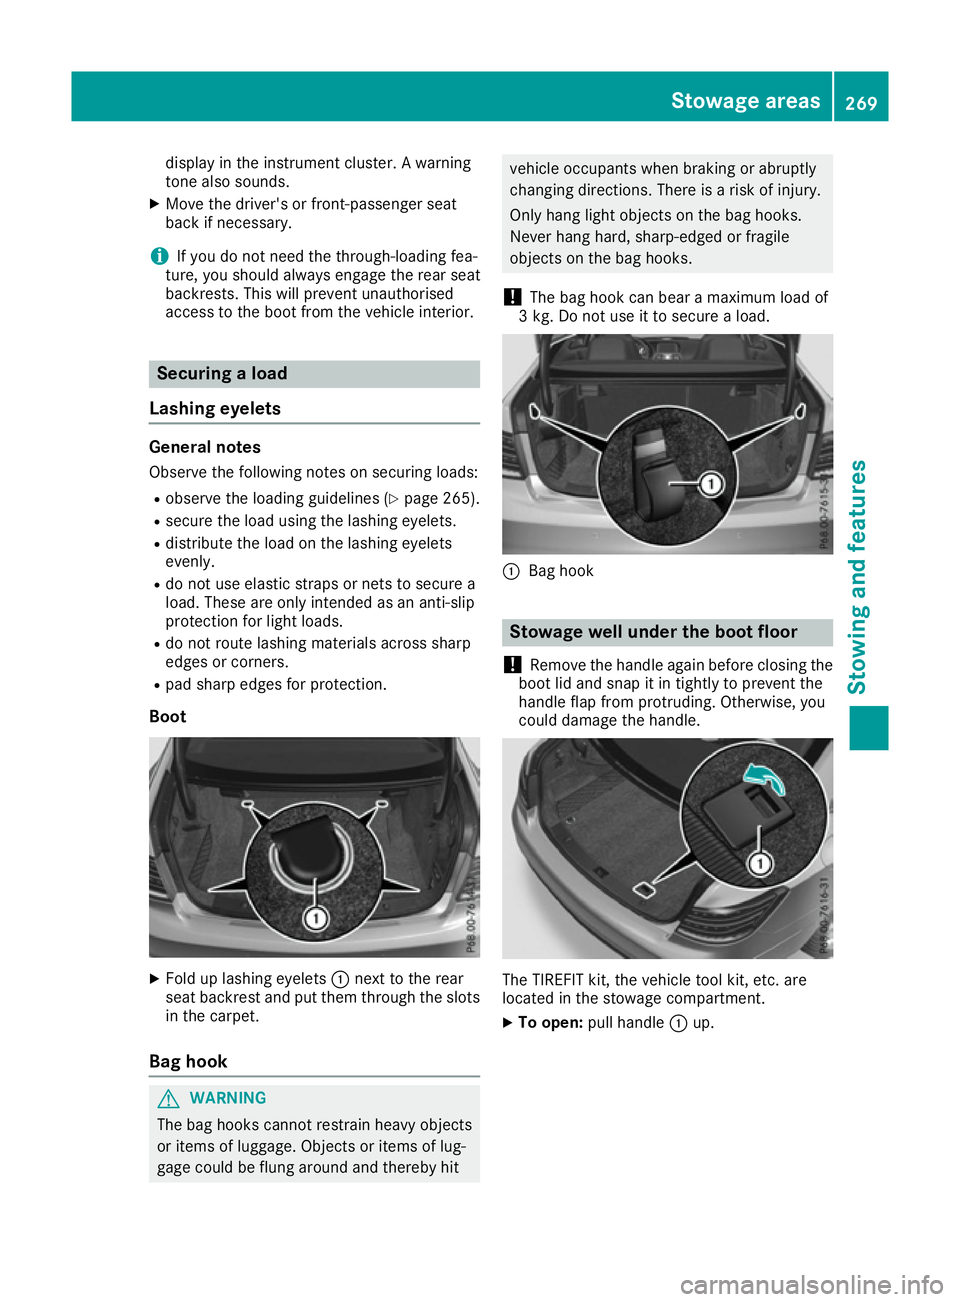
Boot X
Fold up lashing eyelets :next to the rear
seat backrest and put them through the slots
in the carpet.
Bag hook G
WARNING
The bag hooks cannot restrain heavy objects
or items of luggage. Objects or items of lug-
gage could be flung around and thereby hit vehicle occupants when braking or abruptly
changing directions. There is a risk of injury.
Only hang light objects on the bag hooks.
Never hang hard, sharp-edged or fragile
objects on the bag hooks.
! The bag hook can bear a maximum load of
3 kg. Do not use it to secure a load. :
Bag hook Stowage well under the boot floor
! Remove the handle again before closing the
boot lid and snap it in tightly to prevent the
handle flap from protruding. Otherwise, you
could damage the handle. The TIREFIT kit, the vehicle tool kit, etc. are
located in the stowage compartment.
X To open: pull handle :up. Stowage areas
269Stowing and features Z
Page 287 of 345

Even if the active bonnet has been triggered, you
can still continue driving and have it reset at a
qualified specialist workshop. If you pull the
bonnet release lever, you must reset the bonnet
before driving on.
Resetting G
WARNING
Certain components in the engine compart-
ment could be very hot, e.g. the engine, the
radiator and parts of the exhaust system.
There is a risk of injury when accessing the
engine compartment.
As far as possible, allow the engine to cool
down and only touch the components descri- bed in the following. X
Open the bonnet (Y page 284).
X With both hands, lift the bonnet up in the
centre A. The bonnet is open wide enough
when both lids of bonnet lifter ;no longer
move.
If you push the lids back, you will notice resist-
ance.
X Release bonnet :.
X Check whether the lids of bonnet lifter ;are
resting on housings =(arrow).
X The lids of bonnet lifter ;
; are resting on
the housings: close bonnet:
(Y page 285).
or X The lids of bonnet lifter ; ;are not resting
on the housings: first, lift up bonnet :on
left-hand side ?and then on right-hand side B. Lift up bonnet
:until the respective lid of
bonnet lifter ;no longer moves.
The lids of bonnet lifter ;must rest on hous-
ings =(arrow).
X Close bonnet :(Ypage 285).
If you cannot close bonnet :or if the L
symbol appears in the multifunction display,
repeat the steps.
If the bonnet still does not engage correctly or
the L symbol appears in the multifunction
display, do not drive any further. Contact a quali- fied specialist workshop.
If active bonnet :has been triggered, it will be
raised at the back by about 50 mm. Lids ;will
then no longer rest on housings =. The active
bonnet is triggered by pyrotechnics.
Opening the bonnet G
WARNING
Certain components in the engine compart-
ment could be very hot, e.g. the engine, the
radiator and parts of the exhaust system.
There is a risk of injury when accessing the
engine compartment.
As far as possible, allow the engine to cool
down and only touch the components descri- bed in the following. G
WARNING
When the bonnet is open, and the windscreen wipers are set in motion, you can be injured by
the wiper linkage. There is a risk of injury.
Always switch off the windscreen wipers and
the ignition before opening the bonnet.
! Make sure that the windscreen wipers are
not folded away from the windscreen. Other-
wise, you could damage the windscreen wip-
ers or the bonnet. 284
Engine compartmentMaintenance and care
Page 288 of 345

X
Make sure that the windscreen wipers are
switched off.
X Pull release lever :on the bonnet.
The bonnet is released. X
Reach into the gap, pull bonnet catch han-
dle ;up and lift the bonnet.
If you lift the bonnet by approximately 40 cm, the bonnet is opened and held open automat-
ically by the gas-filled strut.
Closing the bonnet X
Lower the bonnet and let it fall from a height
of approximately 20 cm.
X Check that the bonnet has engaged properly.
If the bonnet can be raised slightly, it is not
properly engaged. Open it again and close it
with a little more force. Radiator
Vehicles with a diesel engine: do not cover
the radiator. Do not use thermal mats, insect
protection covers or anything similar. Doing so
can cause the Onboard Diagnostics System to
display inaccurate values. Some of these values are legally required and must always be correct. Engine oil
General notes Depending on your driving style, the vehicle
consumes up to 0.8 litres of oil per 1000 km. The
oil consumption may be higher than this when
the vehicle is new or if you frequently drive at
high engine speeds.
Depending on the engine, the oil dipstick may be installed at a different location.
When checking the oil level:
R park the vehicle on a level surface
R the engine should be switched off for approx-
imately five minutes if the engine is at normal
operating temperature
R if the engine is not at normal operating tem-
perature, e.g. if the engine was only started
briefly, wait approximately 30 minutes before carrying out the measurement
Checking the oil level using the oil dip-
stick G
WARNING
Certain components in the engine compart-
ment could be very hot, e.g. the engine, the
radiator and parts of the exhaust system.
There is a risk of injury when accessing the
engine compartment.
As far as possible, allow the engine to cool
down and only touch the components descri- bed in the following. Example: vehicles with a petrol engine
X Pull oil dipstick :out of the oil dipstick tube.
X Wipe off oil dipstick :. Engine compartment
285Maintenance and care Z