2015 MERCEDES-BENZ E-CLASS CABRIOLET manual transmission
[x] Cancel search: manual transmissionPage 218 of 349
Back button
% Press briefly:
R Back
R Switches off voice-operated con-
trol for navigation or LINGUA-
TRONIC
R Hides display messages or calls up
the last Trip Tripmenu function used
R Exits the telephone book/redial
memory % Press and hold:
R
Calls up the standard display in the
Trip
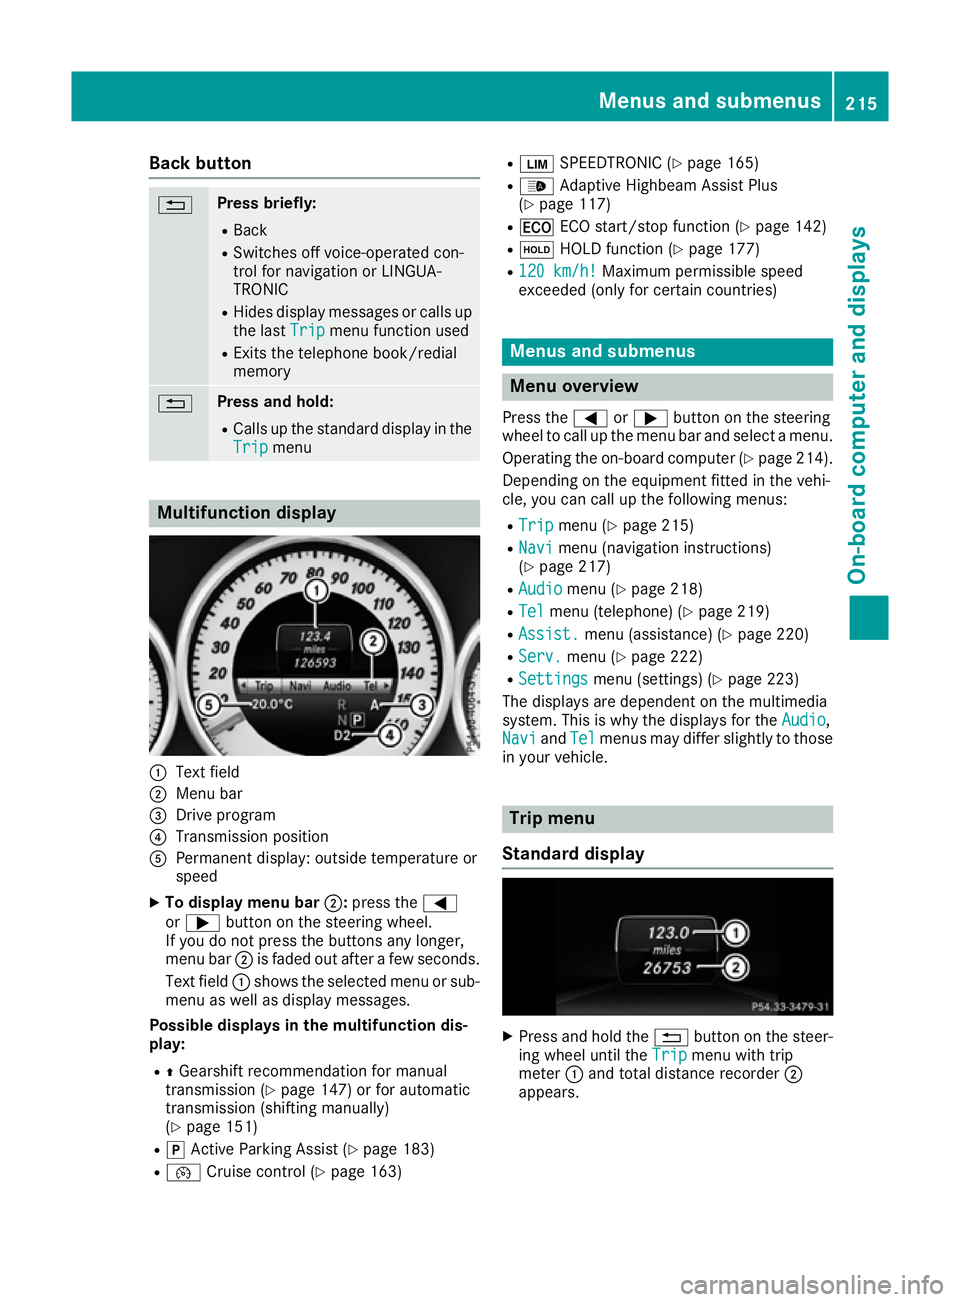
Trip menu Multifunction display
:
Text field
; Menu bar
= Drive program
? Transmission position
A Permanent display: outside temperature or
speed
X To display menu bar ;:press the =
or ; button on the steering wheel.
If you do not press the buttons any longer,
menu bar ;is faded out after a few seconds.
Text field :shows the selected menu or sub-
menu as well as display messages.
Possible displays in the multifunction dis-
play:
R ZGearshift recommendation for manual
transmission (Y page 147) or for automatic
transmission (shifting manually)
(Y page 151)
R j Active Parking Assist (Y page 183)
R ¯ Cruise control (Y page 163) R
È SPEEDTRONIC (Y page 165)
R _ Adaptive Highbeam Assist Plus
(Y page 117)
R ¤ ECO start/stop function (Y page 142)
R ë HOLD function (Y page 177)
R 120 km/h! 120 km/h! Maximum permissible speed
exceeded (only for certain countries) Menus and submenus
Menu overview
Press the =or; button on the steering
wheel to call up the menu bar and select a menu.
Operating the on-board computer (Y page 214).
Depending on the equipment fitted in the vehi-
cle, you can call up the following menus:
R Trip Trip menu (Y page 215)
R Navi
Navi menu (navigation instructions)
(Y page 217)
R Audio
Audio menu (Y page 218)
R Tel
Tel menu (telephone) (Y page 219)
R Assist.
Assist. menu (assistance) (Y page 220)
R Serv.
Serv. menu (Y page 222)
R Settings
Settings menu (settings) (Y page 223)
The displays are dependent on the multimedia
system. This is why the displays for the Audio Audio,
Navi
Navi andTel
Tel menus may differ slightly to those
in your vehicle. Trip menu
Standard display X
Press and hold the %button on the steer-
ing wheel until the Trip
Tripmenu with trip
meter :and total distance recorder ;
appears. Menus and submenus
215On-board computer and displays Z
Page 219 of 349
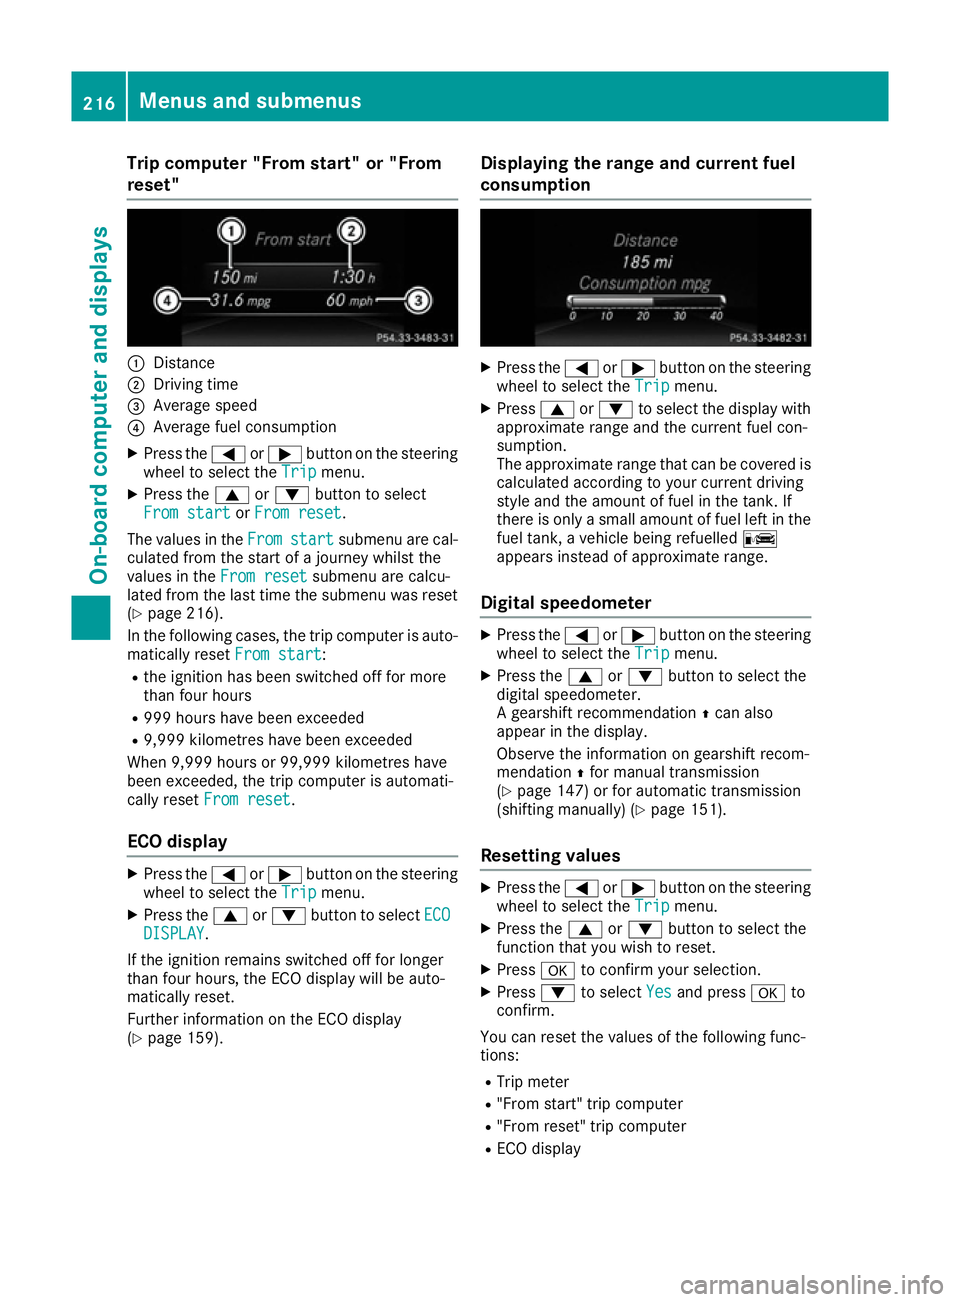
Trip computer "From start" or "From
reset" :
Distance
; Driving time
= Average speed
? Average fuel consumption
X Press the =or; button on the steering
wheel to select the Trip
Tripmenu.
X Press the 9or: button to select
From start
From start orFrom reset
From reset.
The values in the From
Fromstart
start submenu are cal-
culated from the start of a journey whilst the
values in the From reset From resetsubmenu are calcu-
lated from the last time the submenu was reset
(Y page 216).
In the following cases, the trip computer is auto-
matically reset From start
From start:
R the ignition has been switched off for more
than four hours
R 999 hours have been exceeded
R 9,999 kilometres have been exceeded
When 9,999 hours or 99,999 kilometres have
been exceeded, the trip computer is automati-
cally reset From reset From reset.
ECO display X
Press the =or; button on the steering
wheel to select the Trip
Tripmenu.
X Press the 9or: button to select ECO
ECO
DISPLAY
DISPLAY.
If the ignition remains switched off for longer
than four hours, the ECO display will be auto-
matically reset.
Further information on the ECO display
(Y page 159). Displaying the range and current fuel
consumption X
Press the =or; button on the steering
wheel to select the Trip Tripmenu.
X Press 9or: to select the display with
approximate range and the current fuel con-
sumption.
The approximate range that can be covered is calculated according to your current driving
style and the amount of fuel in the tank. If
there is only a small amount of fuel left in the
fuel tank, a vehicle being refuelled C
appears instead of approximate range.
Digital speedometer X
Press the =or; button on the steering
wheel to select the Trip Tripmenu.
X Press the 9or: button to select the
digital speedometer.
A gearshift recommendation Zcan also
appear in the display.
Observe the information on gearshift recom-
mendation Zfor manual transmission
(Y page 147) or for automatic transmission
(shifting manually) (Y page 151).
Resetting values X
Press the =or; button on the steering
wheel to select the Trip Tripmenu.
X Press the 9or: button to select the
function that you wish to reset.
X Press ato confirm your selection.
X Press :to select Yes
Yesand press ato
confirm.
You can reset the values of the following func-
tions: R Trip meter
R "From start" trip computer
R "From reset" trip computer
R ECO display 216
Menus and submenusOn-board computer and displays
Page 226 of 349
R
Checking the tyre pressure electronically
(Y page 326)
R Calling up the service due date
(Y page 294) Settings menu
Introduction Depending on the equipment fitted in the vehi-
cle, In the
Settings Settings menu you have the follow-
ing options:
R Changing the instrument cluster settings
(Y page 223)
R Changing the light settings (Y page 223)
R Changing the vehicle settings (Y page 225)
R Changing the heating settings (Y page 226)
R Changing the convenience settings
(Y page 227)
R Restoring the factory settings (Y page 228)
Instrument cluster Selecting the distance unit
The Display unit Speed-/odometer:
Display unit Speed-/odometer: func-
tion allows you to choose whether certain dis-
plays appear in kilometres or miles in the mul-
tifunction display.
X Press the =or; button on the steering
wheel to select the Settings Settingsmenu.
X Press the :or9 button to select the
Instrument cluster
Instrument cluster submenu.
X Press ato confirm.
X Press the :or9 button to select the
Display unit Speed-/odometer
Display unit Speed-/odometer function.
You will see the selected setting: km
kmormiles
miles.
X Press the abutton to save the setting.
The selected unit of measurement for distance
applies to the: R the digital speedometer in the Trip
Trip menu
R the total distance recorder and trip meter
R the trip computer
R the current consumption and the range
R the navigation instructions in the Navi
Navi menu
R cruise control
R SPEEDTRONIC
R DISTRONIC PLUS
R ASSYST PLUS service interval display Switching the additional speedometer
on/off
Vehicles for the United Kingdom: this function is unavailable.
Only vehicles with manual transmission have
this function.
If the additional speedometer is switched on,
the speed is shown in the status bar of the mul-tifunction display instead of the outside tem-
perature.
The speed display is inverse to your speedome-
ter.
X Press the =or; button on the steering
wheel to select the Sett.
Sett. menu.
X Press the :or9 button to select the
Instrument cluster Instrument cluster submenu.
X Press ato confirm.
X Press the :or9 button to select the
Dig. speedo [mph]:
Dig. speedo [mph]: orDig. speedo
Dig. speedo
[km/h]:
[km/h]: function.
You will see the selected setting: on
on oroff
off .
X Press the abutton to save the setting.
Selecting permanent display
Vehicles for the United Kingdom: this function is unavailable.
The Permanent display: Permanent display: function allows you
to choose whether the multifunction display
always shows the outside temperature or the
speed.
The speed display is inverse to your speedome-
ter.
X Press the =or; button on the steering
wheel to select the Settings Settingsmenu.
X Press the :or9 button to select the
Instrument cluster
Instrument cluster submenu.
X Press ato confirm.
X Press the :or9 button to select the
Permanent display:
Permanent display: function.
The current setting, outside temperature
outside temperature
or Addit. speedo [mph]:
Addit. speedo [mph]: , appears.
X Press the abutton to save the setting.
Lights Setting the brightness for the instrument
cluster lighting and switches
The lighting in the instrument cluster, in the dis- plays and the controls in the vehicle interior can Menus and submenus
223On-board computer and displays Z
Page 276 of 349
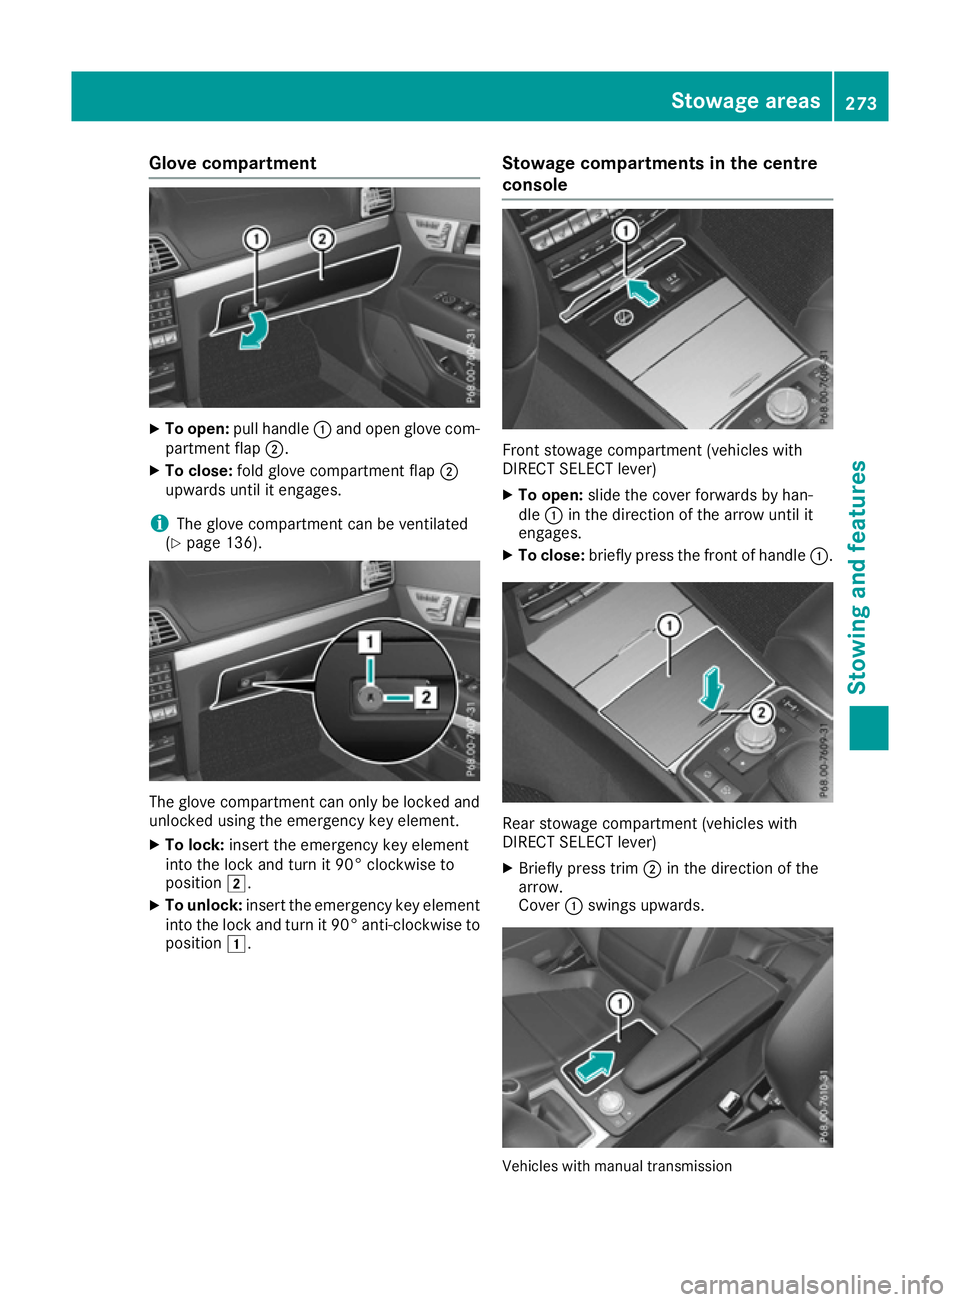
Glove compartment
X
To open: pull handle :and open glove com-
partment flap ;.
X To close: fold glove compartment flap ;
upwards until it engages.
i The glove compartment can be ventilated
(Y page 136). The glove compartment can only be locked and
unlocked using the emergency key element.
X To lock: insert the emergency key element
into the lock and turn it 90° clockwise to
position 2.
X To unlock: insert the emergency key element
into the lock and turn it 90° anti-clockwise to
position 1. Stowage compartments in the centre
console Front stowage compartment (vehicles with
DIRECT SELECT lever)
X To open: slide the cover forwards by han-
dle :in the direction of the arrow until it
engages.
X To close: briefly press the front of handle :. Rear stowage compartment (vehicles with
DIRECT SELECT lever)
X Briefly press trim ;in the direction of the
arrow.
Cover :swings upwards. Vehicles with manual transmission Stowage areas
273Stowing and features Z
Page 277 of 349
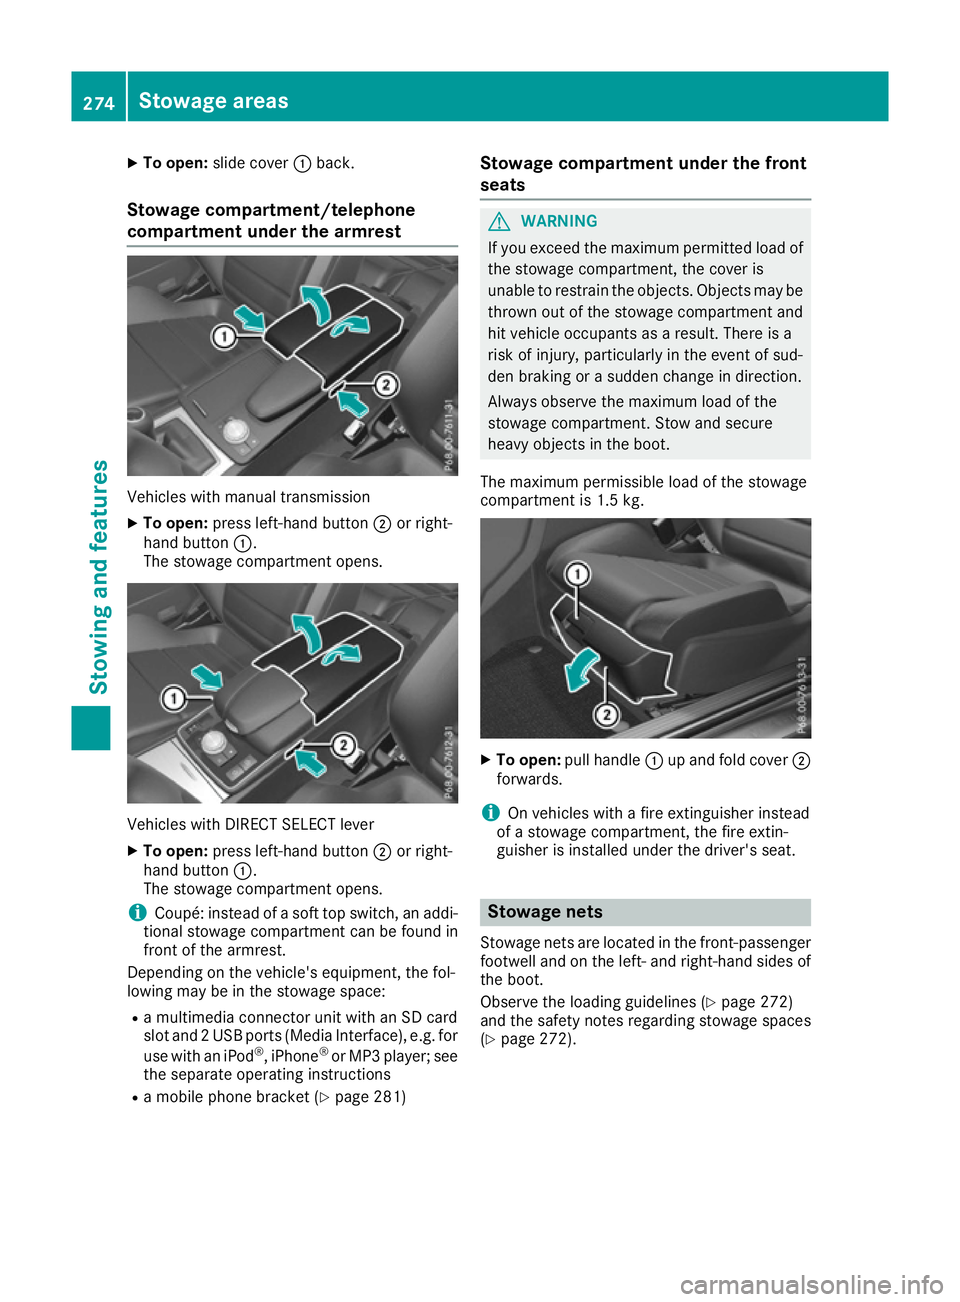
X
To open: slide cover :back.
Stowage compartment/telephone
compartment under the armrest Vehicles with manual transmission
X To open: press left-hand button ;or right-
hand button :.
The stowage compartment opens. Vehicles with DIRECT SELECT lever
X To open: press left-hand button ;or right-
hand button :.
The stowage compartment opens.
i Coupé: instead of a soft top switch, an addi-
tional stowage compartment can be found in
front of the armrest.
Depending on the vehicle's equipment, the fol-
lowing may be in the stowage space:
R a multimedia connector unit with an SD card
slot and 2 USB ports (Media Interface), e.g. for
use with an iPod ®
, iPhone ®
or MP3 player; see
the separate operating instructions
R a mobile phone bracket (Y page 281)Stowage compartment under the front
seats G
WARNING
If you exceed the maximum permitted load of the stowage compartment, the cover is
unable to restrain the objects. Objects may be
thrown out of the stowage compartment and
hit vehicle occupants as a result. There is a
risk of injury, particularly in the event of sud-
den braking or a sudden change in direction.
Always observe the maximum load of the
stowage compartment. Stow and secure
heavy objects in the boot.
The maximum permissible load of the stowage
compartment is 1.5 kg. X
To open: pull handle :up and fold cover ;
forwards.
i On vehicles with a fire extinguisher instead
of a stowage compartment, the fire extin-
guisher is installed under the driver's seat. Stowage nets
Stowage nets are located in the front-passenger footwell and on the left- and right-hand sides of
the boot.
Observe the loading guidelines (Y page 272)
and the safety notes regarding stowage spaces
(Y page 272). 274
Stowage areasSto
wing an d features
Page 280 of 349
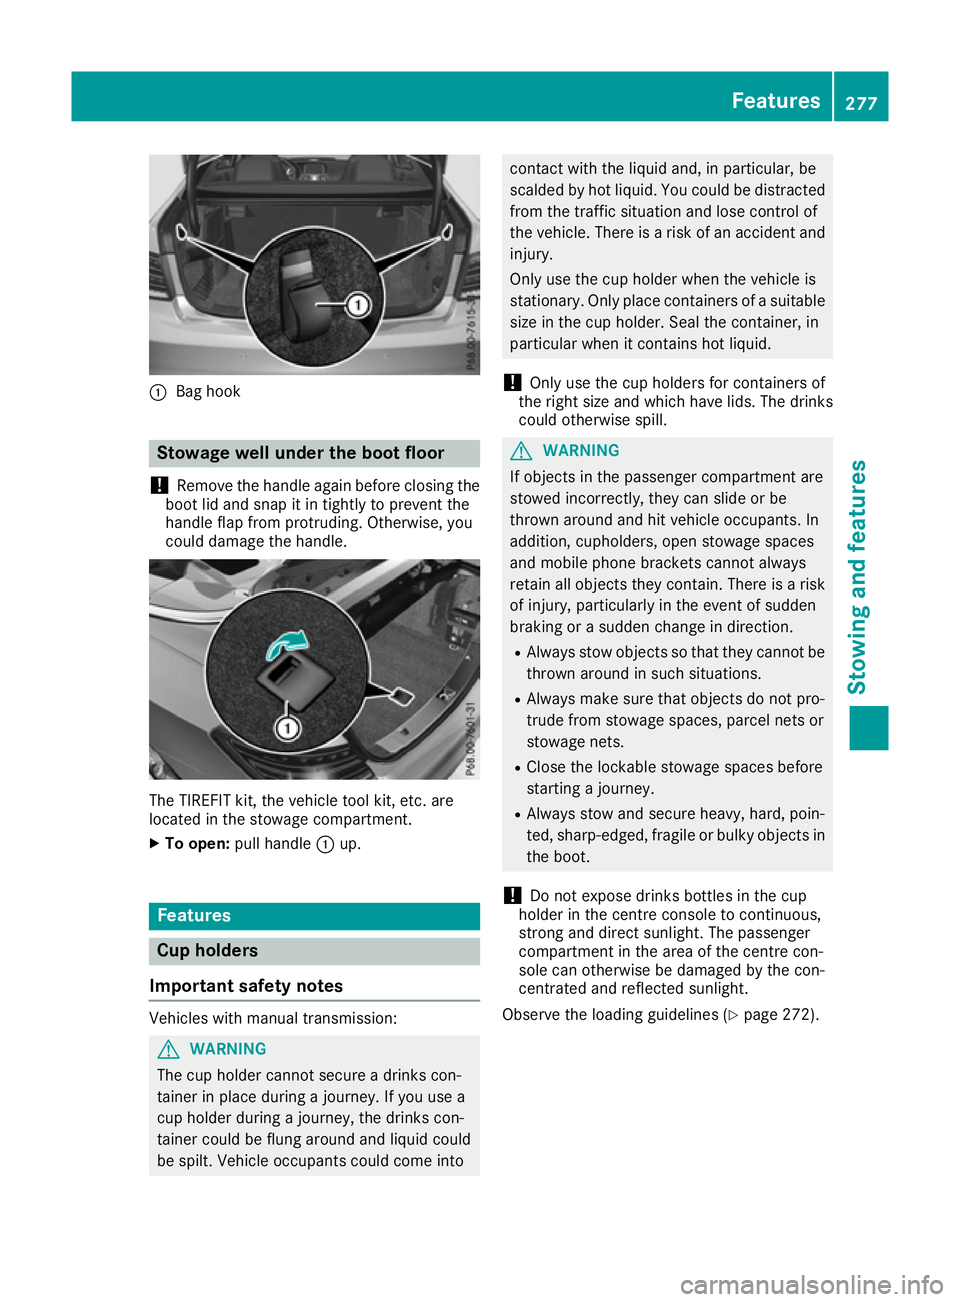
:
Bag hook Stowage well under the boot floor
! Remove the handle again before closing the
boot lid and snap it in tightly to prevent the
handle flap from protruding. Otherwise, you
could damage the handle. The TIREFIT kit, the vehicle tool kit, etc. are
located in the stowage compartment.
X To open: pull handle :up. Features
Cup holders
Important safety notes Vehicles with manual transmission:
G
WARNING
The cup holder cannot secure a drinks con-
tainer in place during a journey. If you use a
cup holder during a journey, the drinks con-
tainer could be flung around and liquid could
be spilt. Vehicle occupants could come into contact with the liquid and, in particular, be
scalded by hot liquid. You could be distracted
from the traffic situation and lose control of
the vehicle. There is a risk of an accident and
injury.
Only use the cup holder when the vehicle is
stationary. Only place containers of a suitable size in the cup holder. Seal the container, in
particular when it contains hot liquid.
! Only use the cup holders for containers of
the right size and which have lids. The drinks
could otherwise spill. G
WARNING
If objects in the passenger compartment are
stowed incorrectly, they can slide or be
thrown around and hit vehicle occupants. In
addition, cupholders, open stowage spaces
and mobile phone brackets cannot always
retain all objects they contain. There is a risk of injury, particularly in the event of sudden
braking or a sudden change in direction.
R Always stow objects so that they cannot be
thrown around in such situations.
R Always make sure that objects do not pro-
trude from stowage spaces, parcel nets or
stowage nets.
R Close the lockable stowage spaces before
starting a journey.
R Always stow and secure heavy, hard, poin-
ted, sharp-edged, fragile or bulky objects in
the boot.
! Do not expose drinks bottles in the cup
holder in the centre console to continuous,
strong and direct sunlight. The passenger
compartment in the area of the centre con-
sole can otherwise be damaged by the con-
centrated and reflected sunlight.
Observe the loading guidelines (Y page 272). Features
277Stowing and features Z
Page 281 of 349
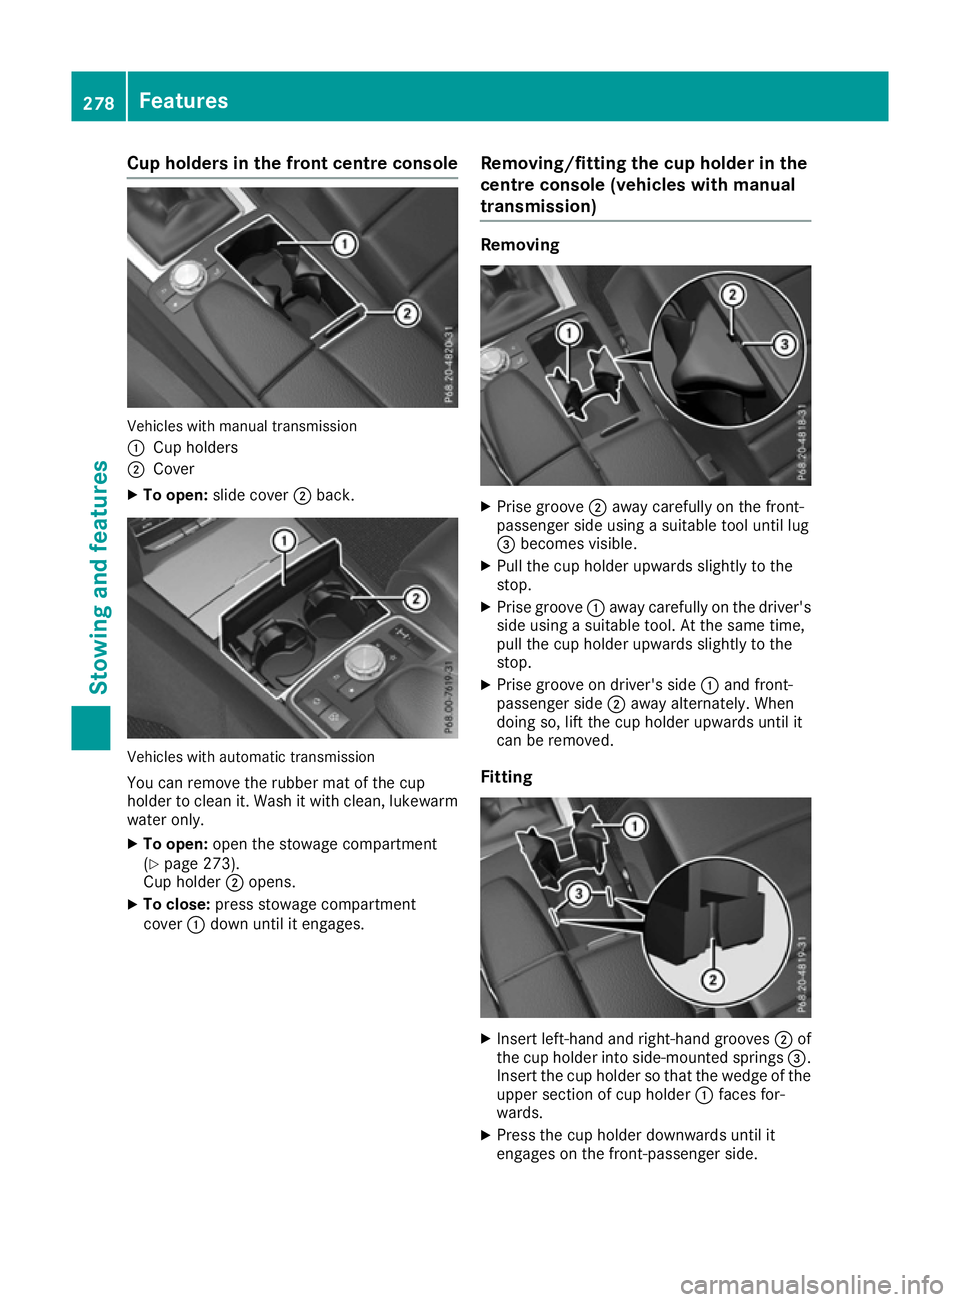
Cup holders in the front centre console
Vehicles with manual transmission
:
Cup holders
; Cover
X To open: slide cover ;back. Vehicles with automatic transmission
You can remove the rubber mat of the cup
holder to clean it. Wash it with clean, lukewarm
water only.
X To open: open the stowage compartment
(Y page 273).
Cup holder ;opens.
X To close: press stowage compartment
cover :down until it engages. Removing/fitting the cup holder in the
centre console (vehicles with manual
transmission) Removing
X
Prise groove ;away carefully on the front-
passenger side using a suitable tool until lug
= becomes visible.
X Pull the cup holder upwards slightly to the
stop.
X Prise groove :away carefully on the driver's
side using a suitable tool. At the same time,
pull the cup holder upwards slightly to the
stop.
X Prise groove on driver's side :and front-
passenger side ;away alternately. When
doing so, lift the cup holder upwards until it
can be removed.
Fitting X
Insert left-hand and right-hand grooves ;of
the cup holder into side-mounted springs =.
Insert the cup holder so that the wedge of the upper section of cup holder :faces for-
wards.
X Press the cup holder downwards until it
engages on the front-passenger side. 278
FeaturesStowing and features
Page 314 of 349

R
It is important that you observe the descri-
bed order of the battery terminals when
connecting and disconnecting a battery.
R When jump-starting, make sure that the
battery poles with identical polarity are
connected.
R It is particularly important to observe the
described order when connecting and dis-
connecting the jump leads.
R Never connect or disconnect the battery
terminals while the engine is running. G
WARNING
Battery acid is caustic. There is a risk of injury. Avoid contact with the skin, eyes or clothing.
Do not breathe in any battery gases. Do not
lean over the battery. Keep the batteries out
of the reach of children. Immediately rinse off
battery acid thoroughly with plenty of clean
water and seek medical attention at once. H
Environmental note Batteries contain pollutants.
It is illegal to dispose of them with the household rubbish.
They must be collected sep-
arately and disposed of in anenvironmentally responsible
recycling system. Dispose of batteries in an
environmentally responsible
manner. Take discharged
batteries to a qualified spe-
cialist workshop or to a col-
lection point for used batter-
ies.
! Have the battery checked regularly at a
qualified specialist workshop.
Observe the service intervals in the Service
Booklet or contact a qualified specialist work- shop for more information. !
Always have work on the batteries carried
out at a qualified specialist workshop. Should
it, in exceptional circumstances, be abso-
lutely necessary to disconnect the 12-volt
battery yourself, please observe the follow-
ing:
R secure the vehicle to prevent it from rolling
away.
R switch the ignition off.
R first, disconnect the negative terminal, fol-
lowed by the positive terminal.
Vehicles with automatic transmission: the
transmission is locked in position Pafter dis-
connecting the battery.
After the work has been completed, firmly
reinstall the battery and the cover of the pos- itive terminal.
Comply with safety precautions and take pro-
tective measures when handling batteries. Risk of explosion
Fire, naked flames and smoking are
prohibited when handling the bat-
tery. Avoid creating sparks.
Battery acid is caustic. Avoid contact
with the skin, eyes or clothing.
Wear suitable protective clothing, in
particular gloves, an apron and a
face mask.
Immediately rinse acid splashes off
with clean water. Consult a doctor if necessary. Wear eye protection.
Keep children away.
Observe this Owner's Manual.
For safety reasons, Mercedes-Benz recom-
mends that you only use batteries which have
been tested and approved for your vehicle by
Mercedes-Benz. These batteries provide
increased impact protection to prevent vehicle Battery (vehicle)
311Breakdown assistance Z