2015 MERCEDES-BENZ E-CLASS CABRIOLET steering
[x] Cancel search: steeringPage 248 of 349
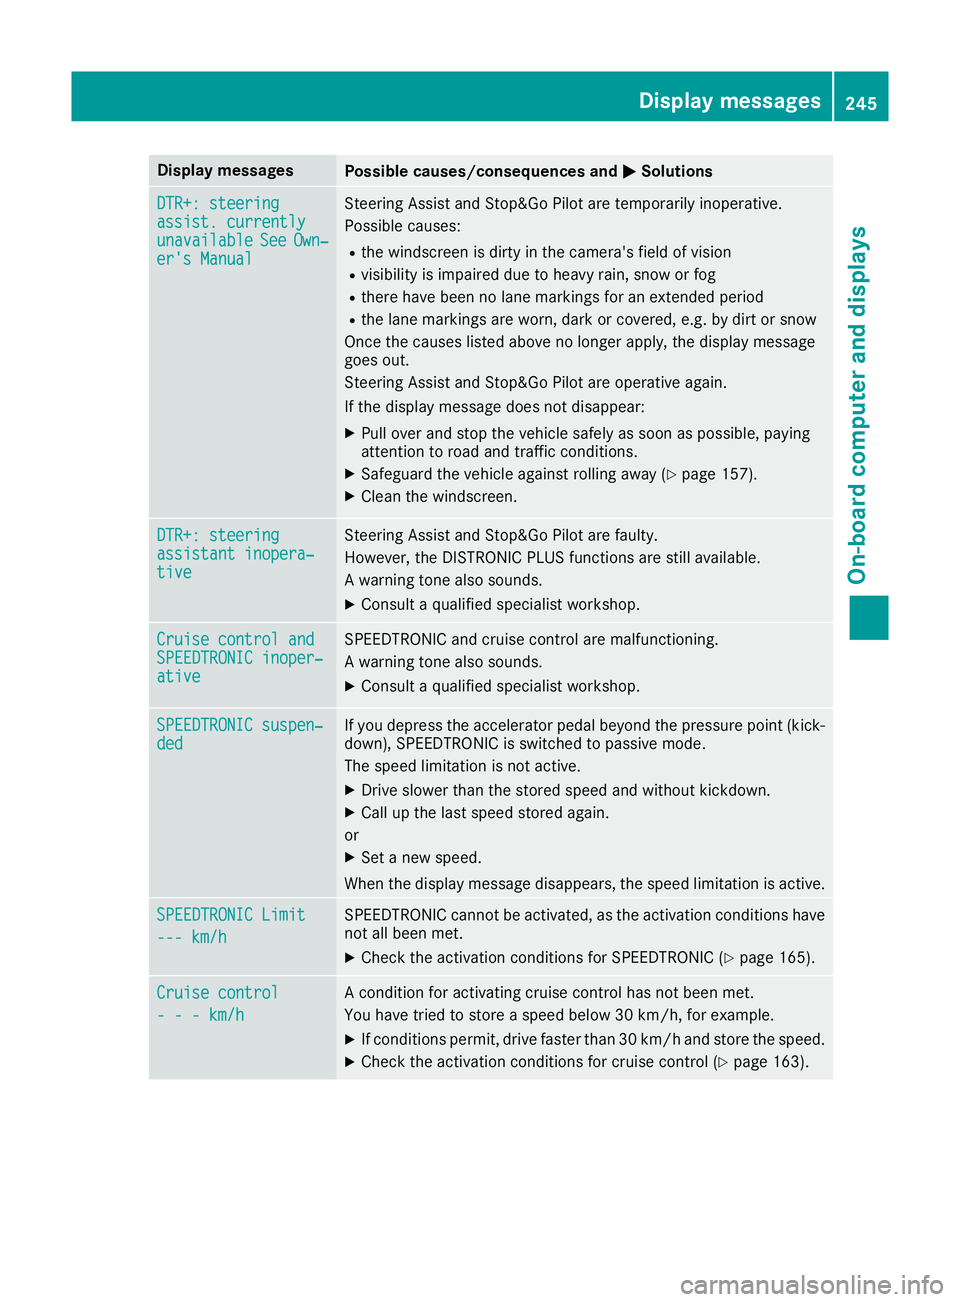
Display messages
Possible causes/consequences and
M
MSolutions DTR+: steering
DTR+: steering
assist. currently assist. currently
unavailable unavailable
See
SeeOwn‐
Own‐
er's Manual
er's Manual Steering Assist and Stop&Go Pilot are temporarily inoperative.
Possible causes:
R the windscreen is dirty in the camera's field of vision
R visibility is impaired due to heavy rain, snow or fog
R there have been no lane markings for an extended period
R the lane markings are worn, dark or covered, e.g. by dirt or snow
Once the causes listed above no longer apply, the display message
goes out.
Steering Assist and Stop&Go Pilot are operative again.
If the display message does not disappear:
X Pull over and stop the vehicle safely as soon as possible, paying
attention to road and traffic conditions.
X Safeguard the vehicle against rolling away (Y page 157).
X Clean the windscreen. DTR+: steering DTR+: steering
assistant inopera‐ assistant inopera‐
tive tive Steering Assist and Stop&Go Pilot are faulty.
However, the DISTRONIC PLUS functions are still available.
A warning tone also sounds.
X Consult a qualified specialist workshop. Cruise control and Cruise control and
SPEEDTRONIC inoper‐ SPEEDTRONIC inoper‐
ative ative SPEEDTRONIC and cruise control are malfunctioning.
A warning tone also sounds.
X Consult a qualified specialist workshop. SPEEDTRONIC suspen‐ SPEEDTRONIC suspen‐
ded ded If you depress the accelerator pedal beyond the pressure point (kick-
down), SPEEDTRONIC is switched to passive mode.
The speed limitation is not active.
X Drive slower than the stored speed and without kickdown.
X Call up the last speed stored again.
or X Set a new speed.
When the display message disappears, the speed limitation is active. SPEEDTRONIC Limit SPEEDTRONIC Limit
--- km/h --- km/h SPEEDTRONIC cannot be activated, as the activation conditions have
not all been met.
X Check the activation conditions for SPEEDTRONIC (Y page 165).Cruise control
Cruise control
- - - km/h - - - km/h A condition for activating cruise control has not been met.
You have tried to store a speed below 30 km/h, for example.
X If conditions permit, drive faster than 30 km/h and store the speed.
X Check the activation conditions for cruise control (Y page 163). Display
messages
245On-board computer and displays Z
Page 249 of 349

Display messages
Possible causes/consequences and
M
MSolutions Cruise control off
Cruise control off Cruise control has been deactivated.
If a warning tone also sounds, cruise control has deactivated auto-
matically (Y page 163). 120 km/h 120 km/h
Maximum Maximum
speed
speedexcee‐
excee‐
ded
ded Only for certain countries: the maximum speed has been exceeded.
In addition, the multifunction display shows
120 km/h! 120 km/h!.
X Drive more slowly. Tyres
Display messages
Possible causes/consequences and
M
MSolutions Tyre pressure
Tyre pressure
Check tyres Check tyres The tyre pressure loss warning system has detected a significant loss
in pressure.
A warning tone also sounds.
Possible causes:
R you have changed the positions of the wheels and tyres or fitted new
wheels and tyres
R the tyre pressure in one or more tyres has dropped
G WARNING
Underinflated tyres pose the following risks:
R the tyres may burst, especially as the load and vehicle speed
increase
R the tyres may wear excessively and/or unevenly, which may greatly
impair tyre traction
R the driving characteristics, as well as steering and braking, may be
greatly impaired
There is a risk of an accident.
X Stop the vehicle without making any sudden steering or braking
manoeuvres. Pay attention to the traffic conditions as you do so.
X Safeguard the vehicle against rolling away (Y page 157).
X Check the tyres and, if necessary, follow the instructions for a flat
tyre (Y page 306).
X Check the tyre pressures and, if necessary, correct the tyre pres-
sure.
X Restart the tyre pressure loss warning system when the tyre pres-
sure is correct (Y page 326). Check Check
tyre
tyrepressures
pressures
then restart Run
then restart Run
Flat Indicator Flat Indicator The tyre pressure loss warning system generated a display message
and has not been restarted since.
X Set the correct tyre pressure in all four tyres.
X Restart the tyre pressure loss warning system (Y page 326).Run Flat Indicator Run Flat Indicator
inoperative inoperative The tyre pressure loss warning system is faulty.
X Consult a qualified specialist workshop. 246
Display
messagesOn-board computer and displays
Page 250 of 349
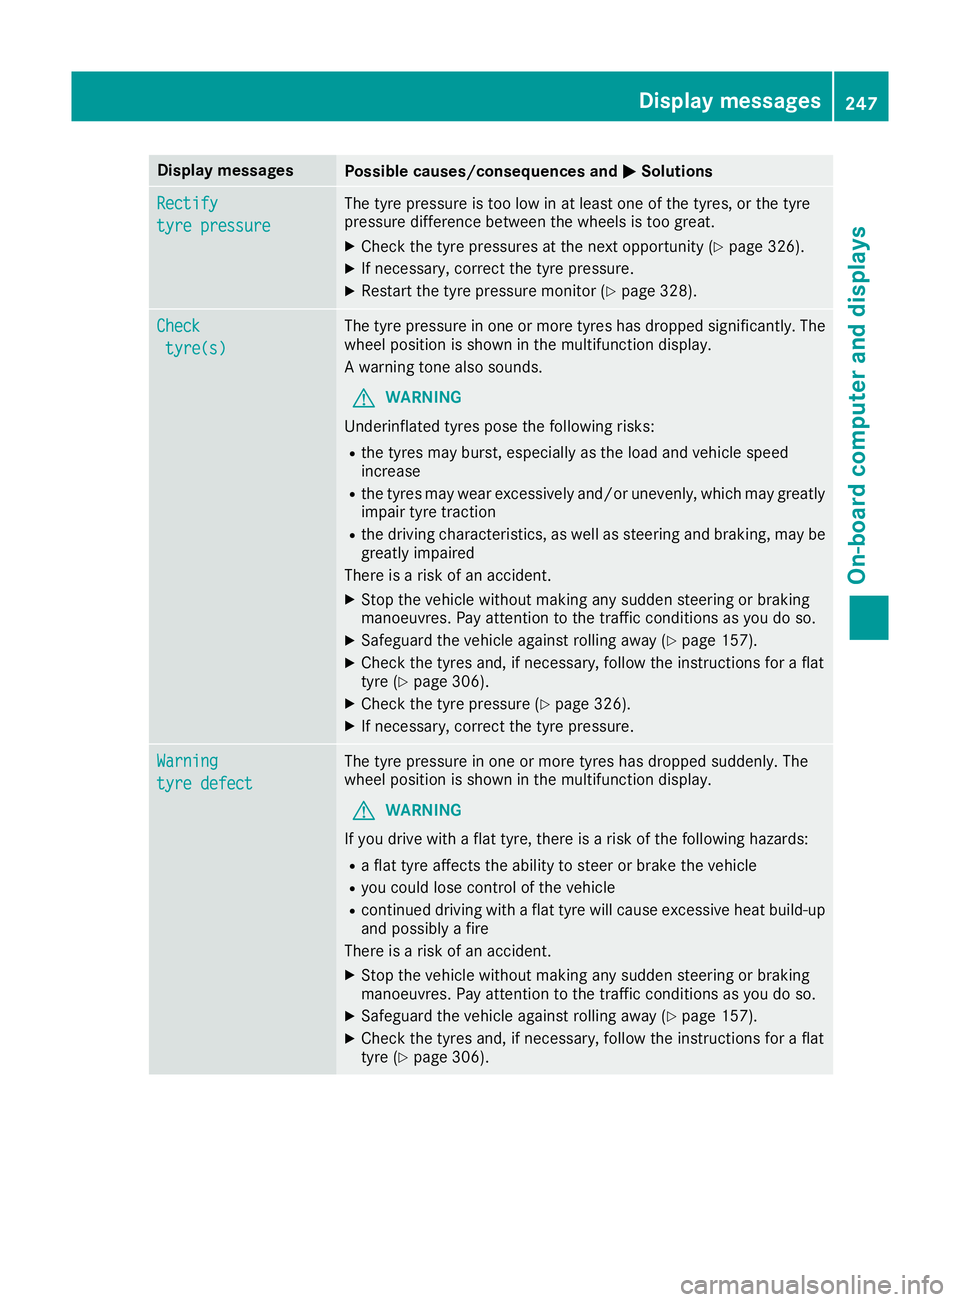
Display messages
Possible causes/consequences and
M
MSolutions Rectify
Rectify
tyre pressure tyre pressure The tyre pressure is too low in at least one of the tyres, or the tyre
pressure difference between the wheels is too great.
X Check the tyre pressures at the next opportunity (Y page 326).
X If necessary, correct the tyre pressure.
X Restart the tyre pressure monitor (Y page 328).Check
Check
tyre(s)
tyre(s) The tyre pressure in one or more tyres has dropped significantly. The
wheel position is shown in the multifunction display.
A warning tone also sounds.
G WARNING
Underinflated tyres pose the following risks:
R the tyres may burst, especially as the load and vehicle speed
increase
R the tyres may wear excessively and/or unevenly, which may greatly
impair tyre traction
R the driving characteristics, as well as steering and braking, may be
greatly impaired
There is a risk of an accident.
X Stop the vehicle without making any sudden steering or braking
manoeuvres. Pay attention to the traffic conditions as you do so.
X Safeguard the vehicle against rolling away (Y page 157).
X Check the tyres and, if necessary, follow the instructions for a flat
tyre (Y page 306).
X Check the tyre pressure (Y page 326).
X If necessary, correct the tyre pressure. Warning Warning
tyre defect tyre defect The tyre pressure in one or more tyres has dropped suddenly. The
wheel position is shown in the multifunction display.
G WARNING
If you drive with a flat tyre, there is a risk of the following hazards: R a flat tyre affects the ability to steer or brake the vehicle
R you could lose control of the vehicle
R continued driving with a flat tyre will cause excessive heat build-up
and possibly a fire
There is a risk of an accident.
X Stop the vehicle without making any sudden steering or braking
manoeuvres. Pay attention to the traffic conditions as you do so.
X Safeguard the vehicle against rolling away (Y page 157).
X Check the tyres and, if necessary, follow the instructions for a flat
tyre (Y page 306). Display
messages
247On-board computer and displays Z
Page 254 of 349

Display messages
Possible causes/consequences and
M
MSolutions j
Check Check
trailer
trailer hitch
hitch
lock
lock The trailer tow hitch is not correctly engaged.
A warning tone also sounds.
G WARNING
If the ball coupling is not engaged, the trailer may come loose. There
is a risk of an accident.
X Stop the vehicle immediately, paying attention to road and traffic
conditions, and switch off the engine.
X Apply the parking brake.
X Engage the trailer coupling's ball coupling in the end position
(Y page 210). &
inoperative inoperative
Battery
Battery
Low
Low The on-board voltage is too low. The auxiliary heating has switched
itself off or cannot be switched on (Y page 132).
X Drive for a considerable distance.
The battery charges. The auxiliary heating is operational again as
soon as the on-board electrical system voltage is sufficient. &
inoperative Refuel inoperative Refuel
vehicle vehicle There is too little fuel in the fuel tank. The auxiliary heating cannot be
switched on (Y page 132).
X Refuel at the nearest filling station. &
inoperative inoperative
See
SeeOwn‐
Own‐
er's Man.
er's Man. The auxiliary heating is temporarily malfunctioning or faulty.
X When the vehicle is on a level surface and the engine has cooled
down, make up to four attempts to switch on the auxiliary heating,
waiting several minutes between each attempt (Y page 132).
X If the auxiliary heating does not switch on, consult a qualified spe-
cialist workshop. Telephone Telephone
No
Noservice
service Your vehicle is outside the network provider's transmitter/receiver
range.
X Wait until the mobile phone operational readiness symbol appears
in the multifunction display. Ð
Power steering mal‐ Power steering mal‐
function See Own‐ function See Own‐
er's Manual er's Manual The power steering assistance is faulty.
A warning tone also sounds.
G WARNING
You will need to use more force to steer.
There is a risk of an accident.
X Check whether you are able to apply the extra force required.
X If you are able to steer safely: carefully drive on to a qualified
specialist workshop.
X If you are unable to steer safely: do not drive on. Contact the
nearest qualified specialist workshop. Display
messages
251On-board computer and displays Z
Page 265 of 349
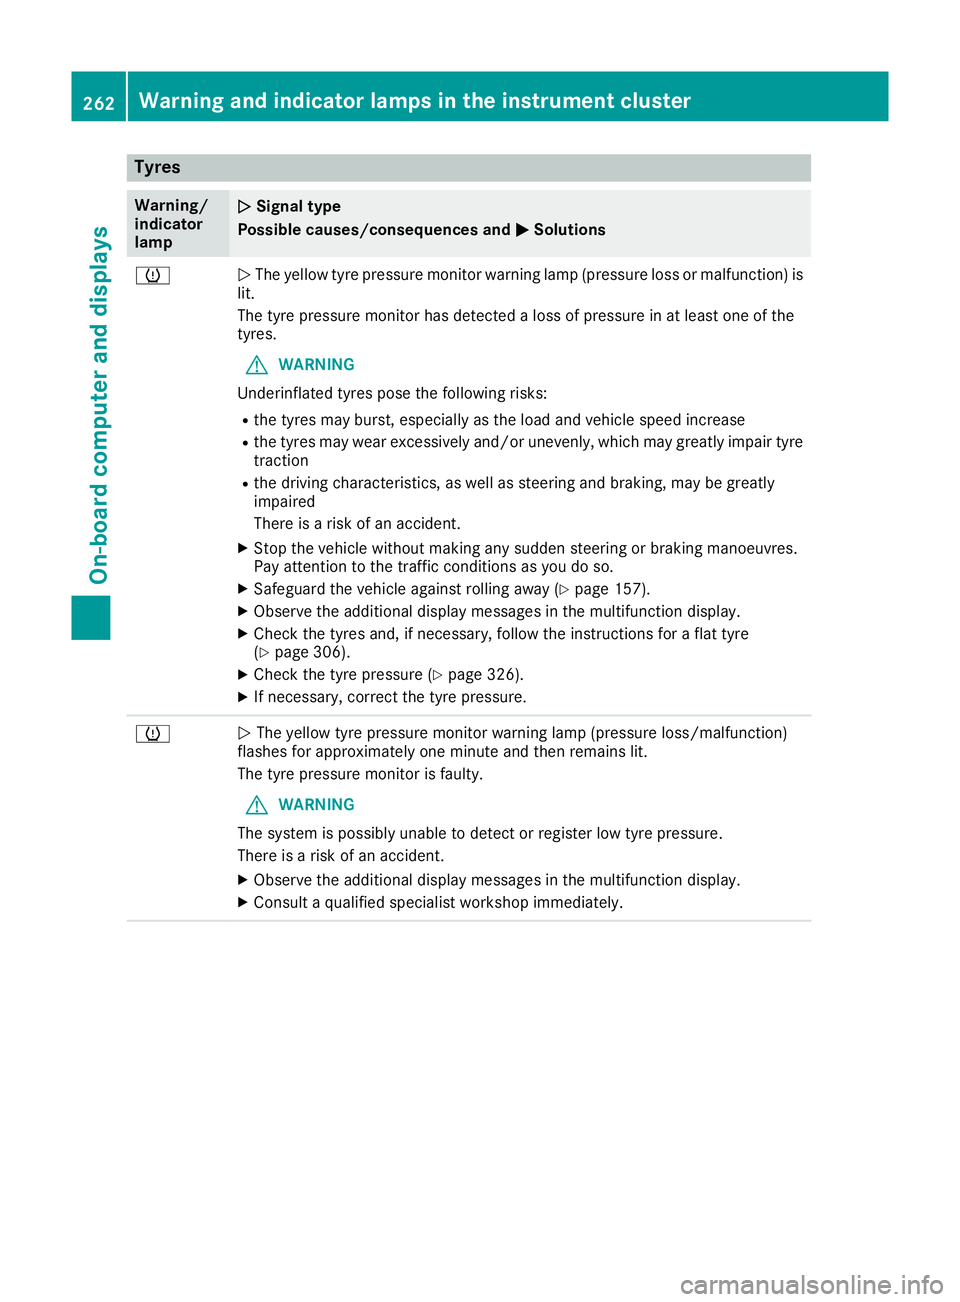
Tyres
Warning/
indicator
lamp
N N
Signal type
Possible causes/consequences and M
MSolutions h
N
The yellow tyre pressure monitor warning lamp (pressure loss or malfunction) is
lit.
The tyre pressure monitor has detected a loss of pressure in at least one of the
tyres.
G WARNING
Underinflated tyres pose the following risks:
R the tyres may burst, especially as the load and vehicle speed increase
R the tyres may wear excessively and/or unevenly, which may greatly impair tyre
traction
R the driving characteristics, as well as steering and braking, may be greatly
impaired
There is a risk of an accident.
X Stop the vehicle without making any sudden steering or braking manoeuvres.
Pay attention to the traffic conditions as you do so.
X Safeguard the vehicle against rolling away (Y page 157).
X Observe the additional display messages in the multifunction display.
X Check the tyres and, if necessary, follow the instructions for a flat tyre
(Y page 306).
X Check the tyre pressure (Y page 326).
X If necessary, correct the tyre pressure. h
N
The yellow tyre pressure monitor warning lamp (pressure loss/malfunction)
flashes for approximately one minute and then remains lit.
The tyre pressure monitor is faulty.
G WARNING
The system is possibly unable to detect or register low tyre pressure.
There is a risk of an accident.
X Observe the additional display messages in the multifunction display.
X Consult a qualified specialist workshop immediately. 262
Warning and indicator lamps in the instrument clusterOn-board computer and displays
Page 285 of 349
An exterior aerial has the following advantages:
R it conducts the electromagnetic fields gener-
ated by a wireless device to the exterior
R the field strength in the vehicle interior is
lower than in a vehicle that does not have an exterior aerial
Information on retrofitting two-way radios and
mobile phones (RF transmitters) (Y page 335).
General notes There are various mobile phone brackets that
may be fitted in your vehicle; in some cases,
these are country-specific.
More information on suitable mobile phones,
mobile phone brackets and on connecting Blue-
tooth ®
-capable mobile phones with the multi-
media system can be obtained:
R at your Mercedes-Benz Service Centre
R on the Internet at http://www.mercedes-
benz.com/connect
The functions and services available when you
use the phone depend on your mobile phone
model and service provider.
Using a mobile phone To connect a mobile phone to the exterior aerial
and charge it, insert it into the mobile phone
bracket.
X Open the telephone compartment
(Y page 274).
X Place the mobile phone bracket into the pre-
installed fitting; see the separate installation
instructions for the mobile phone fitting.
X Insert the mobile phone into the mobile phone
bracket; see the separate installation instruc-
tions for the mobile phone fitting.
i The mobile phone can also be operated
without being in the bracket. However, the
charging function and aerial function are not
available.
In order to use Bluetooth ®
(SAP profile) on your
telephone module, you must first insert the tele-
phone module into the pre-installed fitting. This connects it to the exterior aerial. If you wish to
charge the mobile phone, then you must con-
nect it to a USB port.
Further information on the telephone module
with Bluetooth ®
(SAP profile) can be found in the
Digital Owner's Manual. Operating the mobile phone You can operate the telephone using the
6
and ~ buttons on the multifunction steering
wheel. You can operate other mobile phone
functions via the on-board computer
(Y page 219).
When you remove the key from the ignition lock,
the mobile phone is disconnected from the
hands-free system. Active calls will first be
transferred to the mobile phone directly.
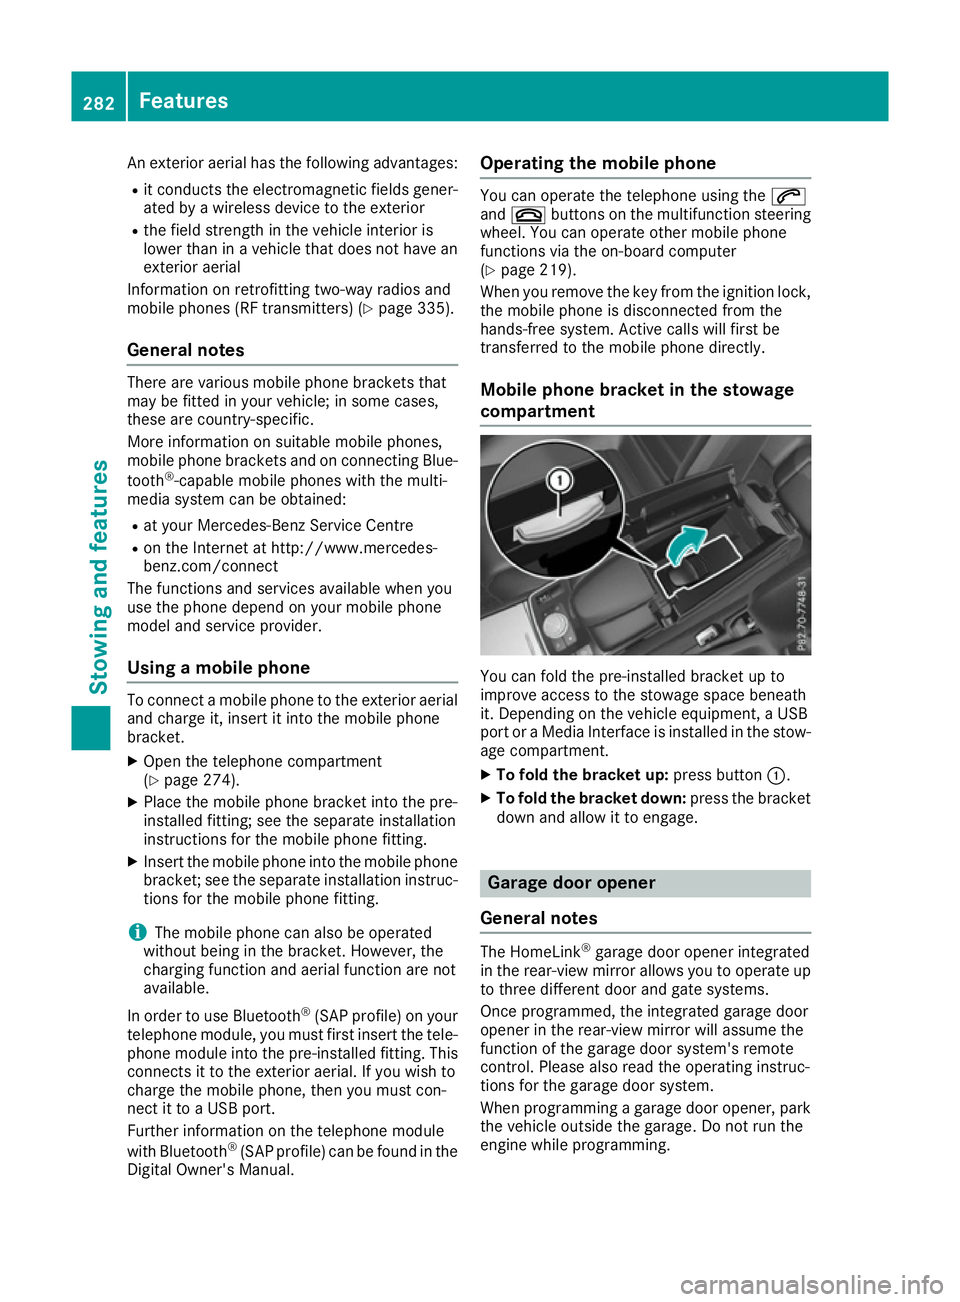
Mobile phone bracket in the stowage
compartment You can fold the pre-installed bracket up to
improve access to the stowage space beneath
it. Depending on the vehicle equipment, a USB
port or a Media Interface is installed in the stow- age compartment.
X To fold the bracket up: press button:.
X To fold the bracket down: press the bracket
down and allow it to engage. Garage door opener
General notes The HomeLink
®
garage door opener integrated
in the rear-view mirror allows you to operate up
to three different door and gate systems.
Once programmed, the integrated garage door
opener in the rear-view mirror will assume the
function of the garage door system's remote
control. Please also read the operating instruc-
tions for the garage door system.
When programming a garage door opener, park
the vehicle outside the garage. Do not run the
engine while programming. 282
FeaturesSto
wing an d features
Page 297 of 349

Further information on windscreen washer
fluid/antifreeze (Y page 342).Service
ASSYST PLUS
Service messages The ASSYST PLUS service interval display
informs you of the next service due date.
Information on the type of service and service
intervals (see the separate Service Booklet).
You can obtain further information from a
Mercedes-Benz Service Centre.
i The ASSYST PLUS service interval display
does not show any information on the engine oil level. Observe the notes on the engine oil
level (Y page 291).
The multifunction display shows a service mes-
sage for a few seconds, e.g.:
R Service A in .. days Service A in .. days
R Service A overdue
Service A overdue
R Service A overdue by .. days
Service A overdue by .. days
Depending on the operating conditions of the
vehicle, the remaining time or distance until the next service due date is displayed.
The letter indicates which service is due. A A
stands for a minor service and B
Bfor a major ser-
vice. A number or another letter may be dis-
played after the letter.
Only for certain countries: the position after the
letter A
A or B Bindicates any necessary additional
maintenance work to be performed. If you notify a qualified specialist workshop of this display,
you will receive a statement on the associated
costs.
The ASSYST PLUS service interval display does
not take into account any periods of time during
which the battery is disconnected.
Maintaining the time-dependent service sched-
ule:
X Note down the service due date displayed in
the multifunction display before disconnect-
ing the battery.
or X After reconnecting the battery, subtract the
battery disconnection periods from the ser-
vice date shown on the display. Hiding service messages X
Press the aor% button on the steering
wheel.
Displaying service messages X
Switch the ignition on.
X Press the =or; button on the steering
wheel to select the Service Servicemenu.
X Press the 9or: button to select the
ASSYST
ASSYST PLUS
PLUSsubmenu and confirm by press-
ing the abutton.
The service due date appears in the multi-
function display.
Information about Service Resetting the ASSYST PLUS service inter-
val display
! If the ASSYST PLUS service interval display
has been inadvertently reset, this setting can
be corrected at a qualified specialist work-
shop.
Have service work carried out as described in
the Service Booklet. This may otherwise lead to increased wear and damage to the major
assemblies or the vehicle.
A qualified specialist workshop, e.g. a
Mercedes-Benz Service Centre, will reset the
ASSYST PLUS service interval display after the
service work has been carried out. You can also
obtain further information on maintenance
work, for example.
Special service requirements The prescribed service interval is based on nor-
mal operation of the vehicle. Service work will
need to be performed more often if the vehicle is operated under arduous conditions or increased
loads, for example:
R regular city driving with frequent intermediate
stops
R if the vehicle is primarily used to travel short
distances
R for frequent operation in mountainous terrain
or on poor road surfaces
R if the engine is often left idling for long periods
In these or similar operating conditions, have,
for example, the air filter, engine oil and oil filter changed more frequently. The tyres must be
checked more frequently if the vehicle is oper- 294
ServiceMaintenance and care
Page 305 of 349
Cleaning the plastic trim
G
WARNING
Care products and cleaning agents containing solvents can cause surfaces in the cockpit to
become porous. This could result in plastic
parts breaking away when the airbags are
deployed. There is a danger of injury.
Do not use care products and cleaning agents containing solvents to clean the cockpit.
! Do not affix the following to plastic surfaces:
R stickers
R films
R scented oil bottles or similar items
You could otherwise damage the plastic.
! Do not allow cosmetics, insect repellent or
sunscreen to come in contact with the plastic trim. This maintains the high-quality look of
the surfaces.
X Wipe the plastic trim with a damp, lint-free
cloth, e.g. a microfibre cloth.
X Heavy soiling: use car care and cleaning
products recommended and approved by
Mercedes-Benz.
The surface may change colour temporarily.
Wait until the surface is dry again.
Cleaning the steering wheel and gear or selector lever X
Thoroughly wipe with a damp cloth or use
leather care agents that have been recom-
mended and approved by Mercedes-Benz.
Cleaning wooden trim and trim ele-
ments !
Do not use solvent-based cleaning agents
such as tar remover, wheel cleaners, polishes
or waxes. There is otherwise a risk of damag- ing the surface.
X Wipe the wooden trim and trim elements with
a damp, lint-free cloth, e.g. a microfibre cloth.
X Heavy soiling: use car care and cleaning
products recommended and approved by
Mercedes-Benz. Cleaning the seat covers General notes
! Do not use a microfibre cloth to clean covers
made out of real leather, artificial leather or
DINAMICA. If used frequently, this can dam-
age the cover.
i Note that regular care is essential to make
sure that the appearance and comfort of the
covers are retained over time.
Genuine leather seat covers
Leather is a natural product.
It has natural surface properties, e.g.:
R unevenness in structure
R marks caused by growth and injury
R subtle colour differences
These are characteristics of leather and not
material faults.
! To retain the natural appearance of the
leather, observe the following cleaning
instructions:
R Clean genuine leather covers carefully with
a damp cloth and then wipe the covers
down with a dry cloth.
R Make sure that the leather does not
become soaked. It may otherwise become
rough and cracked.
R Only use leather care agents that have
been tested and approved by Mercedes-
Benz. You can obtain these from a qualified
specialist workshop.
Seat covers from other materials
! Observe the following when cleaning:
R clean artificial leather covers with a cloth
moistened with a solution containing 1%
detergent (e.g. washing-up liquid).
R clean cloth covers with a microfibre cloth
moistened with a solution containing 1%
detergent (e.g. washing-up liquid). Rub
carefully, and always wipe entire seat sec-
tions to avoid leaving visible lines. Leave
the seat to dry afterwards. Cleaning results
depend on the type of dirt and how long it
has been there.
R Clean DINAMICA covers with a damp cloth.
Make sure that you wipe entire seat sec-
tions to avoid leaving visible lines. 302
CareMaintenance and care