2015 MERCEDES-BENZ E-CLASS CABRIOLET fold seats
[x] Cancel search: fold seatsPage 20 of 349

Safety system
see Driving safety systems
SD memory card
Ejecting .......................................... 270
Inserting ........................................2 70
Inserting/removing ........................ 270
See also Digital Owner's Manual ... 263
Selecting ........................................ 218
Seat
Adjusting the multicontour seat ..... 104
Seat backrest display message ..... 250
Seat belt
Automatic comfort-fit feature .......... 41
Correct usage .................................. 40
Switching belt adjustment on/off
(on-board computer) ..................... .227
Seat belts
Adjusting the driver's and front-
passenger seat bel t......................... 41
Cleaning ......................................... 303
Display message ............................ 234
Fastening ......................................... 40
Important safety guidelines ............. 39
Introduction ..................................... 38
Rear seat belt status indicator ......... 42
Releasing ......................................... 41
Warning lamp ................................. 254
Warning lamp (function) ................... 42
Seats
Adjusting (electrically) ................... 101
Adjusting (manually and electri-
cally ).............................................. 100
Adjusting the 4-way lumbar sup-
port ................................................ 104
Adjusting the head restraint .......... 101
Cleaning the cover ......................... 302
Correct driver's seat position ........... 99
Folding the backrests forward/
back ............................................... 103
Important safety notes .................... 99
Overview .......................................... 99
Seat heating .................................. 104
Seat heating problem .................... 106
Storing settings (memory func-
tion) ............................................... 112
Switching AIRSCARF on/of f.......... 106
Switching seat heating on/of f....... 104 Switching the seat ventilation on/
off .................................................. 105
Section
Boot ................................................. 82
Securing a load
see Stowage space
Securing luggage ............................... 276
Selector lever
Cleaning ......................................... 302
Sensors (cleaning instructions) ....... 300
Service
see ASSYST PLUS
Service Centre
see Qualified specialist workshop
Service menu (on-board com-
puter) .................................................. 222
Service message
see ASSYST PLUS
Service products
AdBlue ®
special additive s.............. 340
Brake fluid ..................................... 341
Coolant (engine) ............................ 341
Engine oil ....................................... 340
Fuel ................................................ 337
Important safety notes .................. 337
Washer fluid ................................... 342
Setting the air distribution ............... 128
Setting the airflow ............................ 129
Setting the date/time format
See also Digital Owner's Manua l... 263
Setting the language
See also Digital Owner's Manua l... 263
Setting the time
See also Digital Owner's Manua l... 263
Settings
Factory (on-board computer) ......... 228
On-board compute r....................... 223
Side lamps
Switching on/of f........................... 115
Side windows
Important safety notes .................... 84
Opening/closing .............................. 85
Opening/closing all ......................... 86
Problem (malfunction) ..................... 88
Resetting ......................................... 87
Reversing feature ............................. 85
Sidebag ................................................ 44 Index
17
Page 39 of 349

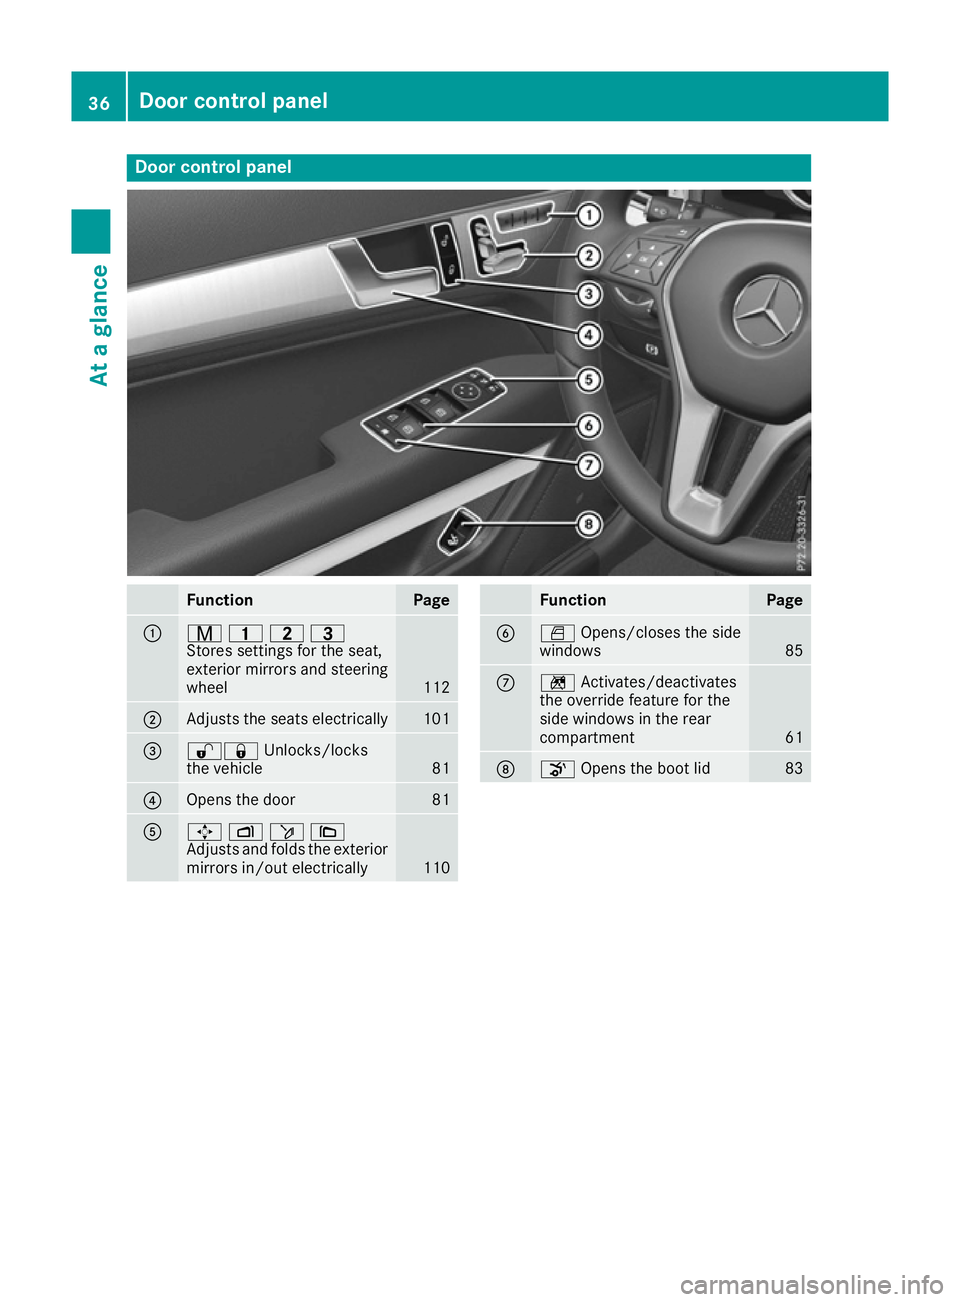
Door control panel
Function Page
:
r
45=
Stores settings for the seat,
exterior mirrors and steering
wheel 112
;
Adjusts the seats electrically 101
=
%&
Unlocks/locks
the vehicle 81
?
Opens the door 81
A
7
Zö\
Adjusts and folds the exterior
mirrors in/out electrically 110 Function Page
B
W
Opens/closes the side
windows 85
C
n
Activates/deactivates
the override feature for the
side windows in the rear
compartment 61
D
o
Opens the boot lid 8336
Door control panelAt a glance
Page 93 of 349

Opening and closing with the key
Important safety notes G
WARNING
When opening or closing the soft top, there is a risk that parts of the body could become
trapped by moving parts such as the roof
mechanism, the boot lid, or the side windows.
There is a risk of injury.
When opening or closing the roof, make sure
that no parts of the body are in the vicinity of moving parts. Release the switch if somebody
becomes trapped.
Opening and closing The key must be near the door handle.
X To open: press the %button in the key
until the soft top is completely opened.
The Top in operation
Top in operation message appears in
the multifunction display. The seat ventilation
is switched on. The rear side windows open.
X To close: press the&button in the key
until the soft top is completely closed.
The Top in operation
Top in operation message appears in
the multifunction display. The soft top and the
side windows close. Closing the soft top manually
Important safety notes G
WARNING
Closing the soft top manually is a complex,
technically challenging procedure which can
also be physically demanding. It could lead to you trapping yourself or other persons. There
is a risk of injury.
Where possible, have the soft top closed man-
ually at a qualified specialist workshop.
If the soft top cannot be closed automatically,
check the following points:
R Is the boot separator engaged (Y page 94)?
R Are the head restraints on the rear bench
seats extended? R
Is the boot lid closed?
R Is the on-board voltage sufficient?
Start the engine if necessary.
If automatic operation still does not work, the
soft top can be closed manually.
The help of a second person is required in car-
rying out this procedure.
Closing the soft top X
Apply the parking brake.
X Open the side windows.
X Lower the head restraints automatically
(Y page 102) or manually (Y page 102).
X Remove the key from the ignition lock.
X Open the boot.
X Take the two straps out of the vehicle tool kit
(Y page 305).
X Take the Allen key out of the Owner's Manual
wallet and keep it with you. X
Turn rotary catch :anti-clockwise and fold
cover ;down. X
Insert Allen key =into valve screw ?on the
hydraulic pump.
X Turn valve screw ?of the hydraulic pump
with Allen key =anti-clockwise a full turn. 90
Soft topOpening and closing
Page 99 of 349

If you park your vehicle with the soft top down
and remove the key, the wind deflector and the
head restraints in the rear compartment retract automatically. When you restart your engine
after having been parked, the wind deflector and
the head restraints in the rear compartment
extend again automatically.
AIRCAP cannot be extended or retracted if the
vehicle speed exceeds approximately
160 km/h.
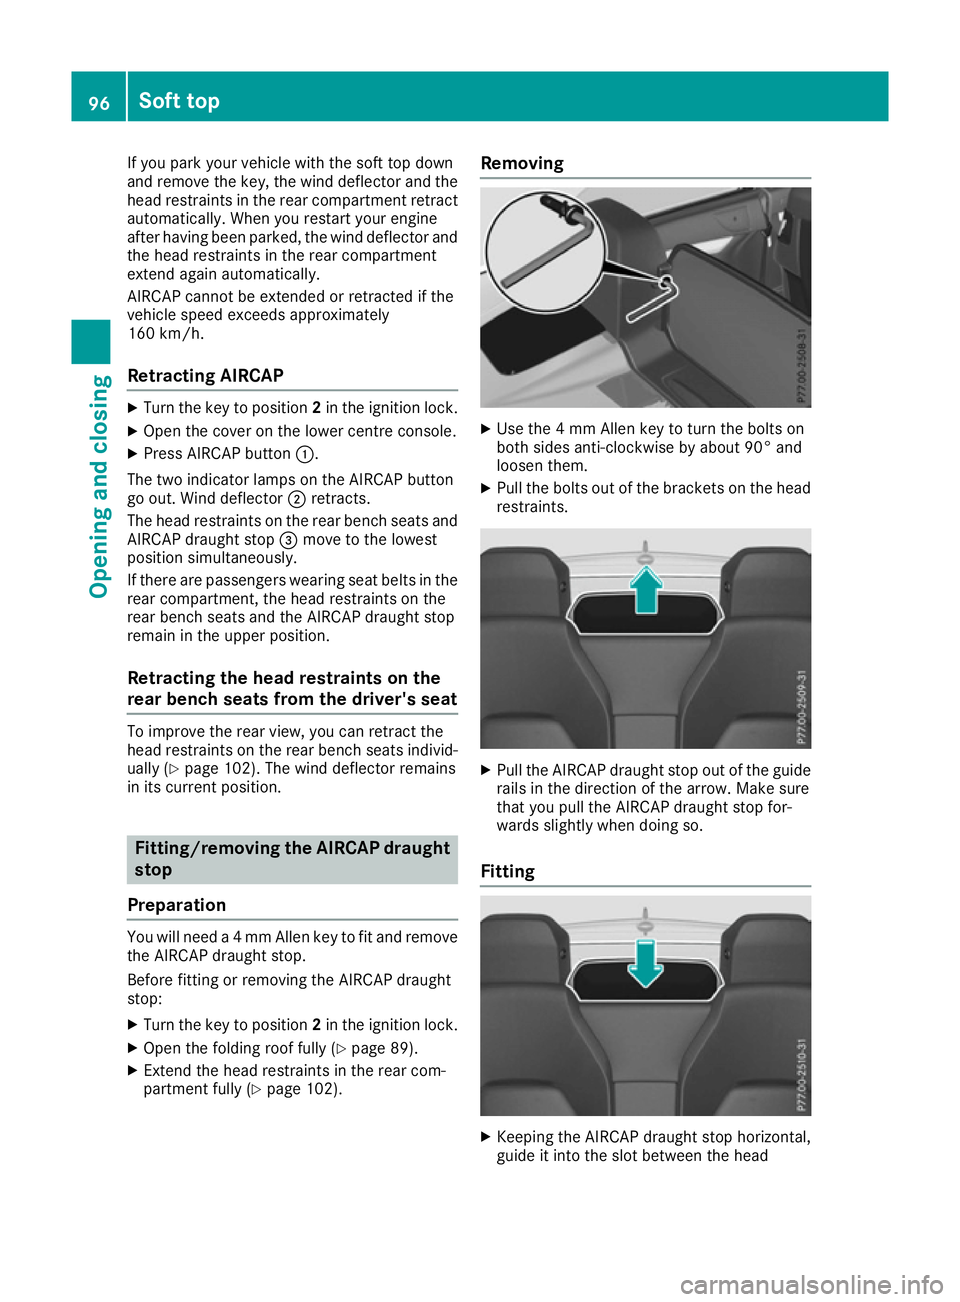
Retracting AIRCAP X
Turn the key to position 2in the ignition lock.
X Open the cover on the lower centre console.
X Press AIRCAP button :.
The two indicator lamps on the AIRCAP button
go out. Wind deflector ;retracts.
The head restraints on the rear bench seats and
AIRCAP draught stop =move to the lowest
position simultaneously.
If there are passengers wearing seat belts in the rear compartment, the head restraints on the
rear bench seats and the AIRCAP draught stop
remain in the upper position.
Retracting the head restraints on the
rear bench seats from the driver's seat To improve the rear view, you can retract the
head restraints on the rear bench seats individ- ually (Y page 102). The wind deflector remains
in its current position. Fitting/removing the AIRCAP draught
stop
Preparation You will need a 4 mm Allen key to fit and remove
the AIRCAP draught stop.
Before fitting or removing the AIRCAP draught
stop:
X Turn the key to position 2in the ignition lock.
X Open the folding roof fully (Y page 89).
X Extend the head restraints in the rear com-
partment fully (Y page 102). Removing
X
Use the 4 mm Allen key to turn the bolts on
both sides anti-clockwise by about 90° and
loosen them.
X Pull the bolts out of the brackets on the head
restraints. X
Pull the AIRCAP draught stop out of the guide
rails in the direction of the arrow. Make sure
that you pull the AIRCAP draught stop for-
wards slightly when doing so.
Fitting X
Keeping the AIRCAP draught stop horizontal,
guide it into the slot between the head 96
Soft topOpening and closing
Page 104 of 349

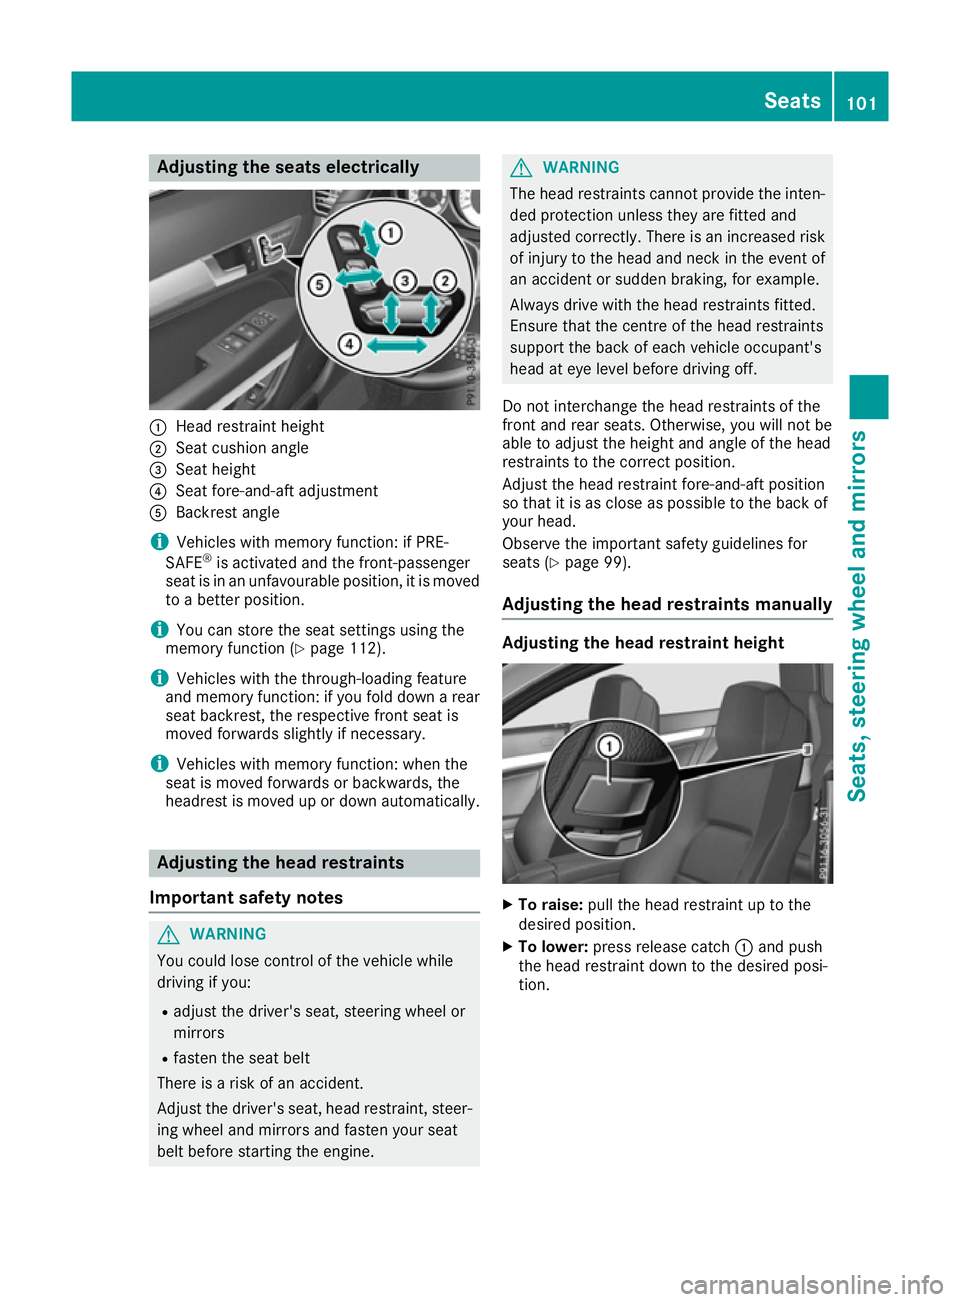
Adjusting the seats electrically
:
Head restraint height
; Seat cushion angle
= Seat height
? Seat fore-and-aft adjustment
A Backrest angle
i Vehicles with memory function: if PRE-
SAFE ®
is activated and the front-passenger
seat is in an unfavourable position, it is moved to a better position.
i You can store the seat settings using the
memory function (Y page 112).
i Vehicles with the through-loading feature
and memory function: if you fold down a rear
seat backrest, the respective front seat is
moved forwards slightly if necessary.
i Vehicles with memory function: when the
seat is moved forwards or backwards, the
headrest is moved up or down automatically. Adjusting the head restraints
Important safety notes G
WARNING
You could lose control of the vehicle while
driving if you:
R adjust the driver's seat, steering wheel or
mirrors
R fasten the seat belt
There is a risk of an accident.
Adjust the driver's seat, head restraint, steer-
ing wheel and mirrors and fasten your seat
belt before starting the engine. G
WARNING
The head restraints cannot provide the inten-
ded protection unless they are fitted and
adjusted correctly. There is an increased risk of injury to the head and neck in the event of
an accident or sudden braking, for example.
Always drive with the head restraints fitted.
Ensure that the centre of the head restraints
support the back of each vehicle occupant's
head at eye level before driving off.
Do not interchange the head restraints of the
front and rear seats. Otherwise, you will not be
able to adjust the height and angle of the head
restraints to the correct position.
Adjust the head restraint fore-and-aft position
so that it is as close as possible to the back of
your head.
Observe the important safety guidelines for
seats (Y page 99).
Adjusting the head restraints manually Adjusting the head restraint height
X
To raise: pull the head restraint up to the
desired position.
X To lower: press release catch :and push
the head restraint down to the desired posi-
tion. Seats
101Seats, steering wheel and mirrors Z
Page 106 of 349

Folding the front-seat backrests
forward/back
Important safety notes G
WARNING
If the backrest is not engaged, it could fold
forwards during a braking manoeuvre or in the event of an accident, for example. The seat
backrest will then push the vehicle occupant
against the seat belt. The seat belt cannot
protect as intended and could result in addi-
tional injury. This poses an increased risk of
injury.
Before each journey, make sure that the back- rest engages fully as described. G
WARNING
You could lose control of the vehicle while
driving if you:
R adjust the driver's seat, steering wheel or
mirror
R fasten the seat belt.
There is a risk of an accident.
Adjust the driver's seat, steering wheel or
mirror and fasten the seat belt before starting
the engine. G
WARNING
When adjusting a seat, you or another vehicle occupant could become trapped by the guiderail of the seat, for instance. There is a risk of
injury.
Make sure that no one has any part of their
body within the sweep of the seat when
adjusting it. Folding the seat backrest forwards With the EASY-ENTRY system, the seat moves
forwards if you have folded the backrest for-
wards and the seat is in the rear half of the
adjustment range. This makes it easier for pas-
sengers to get into and out of the rear compart-
ment.
The head restraint also lowers on vehicles with
electric seat adjustment.
X Vehicles without memory function:
release the head restraint if necessary and
push it down.
X Pull seat release handle :forwards and fold
the backrest forwards until the seat backrest
engages.
X Push the seat as far forwards as it will go.
X Vehicles with memory function: pull seat
release handle :forwards and fold the back-
rest forwards as far as it will go.
The seat moves automatically to the foremost
position.
Folding back the seat backrest X
Vehicles without memory function: push
the seat backrest back horizontally until the
seat reaches the position that was previously
set.
X Fold the seat backrest backwards until you
hear it engage. Do so in a smooth manner.
X After the seat backrest has been folded back,
check the position of the head restraint and
set it to the correct position.
X Vehicles with memory function: swing
back the seat backrest.
The seat moves automatically to the stored
position. Seats
103Seats, steering wheel and mirrors Z
Page 114 of 349

i
The exterior mirrors can also be heated
manually by switching on the rear window
heating.
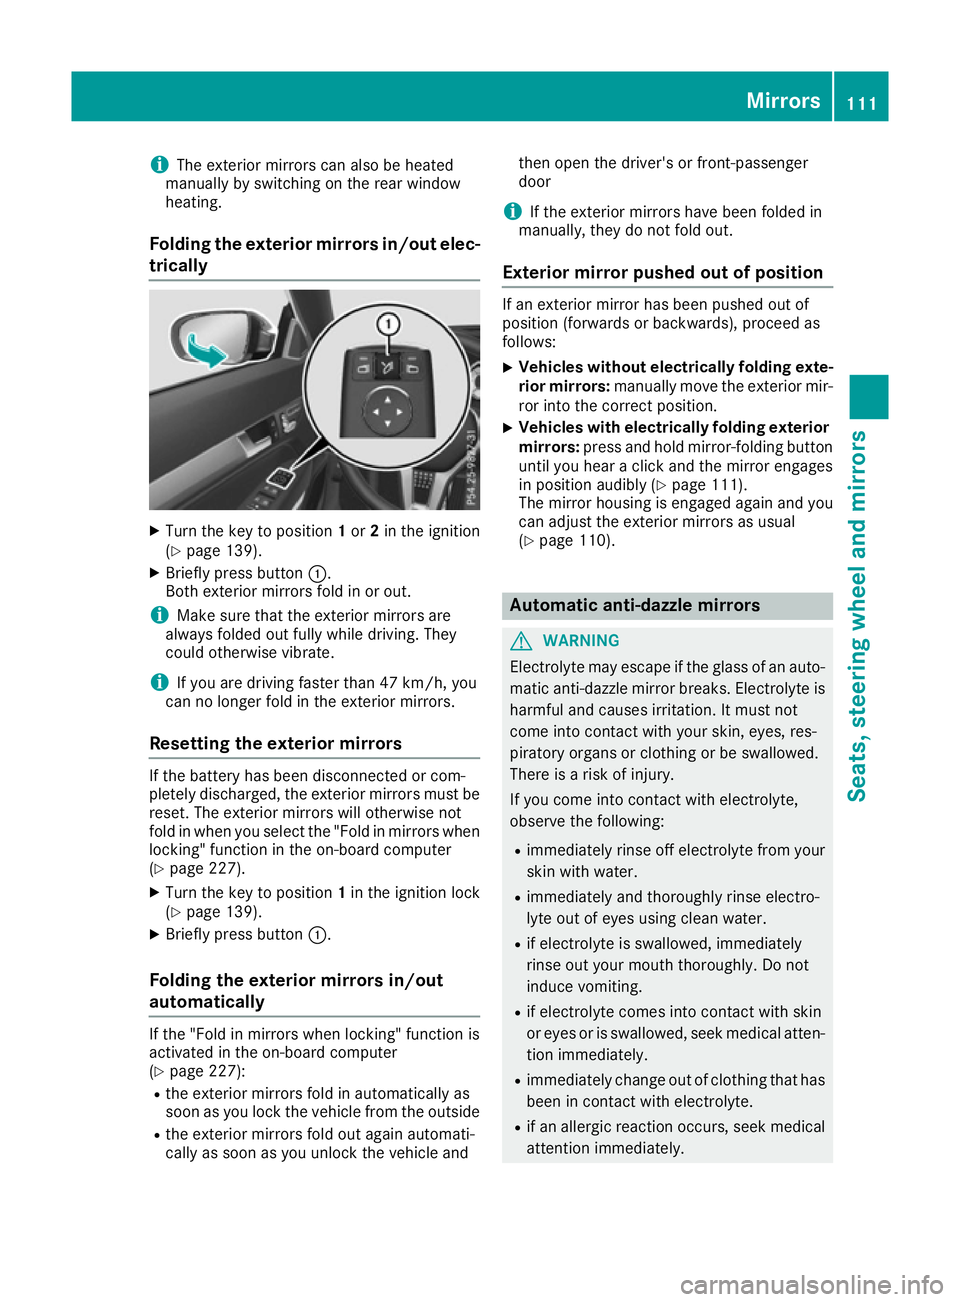
Folding the exterior mirrors in/out elec- trically X
Turn the key to position 1or 2in the ignition
(Y page 139).
X Briefly press button :.
Both exterior mirrors fold in or out.
i Make sure that the exterior mirrors are
always folded out fully while driving. They
could otherwise vibrate.
i If you are driving faster than 47 km/h,
you
can no longer fold in the exterior mirrors.
Resetting the exterior mirrors If the battery has been disconnected or com-
pletely discharged, the exterior mirrors must be
reset. The exterior mirrors will otherwise not
fold in when you select the "Fold in mirrors whenlocking" function in the on-board computer
(Y page 227).
X Turn the key to position 1in the ignition lock
(Y page 139).
X Briefly press button :.
Folding the exterior mirrors in/out
automatically If the "Fold in mirrors when locking" function is
activated in the on-board computer
(Y page 227):
R the exterior mirrors fold in automatically as
soon as you lock the vehicle from the outside
R the exterior mirrors fold out again automati-
cally as soon as you unlock the vehicle and then open the driver's or front-passenger
door
i If the exterior mirrors have been folded in
manually, they do not fold out.
Exterior mirror pushed out of position If an exterior mirror has been pushed out of
position (forwards or backwards), proceed as
follows:
X Vehicles without electrically folding exte-
rior mirrors: manually move the exterior mir-
ror into the correct position.
X Vehicles with electrically folding exterior
mirrors: press and hold mirror-folding button
until you hear a click and the mirror engages
in position audibly (Y page 111).
The mirror housing is engaged again and you
can adjust the exterior mirrors as usual
(Y page 110). Automatic anti-dazzle mirrors
G
WARNING
Electrolyte may escape if the glass of an auto- matic anti-dazzle mirror breaks. Electrolyte is
harmful and causes irritation. It must not
come into contact with your skin, eyes, res-
piratory organs or clothing or be swallowed.
There is a risk of injury.
If you come into contact with electrolyte,
observe the following:
R immediately rinse off electrolyte from your
skin with water.
R immediately and thoroughly rinse electro-
lyte out of eyes using clean water.
R if electrolyte is swallowed, immediately
rinse out your mouth thoroughly. Do not
induce vomiting.
R if electrolyte comes into contact with skin
or eyes or is swallowed, seek medical atten-
tion immediately.
R immediately change out of clothing that has
been in contact with electrolyte.
R if an allergic reaction occurs, seek medical
attention immediately. Mir
rors
111Seats, ste ering wheel and mirrors Z
Page 184 of 349

Warning displays
Warning display for the front area
: Segments on the left-hand side of the vehi-
cle
; Segments on the right-hand side of the vehi-
cle
= Segments showing operational readiness
The warning displays show the distance
between the sensors and the obstacle. The
warning display for the front area is located on
the dashboard above the centre air vents. The
warning display for the rear area is located
between the rear seats.
The warning display for each side of the vehicle
is divided into five yellow and two red segments.
PARKTRONIC is operational if yellow segments
showing operational readiness =light up.
The gear lever position or the transmission posi- tion of the automatic transmission and the
direction in which the vehicle is rolling deter-
mine which warning display is active when the
engine is running.
Manual transmission: Gear lever position Warning display
Forward gear
or
Neutral
Front area activated
Reverse gear
Rear and front areas
activated Automatic transmission:
Transmission posi-
tion Warning display
D
Front area activated
R
or N Rear and front areas
activated
P
No areas activated
One or more segments light up as the vehicle
approaches an obstacle, depending on the vehi-
cle's distance from the obstacle.
From the:
R sixth segment onwards, you will hear an inter-
mittent warning tone for approximately two
seconds.
R seventh segment onwards, you will hear a
warning tone for approximately two seconds.
This indicates that you have now reached the minimum distance.
Deactivating/activating PARKTRONIC :
Deactivating/activating PARKTRONIC
; Indicator lamp
If indicator lamp ;lights up, PARKTRONIC is
deactivated. Active Parking Assist is then also
deactivated.
i PARKTRONIC is automatically activated
when you turn the key to position 2in the
ignition lock.
Towing a trailer !
Fold in the ball coupling if the trailer tow
hitch is not required. PARKTRONIC measures
the minimum detection range to an obstacle
from the bumper, not the ball coupling. Driving systems
181Driving and parking Z