2015 MERCEDES-BENZ CLA SHOOTING BRAKE fuel tank
[x] Cancel search: fuel tankPage 14 of 421
Anti-dazzle mode (automatic) ........ 120
Folding in when locking (on-board
computer) ...................................... 261
Folding in/out (automatically) ....... 120
Folding in/out (electrically )........... 120
Out of position (troubleshooting) ... 120
Parking position ............................. 121
Resetting ....................................... 120
Storing settings (memory func-
tion) ............................................... 122 F
Fault message see Display messages
Filler cap
see Fuel filler flap
Fire extinguisher ............................... 351
First-aid kit ......................................... 350
Fitting a wheel
Fitting a wheel ............................... 383
Lowering the vehicle ...................... 383
Preparing the vehicle ..................... 380
Raising the vehicle ......................... 381
Removing a wheel .......................... 383
Securing the vehicle against roll-
ing away ........................................ 381
Flat tyre
Changing a wheel/fitting the
spare wheel ................................... 379
MOExtended tyre s......................... 352
Preparing the vehicle ..................... 352
TIREFIT kit ...................................... 353
see Emergency spare wheel
Floormat ............................................. 331
Foglamps
Switching on/of f........................... 127
Foglamps (extended range) .............. 131
Frequencies
Mobile phone ................................. 400
Two-way radio ................................ 400
Front foglamps
Display message ............................ 281
Front-passenger front airbag deac-
tivation
Display message ............................ 278 Front-passenger front airbag deac-
tivation system
Operation ......................................... 52
Problems ......................................... 56
System self-test ............................... 54
Fuel
Additives ........................................ 405
Consumption information .............. 406
Consumption statistics .................. 250
Displaying the current consump-
tion ................................................ 250
Displaying the range ...................... 250
Driving tip s.................................... 196
E10 ................................................ 404
Fuel gaug e....................................... 32
Grade (petrol) ................................ 404
Important safety notes .................. 403
Low outside temperatures ............. 406
Notes for CLA 250 ......................... 405
Notes for Mercedes‑ AMG vehi-
cles ................................................ 404
Problem (malfunction) ................... 191
Quality (diesel )............................... 405
Refuelling ....................................... 188
Tank content/reserve fue l............. 403
Fuel filler flap
Opening ......................................... 189
Fuel filter (white display message) .. 286
Fuel level
Calling up the range (on-board
computer) ...................................... 250
Gauge .............................................. 32
Fuel reserve
see Fuel
Fuel tank
Capacity ........................................ 403
Problem (malfunction) ................... 191
Fuses
Allocation chart ............................. 368
Before changing ............................. 367
Fuse box in the engine compart-
ment .............................................. 367
Fuse box in the front-passenger
footwell .......................................... 368
Important safety notes .................. 367 Index
11
Page 19 of 421
Pulling away
Automatic transmission ................. 168
General notes ................................ 168
Hill start assist ...............................1 69
Manual transmission ..................... .168
Trailer ............................................ 169 Q
QR code Mercedes-Benz Guide App ................. 1
Rescue card ..................................... 26
Qualified specialist workshop ........... 25R
RACE START important safety notes ................... 214
RACE START (AMG vehicles) ............. 214
RACETIMER (on-board computer) .... 263
Radio
Selecting a station ......................... 253
see separate operating instructions
Radio-based vehicle components
Declaration of conformity ................ 24
Rain closing feature (panorama
sliding sunroof) ................................. 107
Reading lamp ..................................... 132
Rear bench seat
Folding the backrest forwards/
back ............................................... 320
Rear compartment
Setting the air vents ..................... .162
Rear foglamp
Changing bulbs .............................. 137
Display message ............................ 281
Switching on/off ........................... 128
Rear lamps
see Lights
Rear seat
Adjusting the angle of the backr-
ests ................................................ 320
Rear window heating
Problem (fault) ............................... 154
Switching on/off ........................... 153
Rear window wiper
Replacing the wiper blade .............. 140
Switching on/off ........................... 138 Rear-compartment seat belt sta-
tus indicator
........................................ 48
Rear-view mirror
Anti-dazzle mode (automatic) ....... .120
Dipping (manual) ........................... 119
Refuelling
Fuel gauge ....................................... 32
Important safety notes .................. 188
Notes for Mercedes ‑AMG vehi-
cles ................................................ 404
Refuelling process ......................... 189
see Fuel
Remote control
Auxiliary heating/ventilation .......... 157
Changing the batteries (auxiliary
heating) ......................................... 159
Replacing bulbs
Important safety notes .................. 133
Overview of bulb types .................. 134
Removing/replacing the cover
(front wheel arch) .......................... 135
Replacing the battery (auxiliary
heating remote control) .................... 159
Rescue card ......................................... 26
Reserve (fuel tank)
see Fuel
Reserve fuel
Display message ............................ 286
Warning lamp ................................. 310
Residual heat (climate control) ........155
Restraint system
Display message ............................ 275
Introduction ..................................... 42
Warning lamp ................................. 309
Warning lamp (function) ................... 43
Rev counter ........................................ 247
Reverse gear
Engaging (manual transmission) .... 176
Reverse gear (selector lever) ........... 180
Reversing camera
Cleaning instructions ..................... 344
Displays in the Audio displa y......... 226
Displays in the COMAND display ... 226
Function/note s............................. 225
Switching on/of f........................... 226
Reversing feature
Panorama sliding sunroof .............. 106 16
Index
Page 24 of 421
Roof load (maximum
)..................... 410
Vehicle dimensions ........................... 410
Vehicle emergency locking ................ 96
Vehicle identification number
see VIN
Vehicle identification plate .............. 402
Vehicle tool kit .................................. 351
Ventilation
Setting the vents ........................... 161
Video
Operating the DVD ......................... 253
VIN
Seat ............................................... 402
Type plate ...................................... 402 W
Warning and indicator lamps ABS ................................................ 304
Brakes ........................................... 303
Distance warning signal ................. 312
ESP ®
.............................................. 306
ESP ®
OFF ....................................... 307
Fuel tank ........................................ 310
LIM (cruise control) ........................ 200
LIM (DISTRONIC PLUS) .................. 205
LIM (variable SPEEDTRONIC) ......... 202
Overview .......................................... 33
PASSENGER AIR BAG ...................... 43
Reserve fue l................................... 310
Seat belt ........................................ 301
Tyre pressure monitor ................... 313
Warning triangle ................................ 350
Washer fluid
Display message ............................ 299
Wheel and tyre combinations
Tyres .............................................. 386
Wheel bolt tightening torque ........... 383
Wheel chock ...................................... 381
Wheels
Changing a whee l.......................... 379
Changing/replacing ....................... 379
Checking ........................................ 371
Cleaning ......................................... 343
Emergency spare wheel ................. 396
Fitting a new wheel ........................ 383
General notes ................................ 384
Important safety notes .................. 370 Information on driving .................... 370
Removing a whee
l.......................... 383
Storing ........................................... 380
Tightening torque ........................... 383
Wheel size/tyre size ...................... 384
Windowbag
Display message ............................ 276
Operation ......................................... 51
Windows
Cleaning ......................................... 343
see Side windows
Windscreen
Demisting ...................................... 152
Windscreen washer fluid
see Windscreen washer system
Windscreen washer system
Important safety notes .................. 409
Topping up ..................................... 339
Windscreen wipers
Display message ............................ 300
Problem (malfunction) ................... 142
Rear window wipe r........................ 138
Replacing the wiper blades ............ 138
Switching on/of f........................... 137
Winter driving
General notes ................................ 372
Winter operation
Slippery road surfaces ................... 198
Snow chains .................................. 373
Winter tyres
Limiting the speed (on-board com-
puter) ............................................. 259
M+S tyres ...................................... 372
Wiper blades
Cleaning ......................................... 344
Important safety notes .................. 138
Replacing (on the rear window )..... 140
Replacing (windscreen) .................. 139
Wooden trim (cleaning instruc-
tions) .................................................. 346
Workshop
see Qualified specialist workshop Z
ZONE function Switching on/of f........................... 151 Index
21
Page 159 of 421
Switching on/off
X
Turn the key to position 0in the ignition
lock or remove it (Y page 165).
X To activate: press theÌbutton.
The indicator lamp in the Ìbutton lights
up.
X To deactivate: press theÌbutton.
The indicator lamp in the Ìbutton goes
out.
i Residual heat is deactivated automati-
cally:
R after approximately 30 minutes
R when the ignition is switched on
R if the battery voltage drops
R when the auxiliary heating is switched on Auxiliary heating
Important safety notes G
DANGER
If the exhaust pipe is blocked or sufficient
ventilation is not possible, toxic exhaust
fumes can enter the vehicle, especially car-
bon monoxide. This is the case, e.g. in
enclosed spaces, or if the vehicle is stuck in
snow. There is a risk of fatal injuries.
You should switch off the auxiliary heating in
enclosed spaces which do not have an extrac- tion system, e.g. a garage. If the vehicle is
stuck in snow and you must leave the auxiliary
heating running, keep the exhaust pipe and
the area around the vehicle clear of snow. To guarantee a sufficient supply of fresh air, open
a window on the side of the vehicle away from the wind. G
WARNING
When the auxiliary heating is switched on,
parts of the vehicle can become very hot. Flammable materials such as leaves, grass or
twigs may ignite if they come into contact
with:
R hot parts of the exhaust system
R the exhaust gas itself
There is a risk of fire.
When the auxiliary heating is switched on,
make sure that:
R no flammable materials come into contact
with hot vehicle components
R the exhaust gas can escape from the
exhaust pipe unhindered
R the exhaust gas does not come into contact
with flammable materials.
The auxiliary heating and the exhaust gas out-
let are situated in front of the right-hand front
wheel.
! Operating the auxiliary heating/ventila-
tion draws on the vehicle battery. After you
have heated or ventilated the vehicle a
maximum of two times, drive for a longer
distance.
Switch the auxiliary heating on regularly once
a month for about ten minutes.
The auxiliary heating timer function calcu-
lates the switch-on time according to the out-
side temperature so that the vehicle is pre-
heated by the departure time. When the
departure time is reached, the auxiliary heat- ing continues to heat for a further five
minutes and then switches off.
The auxiliary heating heats the air in the vehi-
cle interior to the set temperature. This
occurs without using the heat of the running
engine. The auxiliary heating is operated
directly using the vehicle's fuel. For this rea-
son, the fuel tank must be at least Õfull to
ensure that the auxiliary heating functions.
The auxiliary heating/ventilation automati-
cally adjusts to changes in temperature and
weather conditions. For this reason, the aux- iliary heating could switch from ventilation
mode to heating mode or from heating mode to ventilation mode. 156
Operating the climate control systemClimate control
Page 164 of 421
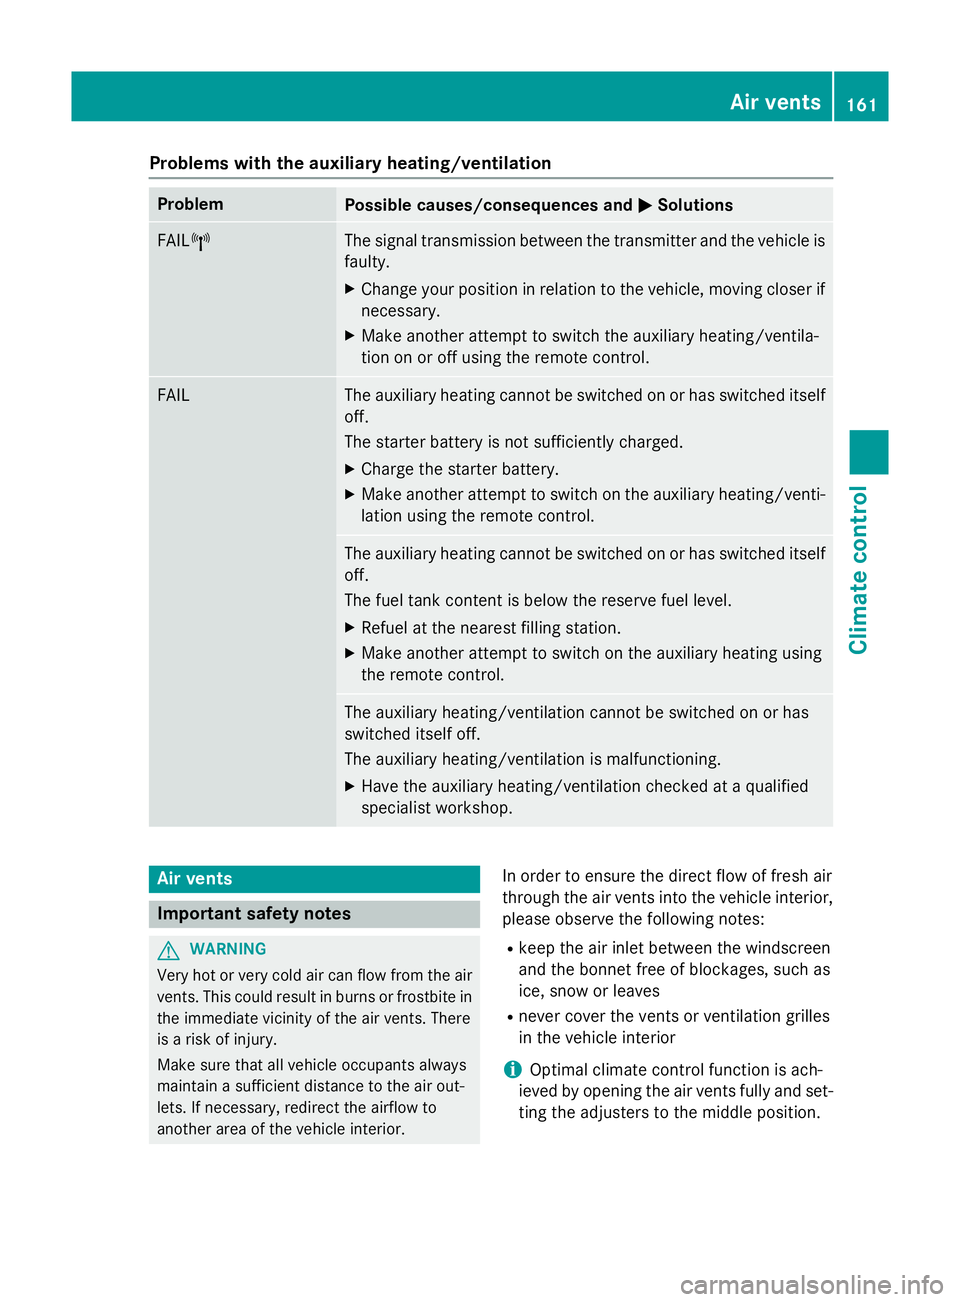
Problems with the auxiliary heating/ventilation
Problem
Possible causes/consequences and
M
MSolutions FAIL¨ The signal transmission between the transmitter and the vehicle is
faulty.
X Change your position in relation to the vehicle, moving closer if
necessary.
X Make another attempt to switch the auxiliary heating/ventila-
tion on or off using the remote control. FAIL The auxiliary heating cannot be switched on or has switched itself
off.
The starter battery is not sufficiently charged.
X Charge the starter battery.
X Make another attempt to switch on the auxiliary heating/venti-
lation using the remote control. The auxiliary heating cannot be switched on or has switched itself
off.
The fuel tank content is below the reserve fuel level.
X Refuel at the nearest filling station.
X Make another attempt to switch on the auxiliary heating using
the remote control. The auxiliary heating/ventilation cannot be switched on or has
switched itself off.
The auxiliary heating/ventilation is malfunctioning.
X Have the auxiliary heating/ventilation checked at a qualified
specialist workshop. Air vents
Important safety notes
G
WARNING
Very hot or very cold air can flow from the air vents. This could result in burns or frostbite in the immediate vicinity of the air vents. There
is a risk of injury.
Make sure that all vehicle occupants always
maintain a sufficient distance to the air out-
lets. If necessary, redirect the airflow to
another area of the vehicle interior. In order to ensure the direct flow of fresh air
through the air vents into the vehicle interior,
please observe the following notes:
R keep the air inlet between the windscreen
and the bonnet free of blockages, such as
ice, snow or leaves
R never cover the vents or ventilation grilles
in the vehicle interior
i Optimal climate control function is ach-
ieved by opening the air vents fully and set- ting the adjusters to the middle position. Air vents
161Climate control Z
Page 176 of 421
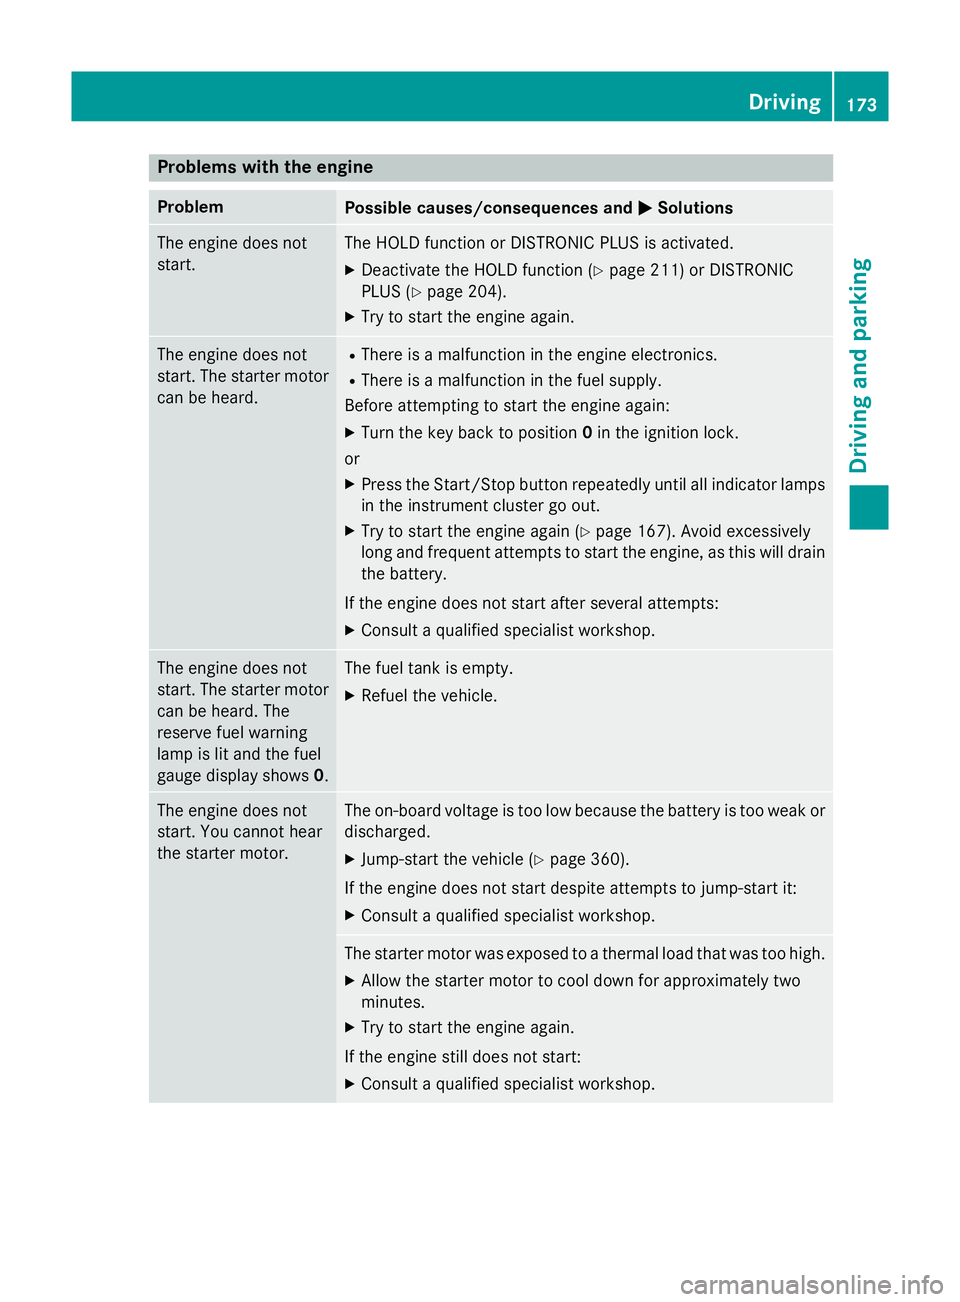
Problems with the engine
Problem
Possible causes/consequences and
M
MSolutions The engine does not
start. The HOLD function or DISTRONIC PLUS is activated.
X Deactivate the HOLD function (Y page 211) or DISTRONIC
PLUS (Y page 204).
X Try to start the engine again. The engine does not
start. The starter motor
can be heard. R
There is a malfunction in the engine electronics.
R There is a malfunction in the fuel supply.
Before attempting to start the engine again:
X Turn the key back to position 0in the ignition lock.
or
X Press the Start/Stop button repeatedly until all indicator lamps
in the instrument cluster go out.
X Try to start the engine again (Y page 167). Avoid excessively
long and frequent attempts to start the engine, as this will drain the battery.
If the engine does not start after several attempts: X Consult a qualified specialist workshop. The engine does not
start. The starter motor
can be heard. The
reserve fuel warning
lamp is lit and the fuel
gauge display shows 0. The fuel tank is empty.
X Refuel the vehicle. The engine does not
start. You cannot hear
the starter motor. The on-board voltage is too low because the battery is too weak or
discharged.
X Jump-start the vehicle (Y page 360).
If the engine does not start despite attempts to jump-start it:
X Consult a qualified specialist workshop. The starter motor was exposed to a thermal load that was too high.
X Allow the starter motor to cool down for approximately two
minutes.
X Try to start the engine again.
If the engine still does not start:
X Consult a qualified specialist workshop. Driving
173Driving and parking Z
Page 192 of 421

fuel. Otherwise, the fuel will enter the fuel
system. Even small amounts of the wrong
fuel can result in damage to the fuel system
and the engine. Notify a qualified specialist workshop and have the fuel tank and fuel
lines drained completely.
! Do not use petrol to refuel vehicles with a
diesel engine. Do not switch on the ignition if you accidentally refuel with the wrong
fuel. Otherwise, fuel can enter the fuel sys-tem. Even small amounts of the wrong fuel
could result in damage to the fuel system
and the engine. The repair costs are high.
Notify a qualified specialist workshop and
have the fuel tank and fuel lines drained
completely.
! Overfilling the fuel tank could damage the
fuel system.
! Take care not to spill any fuel on painted
surfaces. You could otherwise damage the
paintwork.
! Use a filter when adding fuel from a fuel
can. The fuel lines and/or the fuel injection system could otherwise be blocked by par-
ticles from the fuel can.
Do not get into the vehicle again during the
refuelling process. Otherwise, electrostatic
charge could build up again.
If you overfill the fuel tank, some fuel may
spray out when you remove the fuel pump
nozzle.
Further information on fuel and fuel quality
(Y page 402). Refuelling
General notes The fuel filler flap is unlocked/locked auto-
matically when you unlock/lock the vehicle
with the key.
The position of the fuel filler cap is displayed
æ in the instrument cluster. The arrow
next to the filling pump indicates the side of
the vehicle. Opening the fuel filler flap
:
To open the fuel filler flap
; Tyre pressure table
= To insert the fuel filler cap
? Instruction label on the fuel type to be
refuelled
X Vehicles without KEYLESS-GO: remove
the key from the ignition lock.
X Vehicles with KEYLESS-GO start-func-
tion or KEYLESS-GO: open the driver's
door.
The on-board electronics now have status
0. This is the same as the key having been removed.
X Press the fuel filler flap in the direction of
arrow :.
The fuel filler flap swings up.
X Turn the fuel filler cap anti-clockwise and
remove it.
X Insert the fuel filler cap into the holder on
the inside of fuel filler flap =.
X Completely insert the filler neck of the fuel
pump nozzle into the tank, hook in place
and refuel.
X Only fill the tank until the pump nozzle
switches off.
Vehicles with a diesel engine: the filler neck is
designed for refuelling at diesel filling pumps.
Do not add any more fuel after the pump
stops filling for the first time. Otherwise, fuel
may leak out. Refuelling
189Driving and parking Z
Page 194 of 421
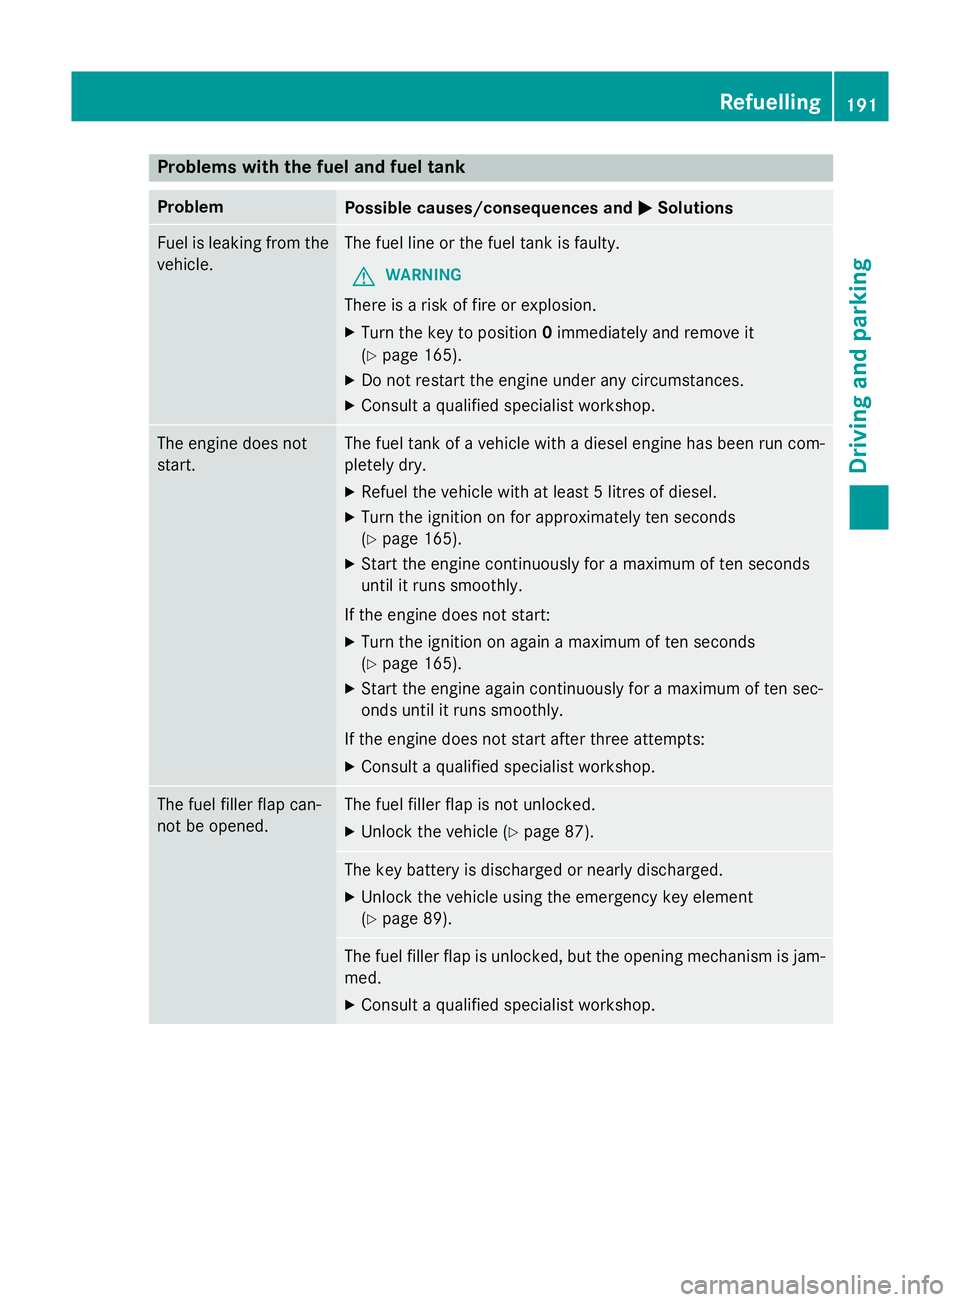
Problems with the fuel and fuel tank
Problem
Possible causes/consequences and
M
MSolutions Fuel is leaking from the
vehicle. The fuel line or the fuel tank is faulty.
G WARNING
There is a risk of fire or explosion. X Turn the key to position 0immediately and remove it
(Y page 165).
X Do not restart the engine under any circumstances.
X Consult a qualified specialist workshop. The engine does not
start. The fuel tank of a vehicle with a diesel engine has been run com-
pletely dry.
X Refuel the vehicle with at least 5 litres of diesel.
X Turn the ignition on for approximately ten seconds
(Y page 165).
X Start the engine continuously for a maximum of ten seconds
until it runs smoothly.
If the engine does not start:
X Turn the ignition on again a maximum of ten seconds
(Y page 165).
X Start the engine again continuously for a maximum of ten sec-
onds until it runs smoothly.
If the engine does not start after three attempts:
X Consult a qualified specialist workshop. The fuel filler flap can-
not be opened. The fuel filler flap is not unlocked.
X Unlock the vehicle (Y page 87). The key battery is discharged or nearly discharged.
X Unlock the vehicle using the emergency key element
(Y page 89). The fuel filler flap is unlocked, but the opening mechanism is jam-
med.
X Consult a qualified specialist workshop. Refuelling
191Driving and parking Z