2015 MERCEDES-BENZ CLA SHOOTING BRAKE fold seats
[x] Cancel search: fold seatsPage 20 of 421
Side windows ................................. 101
Tailgate ............................................ 97
Reversing function
Roller sunblind ............................... 108
Reversing lamps
Display message ............................ 281
Roller sunblind
Panorama sliding sunroof .............. 107
Roof carrier ........................................ 324
Roof lining and carpets (cleaning
instructions) ...................................... 347
Roof load (maximum) ........................ 410S
Safety Children in the vehicle ..................... 59
Safety net
Attaching ....................................... 323
Important safety information ......... 323
Safety system
see Driving safety systems
Seat
Adjusting (Performance Seat) ........ 117
Folding the backrest (rear com-
partment) forwards/back .............. 320
Seat belt
Correct usage .................................. 46
Switching belt adjustment on/off
(on-board computer) ...................... 261
Seat belts
Adjusting the driver's and front-
passenger seat belt ......................... 47
Adjusting the height ......................... 46
Cleaning ......................................... 347
Display message ............................ 274
Fastening ......................................... 46
Important safety guidelines ............. 44
Introduction ..................................... 44
Rear seat belt status indicator ......... 48
Releasing ......................................... 47
Warning lamp ................................. 301
Warning lamp (function) ................... 47
Seats
Adjusting (electrically) ................... 115
Adjusting (manually) ...................... 114
Adjusting the 4-way lumbar sup-
port ................................................ 116 Adjusting the head restraint .......... 115
Cleaning the cover ......................... 346
Correct driver's seat position ........ 112
Important safety notes .................. 113
Seat heating problem .................... 118
Storing settings (memory func-
tion) ............................................... 122
Switching seat heating on/of f....... 117
Selector lever
Cleaning ......................................... 346
Sensors (cleaning instructions) ....... 344
Service
see ASSYST PLUS
Service Centre
see Qualified specialist workshop
Service menu (on-board com-
puter) .................................................. 257
Service message
see ASSYST PLUS
Service products
Brake fluid ..................................... 408
Coolant (engine) ............................ 408
Engine oil ....................................... 406
Fuel ................................................ 402
Important safety notes .................. 402
Washer fluid ................................... 409
Setting the air distribution ............... 151
Setting the airflow ............................ 151
Settings
Factory (on-board computer) ......... 262
On-board compute r....................... 258
SETUP (on-board computer) ............. 262
Shifting to neutral (manual trans-
mission) ............................................. 176
Side lamps
Switching on/of f........................... 128
Side windows
Convenience closing ...................... 103
Convenience opening .................... 102
Important safety notes .................. 101
Opening/closing ............................ 102
Problem (malfunction) ................... 105
Resetting ....................................... 104
Reversing feature ........................... 101
Sidebag ................................................ 50
Sliding sunroof
see Panorama sliding sunroof Index
17
Page 42 of 421
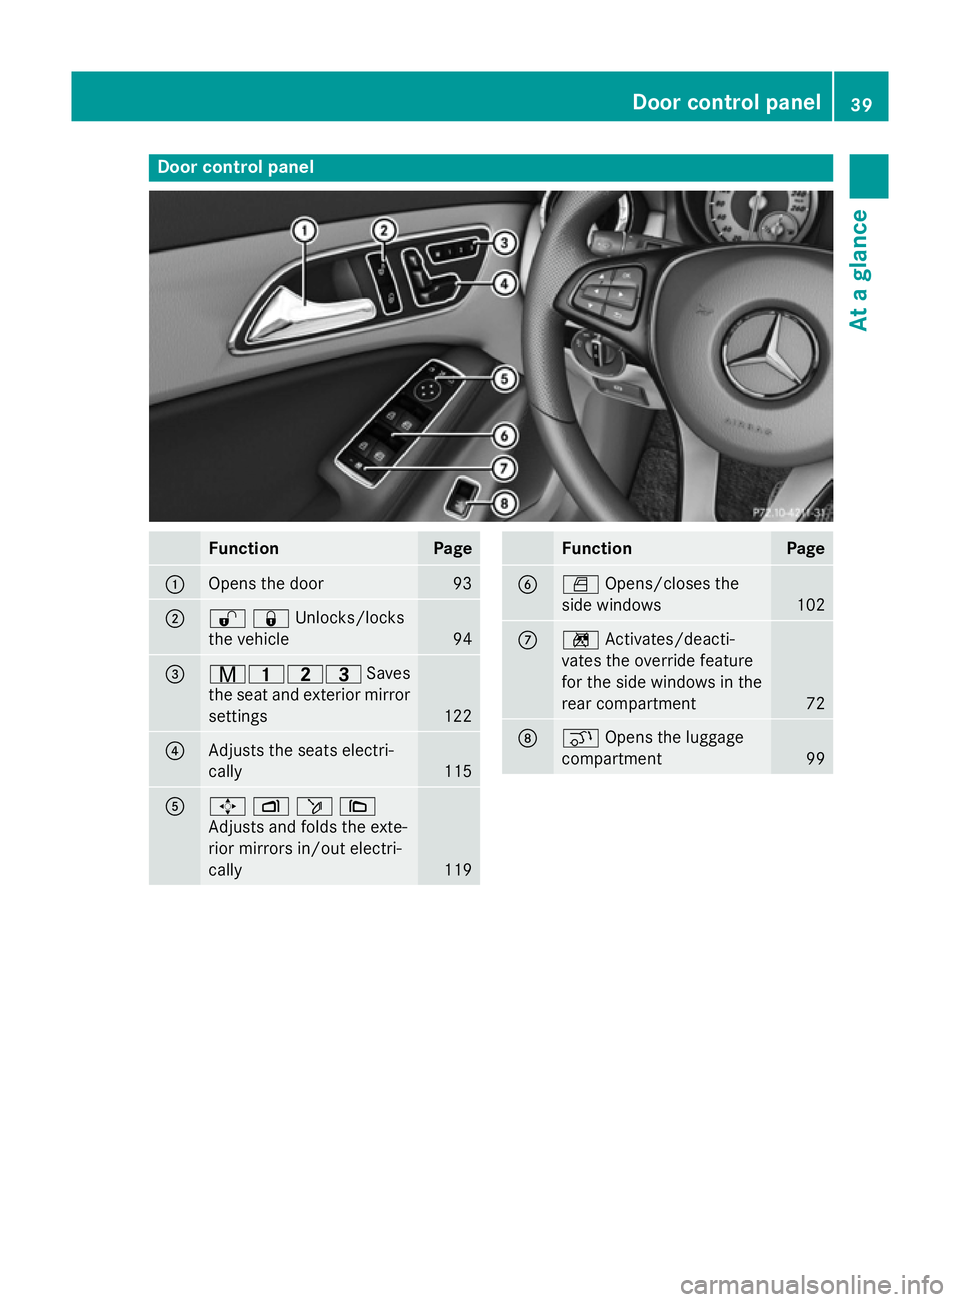
Door control panel
Function Page
:
Opens the door 93
;
%&Unlocks/locks
the vehicle
94
=
r45=
Saves
the seat and exterior mirror settings 122
?
Adjusts the seats electri-
cally
115
A
7
Zö\
Adjusts and folds the exte-
rior mirrors in/out electri-
cally 119 Function Page
B
W
Opens/closes the
side windows 102
C
n
Activates/deacti-
vates the override feature
for the side windows in the
rear compartment 72
D
q
Opens the luggage
compartment 99Door control panel
39At a glance
Page 65 of 421
!
When fitting the child restraint system,
make sure that the seat belt for the centre seat does not get trapped. Otherwise, the
seat belt could be damaged. :
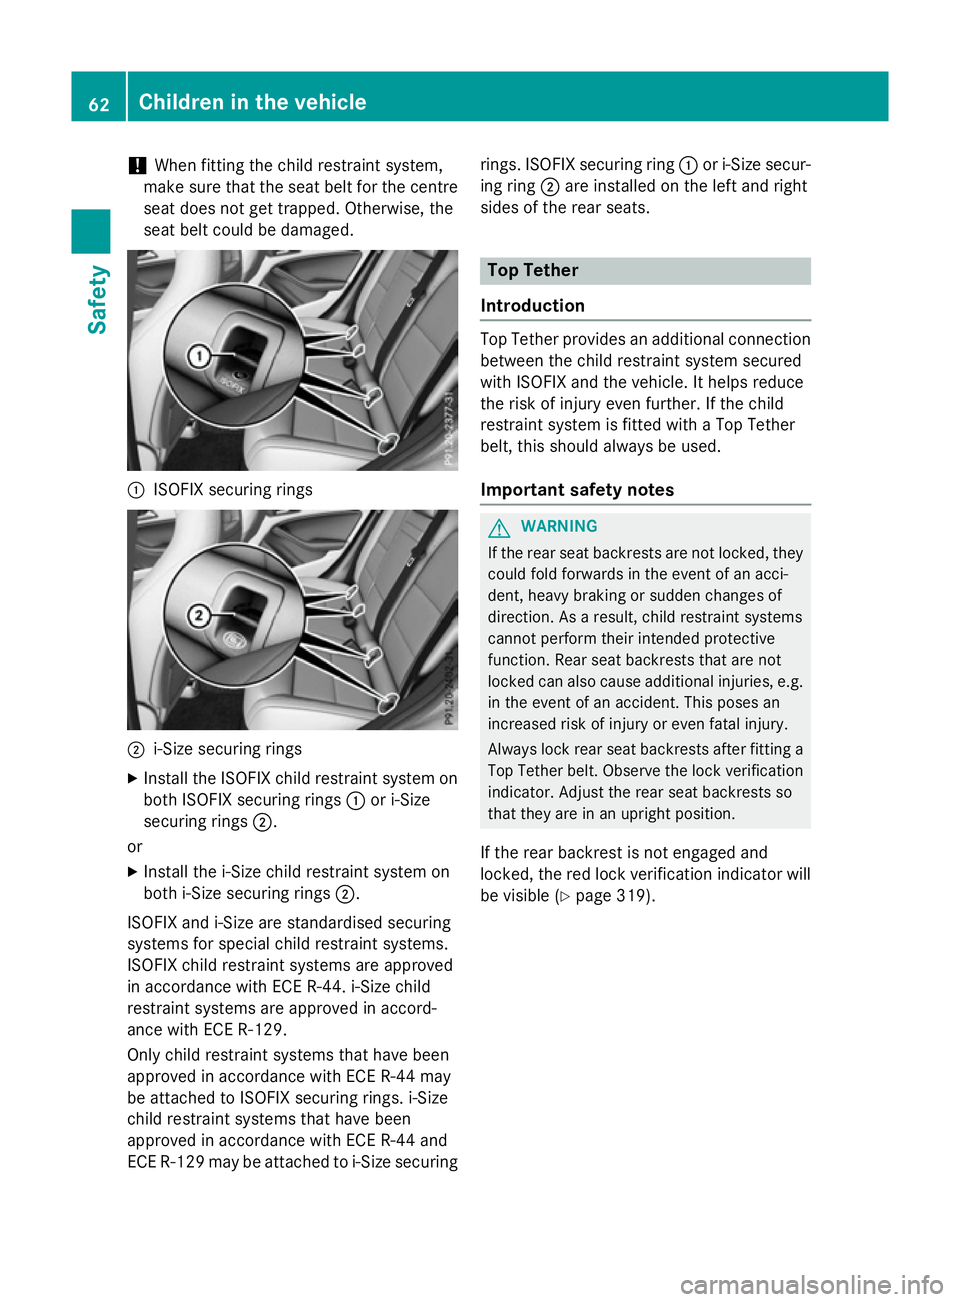
ISOFIX securing rings ;
i-Size securing rings
X Install the ISOFIX child restraint system on
both ISOFIX securing rings :or i-Size
securing rings ;.
or
X Install the i-Size child restraint system on
both i-Size securing rings ;.
ISOFIX and i-Size are standardised securing
systems for special child restraint systems.
ISOFIX child restraint systems are approved
in accordance with ECE R-44. i-Size child
restraint systems are approved in accord-
ance with ECE R-129.
Only child restraint systems that have been
approved in accordance with ECE R-44 may
be attached to ISOFIX securing rings. i-Size
child restraint systems that have been
approved in accordance with ECE R-44 and
ECE R-129 may be attached to i-Size securing rings. ISOFIX securing ring
:or i-Size secur-
ing ring ;are installed on the left and right
sides of the rear seats. Top Tether
Introduction Top Tether provides an additional connection
between the child restraint system secured
with ISOFIX and the vehicle. It helps reduce
the risk of injury even further. If the child
restraint system is fitted with a Top Tether
belt, this should always be used.
Important safety notes G
WARNING
If the rear seat backrests are not locked, they
could fold forwards in the event of an acci-
dent, heavy braking or sudden changes of
direction. As a result, child restraint systems
cannot perform their intended protective
function. Rear seat backrests that are not
locked can also cause additional injuries, e.g. in the event of an accident. This poses an
increased risk of injury or even fatal injury.
Always lock rear seat backrests after fitting a Top Tether belt. Observe the lock verificationindicator. Adjust the rear seat backrests so
that they are in an upright position.
If the rear backrest is not engaged and
locked, the red lock verification indicator will be visible (Y page 319).62
Children in the vehicleSafety
Page 117 of 421
The seats should only be occupied by
passengers, if possible.
R when the seat heating is in operation, do
not cover the seats with insulating mate-
rials, e.g. blankets, coats, bags, seat cov- ers, child seats or booster seats.
! Make sure that there are no objects in the
footwell under or behind the seats when
moving the seats back. There is a risk that
the seats and/or the objects could be dam- aged.
i Further related subjects:
R Luggage compartment enlargement
(folding down the rear seats)
(Y page 319) Adjusting the seats manually
Vehicles without the seating comfort
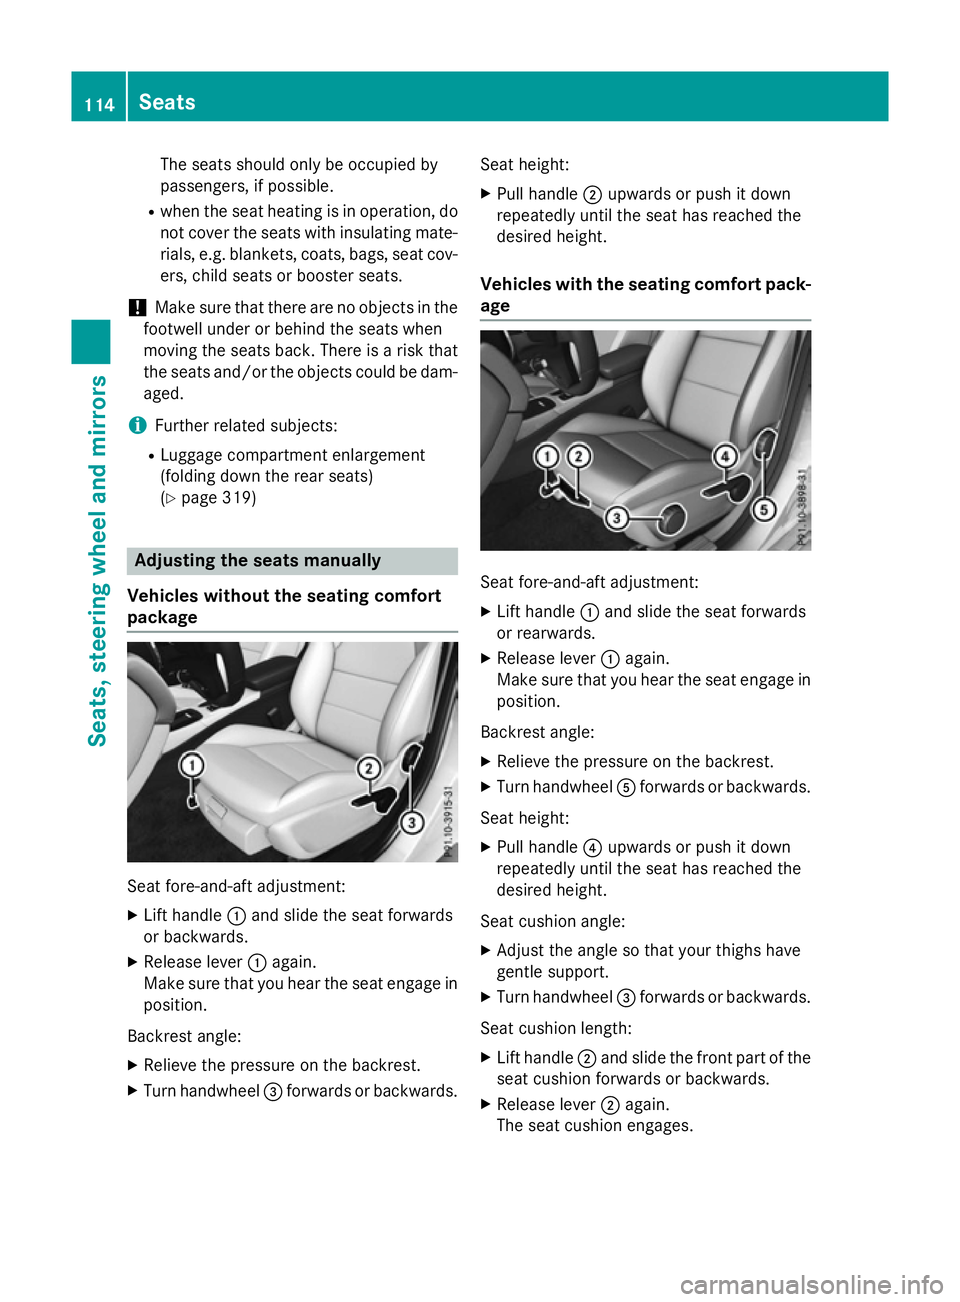
package Seat fore-and-aft adjustment:
X Lift handle :and slide the seat forwards
or backwards.
X Release lever :again.
Make sure that you hear the seat engage in
position.
Backrest angle:
X Relieve the pressure on the backrest.
X Turn handwheel =forwards or backwards. Seat height:
X Pull handle ;upwards or push it down
repeatedly until the seat has reached the
desired height.
Vehicles with the seating comfort pack-
age Seat fore-and-aft adjustment:
X Lift handle :and slide the seat forwards
or rearwards.
X Release lever :again.
Make sure that you hear the seat engage in
position.
Backrest angle: X Relieve the pressure on the backrest.
X Turn handwheel Aforwards or backwards.
Seat height: X Pull handle ?upwards or push it down
repeatedly until the seat has reached the
desired height.
Seat cushion angle:
X Adjust the angle so that your thighs have
gentle support.
X Turn handwheel =forwards or backwards.
Seat cushion length: X Lift handle ;and slide the front part of the
seat cushion forwards or backwards.
X Release lever ;again.
The seat cushion engages. 114
SeatsSeats, steering wheel and mirrors
Page 119 of 421
This function allows you to adjust the dis-
tance between the head restraint and the
back of the head.
X To move forwards: pull the head restraint
forwards in the direction of the arrow until
it engages.
There are a number of detents.
X To move backwards: press and hold
release button :and push the head
restraint backwards.
X When the head restraint is in the desired
position, release the button and make sure
that the head restraint is engaged in posi-
tion.
Rear seat head restraints Adjusting the rear seat head restraint
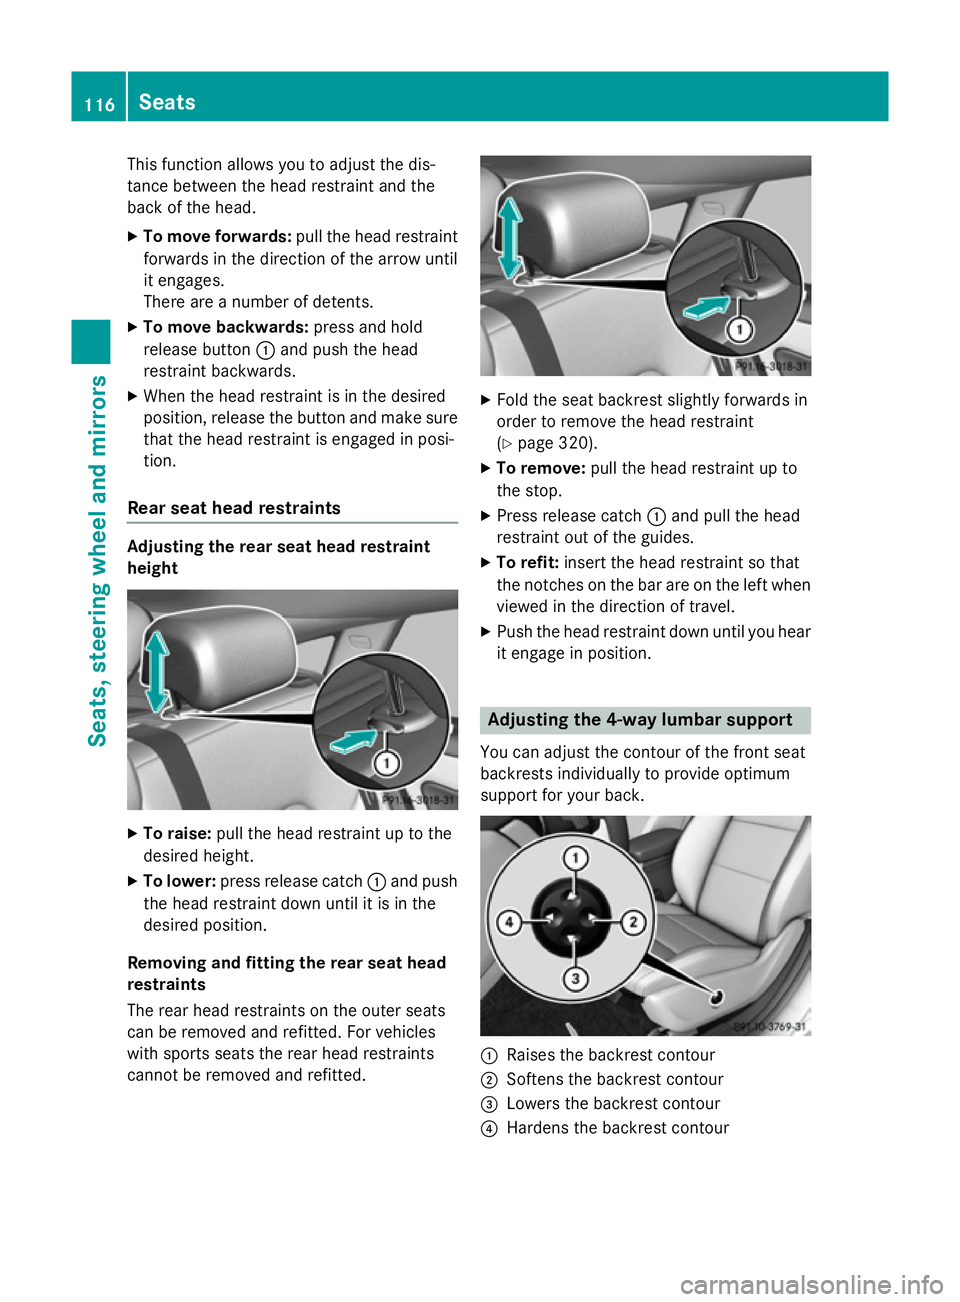
height X
To raise: pull the head restraint up to the
desired height.
X To lower: press release catch :and push
the head restraint down until it is in the
desired position.
Removing and fitting the rear seat head
restraints
The rear head restraints on the outer seats
can be removed and refitted. For vehicles
with sports seats the rear head restraints
cannot be removed and refitted. X
Fold the seat backrest slightly forwards in
order to remove the head restraint
(Y page 320).
X To remove: pull the head restraint up to
the stop.
X Press release catch :and pull the head
restraint out of the guides.
X To refit: insert the head restraint so that
the notches on the bar are on the left when viewed in the direction of travel.
X Push the head restraint down until you hear
it engage in position. Adjusting the 4-way lumbar support
You can adjust the contour of the front seat
backrests individually to provide optimum
support for your back. :
Raises the backrest contour
; Softens the backrest contour
= Lowers the backrest contour
? Hardens the backrest contour 116
SeatsSeats, steering wheel and mirrors
Page 123 of 421
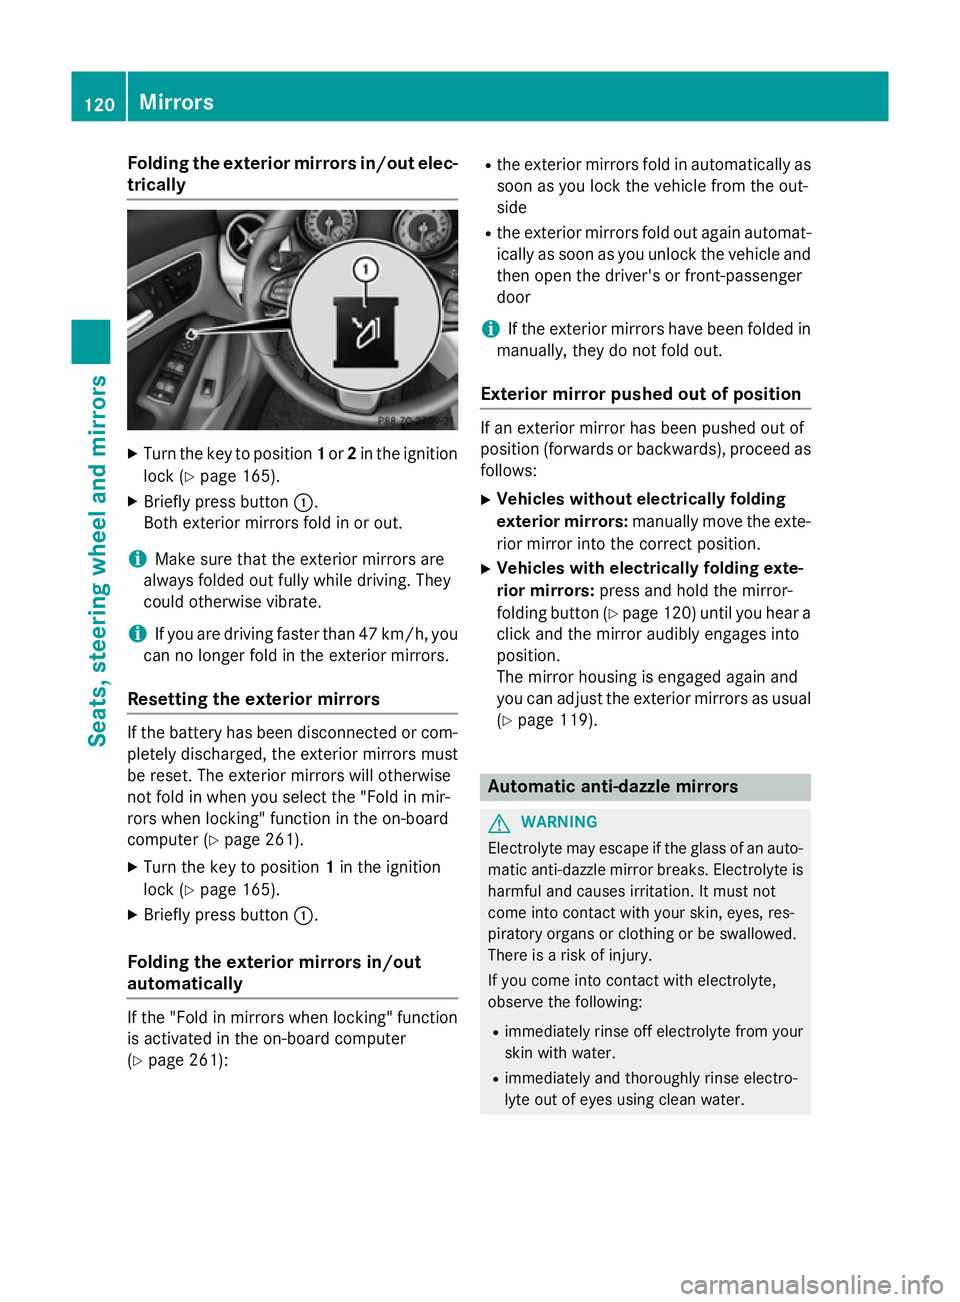
Folding the exterior mirrors in/out elec-
trically X
Turn the key to position 1or 2in the ignition
lock (Y page 165).
X Briefly press button :.
Both exterior mirrors fold in or out.
i Make sure that the exterior mirrors are
always folded out fully while driving. They
could otherwise vibrate.
i If you are driving faster than 47 km/h, you
can no longer fold in the exterior mirrors.
Resetting the exterior mirrors If the battery has been disconnected or com-
pletely discharged, the exterior mirrors must
be reset. The exterior mirrors will otherwise
not fold in when you select the "Fold in mir-
rors when locking" function in the on-board
computer (Y page 261).
X Turn the key to position 1in the ignition
lock (Y page 165).
X Briefly press button :.
Folding the exterior mirrors in/out
automatically If the "Fold in mirrors when locking" function
is activated in the on-board computer
(Y page 261): R
the exterior mirrors fold in automatically as
soon as you lock the vehicle from the out-
side
R the exterior mirrors fold out again automat-
ically as soon as you unlock the vehicle and
then open the driver's or front-passenger
door
i If the exterior mirrors have been folded in
manually, they do not fold out.
Exterior mirror pushed out of position If an exterior mirror has been pushed out of
position (forwards or backwards), proceed as
follows:
X Vehicles without electrically folding
exterior mirrors: manually move the exte-
rior mirror into the correct position.
X Vehicles with electrically folding exte-
rior mirrors: press and hold the mirror-
folding button (Y page 120) until you hear a
click and the mirror audibly engages into
position.
The mirror housing is engaged again and
you can adjust the exterior mirrors as usual
(Y page 119). Automatic anti-dazzle mirrors
G
WARNING
Electrolyte may escape if the glass of an auto- matic anti-dazzle mirror breaks. Electrolyte is
harmful and causes irritation. It must not
come into contact with your skin, eyes, res-
piratory organs or clothing or be swallowed.
There is a risk of injury.
If you come into contact with electrolyte,
observe the following:
R immediately rinse off electrolyte from your
skin with water.
R immediately and thoroughly rinse electro-
lyte out of eyes using clean water. 120
MirrorsSeats, steering wheel and
mirrors