2015 MERCEDES-BENZ CLA SHOOTING BRAKE key
[x] Cancel search: keyPage 272 of 421
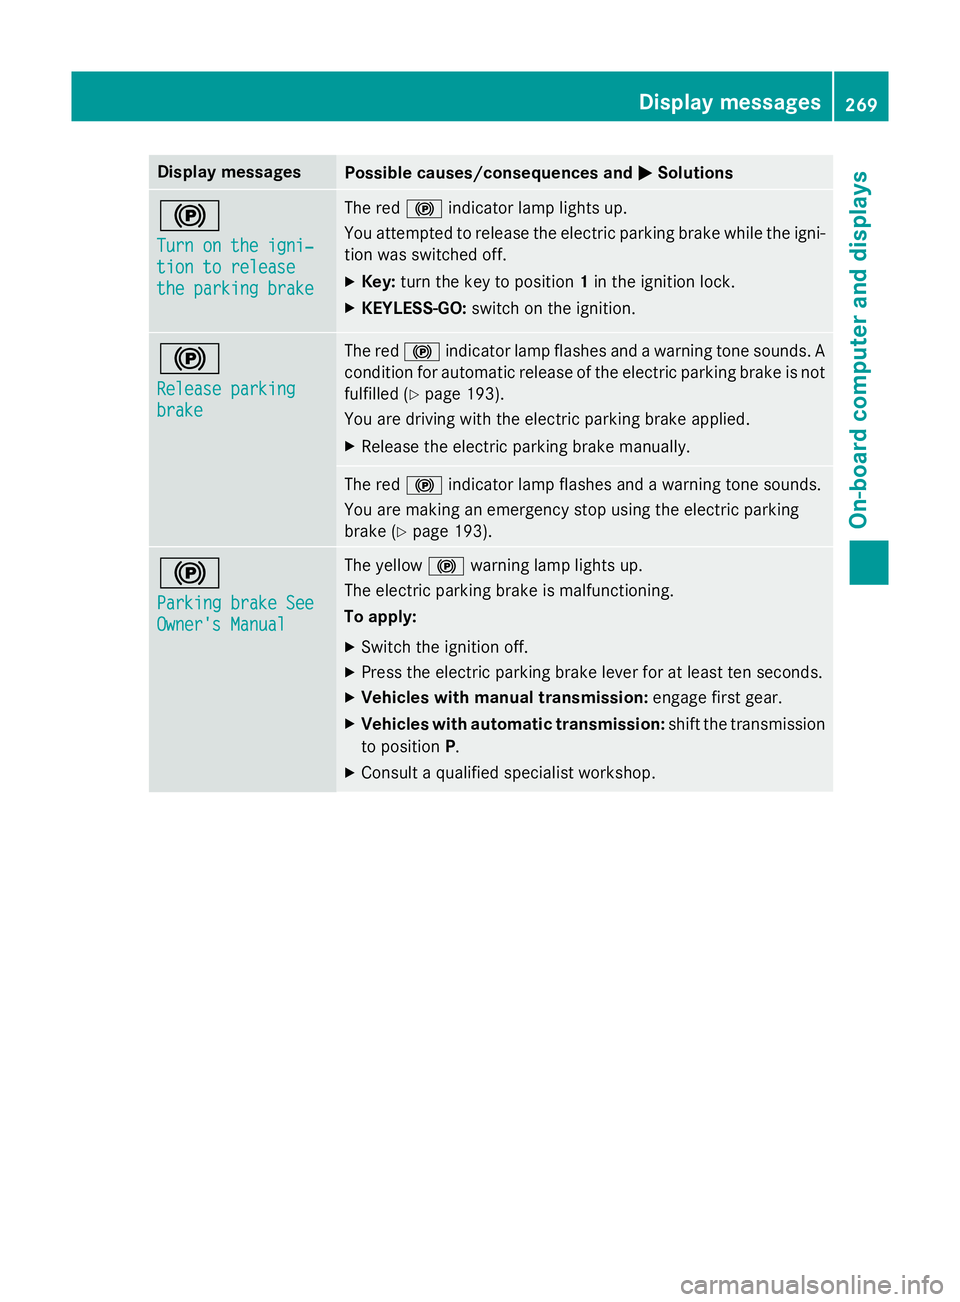
Display messages
Possible causes/consequences and
M
MSolutions !
Turn on the igni‐ Turn on the igni‐
tion to release tion to release
the parking brake the parking brake The red
!indicator lamp lights up.
You attempted to release the electric parking brake while the igni-
tion was switched off.
X Key: turn the key to position 1in the ignition lock.
X KEYLESS-GO: switch on the ignition. !
Release parking Release parking
brake brake The red
!indicator lamp flashes and a warning tone sounds. A
condition for automatic release of the electric parking brake is not
fulfilled (Y page 193).
You are driving with the electric parking brake applied.
X Release the electric parking brake manually. The red
!indicator lamp flashes and a warning tone sounds.
You are making an emergency stop using the electric parking
brake (Y page 193). !
Parking brake See Parking brake See
Owner's Manual Owner's Manual The yellow
!warning lamp lights up.
The electric parking brake is malfunctioning.
To apply:
X Switch the ignition off.
X Press the electric parking brake lever for at least ten seconds.
X Vehicles with manual transmission: engage first gear.
X Vehicles with automatic transmission: shift the transmission
to position P.
X Consult a qualified specialist workshop. Display
messages
269On-board computer and displays Z
Page 302 of 421
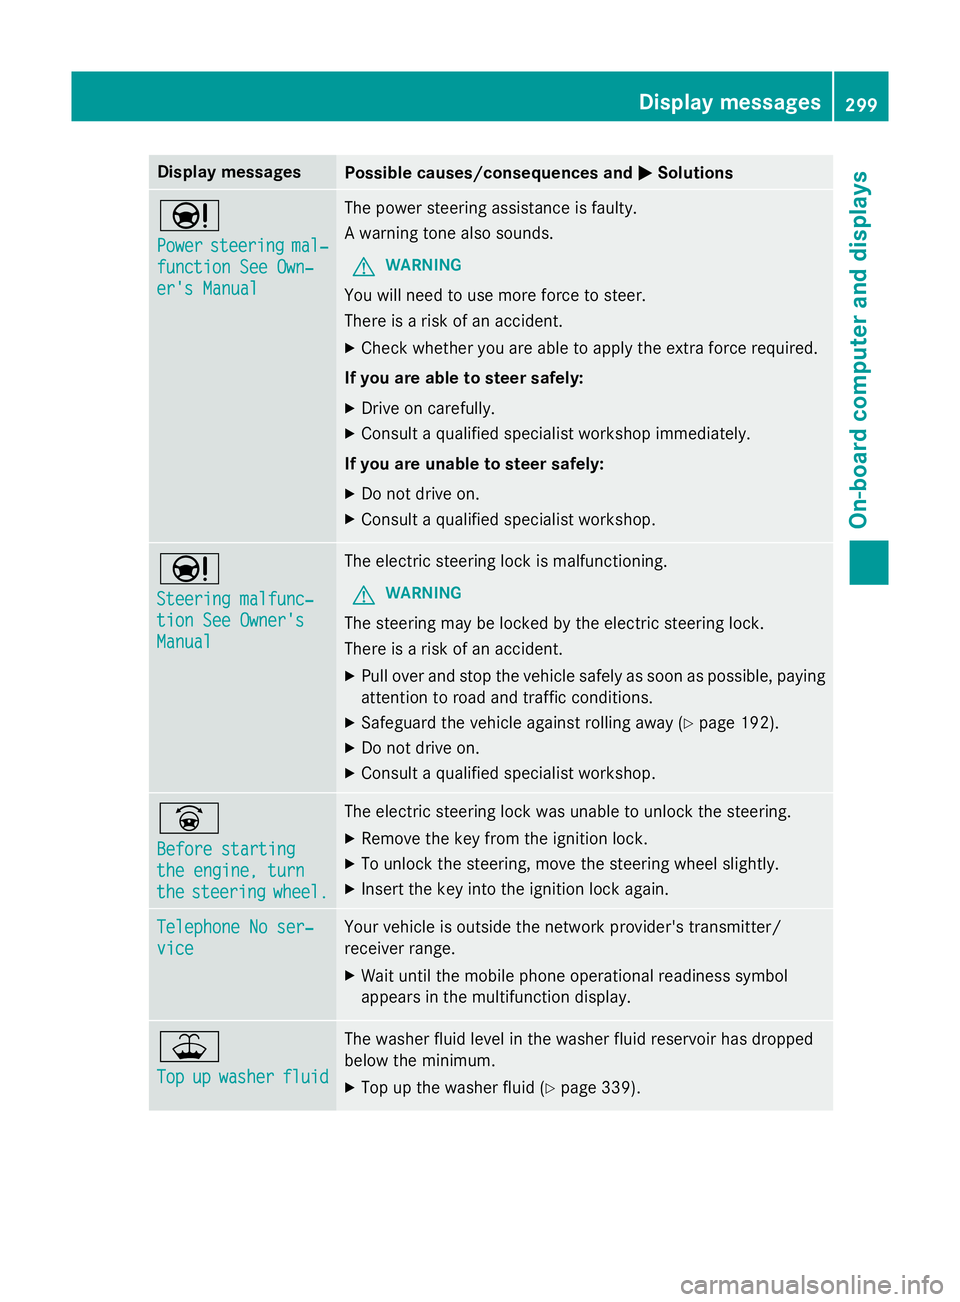
Display messages
Possible causes/consequences and
M
MSolutions Ð
Power Power
steering
steering mal‐
mal‐
function See Own‐
function See Own‐
er's Manual er's Manual The power steering assistance is faulty.
A warning tone also sounds.
G WARNING
You will need to use more force to steer.
There is a risk of an accident. X Check whether you are able to apply the extra force required.
If you are able to steer safely: X Drive on carefully.
X Consult a qualified specialist workshop immediately.
If you are unable to steer safely:
X Do not drive on.
X Consult a qualified specialist workshop. Ð
Steering malfunc‐ Steering malfunc‐
tion See Owner's tion See Owner's
Manual Manual The electric steering lock is malfunctioning.
G WARNING
The steering may be locked by the electric steering lock.
There is a risk of an accident. X Pull over and stop the vehicle safely as soon as possible, paying
attention to road and traffic conditions.
X Safeguard the vehicle against rolling away (Y page 192).
X Do not drive on.
X Consult a qualified specialist workshop. _
Before starting Before starting
the engine, turn the engine, turn
the the
steering
steering wheel.
wheel. The electric steering lock was unable to unlock the steering.
X Remove the key from the ignition lock.
X To unlock the steering, move the steering wheel slightly.
X Insert the key into the ignition lock again. Telephone No ser‐
Telephone No ser‐
vice vice Your vehicle is outside the network provider's transmitter/
receiver range.
X Wait until the mobile phone operational readiness symbol
appears in the multifunction display. ¥
Top Top
up
upwasher
washer fluid
fluid The washer fluid level in the washer fluid reservoir has dropped
below the minimum.
X Top up the washer fluid (Y page 339). Display
messages
299On-board computer and displays Z
Page 303 of 421
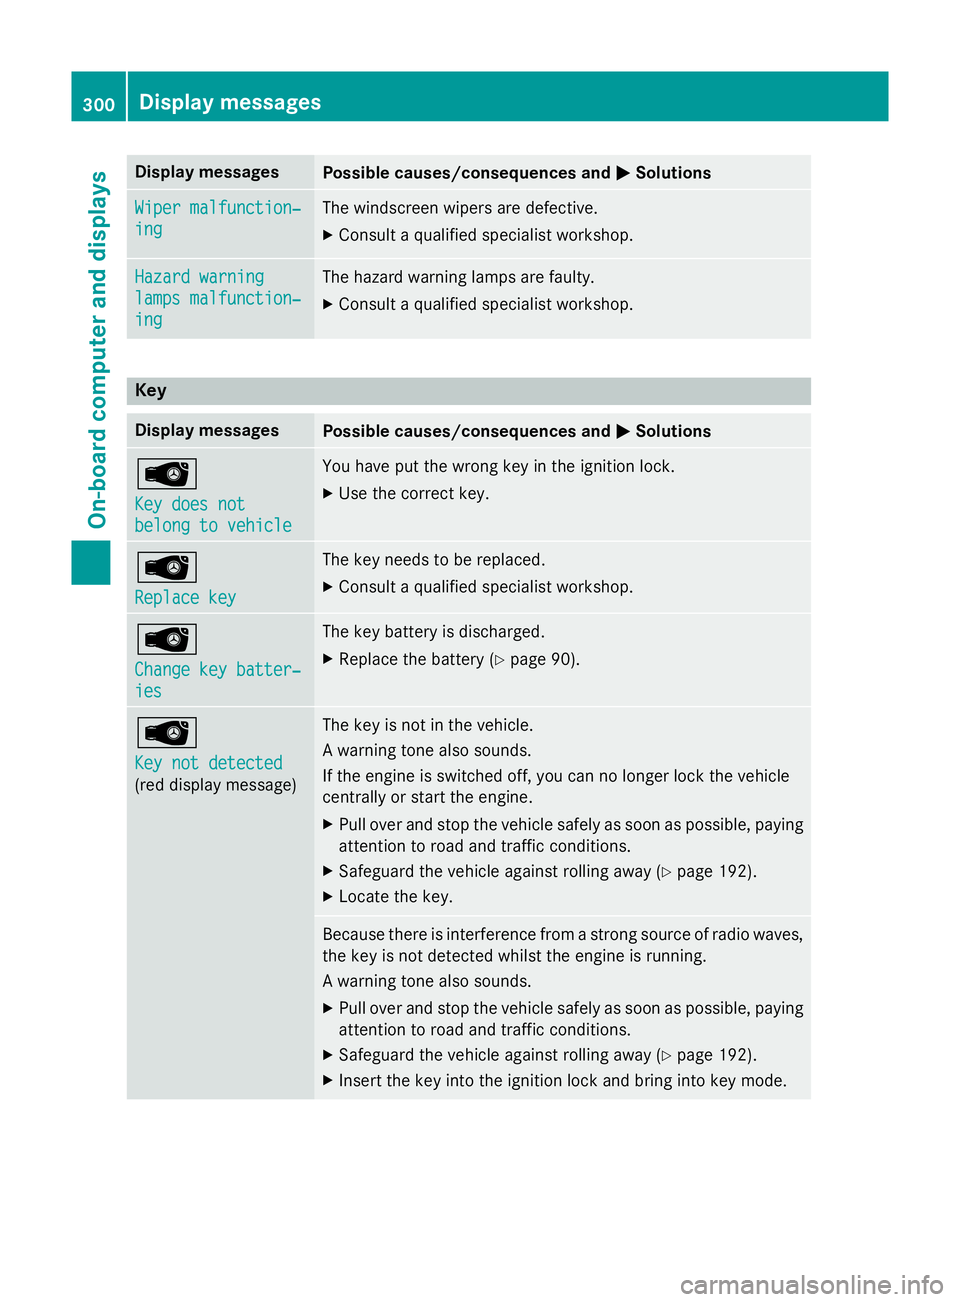
Display messages
Possible causes/consequences and
M
MSolutions Wiper malfunction‐
Wiper malfunction‐
ing ing The windscreen wipers are defective.
X Consult a qualified specialist workshop. Hazard warning
Hazard warning
lamps malfunction‐ lamps malfunction‐
ing ing The hazard warning lamps are faulty.
X Consult a qualified specialist workshop. Key
Display messages
Possible causes/consequences and
M
MSolutions Â
Key does not Key does not
belong to vehicle belong to vehicle You have put the wrong key in the ignition lock.
X Use the correct key. Â
Replace key Replace key The key needs to be replaced.
X Consult a qualified specialist workshop. Â
Change key batter‐ Change key batter‐
ies ies The key battery is discharged.
X Replace the battery (Y page 90).Â
Key not detected Key not detected
(red display message) The key is not in the vehicle.
A warning tone also sounds.
If the engine is switched off, you can no longer lock the vehicle
centrally or start the engine.
X Pull over and stop the vehicle safely as soon as possible, paying
attention to road and traffic conditions.
X Safeguard the vehicle against rolling away (Y page 192).
X Locate the key. Because there is interference from a strong source of radio waves,
the key is not detected whilst the engine is running.
A warning tone also sounds.
X Pull over and stop the vehicle safely as soon as possible, paying
attention to road and traffic conditions.
X Safeguard the vehicle against rolling away (Y page 192).
X Insert the key into the ignition lock and bring into key mode. 300
Display
messagesOn-board computer and displays
Page 304 of 421

Display messages
Possible causes/consequences and
M
MSolutions Â
Key not detected Key not detected
(white display mes-
sage) The key is currently undetected.
X Change the location of the key in the vehicle.
If the key still cannot be detected: X Operate the vehicle with the key in the ignition lock if necessary. Â
Remove starting Remove starting
button, then button, then
insert key insert key The key is continually undetected.
KEYLESS-GO is temporarily malfunctioning or is defective. A warn-
ing tone also sounds.
X Insert the key into the ignition lock and turn it to the desired
position.
X Consult a qualified specialist workshop. Warning and indicator lamps in the instrument cluster
General notes
Some systems perform a self test when the ignition is switched on. Some warning and indicator
lamps may temporarily switch on or flash during the test. This behaviour is nothing to be
concerned about.
The warning and indicator lamps will alert you to a malfunction if they switch on or flash after the engine is started or while driving. Safety
Seat belts Problem
Possible causes/consequences and
M MSolutions ü
Only for certain coun-
tries: the red seat belt
warning lamp lights up
for 6 seconds after the
engine starts.
The seat belt warning lamp reminds the driver and front passenger
to fasten their seat belts.
X Fasten your seat belt (Y page 46).ü
Only for certain coun-
tries: the red seat belt
warning lamp lights up
after the engine starts.
In addition, a warning
tone sounds for up to
6 seconds.
The driver's seat belt is not fastened.
X Fasten your seat belt (Y page 46).
The warning tone ceases. Wa
rning and indi cator lamps in the instrument cluster
301On-board computer and displays Z
Page 327 of 421

Stowage well under the luggage com-
partment floor
Important safety notes G
WARNING
If you drive when the luggage compartment
floor is open, objects could be flung around,
thus striking vehicle occupants. There is a risk of injury, especially when braking or abruptly
changing directions.
Always close the luggage compartment floor
before a journey.
! The maximum load capacity of the stow-
age well under the luggage compartment
floor is 25 kg.
There is a stowage area for TIREFIT, the vehi-
cle tool kit, a folding box, etc. underneath the luggage compartment floor.
Opening/closing the luggage compart-
ment floor X
To open: open the tailgate.
X Holding ribbing ;, press handle :down-
wards.
Handle :folds upwards.
X Swing the luggage compartment floor
upwards using handle :until it rests
against the luggage compartment cover. X
Fold out hook =on the underside of the
luggage compartment floor. X
Attach hook =to the luggage compart-
ment's upper seal ?.
X To close: detach hook =from upper
seal ?.
X Fasten hook =to the bracket on the
underside of the luggage compartment
floor.
X Fold the luggage compartment floor down.
X Press the luggage compartment floor down
until it engages.
Depending on the vehicle equipment, the lug- gage compartment floor can be locked and
unlocked with the emergency key element. Roof carrier
Important safety notes G
WARNING
When a load is transported on the roof, the
vehicle's centre of gravity rises and the han- 324
Stowage areasStowing and features
Page 331 of 421
Cigarette lighter
G
WARNING
You can burn yourself if you touch the hot
heating element or the socket of the cigarette lighter.
In addition, flammable materials can ignite if:
R the hot cigarette lighter falls
R a child holds the hot cigarette lighter to
objects, for example
There is a risk of fire and injury.
Always hold the cigarette lighter by the knob.
Always make sure that the cigarette lighter is
out of reach of children. Never leave children unattended in the vehicle.
Your attention must always be focused on the traffic conditions. Only use the cigarette
lighter when road and traffic conditions per-
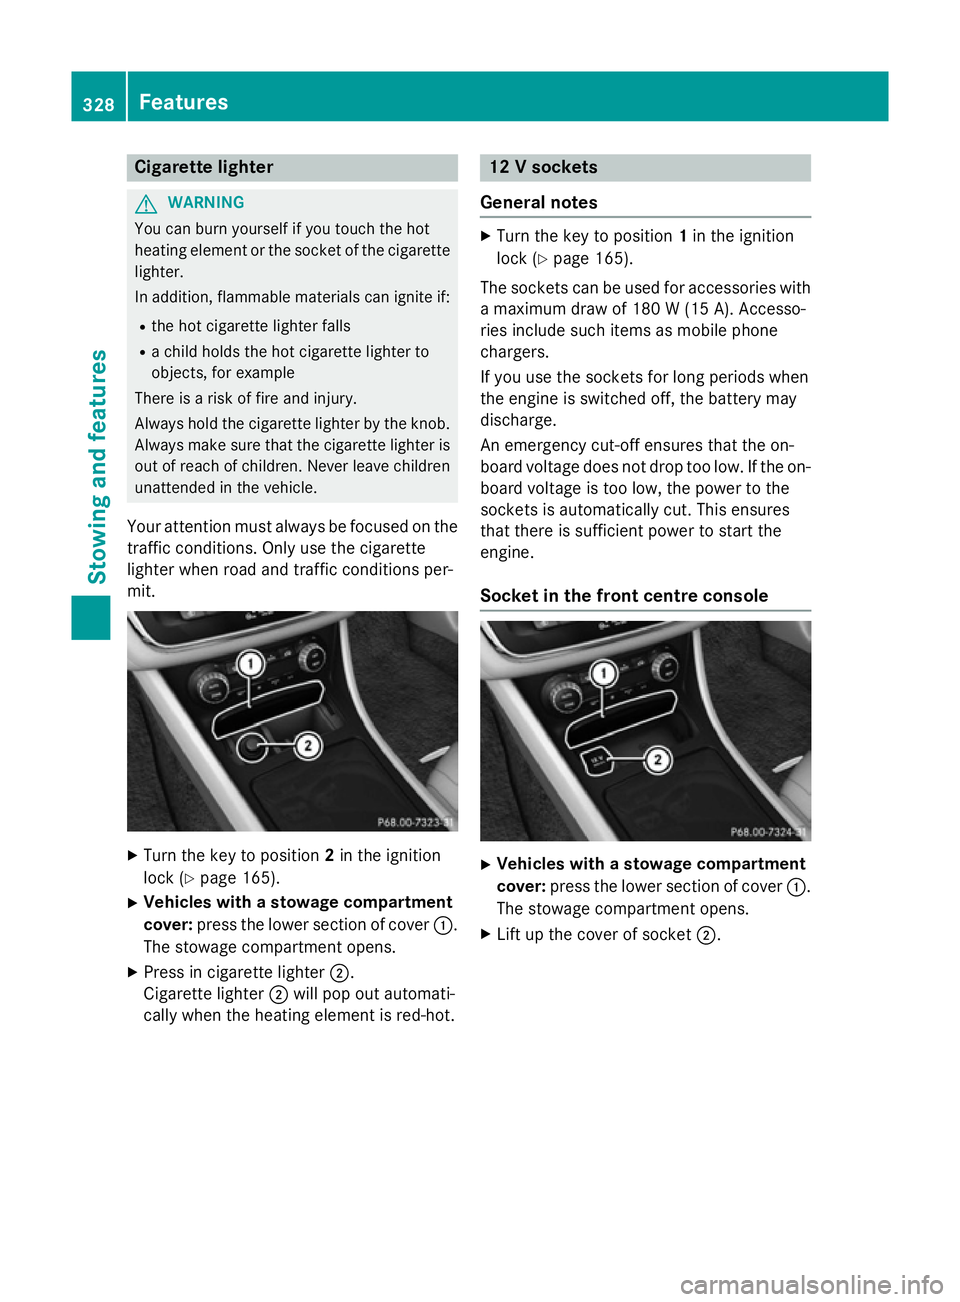
mit. X
Turn the key to position 2in the ignition
lock (Y page 165).
X Vehicles with a stowage compartment
cover: press the lower section of cover :.
The stowage compartment opens.
X Press in cigarette lighter ;.
Cigarette lighter ;will pop out automati-
cally when the heating element is red-hot. 12 V sockets
General notes X
Turn the key to position 1in the ignition
lock (Y page 165).
The sockets can be used for accessories with a maximum draw of 180 W (15A). Accesso-
ries include such items as mobile phone
chargers.
If you use the sockets for long periods when
the engine is switched off, the battery may
discharge.
An emergency cut-off ensures that the on-
board voltage does not drop too low. If the on-
board voltage is too low, the power to the
sockets is automatically cut. This ensures
that there is sufficient power to start the
engine.
Socket in the front cent re console X
Vehicles with a stowage compartment
cover: press the lower section of cover :.
The stowage compartment opens.
X Lift up the cover of socket ;.328
FeaturesSto
wing an d features
Page 334 of 421
phone functions via the on-board computer
(Y page 254).
When you remove the key from the ignition
lock, the mobile phone is disconnected from
the vehicle. You can then no longer make calls using the hands-free system.
If a call is active and you remove the key from the ignition lock, the conversation is trans-
ferred over to the mobile phone. It is then
possible to continue the conversation on the
mobile phone.
Mobile phone bracket in the stowage
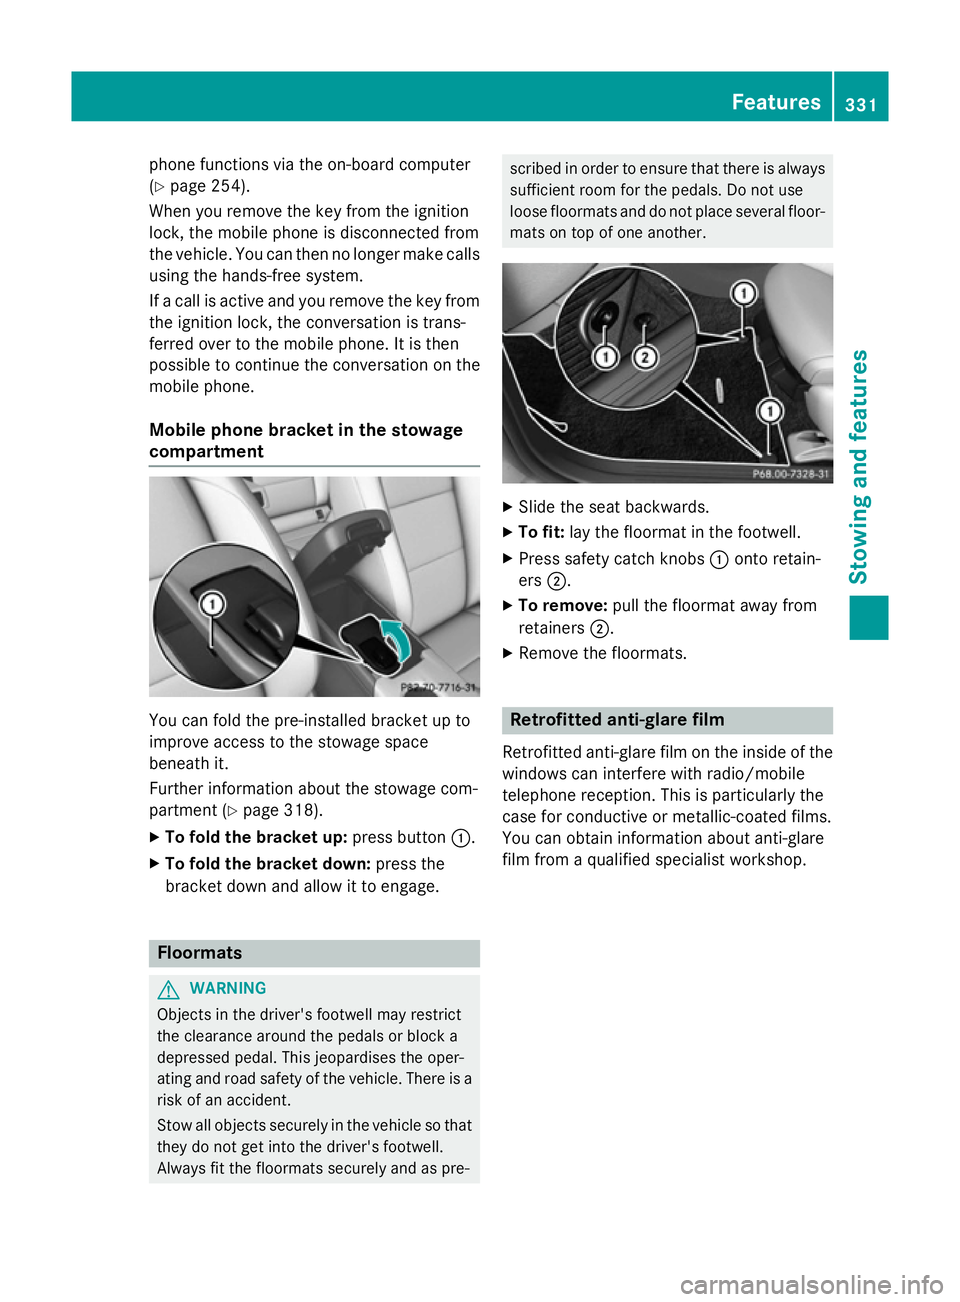
compartment You can fold the pre-installed bracket up to
improve access to the stowage space
beneath it.
Further information about the stowage com-
partment (Y page 318).
X To fold the bracket up: press button:.
X To fold the bracket down: press the
bracket down and allow it to engage. Floormats
G
WARNING
Objects in the driver's footwell may restrict
the clearance around the pedals or block a
depressed pedal. This jeopardises the oper-
ating and road safety of the vehicle. There is a risk of an accident.
Stow all objects securely in the vehicle so that
they do not get into the driver's footwell.
Always fit the floormats securely and as pre- scribed in order to ensure that there is always
sufficient room for the pedals. Do not use
loose floormats and do not place several floor-mats on top of one another. X
Slide the seat backwards.
X To fit: lay the floormat in the footwell.
X Press safety catch knobs :onto retain-
ers ;.
X To remove: pull the floormat away from
retainers ;.
X Remove the floormats. Retrofitted anti-glare film
Retrofitted anti-glare film on the inside of the
windows can interfere with radio/mobile
telephone reception. This is particularly the
case for conductive or metallic-coated films.
You can obtain information about anti-glare
film from a qualified specialist workshop. Features
331Stowing and features Z
Page 341 of 421
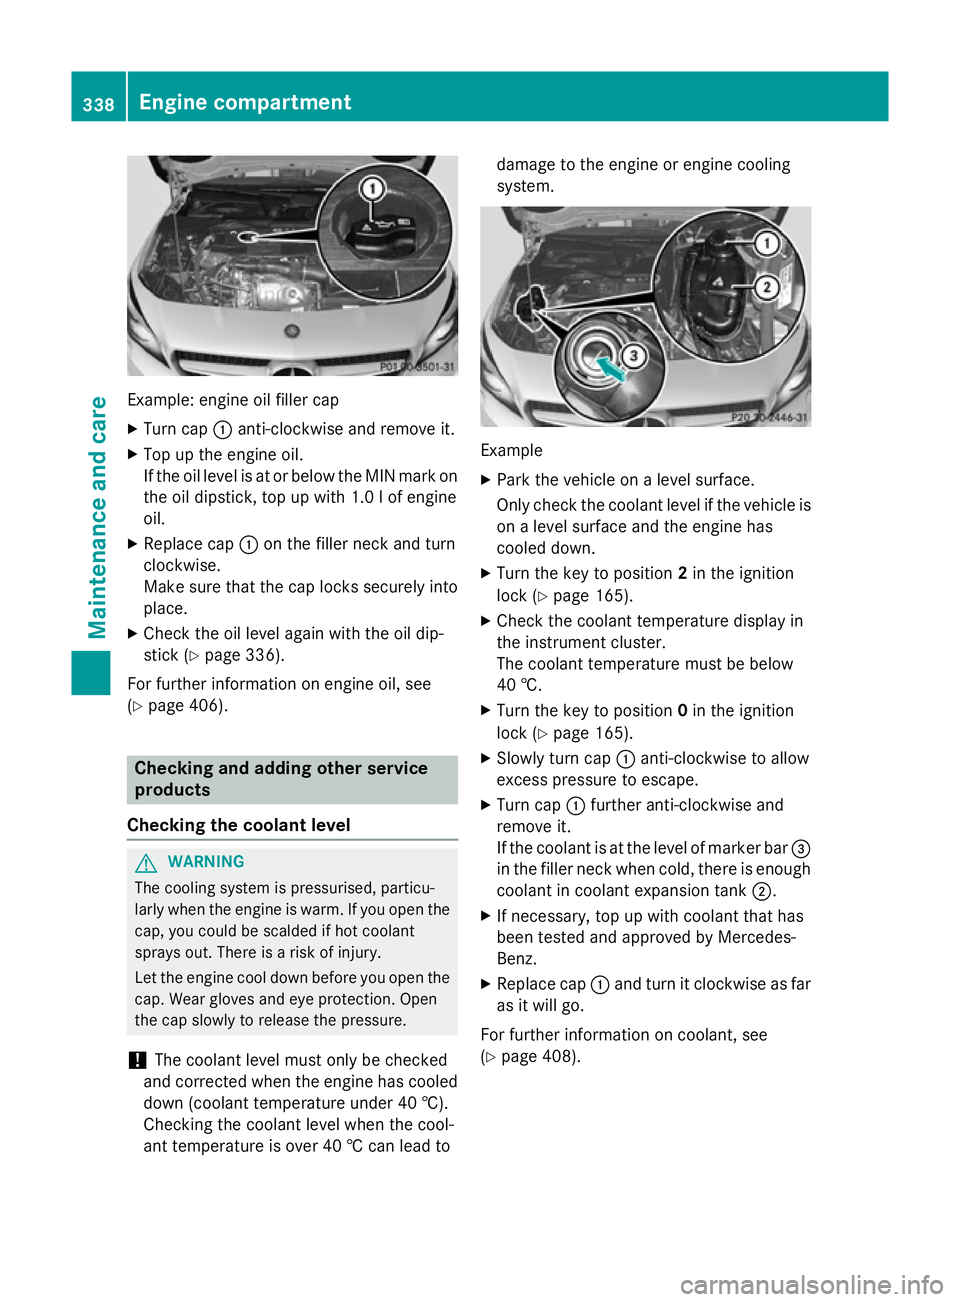
Example: engine oil filler cap
X Turn cap :anti-clockwise and remove it.
X Top up the engine oil.
If the oil level is at or below the MIN mark on
the oil dipstick, top up with 1.0 lof engine
oil.
X Replace cap :on the filler neck and turn
clockwise.
Make sure that the cap locks securely into place.
X Check the oil level again with the oil dip-
stick (Y page 336).
For further information on engine oil, see
(Y page 406). Checking and adding other service
products
Checking the coolant level G
WARNING
The cooling system is pressurised, particu-
larly when the engine is warm. If you open the cap, you could be scalded if hot coolant
sprays out. There is a risk of injury.
Let the engine cool down before you open the
cap. Wear gloves and eye protection. Open
the cap slowly to release the pressure.
! The coolant level must only be checked
and corrected when the engine has cooled
down (coolant temperature under 40 †).
Checking the coolant level when the cool-
ant temperature is over 40 † can lead to damage to the engine or engine cooling
system.
Example
X Park the vehicle on a level surface.
Only check the coolant level if the vehicle is
on a level surface and the engine has
cooled down.
X Turn the key to position 2in the ignition
lock (Y page 165).
X Check the coolant temperature display in
the instrument cluster.
The coolant temperature must be below
40 †.
X Turn the key to position 0in the ignition
lock (Y page 165).
X Slowly turn cap :anti-clockwise to allow
excess pressure to escape.
X Turn cap :further anti-clockwise and
remove it.
If the coolant is at the level of marker bar =
in the filler neck when cold, there is enough coolant in coolant expansion tank ;.
X If necessary, top up with coolant that has
been tested and approved by Mercedes-
Benz.
X Replace cap :and turn it clockwise as far
as it will go.
For further information on coolant, see
(Y page 408). 338
Engine compartmentMaintenance and care