2015 MERCEDES-BENZ B-CLASS SPORTS change time
[x] Cancel search: change timePage 167 of 346
Rthe driver's door must be closed when you
shift from Pto Dor your seat belt must be
fastened.
R the front-passenger door and rear doors
must be closed.
Arming X Briefly pull the cruise control lever towards
you ?, up :or down A.
DISTRONIC PLUS is selected.
X Keep the cruise control lever pressed up :
or down Auntil the desired speed is set.
X Remove your foot from the accelerator
pedal.
Your vehicle adapts its speed to that of the
vehicle in front, but only up to the desired
stored speed.
iIf you do not fully release the accelerator
pedal, the
DISTRONICPLUSPassivemes-
sage appears in the multifunction display.
The set distance to a slower-moving vehicle in front will then not be maintained. You will
be driving at the speed you determine by
the position of the accelerator pedal.
You can also activate DISTRONIC PLUS when
stationary. The lowest speed that can be set is
30 km/h.
Driving with DISTRONIC PLUS
Pulling away and driving
The vehicle can also pull away when it is
facing an unidentified obstacle or is driving on
a different line from another vehicle. The vehi- cle then brakes automatically. Be ready to
brake at all times.
If you depress the brake, DISTRONIC PLUS is
deactivated unless your vehicle is stationary. X
If you want to pull away with
DISTRONIC PLUS: remove your foot from
the brake pedal.
X Briefly pull the cruise control lever (Y page 164) towards you ?.
or
X Accelerate briefly.
Your vehicle pulls away and adapts its
speed to that of the vehicle in front.
If no vehicle is detected in front, your vehi-
cle accelerates to the set speed.
If there is no vehicle in front, DISTRONIC
PLUS operates in the same way as cruise
control.
If DISTRONIC PLUS detects that the vehicle in front has slowed down, it brakes your vehicle.
In this way, the distance you have selected is
maintained.
If DISTRONIC PLUS detects a faster-moving
vehicle in front, it increases the driving speed. The vehicle is only accelerated up to the
speed you have stored.
Selecting the drive program
DISTRONIC Plus supports a sporty driving
style when you have selected the Sor Mdriv-
ing program ( Ypage 147). Acceleration
behind the vehicle in front or to the set speed is then noticeably more dynamic. If you have
selected the E(AMG vehicles: C) drive pro-
gram, the vehicle accelerates more gently.
This setting is recommended in stop-and-
start traffic.
Changing lanes
If you change to the passing lane, DISTRONIC PLUS supports you when: R you are driving faster than 70 km/h
R DISTRONIC PLUS is maintaining the dis-
tance to a vehicle in front
R you switch on the appropriate turn signal
R DISTRONIC PLUS does not detect a danger
of collision
If these conditions are fulfilled, your vehicle is
accelerated. Acceleration will be interrupted
Driving systems165
Driving an d parking
Z
Page 180 of 346
Otherwise Active Parking Assist will be can-
celed.
Active Parking Assist brakes the vehicle to a standstill when the vehicle approaches
the rear border of the parking space.
Maneuvering may be required in tight park- ing spaces.
The
Park Assist Active Select D
ObserveSurroundingsmessage appears in
the multifunction display. X Shift the transmission to position Dwhile
the vehicle is stationary.
Active Parking Assist immediately steers in
the other direction. The
Park Assist Active Accelerate
and BrakeObserve Surroundingsmes-
sage appears in the multifunction display.
iYou will achieve the best results by wait-
ing for the steering procedure to complete before pulling away.
X Drive forwards and be ready to brake at all
times.
Active Parking Assist brakes the vehicle to a standstill when the vehicle approaches
the front border of the parking space.
Maneuvering may be required in tight park-
ing spaces.
The
Park Assist Active Select R
ObserveSurroundingsmessage appears in
the multifunction display.
As soon as the parking procedure is com-
plete, the
ParkAssistSwitchedOffmes-
sage appears and a warning tone sounds. The vehicle is now parked.
The vehicle is kept stationary without the
driver having to depress the brake pedal. The
braking effect is canceled when you depress
the accelerator pedal.
Active Parking Assist no longer supports you
with steering interventions and brake appli-
cations. When Active Parking Assist is fin-
ished, you must steer and brake again your-
self. PARKTRONIC is still available. Parking tips:
R The way your vehicle is positioned in the
parking space after parking is dependent
on various factors. These include the posi-
tion and shape of the vehicles parked in
front and behind it and the conditions of the
location. It may be the case that Active
Parking Assist guides you too far into a
parking space, or not far enough into it. In
some cases, it may also lead you across or
onto the curb. If necessary, you should can- cel the parking procedure with Active Park-ing Assist.
R You can also select preselect transmission
position D. The vehicle redirects and does
not drive as far into the parking space.
Should the transmission change take place too early, the parking procedure will be
canceled. A sensible parking position can
no longer be achieved from this position.
Exiting a parking space
In order that Active Parking Assist can sup-
port you when you exit the parking space:
R you need to have parked using Active Park-
ing Assist.
R the border of the parking space must be
high enough at the front and the rear. A
curb is too small, for example.
R the border of the parking space must not be
too wide, as the position of the vehicle must
not exceed an angle of 45° to the starting
position as it is maneuvering into the park- ing space.
R a maneuvering distance of at least 3.3 ft
(1.0 m) must be available.
Active Parking Assist can only assist you with
exiting a parking space if you have parked the vehicle parallel to the direction of travel using
Active Parking Assist.
iIf PARKTRONIC detects obstacles, Active
Parking Assist brakes automatically whilst
the vehicle exits the parking space. You are
responsible for braking in good time.
178Driving systems
Driving and parking
Page 186 of 346
The functionality of ATTENTION ASSIST is
restricted and warnings may be delayed or
not occur at all:
R if the length of the journey is less than
approximately 30 minutes
R if the road condition is poor, e.g. if the sur-
face is uneven or if there are potholes
R if there is a strong side wind
R if you have adopted a sporty driving style
with high cornering speeds or high rates of
acceleration
R if you are predominantly driving slower
than 37 mph (60 km/h) or faster than
125 mph (200 km/h)
R if the time has been set incorrectly
R in active driving situations, such as when
you change lanes or change your speed
ATTENTION ASSIST is reset when you con-
tinue your journey and starts assessing your
tiredness again if:
R you switch off the engine
R you take off your seat belt and open the
driver's door, e.g. for a change of drivers or
to take a break
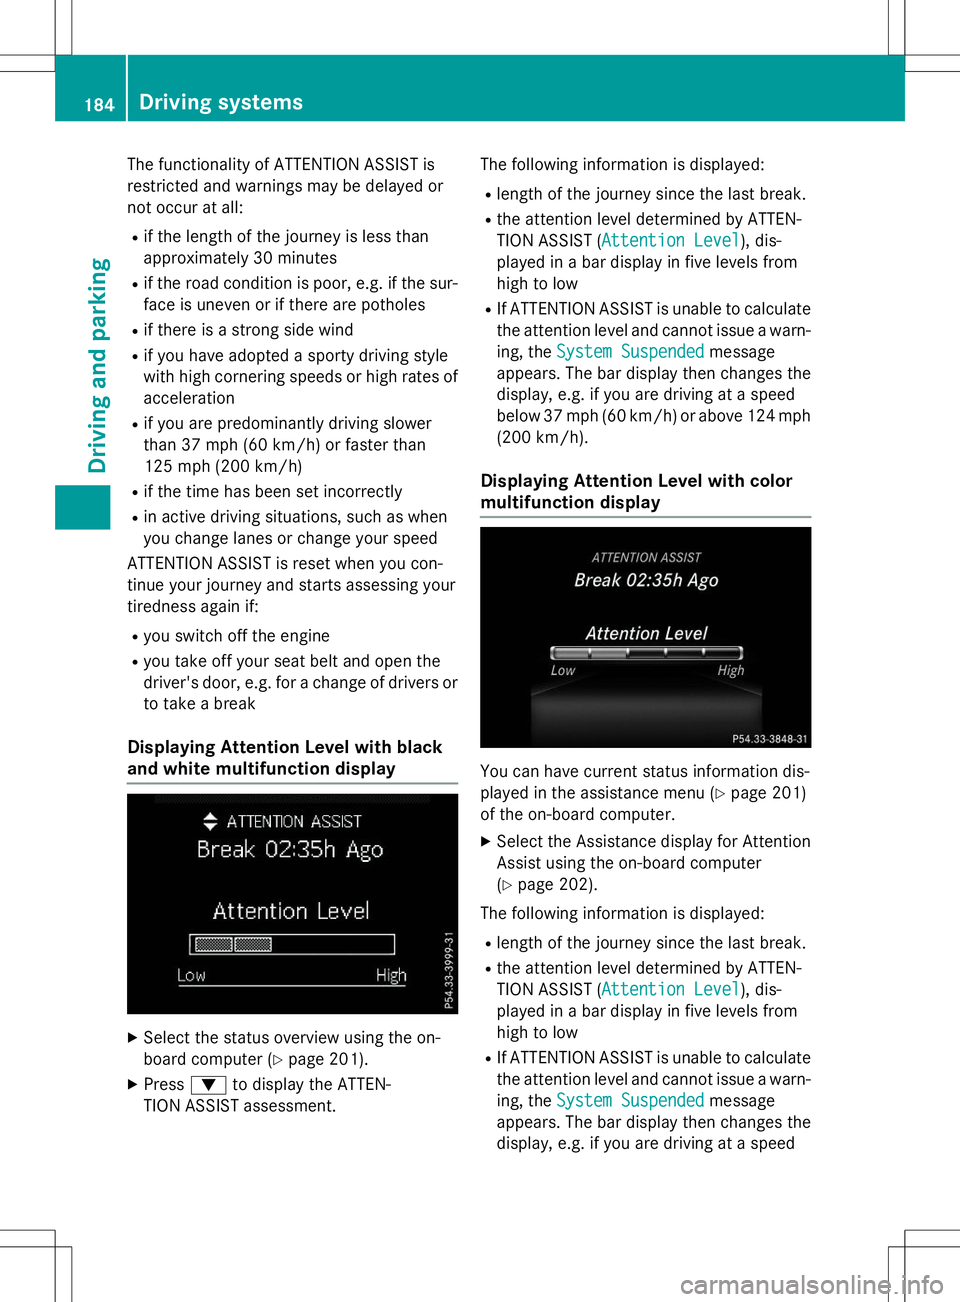
Displaying Attention Level with black
and white multifunction display
X Select the status overview using the on-
board computer ( Ypage 201).
X Press :to display the ATTEN-
TION ASSIST assessment. The following information is displayed:
R length of the journey since the last break.
R the attention level determined by ATTEN-
TION ASSIST (
Attention Level), dis-
played in a bar display in five levels from
high to low
R If ATTENTION ASSIST is unable to calculate
the attention level and cannot issue a warn-
ing, the
System Suspendedmessage
appears. The bar display then changes the
display, e.g. if you are driving at a speed
below 37 mph (60 km/h) or above 124 mph
(200 km/h).
Displaying Attention Level with color
multifunction display
You can have current status information dis-
played in the assistance menu ( Ypage 201)
of the on-board computer.
X Select the Assistance display for Attention
Assist using the on-board computer( Y page 202).
The following information is displayed: R length of the journey since the last break.
R the attention level determined by ATTEN-
TION ASSIST (
Attention Level), dis-
played in a bar display in five levels from
high to low
R If ATTENTION ASSIST is unable to calculate
the attention level and cannot issue a warn-
ing, the
System Suspendedmessage
appears. The bar display then changes the
display, e.g. if you are driving at a speed
184Driving systems
Driving and parking
Page 187 of 346
below 37 mph (60 km/h) or above 124 mph
(200 km/h).
Activating ATTENTION ASSIST
XActivate ATTENTION ASSIST using the on-
board computer ( Ypage 203).
The system determines the attention level
of the driver depending on the setting
selected:
Selection
Standard: the sensitivity with
which the system determines the attention
level is set to normal.
Selection
Sensitive: the sensitivity is set
higher. The attention level detected by Atten- tion Assist is adapted accordingly and the
driver is warned earlier.
Vehicles with black and white multifunc-
tion display: when ATTENTION ASSIST is
activated, the multifunction display in the sta-
tus overview shows the Àsymbol.
Vehicles with color multifunction display: when ATTENTION ASSIST is deactivated, the
multifunction display in the assistance
graphic shows the ésymbol.
When ATTENTION ASSIST has been deactiva-
ted, it is automatically reactivated after the
engine has been stopped. The sensitivity
selected corresponds to the last selection
activated (standard/sensitive).
Warning in the multifunction display
If fatigue or increasing lapses in concentra-
tion are detected, a warning appears in the
multifunction display:
ATTENTION ASSIST
Take a Break!.
In addition to the message shown in the mul-
tifunction display, you will then hear a warn-
ing tone.
X If necessary, take a break.
X Confirm the message by pressing the a
button on the steering wheel.
On long journeys, take regular breaks in good
time to allow yourself to rest properly. If you
do not take a break and ATTENTION ASSIST still detects increasing lapses in concentra-
tion, you will be warned again after
15 minutes at the earliest. This will only hap-
pen if ATTENTION ASSIST still detects typical
indicators of fatigue or increasing lapses in
concentration.
If a warning is output in the multifunction dis-
play, a service station search is performed in
COMAND. You can select a service station
and navigation to this service station will then
begin. This function can be activated and
deactivated in COMAND.
Lane Tracking package
General notes
The Lane Tracking package consists of Blind
Spot Assist ( Ypage 185) and Lane Keeping
Assist ( Ypage 187).
Blind Spot Assist
General notes
Blind Spot Assist monitors the areas on either
side of the vehicle that are not visible to the
driver with two lateral, rear-facing radar sen-
sors. A warning display in the exterior mirrors draws your attention to vehicles detected in
the monitored area. If you then switch on the corresponding turn signal to change lanes,
you will also receive a visual and audible col-
lision warning.
Blind Spot Assist supports you from a speed
of approximately 20 mph (30 km/ h).
Important safety notes
GWARNING
Blind Spot Assist does not react to: R vehicles overtaken too closely on the side,
placing them in the blind spot area
R vehicles which approach with a large speed
differential and overtake your vehicle
As a result, Blind Spot Assist may not give
warnings in such situations. There is a risk of an accident.
Driving systems185
Driving and pa rking
Z
Page 190 of 346
There is a risk of an accident.
Always pay particular attention to the traffic
situation and stay in lane, in particular if
warned by Lane Keeping Assist.
GWARNING
The Lane Keeping Assist warning does not
return the vehicle to the original lane. There isa risk of an accident.
You should always steer, brake or accelerate
yourself, in particular if warned by Lane Keep- ing Assist.
If you fail to adapt your driving style, Lane
Keeping Assist can neither reduce the risk of
an accident nor override the laws of physics.
Lane Keeping Assist cannot take into account the road, traffic and weather conditions. Lane
Keeping Assist is merely an aid. You are
responsible for the distance to the vehicle in
front, for vehicle speed, for braking in good
time and for staying in your lane.
The Lane Keeping Assist does not keep the
vehicle in the lane.
The system may be impaired or may not func- tion if:
R there is poor visibility, e.g. due to insuffi-
cient illumination of the road, or due to
snow, rain, fog or spray
R there is glare, e.g. from oncoming traffic,
the sun or reflections (e.g. when the road
surface is wet)
R the windshield is dirty, fogged up, damaged
or covered, for instance by a sticker, in the
vicinity of the camera
R there are no, several or unclear lane mark-
ings for a lane, e.g. in areas with road con-
struction work
R the lane markings are worn away, dark or
covered up, e.g. by dirt or snow
R the distance to the vehicle in front is too
small and the lane markings thus cannot be
detected R
the lane markings change quickly, e.g.
lanes branch off, cross one another ormerge
R the road is narrow and winding
R there are strong shadows cast on the road
Switching on Lane Keeping Assist
X Activate Lane Keeping Assist using the on-
board computer; to do so, select
Standard
orAdaptive( Y page 203).
If you drive at speeds above 60 km/ hand
lane markings are detected, the lane mark-
ings in the assistance graphics display ( Y page 202) are shown in green.
When
Standardis selected, no warning vibra-
tion occurs if:
R you have switched on the turn signals. In
this event, the warnings are suppressed for
a certain period of time.
R a driving safety system intervenes, such as
ABS, BAS or ESP ®
.
When
Adaptiveis selected, no warning vibra-
tion occurs if:
R you have switched on the turn signals. In
this event, the warnings are suppressed for
a certain period of time.
R a driving safety system intervenes, e.g.
ABS, BAS or ESP ®
.
R you accelerate hard, e.g. kickdown.
R you brake hard.
R you steer actively, e.g. swerve to avoid an
obstacle or change lanes quickly.
R you cut the corner on a sharp bend.
In order that you are warned only when nec-
essary and in good time if you cross the lane marking, the system recognizes certain con-
ditions and warns you accordingly.
The warning vibration occurs earlier if:
R you approach the outer lane marking on a
bend.
R the road has very wide lanes, e.g. a high-way.
R the system recognizes solid lane markings.
188Driving systems
Driving and parking
Page 250 of 346
Useful information
iThis Operator's Manual describes all
models and all standard and optional equip- ment of your vehicle available at the time of
publication of the Operator's Manual.
Country-specific differences are possible.
Please note that your vehicle may not be
equipped with all features described. This
also applies to safety-related systems and
functions.
iRead the information on qualified special-
ist workshops ( Ypage 24).
Loading guidelines
GWARNING
If objects, luggage or loads are not secured or
not secured sufficiently, they could slip, tip
over or be flung around and thereby hit vehicle
occupants. There is a risk of injury, particu-
larly in the event of sudden braking or a sud-
den change in direction.
Always store objects so that they cannot be
flung around. Secure objects, luggage or
loads against slipping or tipping before the
journey.
GWARNING
Combustion engines emit poisonous exhaust
gases such as carbon monoxide. If the tailgate is open when the engine is running, particu-
larly if the vehicle is moving, exhaust fumes
could enter the passenger compartment.
There is a risk of poisoning.
Turn off the engine before opening the tail-
gate. Never drive with the tailgate open.
GWARNING
The exhaust tail pipe and tail pipe trim can
become very hot. If you come into contact
with these parts of the vehicle, you could burn
yourself. There is a risk of injury.
Always be particularly careful around the
exhaust tail pipe and the tail pipe trim. Allow
these components to cool down before touch-
ing them.
The handling characteristics of a laden vehi-
cle are dependent on the distribution of the
load within the vehicle. For this reason, you
should observe the following notes when
transporting a load: R Never exceed the maximum permissible
gross vehicle mass or the gross axle weight
rating for the vehicle (including occupants).
The values are specified on the vehicle
identification plate on the B-pillar of the
driver's door.
R The cargo compartment is the preferred
place to carry objects.
R Position heavy loads as far forwards as pos-
sible and as low down in the cargo com-
partment as possible.
R The load must not protrude above the
upper edge of the seat backrests.
R Always place the load against the rear or
front seat backrests. Make sure that the
seat backrests are securely locked intoplace.
R Always place the load behind unoccupied
seats if possible.
R Use the cargo tie-down rings and the parcel
nets to transport loads and luggage.
R Use cargo tie-down rings and fastening
materials appropriate for the weight and
size of the load.
R Hook in the cargo net when loading.
R The maximum load capacity of the stowage
well under the cargo compartment floor is
55 lbs (25 kg).
R Secure the load with sufficiently strong and
wear-resistant tie-downs. Pad sharp edges
for protection.
!Do not position the load on one part of the
folding cargo compartment floor only. The
maximum load capacity of the folding cargo
compartment floor is 220 lbs (100 kg). Dis- tribute the weight evenly to avoid damaging
the cargo compartment floor. Place a solid
248Loading guidelines
Stowage and features
Page 252 of 346
Stowage compartment in front of the arm-
rest (vehicles with automatic transmis- sion)
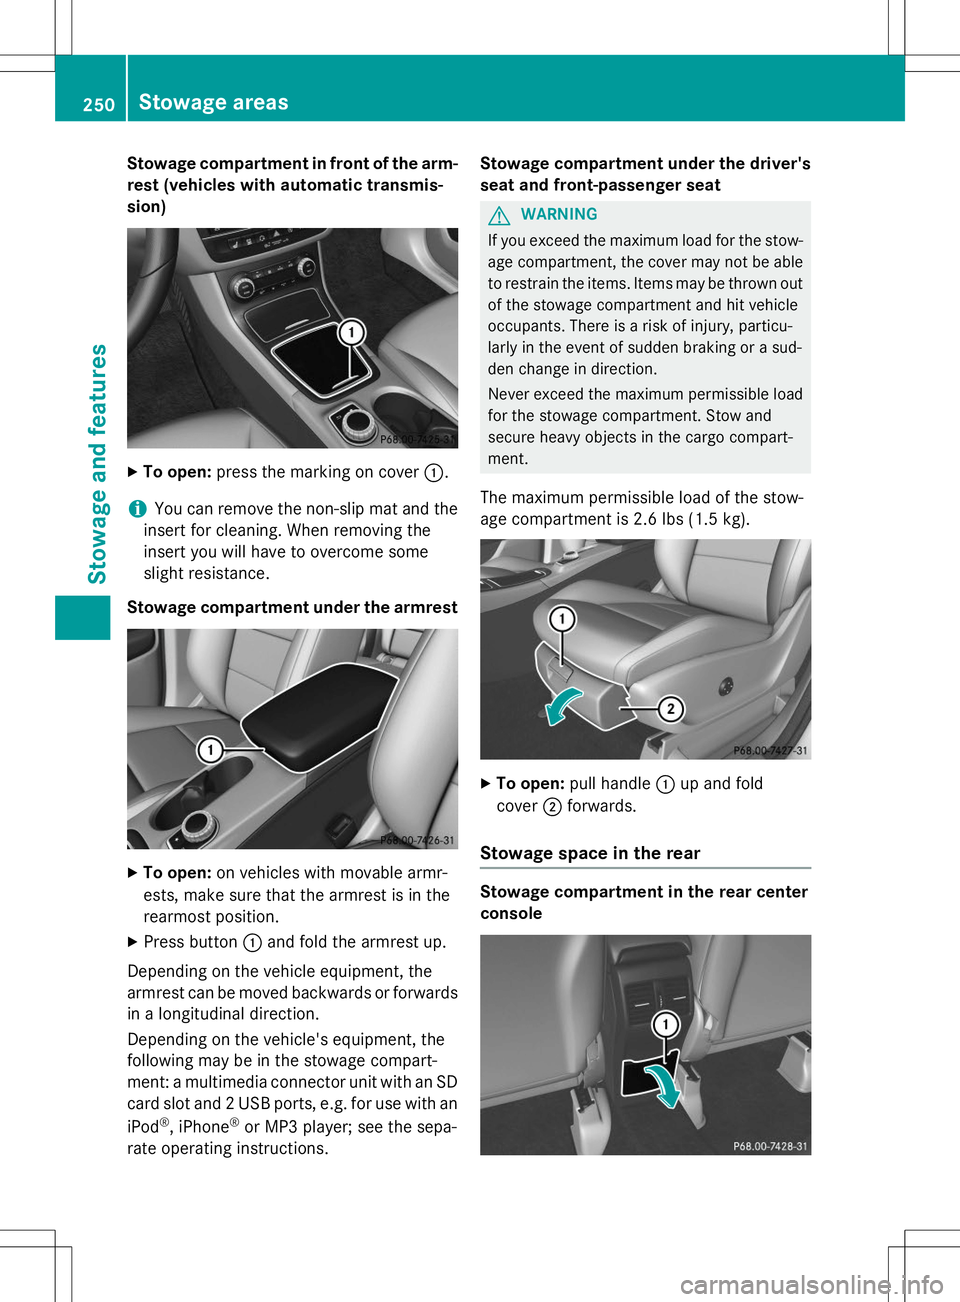
X To open: press the marking on cover :.
iYou can remove the non-slip mat and the
insert for cleaning. When removing the
insert you will have to overcome some
slight resistance.
Stowage compartment under the armrest
X To open: on vehicles with movable armr-
ests, make sure that the armrest is in the
rearmost position.
X Press button :and fold the armrest up.
Depending on the vehicle equipment, the
armrest can be moved backwards or forwards
in a longitudinal direction.
Depending on the vehicle's equipment, the
following may be in the stowage compart-
ment: a multimedia connector unit with an SD
card slot and 2 USB ports, e.g. for use with an iPod ®
, iPhone ®
or MP3 player; see the sepa-
rate operating instructions. Stowage compartment under the driver's
seat and front-passenger seat
GWARNING
If you exceed the maximum load for the stow- age compartment, the cover may not be ableto restrain the items. Items may be thrown out
of the stowage compartment and hit vehicle
occupants. There is a risk of injury, particu-
larly in the event of sudden braking or a sud-
den change in direction.
Never exceed the maximum permissible load
for the stowage compartment. Stow and
secure heavy objects in the cargo compart-
ment.
The maximum permissible load of the stow-
age compartment is 2.6 lbs (1.5 kg).
X To open: pull handle :up and fold
cover ;forwards.
Stowage space in the rear
Stowage compartment in the rear center
console
250Stowage areas
Stowage and features
Page 286 of 346
Useful information
iThis Operator's Manual describes all
models and all standard and optional equip- ment of your vehicle available at the time of
publication of the Operator's Manual.
Country-specific differences are possible.
Please note that your vehicle may not be
equipped with all features described. This
also applies to safety-related systems and
functions.
iRead the information on qualified special-
ist workshops ( Ypage 24).
Where will I find...?
Vehicle tool kit
General notes
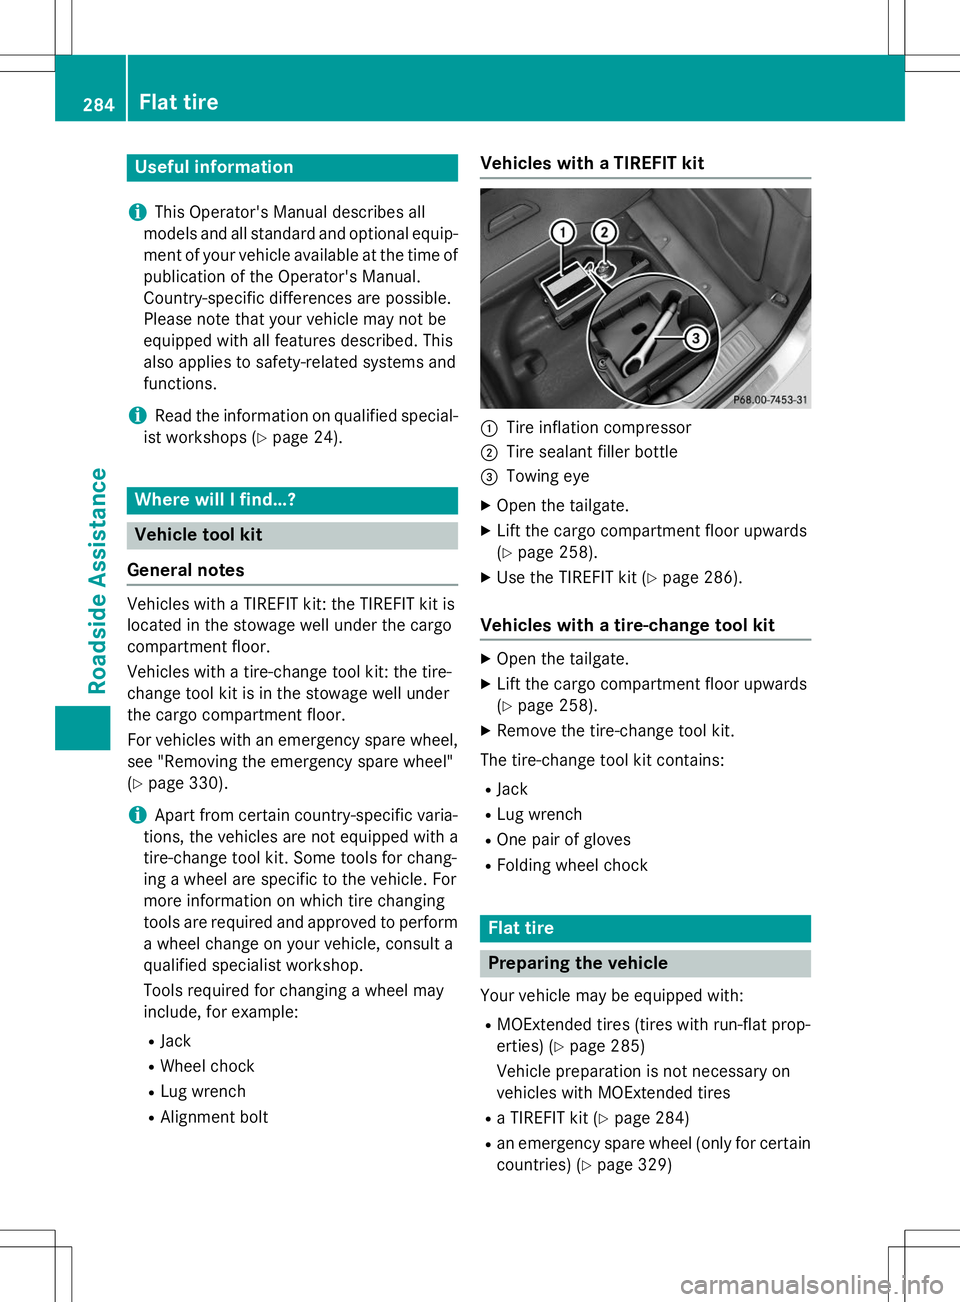
Vehicles with a TIREFIT kit: the TIREFIT kit is
located in the stowage well under the cargo
compartment floor.
Vehicles with a tire-change tool kit: the tire-
change tool kit is in the stowage well under
the cargo compartment floor.
For vehicles with an emergency spare wheel, see "Removing the emergency spare wheel" ( Y page 330).
iApart from certain country-specific varia-
tions, the vehicles are not equipped with a
tire-change tool kit. Some tools for chang-
ing a wheel are specific to the vehicle. For
more information on which tire changing
tools are required and approved to perform
a wheel change on your vehicle, consult a
qualified specialist workshop.
Tools required for changing a wheel may
include, for example:
R Jack
R Wheel chock
R Lug wrench
R Alignment bolt
Vehicles with a TIREFIT kit
:Tire inflation compressor
;Tire sealant filler bottle
=Towing eye
X Open the tailgate.
X Lift the cargo compartment floor upwards (Y page 258).
X Use the TIREFIT kit ( Ypage 286).
Vehicles with a tire-change tool kit
X
Open the tailgate.
X Lift the cargo compartment floor upwards (Y page 258).
X Remove the tire-change tool kit.
The tire-change tool kit contains: R Jack
R Lug wrench
R One pair of gloves
R Folding wheel chock
Flat tire
Preparing the vehicle
Your vehicle may be equipped with:
R MOExtended tires (tires with run-flat prop-
erties) ( Ypage 285)
Vehicle preparation is not necessary on
vehicles with MOExtended tires
R a TIREFIT kit ( Ypage 284)
R an emergency spare wheel (only for certain
countries) ( Ypage 329)
284Flat tire
Roadside Assistance