2015 MERCEDES-BENZ B-CLASS HATCHBACK change wheel
[x] Cancel search: change wheelPage 253 of 293

fore recommended that you additionally equip
your vehicle with a TIREFIT kit if you fit tyres that do not feature run-flat characteristics, e.g. win-
ter tyres. A TIREFIT kit can be obtained from a
qualified specialist workshop.
Information on changing and fitting a wheel
(Y page 273).
X Stop the vehicle as far away as possible from
traffic on solid, non-slippery and level ground.
X Switch on the hazard warning lamps.
X Secure the vehicle against rolling away
(Y page 145).
X If possible, bring the front wheels into the
straight-ahead position.
X Switch off the drive system.
X Vehicles without KEYLESS-GO: remove the
key from the ignition lock.
X Vehicles with KEYLESS-GO start-function
or KEYLESS-GO: open the driver's door.
The on-board electronics now have status 0.
This is the same as the key having been
removed.
X Vehicles with KEYLESS-GO start-function
or KEYLESS-GO: remove the Start/Stop but-
ton from the ignition lock (Y page 126).
X Make sure that the passengers are not endan-
gered as they do so. Make sure that no one is
near the danger area while a wheel is being
changed. Anyone who is not directly assisting
in the wheel change should, for example,
stand behind the barrier.
X Get out of the vehicle. Pay attention to traffic
conditions when doing so.
X Close the driver's door.
X Place the warning triangle at a suitable dis-
tance (Y page 248). Observe legal require-
ments. MOExtended tyres (tyres with run-flat
characteristics)
General notes With MOExtended tyres (tyres with run-flat char-
acteristics), you can continue to drive your vehi- cle even if there is a total loss of pressure in one
or more tyres. The affected tyre must not show
any clearly visible damage.
You can recognise MOExtended tyres by the
MOExtended marking which appears on the tyre wall. You will find this marking next to the tyre size designation, the load-bearing capacity and
the speed index.
MOExtended tyres may only be used in conjunc-
tion with an activated tyre pressure monitor.
If a pressure loss warning message appears
in the multifunction display:
R observe the instructions in the display mes-
sages (Y page 209)
R check the tyre for damage
R if driving on, observe the following notes
The driving distance possible in run-flat mode is approximately 80 km when the vehicle is parti-
ally laden and approximately 30 km when the
vehicle is fully laden.
In addition to the vehicle load, the driving dis-
tance possible depends upon:
R vehicle speed
R road condition
R outside temperature
The driving distance possible in run-flat mode
may be reduced by extreme driving conditions/ manoeuvres, or it can be increased through a
moderate style of driving.
The driving distance possible in run-flat mode is
counted from the moment the tyre pressure loss warning appears in the multifunction display.
You must not exceed a maximum speed of
80 km/h.
When replacing one or all tyres, observe the fol-
lowing specifications for your vehicle's tyres:
R size
R type and
R the "MOExtended" mark.
If a tyre has gone flat and cannot be replaced
with an MOExtended tyre, a standard tyre may
be used as a temporary measure. Make sure
that you use the proper size and type (summer
or winter tyre).
Vehicles with MOExtended tyres are not equip-
ped with a TIREFIT kit at the factory. It is there-
fore recommended that you additionally equip
your vehicle with a TIREFIT kit if you fit tyres that do not feature run-flat characteristics, e.g. win-
ter tyres. A TIREFIT kit can be obtained from a
qualified specialist workshop. 250
Flat tyreBreakdown assistance
Page 254 of 293

Important safety notes
G
WARNING
When driving in emergency mode, the driving characteristics deteriorate, e.g. when corner-
ing, accelerating quickly and when braking.
There is a risk of accident.
Do not exceed the stated maximum speed.
Avoid abrupt steering and driving manoeu-
vres, and driving over obstacles (kerbs, pot-
holes, off-road). This applies in particular to a laden vehicle.
Stop driving in emergency mode if:
R you hear banging noises.
R the vehicle starts to shake.
R you see smoke and smell rubber.
R ESP ®
is intervening constantly.
R there are tears in the sidewalls of the tyre.
After driving in emergency mode, have the
wheel rims checked at a qualified specialist
workshop with regard to their further use. The
faulty tyre must be replaced. TIREFIT kit
Important safety notes TIREFIT is a tyre sealant.
You can use TIREFIT to seal punctures of up to
4 mm, particularly those in the tyre tread. You
can use TIREFIT at outside temperatures down
to
Ò20 †. G
WARNING
In the following situations, the tyre sealant is
unable to provide sufficient breakdown assis- tance, as it is unable to seal the tyre properly:
R there are cuts or punctures in the tyre
larger than those mentioned above.
R the wheel rim is damaged.
R you have driven at very low tyre pressures
or on a flat tyre.
There is a risk of an accident.
Do not drive any further. Contact a qualified
specialist workshop. G
WARNING
The tyre sealant is harmful and causes irrita-
tion. It must not come into contact with your
skin, eyes or clothing or be swallowed. Do not inhale TIREFIT fumes. Keep tyre sealant away
from children. There is a risk of injury.
If you come into contact with the tyre sealant,
observe the following:
R Rinse off the tyre sealant from your skin
immediately with water.
R If the tyre sealant comes into contact with
your eyes, immediately rinse them thor-
oughly with clean water.
R If tyre sealant is swallowed, immediately
rinse your mouth out thoroughly and drink
plenty of water. Do not induce vomiting,
and seek medical attention immediately.
R Immediately change out of clothing which
has come into contact with tyre sealant.
R If an allergic reaction occurs, seek medical
attention immediately.
Comply with the manufacturer’s safety instruc-
tions on the sticker on the tyre inflation com-
pressor.
Using the TIREFIT kit X
Do not remove any foreign objects which have
penetrated the tyre, e.g. screws or nails.
X Remove the tyre sealant bottle, the accom-
panying TIREFIT sticker and the tyre inflation
compressor from the stowage well under-
neath the luggage compartment floor
(Y page 249). Flat tyre
251Breakdown assistance Z
Page 271 of 293

R
Run in new tyres at moderate speeds for the
first 100 km. They only reach their full per-
formance after this distance.
R Do not drive with tyres which have too little
tread depth. This otherwise significantly
reduces the traction on wet roads (aquaplan-
ing).
R Replace the tyres after six years at the latest,
regardless of wear. MOExtended tyres (tyres with run-flat
characteristics)
With MOExtended tyres (tyres with run-flat char- acteristics), you can continue to drive your vehi-
cle even if there is a total loss of pressure in one or more tyres.
MOExtended tyres may only be used in conjunc-tion with an activated tyre pressure monitor and
only on wheels specifically tested by Mercedes- Benz.
Notes on driving with MOExtended tyres with a
flat tyre (Y page 250).
Vehicles with MOExtended tyres are not equip-
ped with a TIREFIT kit at the factory. It is there-
fore recommended that you additionally equip
your vehicle with a TIREFIT kit if you fit tyres that do not feature run-flat characteristics, e.g. win-
ter tyres. A TIREFIT kit can be obtained from a
qualified specialist workshop. Winter operation
General notes
Have your vehicle winterproofed at a qualified
specialist workshop at the onset of winter.
Observe the notes in the "Changing a wheel"
section (Y page 273). Driving with summer tyres
At temperatures below +7 †, summer tyres lose elasticity and therefore traction and braking
power. Change the tyres on your vehicle to
M+S tyres. Using summer tyres at very cold
temperatures could cause tears to form,
thereby damaging the tyres permanently.
Mercedes-Benz cannot accept responsibility for
this type of damage. G
WARNING
Damaged tyres can cause tyre inflation pres-
sure loss. As a result, you could lose control of your vehicle. There is a risk of accident.
Check the tyres regularly for signs of damageand replace any damaged tyres immediately. M+S tyres
G
WARNING
M+S tyres with a tyre tread depth of less than 4 mm are not suitable for use in winter as they
do not provide sufficient traction. There is a
risk of accident.
M+S tyres with a tread depth of less than
4 mm must be replaced.
At temperatures below +7 †, use winter tyres or all-season tyres. Both types of tyre are identified
by the M+S marking.
Only winter tyres bearing the isnowflake
symbol in addition to the M+S marking provide
the best possible grip in wintry road conditions. Only these tyres will allow driving safety sys-
tems such as ABS and ESP ®
to function opti-
mally in winter. These tyres have been devel-
oped specifically for driving in snow.
Use M+S tyres of the same make and tread on all
wheels to maintain safe handling characteris-
tics.
Always observe the maximum permissible
speed specified for the M+S tyres you have fit-
ted.
If you fit M+S tyres that have a lower maximum
permissible speed than that of the vehicle, affix
an appropriate warning sign in the driver's field of vision. This can be obtained at a qualified
specialist workshop.
When you have fitted the M+S tyres:
X Check the tyre pressures (Y page 269).
X Restart the tyre pressure monitor
(Y page 272). 268
Winter operationWheels and ty
res
Page 272 of 293

Snow chains
G
WARNING
If snow chains are fitted to the rear wheels,
they may scrape against the vehicle body or
chassis components. This could cause dam-
age to the vehicle or the tyres. There is a risk of an accident.
To avoid hazardous situations:
R never fit snow chains on the rear wheels
R always fit snow chains in pairs to the front
wheels.
For safety reasons, Mercedes-Benz recom-
mends that you only use snow chains that have been specifically approved for your vehicle by
Mercedes-Benz, or that are of a corresponding
standard of quality. For more information,
please contact a qualified specialist workshop.
If you intend to fit snow chains, please bear the
following points in mind:
R snow chains cannot be fitted to all wheel-tyre
combinations. Permissible wheel-tyre combi-
nations (Y page 277).
R only use snow chains if the road surface is
completely snow-covered. Remove the snow
chains as soon as possible when you come to a road that is not snow-covered.
R local regulations may restrict the use of snow
chains. Observe the appropriate regulations if you wish to fit snow chains.
R do not exceed the maximum permissible
speed of 50 km/h.
R when snow chains are fitted, never use Active
Parking Assist (Y page 158).
You may wish to deactivate ESP ®
(Y page 65)
when pulling away with snow chains fitted. This way you can allow the wheels to spin in a con-
trolled manner, achieving increased driving
force (cutting action). Tyre pressure
Tyre pressure specifications
G
WARNING
Underinflated or overinflated tyres pose the
following risks:
R the tyres may burst, especially as the load
and vehicle speed increase.
R the tyres may wear excessively and/or
unevenly, which may greatly impair tyre
traction.
R the driving characteristics, as well as steer-
ing and braking, may be greatly impaired.
There is a risk of an accident.
Observe the recommended tyre pressure and check the tyre pressure of all the tyres includ-
ing the spare wheel:
R at least every two weeks
R when the load changes
R before embarking on a longer journey
R for changed operating conditions, e.g. off-
road driving
If necessary, correct the tyre pressure. G
WARNING
If you fit unsuitable accessories onto tyre
valves, the tyre valves may be overloaded and malfunction, which can cause tyre pressure
loss. Due to their design, retrofitted tyre pres-
sure monitors keep the tyre valve open. This
can also result in tyre pressure loss. There is a risk of accident.
Only screw standard valve caps or valve caps
specifically provided by Mercedes-Benz for
your vehicle onto the tyre valve. G
WARNING
If the tyre pressure drops repeatedly, the
wheel, valve or tyre may be damaged. Tyre
pressure that is too low may result in a tyre
blow-out. There is a risk of accident. R Check the tyre for foreign objects.
R Check whether the wheel is losing air or the
valve is leaking. Tyre pressure
269Wheels and tyres
Z
Page 273 of 293

If you are unable to rectify the damage, con-
tact a qualified specialist workshop. H
Environmental note
Check the tyre pressure regularly, at least
every 14 days.
The recommended tyre pressures for various
operating conditions can be found in the tyre
pressure table in the charge socket flap
(Y page 141).
Additionally, the tyre pressure table may also
state tyre pressures for different load condi-
tions. These are defined in the table as different numbers of passengers and amounts of lug-
gage. The actual number of seats may vary; for
more information, please refer to the vehicle's
registration documents.
If tyre sizes are not specified, the tyre pressures
stated on the tyre pressure table apply for all
tyres approved for this vehicle. If a tyre size precedes a tyre pressure, the fol-
lowing tyre pressure information is only valid for that tyre size.
Use a suitable pressure gauge to check the tyre
pressure. The outer appearance of a tyre does
not permit any reliable conclusion about the tyre
pressure. You can also check the tyre pressure
using the on-board computer.
If possible, only correct tyre pressures when the
tyres are cold.
The tyres are cold:
R if the vehicle has been parked with the tyres
out of direct sunlight for at least three hours
and
R if the vehicle has not been driven further than
1.6 km
Depending on the ambient temperature, the
vehicle speed and the load on the tyres, the tyre temperature and thus the tyre pressure changes
by approximately 10 kPa (0.1 bar/1.5 psi) per
10 †. Take this into account when checking the
pressure of warm tyres. Only correct the tyre
pressure if it is too low for the current operating
conditions.
Driving with tyre pressure that is too high or too
low can:
R shorten the service life of the tyres
R cause increased tyre damage
R have a negative effect on handling character-
istics and thus driving safety (e.g. aquaplan-
ing)
The tyre pressure values given for low loads are
minimum values which offer you good ride com- fort characteristics.
However, you can also use the values given for
higher loads. These are permissible and will not
adversely affect the running of the vehicle. Tyre pressure monitor
General notes If a tyre pressure monitor system is fitted, the
vehicle's wheels have sensors fitted that moni-
tor the tyre pressures in all four tyres. The tyre
pressure monitor warns you if the pressure
drops in one or more of the tyres. The tyre pres- sure monitor only functions if the corresponding sensors are fitted to all wheels.
Information on tyre pressures is shown in the
multifunction display. After a few minutes of
driving, the current tyre pressure of each tyre is
shown in the Serv. Serv.menu of the multifunction
display, see illustration (example). For further information on displaying this mes-
sage, refer to the "Checking the tyre pressure
electronically" section (Y
page 271).270
Tyre pressureWheels and tyres
Page 275 of 293

the tyre pressure in at least one tyre is too
low. The tyre pressure must be corrected
when the opportunity arises.
R If the Tyre
Tyre pressure pressure Check
Checktyre(s)
tyre(s) mes-
sage appears in the multifunction display, the tyre pressure in one or more tyres has drop-
ped significantly. The tyres must be checked.
R If the Tyre pressure Caution Tyre mal‐
Tyre pressure Caution Tyre mal‐
function
function message appears in the multifunc-
tion display, the tyre pressure in one or more
tyres has dropped suddenly. The tyres must
be checked.
Observe the instructions and safety notes in the display messages in the "Tyres" section
(Y page 209).
If the wheel positions on the vehicle are inter-
changed, the tyre pressures may be displayed
for the wrong positions for a short time. After a
few minutes of driving, this is rectified and the
tyre pressures are displayed for the correct
positions.
Restarting the tyre pressure monitor When you restart the tyre pressure monitor, all
existing warning messages are deleted and the
warning lamps go out. The monitor uses the cur-
rently set tyre pressures as the reference values
for monitoring. In most cases, the tyre pressure monitor will automatically detect the new refer-
ence values after you have changed the tyre
pressure. However, you can also set reference
values manually as described here. The tyre
pressure monitor then monitors the new tyre
pressure values.
X Use the table on the inside of the charge
socket flap to ensure that the tyre pressure is
set correctly in all four tyres for the current
operating conditions.
Also observe the notes in the section on tyre
pressures (Y page 269).
X Make sure that the key is in position 2in the
ignition lock (Y page 126).
X Press =or; on the steering wheel to
select the Serv.
Serv.menu.
X Press the 9or: button to select
Tyre pressure Tyre pressure.
X Press the abutton.
The multifunction display shows the current
tyre pressure for each tyre or the Tyre
Tyre pres‐
pres‐ sures
sures
will
willbe
bedisplayed
displayed after
aftera
afew
few
minutes of driving
minutes of driving message.
X Press the :button.
The multifunction display shows the Use
Use
current pressures as new reference
current pressures as new reference
values values message.
If you wish to confirm the restart: X Press the abutton.
The Tyre
Tyre press.
press. monitor
monitor restarted
restarted mes-
sage appears in the multifunction display.
After you have driven for a few minutes, the
system checks whether the current tyre pres-
sures are within the specified range. The new tyre pressures are then accepted as refer-
ence values and monitored.
If you wish to cancel the restart:
X Press the %button.
The tyre pressure values stored at the last
restart will continue to be monitored.
Radio type approval for the tyre pres-
sure monitor Country Radio type approval number
Argentina MW2433A
H-12337
GG4
H-12338
Brazil 2770-12-8001
Model: MW2433A
0381-13-8001
Model: GG4 Abu Dhabi
Dubai TRA, Registered NO
ER0092100/12
TRA, Registered NO
ER0099792/12
TRA, Registered NO
ER0076990/11
Dealer NO: DA0047074/10272
Tyre pressureWheels and tyres
Page 276 of 293

Country Radio type approval number
Jordan Model: Gen Alpha Wal 2 TPMS
transmitter
Type Approval Number:
TRC/LPD/2012/114
Model: Gen Gamma Gen
4 433.92 Mhz.
Type Approval Number:
TRC/LPD/2012/190
Model: Corax 3 MRXMC34MA4
Type Approval Number:
TRC/LPD/2011/158
Type Number: LPD Morocco MR7319 ANRT 2012/
11/07/2012
MR7672 ANRT 2012/
23/11/2012
MR6706 ANRT 2011
Moldova 1024
Philip-
pines No: ESD-1206394C
No: ESD-1306871C
Serbia И 011 12
Singapore Compliance with IDA Standard
DA- 103365
South
Africa TA-2012/719
TA-2012/1540
TA-2011/1370
Changing a wheel
Flat tyre
You can find information on what to do in the
event of a flat tyre in the "Breakdown assis-
tance" section (Y page 249). Information on
driving with MOExtended tyres in the event of a flat tyre can be found under "Breakdown assis-
tance" (Y page 250). Interchanging the wheels
G
WARNING
Interchanging the front and rear wheels may
severely impair the driving characteristics if the wheels or tyres have different dimensions.
The wheel brakes or suspension components may also be damaged. There is a risk of acci-
dent.
Interchange front and rear wheels only if the
wheels and tyres are of the same dimensions.
! On vehicles fitted with a tyre pressure mon-
itor, electronic components are located in the wheel.
Tyre-fitting tools should not be applied in thearea of the valve, as this could damage the
electronic components.
Only have tyres changed at a qualified spe-
cialist workshop.
Interchanging the front and rear wheels of dif-
fering dimensions can render the general oper-
ating permit invalid.
Observe the instructions and safety notes in the "Changing a wheel" section (Y page 273).
The wear patterns on the front and rear tyres
differ depending on the operating conditions.
Interchange the wheels before a clear wear pat-
tern has formed on the tyres. Front tyres typi-
cally wear more on the shoulders and the rear
tyres in the centre.
On vehicles that have the same size front and
rear wheels, you can interchange the wheels
every 5,000 to 10,000 km depending on the
degree of tyre wear. Ensure the direction of
rotation is maintained.
Clean the contact surfaces of the wheel and the
brake disc thoroughly every time a wheel is
interchanged. Check the tyre pressure and reac-
tivate the tyre pressure monitor if necessary. Direction of rotation
Tyres with a specified direction of rotation have additional benefits, e.g. if there is a risk of aqua-
planing. These advantages can only be gained if the tyres are fitted corresponding to the direc-
tion of rotation.
An arrow on the sidewall of the tyre indicates its
correct direction of rotation. Changing a wheel
273Wheels and tyres Z
Page 277 of 293
Storing wheels
Store wheels in a cool, dry and preferably dark
place if they are not being used. Protect the
tyres against oil and grease. Fitting a wheel
Preparing the vehicle X
Stop the vehicle on solid, non-slippery and
level ground.
X Apply the electric parking brake manually.
X Move the front wheels to the straight-ahead
position.
X Shift the transmission to position P.
X Switch off the drive system.
X Vehicles without KEYLESS-GO: remove the
key from the ignition lock.
X Vehicles with KEYLESS-GO start-function
or KEYLESS-GO: open the driver's door.
The on-board electronics now have status 0.
This is the same as the key having been
removed.
X Vehicles with KEYLESS-GO start-function
or KEYLESS-GO: remove the Start/Stop but-
ton from the ignition lock (Y page 126).
X If included in the vehicle equipment, remove
the tyre-change tool kit from the vehicle.
X Safeguard the vehicle against rolling away
(Y page 145).
i Apart from some country-specific variants,
vehicles are not equipped with tyre-changing
tools. Some tools for changing a wheel are
specific to the vehicle. For more information
on which tools are required to perform a
wheel change on your vehicle, consult a quali- fied specialist workshop.
Necessary tyre-changing tools may include,
for example:
R Jack
R Wheel chock
R Wheel wrench Securing the vehicle against rolling
away
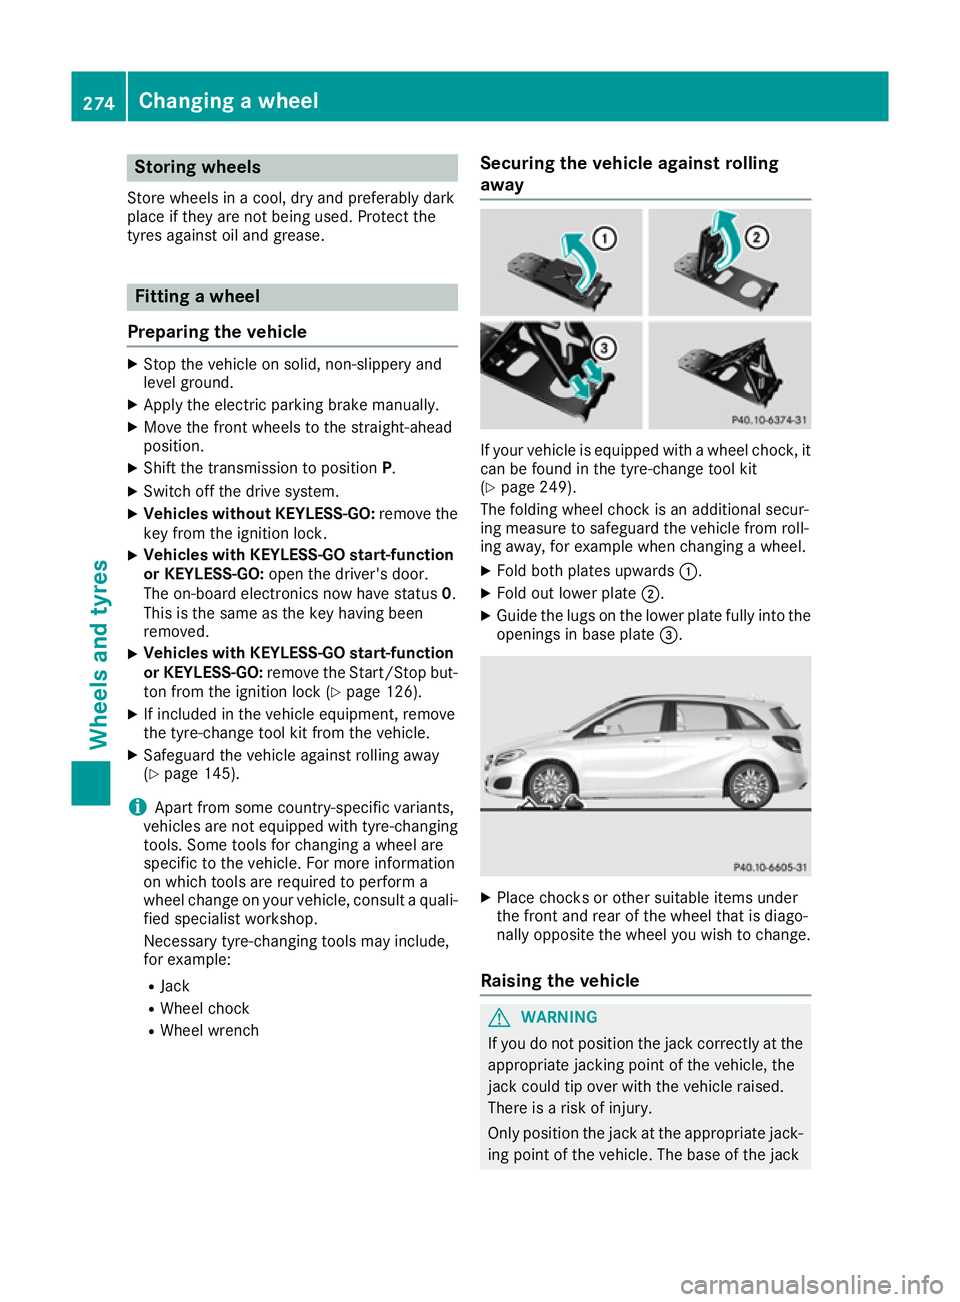
If your vehicle is equipped with a wheel chock, it
can be found in the tyre-change tool kit
(Y page 249).
The folding wheel chock is an additional secur-
ing measure to safeguard the vehicle from roll-
ing away, for example when changing a wheel.
X Fold both plates upwards :.
X Fold out lower plate ;.
X Guide the lugs on the lower plate fully into the
openings in base plate =. X
Place chocks or other suitable items under
the front and rear of the wheel that is diago-
nally opposite the wheel you wish to change.
Raising the vehicle G
WARNING
If you do not position the jack correctly at the appropriate jacking point of the vehicle, the
jack could tip over with the vehicle raised.
There is a risk of injury.
Only position the jack at the appropriate jack-
ing point of the vehicle. The base of the jack 274
Changing a wheelWheels and tyres