2015 MERCEDES-BENZ B-Class ELECTRIC service
[x] Cancel search: servicePage 290 of 338
The jump-starting connection point is in the
engine compartment (Y page 290).
X Open the hood.
X Connect the battery charger to the positive
terminal and ground point in the same
order as when connecting the donor bat-
tery in the jump-starting procedure
(Y page 290).
If the indicator/warning lamps do not light up at low temperatures, it is very likely that the
discharged battery has frozen. In this case
you may neither jump-start the vehicle nor
charge the battery. The service life of a
thawed-out battery may be shorter. The start-
ing characteristics can be impaired, particu-
larly at low temperatures. Have the thawed-
out battery checked at a qualified specialist
workshop.
Only charge the installed battery with a bat-
tery charger which has been tested and
approved by Mercedes-Benz. A battery
charger unit specially adapted for Mercedes-
Benz vehicles and tested and approved by
Mercedes-Benz is available as an accessory.
It permits the charging of the battery in its
installed position. Contact an authorized
Mercedes-Benz Center for further informa-
tion and availability. Read the battery charg-
er's operating instructions before charging
the battery. High-voltage battery – important
safety notes
G
DANGER
The vehicle's high voltage electrical system is under high voltage. If you modify components
in the vehicle's high-voltage electrical system or touch damaged components, you may be
electrocuted. The components in the vehi-
cle's high-voltage electrical system may be
damaged in an accident, although the damage
is not visible. There is a risk of fatal injury.
Following an accident, do not touch any high- voltage components and never modify the
vehicle's high-voltage electrical system. Have the vehicle towed away after an accident and
the vehicle's high-voltage electrical system
checked by a qualified specialist workshop. G
WARNING
In the event of a vehicle fire, the internal pres- sure of the high-voltage battery can exceed a
critical value. In this case flammable gas
escapes through a ventilation valve on the
underbody. The gas can ignite. There is a risk of injury.
Leave the danger zone immediately. Secure
the danger area at a suitable distance, whilst
observing legal requirements.
The vehicle's high voltage electrical system is under high voltage.
R Do not handle high-voltage components or
the orange cables of the vehicle's high-volt-age electrical system.
R Do not touch high-voltage components or
the orange cables of the high-voltage elec-
trical system when a vehicle has been
involved in a crash.
R Do not touch any damaged components or
the damaged orange cables of the vehicle's
high-voltage electrical system.
R Do not remove the covers of the high-volt-
age electrical system components that are
marked with a warning sticker.
Do not leave the vehicle parked for longer
than 14 days with a high-voltage battery con- dition of charge below 20%.
You can check the condition of charge in the
charge level display (Y page 184).
If you park the vehicle and leave it stationary for longer periods, connect it to a power sup-
ply.
If you leave the vehicle parked for longer than
four weeks, the battery may be damaged by
exhaustive discharging. 288
BatteriesRoadside Assistance
Page 292 of 338
Jump-starting
For the jump-starting procedure, use only the jump-starting connection point, consisting of a positive terminal and a ground point, in the engine compartment. G
WARNING
Battery acid is caustic. There is a risk of injury.
Avoid contact with skin, eyes or clothing. Do not inhale any battery gases. Do not lean over the
battery. Keep children away from batteries. Wash away battery acid immediately with plenty of
clean water and seek medical attention. G
WARNING
During charging and jump-starting, explosive gases can escape from the battery. There is a risk of an explosion.
Particularly avoid fire, open flames, creating sparks and smoking. Ensure there is sufficient ven-
tilation while charging and jump-starting. Do not lean over a battery. G
WARNING
During the charging process, a battery produces hydrogen gas. If a short circuit occurs or sparks
are created, the hydrogen gas can ignite. There is a risk of an explosion.
R Make sure that the positive terminal of a connected battery does not come into contact with
vehicle parts.
R Never place metal objects or tools on a battery.
R It is important that you observe the described order of the battery terminals when connecting
and disconnecting a battery.
R When jump-starting, make sure that the battery poles with identical polarity are connected.
R It is particularly important to observe the described order when connecting and disconnecting
the jumper cables.
R Never connect or disconnect the battery terminals while the engine is running. G
WARNING
A discharged battery can freeze at temperatures below freezing point. When jump-starting the
vehicle or charging the battery, gases can escape from the battery. There is a risk of an explosion.
Allow the frozen battery to thaw out before charging it or jump-starting.
! Avoid repeated and lengthy starting attempts.
Do not use a rapid-charging device to start the engine.
If the indicator/warning lamps do not light up at low temperatures, it is very likely that the
discharged battery has frozen. In this case you may neither jump-start the vehicle nor charge the battery. The service life of a thawed-out battery may be shorter. Have the thawed-out
battery checked at a qualified specialist workshop.
If the 12 V battery is discharged, or after the vehicle has been jump-started, the Without
Without
changing gear, consult workshop
changing gear, consult workshop message appears. There is a malfunction in the on-
board voltage. Visit a qualified specialist workshop immediately.290
Jump-startingRoadside Assistance
Page 293 of 338
The drive system cannot be started if the 12 V battery is discharged. This is not dependent on
whether the high-voltage battery is charged or not. The vehicle cannot be jump-started if the
high-voltage battery is discharged. The high-voltage battery must be charged first.
The drive system can be started using another vehicle. R Only use batteries with an equal nominal voltage (12 volts).
R Make sure that the battery of the donor vehicle does not have a significantly lower capacity
than the discharged battery.
R Use jumper cables with a sufficient cross-section and insulated terminal clamps from a
qualified specialist workshop, e.g. an authorized Mercedes-Benz Center.
R Make sure that the two vehicles do not touch.
R Route the jumper cables so that they cannot be caught by rotating components in the engine
compartment.
R Do not disconnect the discharged battery from the vehicle's electrical system. X
Switch off the engine of both vehicles.
X Shift the transmission to position P.
X Switch off all electrical consumers.
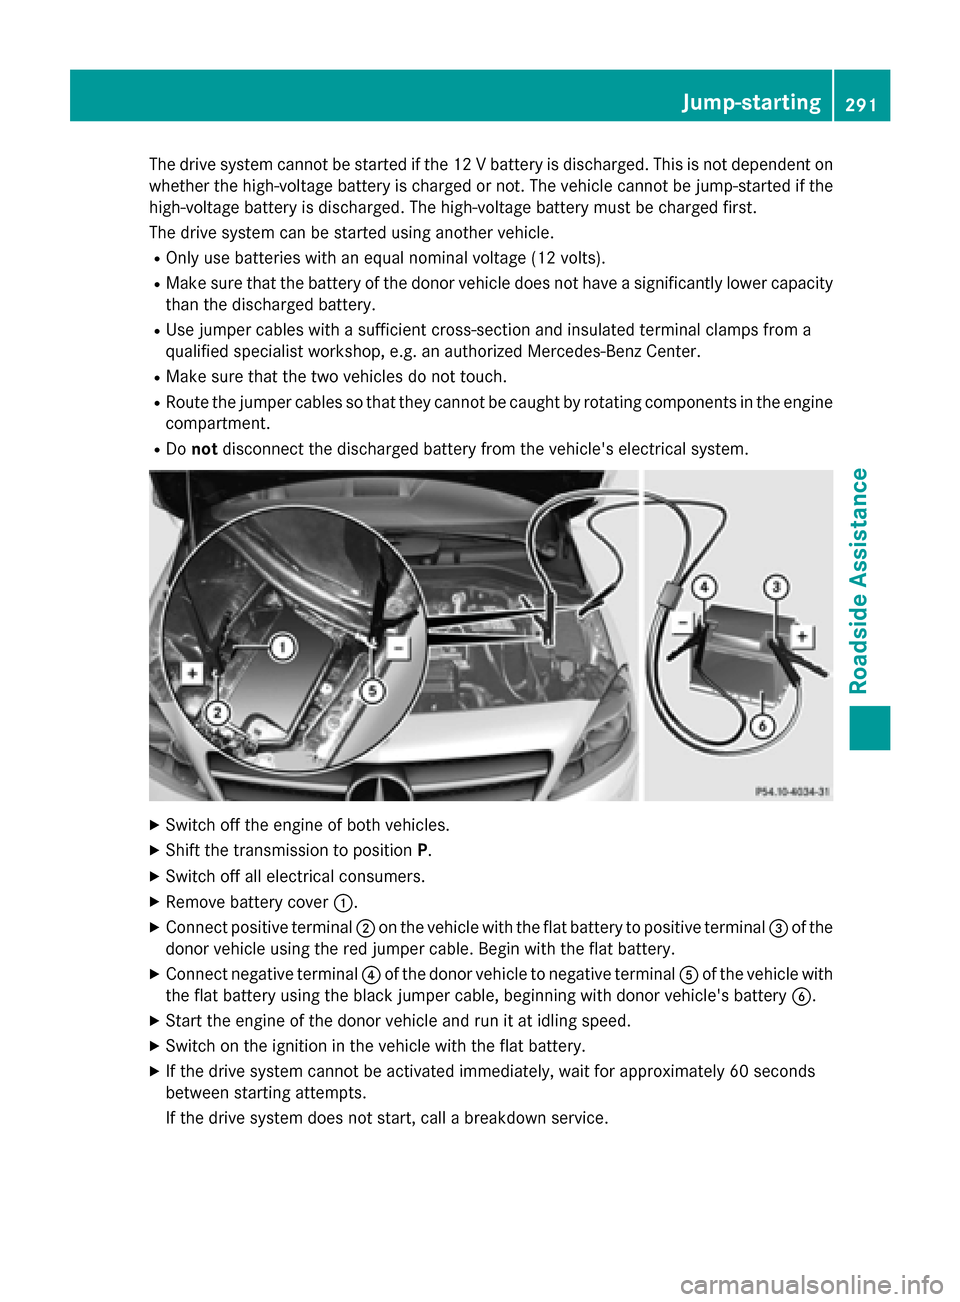
X Remove battery cover :.
X Connect positive terminal ;on the vehicle with the flat battery to positive terminal =of the
donor vehicle using the red jumper cable. Begin with the flat battery.
X Connect negative terminal ?of the donor vehicle to negative terminal Aof the vehicle with
the flat battery using the black jumper cable, beginning with donor vehicle's battery B.
X Start the engine of the donor vehicle and run it at idling speed.
X Switch on the ignition in the vehicle with the flat battery.
X If the drive system cannot be activated immediately, wait for approximately 60 seconds
between starting attempts.
If the drive system does not start, call a breakdown service. Jump-starting
291Roadside Assistance Z
Page 295 of 338
!
When towing, pull away slowly and
smoothly. If the tractive power is too high,
the vehicles could be damaged.
! The vehicle can be towed a maximum of
30 miles (50km). The towing speed of
30 mph (50km/h) must not be exceeded.
If the vehicle has to be towed more than
30 miles (50km), the front axle must be
raised or the entire vehicle raised and
transported.
! Do not tow with sling-type equipment.
This could damage the vehicle.
! To tow vehicles with KEYLESS-GO, use
the SmartKey instead of the Start/Stop
button. The transmission may otherwise
shift to position Pwhen you open the driv-
er's or front-passenger door, which could
damage the transmission.
Observe the legal requirements for the rele-
vant countries when towing away.
Make sure that no charging cable is plugged
in. The parking lock cannot be released if a
charging cable is plugged in.
It is better to have the vehicle transported
than to have it towed away.
If the vehicle can no longer be driven because
of an accident or breakdown, you have the
following options:
R transporting the vehicle
As a rule, you should have the vehicle trans-
ported.
R towing the vehicle with a tow rope or tow
bar
Only tow the vehicle in exceptional cases.
Observe the following notes.
The vehicle may not be towed and must
always be transported if:
R the multifunction display is not working
R one of more of the following warning lamps
is lit up:
- Drive system
- 12 V battery R
one or both of the following display mes-
sages have appeared:
- Stop Switch Engine Off
Stop Switch Engine Off
- Service Required Do Not Shift Service Required Do Not Shift
Gears Visit Dealer Gears Visit Dealer
R the brake pedal begins to pulsate as the
towing procedure commences.
R you have to tow the vehicle over a longer
distance than 30 miles (50 km)
When towing a vehicle, the transmission must be in position N.
The battery must be connected and charged.
Otherwise, you:
R cannot turn the SmartKey to position 2in
the ignition lock
R cannot release the electric parking brake
R cannot shift the transmission to position N
i The function of the electric parking brake
and the parking lock is dependent on the
on-board voltage.
If the on-board voltage is low or there is a
system malfunction, it is possible that:
R the electric parking brake may not be
applied in certain circumstances, or
R the transmission may not be shifted to P
i Switch off non-essential consumers, e.g.
the radio.
i Disarm the automatic locking feature
(Y page 198). You could otherwise be
locked out when pushing or towing the
vehicle. Towing
293Roadside Assistance Z
Page 303 of 338
other obstacles. If it is necessary to drive over
curbs, speed humps or similar elevations, try to do so slowly and at an obtuse angle. Oth-
erwise, the tires, particularly the sidewalls,
may be damaged. Regular checking of wheels and tires
G
WARNING
Damaged tires can cause tire inflation pres-
sure loss. As a result, you could lose control of your vehicle. There is a risk of accident.
Check the tires regularly for signs of damage
and replace any damaged tires immediately.
Regularly check the wheels and tires of your
vehicle for damage at least once a month, as well as after driving off-road or on rough
roads. Damaged wheels can cause a loss of
tire pressure. Pay particular attention to dam-
age such as:
R cuts in the tires
R punctures
R tears in the tires
R bulges on tires
R deformation or severe corrosion on wheels
Regularly check the tire tread depth and the
condition of the tread across the whole width of the tire (Y page 301). If necessary, turn the
front wheels to full lock in order to inspect the
inner side of the tire surface.
All wheels must have a valve cap to protect
the valve against dirt and moisture. Do not
mount anything onto the valve other than the standard valve cap or other valve caps
approved by Mercedes-Benz for your vehicle.
Do not use any other valve caps or systems,
e.g. tire pressure monitoring systems.
Regularly check the pressure of all the tires
particularly prior to long trips. Adjust the tire pressure as necessary (Y page 303).The service life of tires depends, among other
things, on the following factors:
R Driving style
R Tire pressure
R Distance covered Notes on tire tread
G
WARNING
Insufficient tire tread will reduce tire traction.
The tire is no longer able to dissipate water.
This means that on wet road surfaces, the risk of hydroplaning increases, in particular where speed is not adapted to suit the driving con-
ditions. There is a risk of accident.
If the tire pressure is too high or too low, tires
may exhibit different levels of wear at differ-
ent locations on the tire tread. Thus, you
should regularly check the tread depth and
the condition of the tread across the entire
width of all tires.
Minimum tire tread depth for:
R Summer tires: âin (3 mm)
R M+S tires: ãin (4 mm)
For safety reasons, replace the tires before
the legally prescribed limit for the minimum
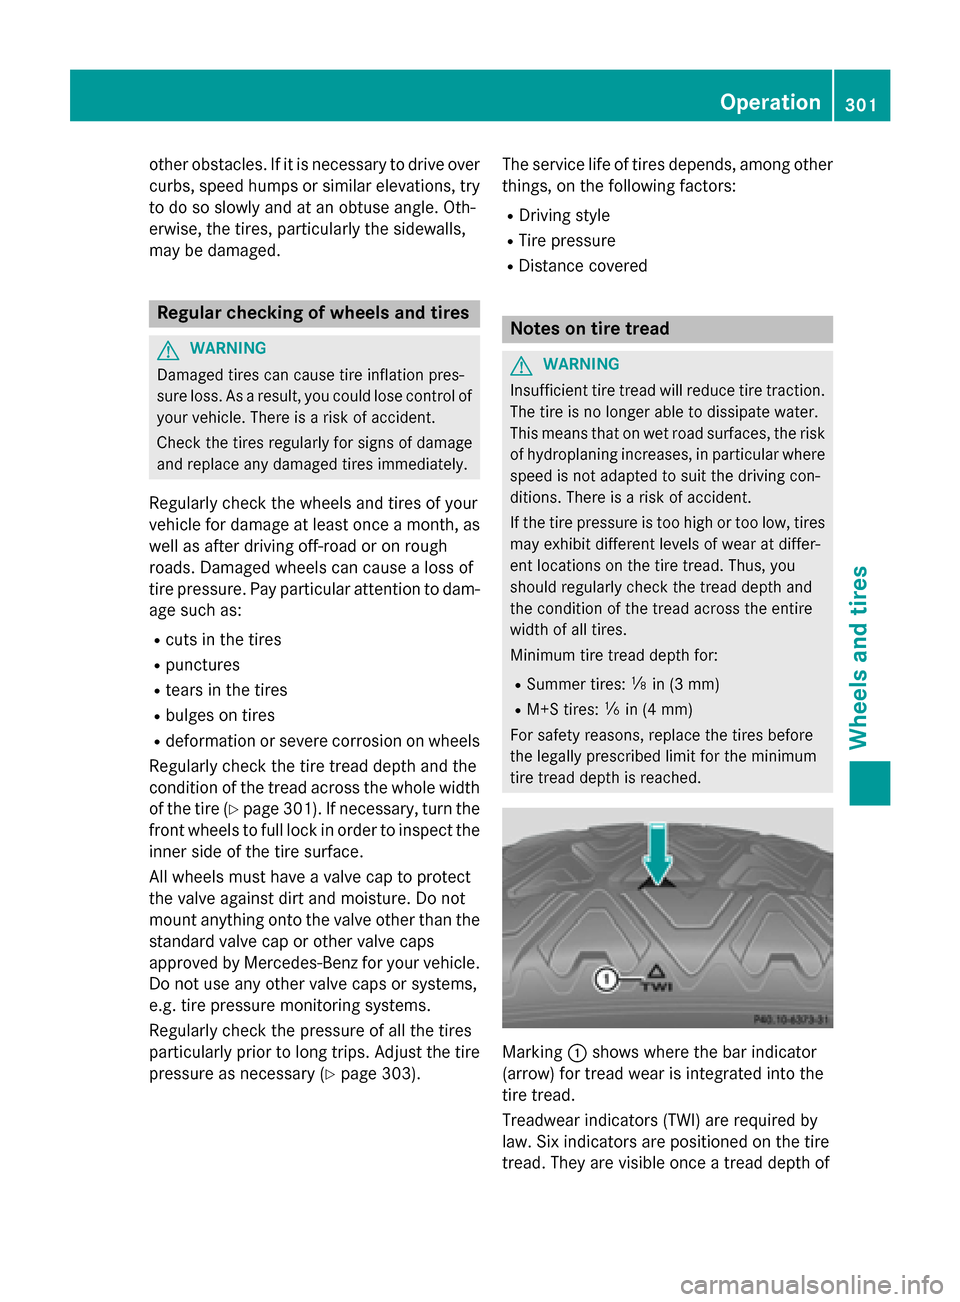
tire tread depth is reached. Marking
:shows where the bar indicator
(arrow) for tread wear is integrated into the
tire tread.
Treadwear indicators (TWI) are required by
law. Six indicators are positioned on the tire
tread. They are visible once a tread depth of Operation
301Wheels and tires Z
Page 318 of 338
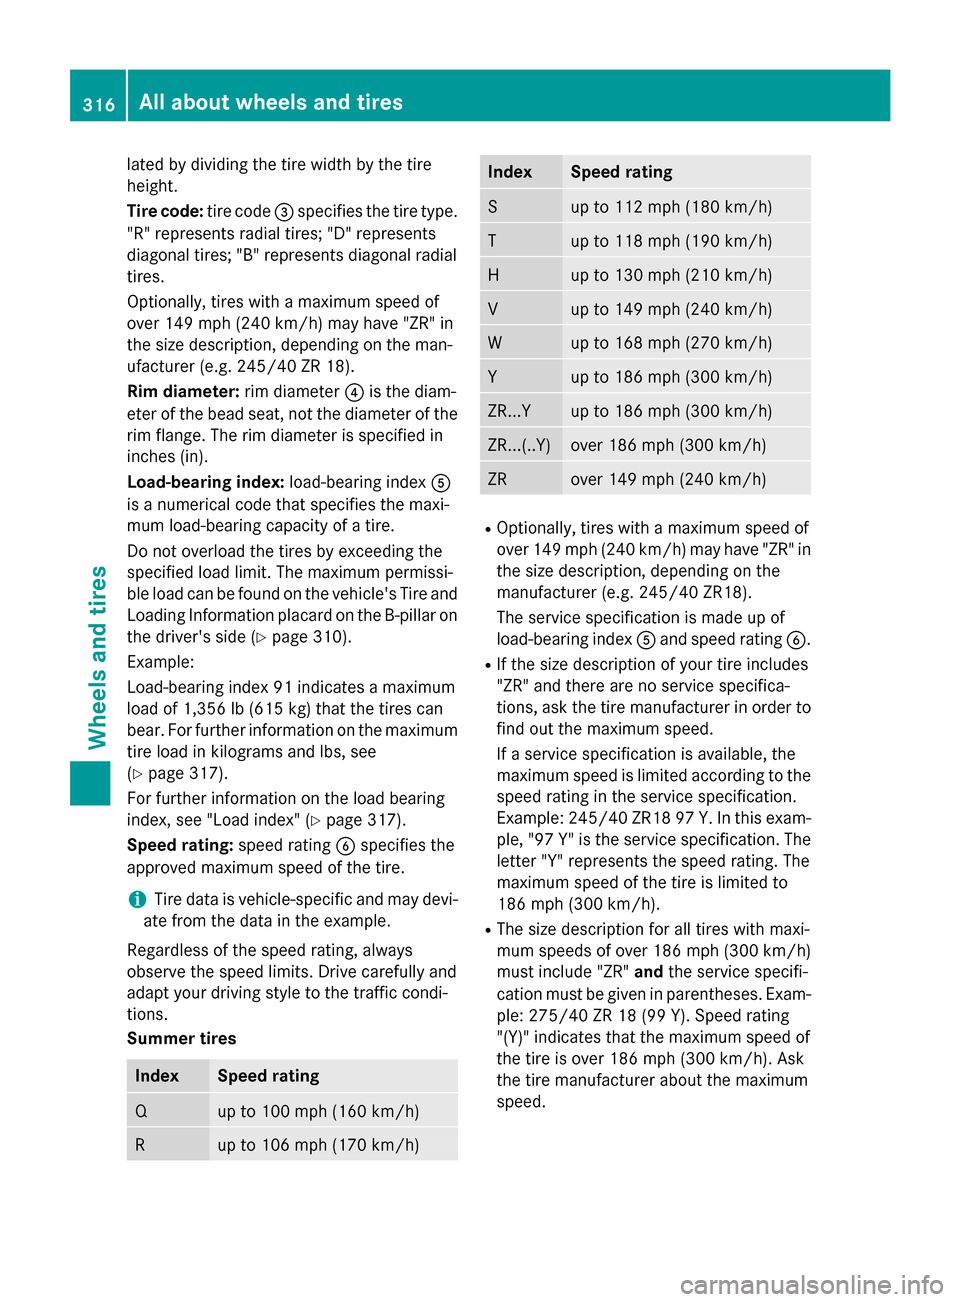
lated by dividing the tire width by the tire
height.
Tire code: tire code=specifies the tire type.
"R" represents radial tires; "D" represents
diagonal tires; "B" represents diagonal radial
tires.
Optionally, tires with a maximum speed of
over 149 mph (240 km/h) may have "ZR" in
the size description, depending on the man-
ufacturer (e.g. 245/40 ZR 18).
Rim diameter: rim diameter?is the diam-
eter of the bead seat, not the diameter of the
rim flange. The rim diameter is specified in
inches (in).
Load-bearing index: load-bearing indexA
is a numerical code that specifies the maxi-
mum load-bearing capacity of a tire.
Do not overload the tires by exceeding the
specified load limit. The maximum permissi-
ble load can be found on the vehicle's Tire and Loading Information placard on the B-pillar on
the driver's side (Y page 310).
Example:
Load-bearing index 91 indicates a maximum
load of 1,356 lb (615 kg) that the tires can
bear. For further information on the maximum
tire load in kilograms and lbs, see
(Y page 317).
For further information on the load bearing
index, see "Load index" (Y page 317).
Speed rating: speed ratingBspecifies the
approved maximum speed of the tire.
i Tire data is vehicle-specific and may devi-
ate from the data in the example.
Regardless of the speed rating, always
observe the speed limits. Drive carefully and
adapt your driving style to the traffic condi-
tions.
Summer tires Index Speed rating
Q up to 100 mph (160 km/h)
R up to 106 mph (170 km/h) Index Speed rating
S up to 112 mph (180 km/h)
T up to 118 mph (190 km/h)
H up to 130 mph (210 km/h)
V up to 149 mph (240 km/h)
W up to 168 mph (270 km/h)
Y up to 186 mph (300 km/h)
ZR...Y up to 186 mph (300 km/h)
ZR...(..Y) over 186 mph
(300 km/h) ZR over 149 mph
(240 km/h) R
Optionally, tires with a maximum speed of
over 149 mph (240 km/h) may have "ZR" in the size description, depending on the
manufacturer (e.g. 245/40 ZR18).
The service specification is made up of
load-bearing index Aand speed rating B.
R If the size description of your tire includes
"ZR" and there are no service specifica-
tions, ask the tire manufacturer in order to
find out the maximum speed.
If a service specification is available, the
maximum speed is limited according to the
speed rating in the service specification.
Example: 245/40 ZR18 97 Y.In this exam-
ple, "97 Y" is the service specification. The letter "Y" represents the speed rating. The
maximum speed of the tire is limited to
186 mph (300 km/h).
R The size description for all tires with maxi-
mum speeds of over 186 mph (300 km/h)
must include "ZR" andthe service specifi-
cation must be given in parentheses. Exam- ple: 275/40 ZR 18 (99 Y). Speed rating
"(Y)" indicates that the maximum speed of
the tire is over 186 mph (300 km/h). Ask
the tire manufacturer about the maximum
speed. 316
All about wheels and tiresWheels and tires
Page 331 of 338
Useful information
............................330
Information regarding technical
data .................................................... 330
Identification plates .........................330
Service products and filling capaci- ties ..................................................... 331
Vehicle data ....................................... 334 329Technical data
Page 333 of 338
Vehicle identification number (VIN)
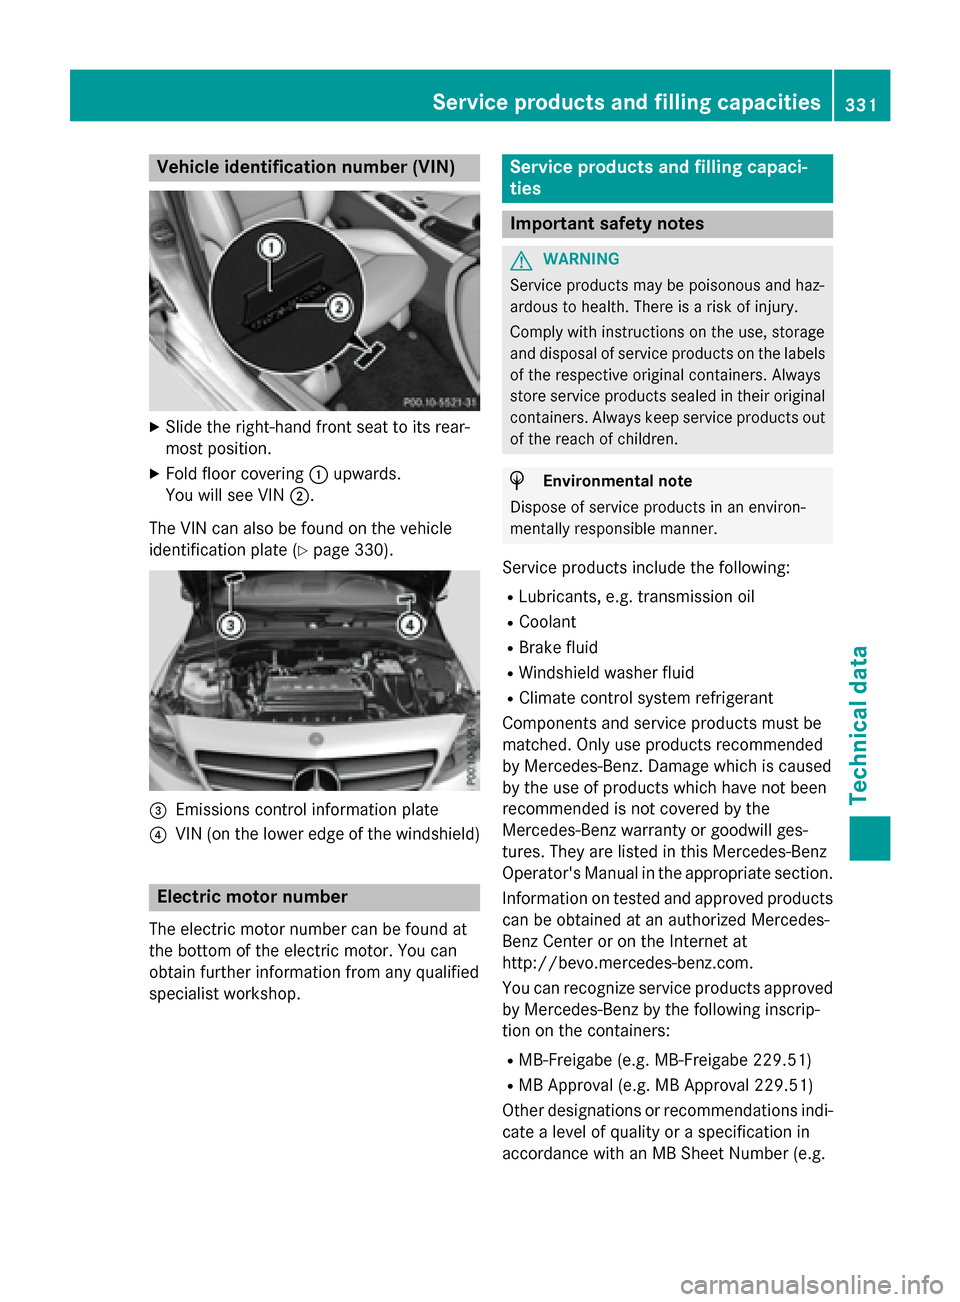
X
Slide the right-hand front seat to its rear-
most position.
X Fold floor covering :upwards.
You will see VIN ;.
The VIN can also be found on the vehicle
identification plate (Y page 330).=
Emissions control information plate
? VIN (on the lower edge of the windshield) Electric motor number
The electric motor number can be found at
the bottom of the electric motor. You can
obtain further information from any qualified
specialist workshop. Service products and filling capaci-
ties
Important safety notes
G
WARNING
Service products may be poisonous and haz-
ardous to health. There is a risk of injury.
Comply with instructions on the use, storage
and disposal of service products on the labels of the respective original containers. Always
store service products sealed in their original containers. Always keep service products out
of the reach of children. H
Environmental note
Dispose of service products in an environ-
mentally responsible manner.
Service products include the following:
R Lubricants, e.g. transmission oil
R Coolant
R Brake fluid
R Windshield washer fluid
R Climate control system refrigerant
Components and service products must be
matched. Only use products recommended
by Mercedes-Benz. Damage which is caused
by the use of products which have not been
recommended is not covered by the
Mercedes-Benz warranty or goodwill ges-
tures. They are listed in this Mercedes-Benz
Operator's Manual in the appropriate section.
Information on tested and approved products can be obtained at an authorized Mercedes-
Benz Center or on the Internet at
http://bevo.mercedes-benz.com.
You can recognize service products approved
by Mercedes-Benz by the following inscrip-
tion on the containers:
R MB-Freigabe (e.g. MB-Freigabe 229.51)
R MB Approval (e.g. MB Approval 229.51)
Other designations or recommendations indi- cate a level of quality or a specification in
accordance with an MB Sheet Number (e.g. Service products and filling capacities
331Technical data Z