2015 LINCOLN MKZ HYBRID buttons
[x] Cancel search: buttonsPage 158 of 504

HomeLink Wireless Control System (If
Equipped) WARNING
Do not use the system with any garage
door opener that does not have the
safety stop and reverse feature as required
by U.S. Federal Safety Standards (this
includes any garage door opener
manufactured before April 1, 1982). A garage
door opener which cannot detect an object,
signaling the door to stop and reverse, does
not meet current federal safety standards.
Using a garage door opener without these
features increases the risk of serious injury
or death. Note:
Make sure that the garage door and
security device are free from obstruction
when you are programming. Do not program
the system with the vehicle in the garage.
Note: Make sure you keep the original
remote control transmitter for use in other
vehicles as well as for future system
programming. Note:
We recommend that upon the sale or
lease termination of your vehicle, you erase
the programmed function buttons for security
reasons. See Erasing the function button
codes later in this section.
Note: You can program a maximum of three
devices. To change or replace any of the
three devices after it has been initially
programmed, you must first erase the current
settings. See Erasing the function button
codes later in this section. The universal garage door opener replaces
the common hand-held garage door opener
with a three-button transmitter that is
integrated into the driver’
s sun visor.The system includes two primary features, a
garage door opener and a platform for
remote activation of devices within the home.
As well as being programmed for garage
doors, the system transmitter can be
programmed to operate entry gate operators,
security systems, entry door locks and home
or office lighting.
Additional system information can be found
online at www.homelink.com or by calling
the toll-free help line on 1-800-355-3515.
In-vehicle programming
This process is to program your hand-held
transmitter and your in-vehicle HomeLink
button.
Note:
Put a new battery in the hand-held
transmitter. This will ensure quicker training
and accurate transmission of the
radio-frequency signal.
155
MKZ Hybrid (), enUSA Universal Garage Door OpenerE142657
Page 159 of 504

1. With your vehicle parked outside of the
garage, turn your ignition to the on
position, but do not start your vehicle.
2. Hold your hand-held garage door transmitter 1–3 inches (2–8 centimeters)
away from the HomeLink button you want
to program.
3. Using both hands, simultaneously, press
and hold the desired HomeLink button
and the hand-held transmitter button. DO
NOT release either one until the
HomeLink indicator light flashes slowly
and then rapidly. When the indicator light
flashes rapidly, both buttons may be
released. The rapid flashing indicates
successful training. 4.
Press and hold the HomeLink button you
programmed for five seconds, then
release. You may need to do this twice
to activate the door. If your garage door
does not operate, watch the HomeLink
indicator light.
If the indicator light stays on, the
programming is complete. See Programming
your garage door motor later in this section.
If the indicator light flashes rapidly for 2
seconds and then turns to a constant light,
the HomeLink button is not programmed yet.
Do the following:
Press and hold the HomeLink button while
you press and release the hand-held
transmitter button every 2 seconds. The
HomeLink indicator light will flash slowly and
then rapidly once the HomeLink function
button recognizes and accepts the hand-held
transmitter’ s radio frequency signal.
After programming the HomeLink button,
begin programming your garage door opener
motor.
Note: You may need a ladder to reach the
unit and you may need to remove the cover
or lamp lens on your garage door opener. To program additional buttons, repeat Steps
1 – 4.
For questions or comments, please contact
HomeLink at www.homelink.com or
1-800-355-3515.
Programming your garage door opener
motor
1. Press the learn button on the garage
door opener motor and then you have
30 seconds to complete the next two
steps.
2. Return to your vehicle.
156
MKZ Hybrid (), enUSA Universal Garage Door OpenerE142658 E142659
Page 160 of 504

3. Press and hold the function button you
want to program for 2 seconds, then
release. Repeat this step. Depending on
your brand of garage door opener, you
may need to repeat this sequence a third
time.
Erasing the Function Button Codes
Note: You cannot erase individual buttons. 1. Press and hold the outer two function
buttons simultaneously for approximately
20 seconds until the indicator lights
above the buttons flash rapidly.
2. When the indicator lights flash, release the buttons. The codes for all buttons are
erased.
Reprogramming a Single Button
To program a device to a previously trained
button, follow these steps:
1. Press and hold the desired button. Do NOT release the button. 2.
The indicator light will begin to flash after
20 seconds. Without releasing the
button, follow Step 1 in the Programming
section.
For questions or comments, contact
HomeLink at www.homelink.com or
1-800-355-3515.
Programming to a Genie Intellicode 2
Garage Door Opener
Note: The Genie Intellicode 2 transmitter
must already be programmed to operate
with the garage door opener.
Note: To program HomeLink to the
transmitter you must first put the transmitter
into programming mode.
157
MKZ Hybrid (), enUSA Universal Garage Door OpenerE142658 E142660
Page 161 of 504

Red indicator light
A.
Green indicator light
B.
1. Press and hold one of the buttons on the
hand-held transmitter for 10 seconds. The
indicator light will change from green to
red and green.
2. Press the same button twice to confirm the change to programming mode. If
done properly the indicator light will
appear red.
3. Hold the transmitter within 1–3 inches (2–8 centimeters) of the button on the
visor you want to program. 4. Press and hold both the programmed
Genie button on the hand-held
transmitter and the button you want to
program. The indicator light on the visor
will flash rapidly when the programming
is successful.
Note: The Genie transmitter will transmit for
up to 30 seconds. If HomeLink does not
program within 30 seconds the Genie
transmitter will need to be pressed again. If
the Genie transmitter indicator light displays
green and red, release the button until the
indicator light turns off before pressing the
button again.
Once HomeLink has been programmed
successfully, the Genie transmitter must be
changed out of program mode. To do this:
1. Press and hold the previously programmed Genie button on the
hand-held transmitter for 10 seconds. The
indicator light will change from red to red
and green.
2. Press the same button twice to confirm the change. If done correctly the indicator
light will turn green. Programming HomeLink to the Genie
Intellicode Garage Door Opener Motor
Note:
You may need a ladder to access the
garage door opener motor. 1. Press and hold the program button on
the garage door opener motor until both
blue indicator lights turn on.
2. Release the program button. Only the smaller round indicator light should be
on.
3. Press and release the program button. The larger purple indicator light will flash.
Note: The next two steps must be completed
in 30 seconds.
158
MKZ Hybrid (), enUSA Universal Garage Door OpenerBAE142661 E142662
Page 162 of 504

4. Press and release the Genie Intellicode
2 hand-held transmitter’ s previously
programmed button. Both indicator lights
on the garage door opener motor unit
should now flash purple.
5. Press and hold the previously programmed button on the visor for 2
seconds. Repeat this step up to 3 times
until the garage door moves.
Programming is now complete.
Clearing a HomeLink Device
To erase programming from the three
HomeLink buttons press and hold the two
outer HomeLink buttons until the indicator
light begins to flash. The indicator light will
begin flashing in 10 to 20 seconds, at which
time both buttons should be released.
Programming has now been erased, and the
indicator light should blink slowly to indicate
the device is in train mode when any of the
three HomeLink buttons are pressed. FCC and RSS-210 Industry Canada
Compliance
This device complies with Part 15 of the FCC
Rules and with RSS-210 of Industry Canada.
Operation is subject to the following two
conditions: (1) this device may not cause
harmful interference, and (2) this device must
accept any interference received, including
interference that may cause undesired
operation.
Changes or modifications to your device not
expressly approved by the party responsible
for compliance can void the user’
s authority
to operate the equipment.
159
MKZ Hybrid (), enUSA Universal Garage Door Opener
Page 190 of 504

AUTOMATIC TRANSMISSION
WARNINGS
Always set the parking brake fully and
make sure your vehicle is in park (P).
Turn the ignition off whenever you leave your
vehicle. Do not apply the brake pedal and
accelerator pedal simultaneously.
Applying both pedals simultaneously for
more than three seconds will limit engine
rpm, which may result in difficulty maintaining
speed in traffic and could lead to serious
injury. Push Button Shift Transmission
Your vehicle is equipped with an electronic
transmission. The shift buttons are located
on the instrument panel, next to the
MyLincoln Touch
™ system. Select the gears
by pressing and releasing the PRNDL
buttons. Every time you select a gear, the selected
button will light up. You will also see the gear
selected appear in the instrument cluster. Understanding the Positions of your
Electronic Transmission
Note:
Always come to a complete stop
before putting your vehicle into and out of
park (P).
Putting your vehicle in gear:
1. Fully press down the brake pedal.
2. Press and release the button on the instrument panel of the gear you want to
select.
3. The gear shift button you select will illuminate and the instrument cluster will
show the selected gear.
4. Release the brake pedal and your transmission will remain in the selected
gear.
187
MKZ Hybrid (), enUSA TransmissionP
RN
D
L
E146131 E152628
Page 193 of 504

Brake-Shift Interlock Override
WARNINGS
Do not drive your vehicle until you
verify that the brake lamps are working.
When doing this procedure, you will
be taking your vehicle out of park
which means your vehicle can roll freely. To
avoid unwanted vehicle movement, always
fully set the parking brake prior to doing this
procedure. Use wheel chocks if appropriate. If you fully release the parking brake,
but the brake warning lamp remains
illuminated, the brakes may not be working
properly. See your authorized dealer. Note:
See your authorized dealer as soon
as possible if this procedure is used.
Note: For some markets this feature will be
disabled.
Note: This feature will only function if your
12-volt battery has power. Use the brake-shift interlock override
procedure to put your vehicle in gear in the
event of an electrical malfunction or if your
vehicle has a dead battery. The brake shift
interlock override button is located inside of
the center console, below media inputs. You
will need a tool (for example a screwdriver
or similar tool) to access the button.
1. Apply the parking brake and turn the
ignition off before performing this
procedure. 2.
Locate the brake shifter interlock access
slot. The slot is located below the media
hub, in the front of the center console
storage bin and it is not labeled. Note:
Make sure that you correctly identify
the access hole as not to damage the media
hub.
3. Using a tool, press and hold the brake shift interlock switch. When the
instrument panel buttons flash, your
vehicle is in override mode.
4. With the override switch still held, press the neutral (N) button for towing, or the
desired gear to shift from Park.
5. Release the override button.
6. Your vehicle will remain in Stay in Neutral
mode for wrecker towing purposes or
can be shifted to the desired gear and
driven (if your vehicle can be driven).
7. Release the parking brake.
If Your Vehicle Gets Stuck In Mud or
Snow
Note: Do not rock your vehicle if the engine
is not at normal operating temperature or
damage to the transmission may occur.
Note: Do not rock your vehicle for more than
a minute or damage to the transmission and
tires may occur, or the engine may overheat.
190
MKZ Hybrid (), enUSA TransmissionE152215
Page 300 of 504
Note:
Always dispose of automotive
batteries in a responsible manner. Follow
your local authorized standards for disposal.
Call your local authorized recycling center
to find out more about recycling automotive
batteries.
Note: It is recommended that the negative
battery cable terminal be disconnected from
the battery if you plan to store your vehicle
for an extended period of time.
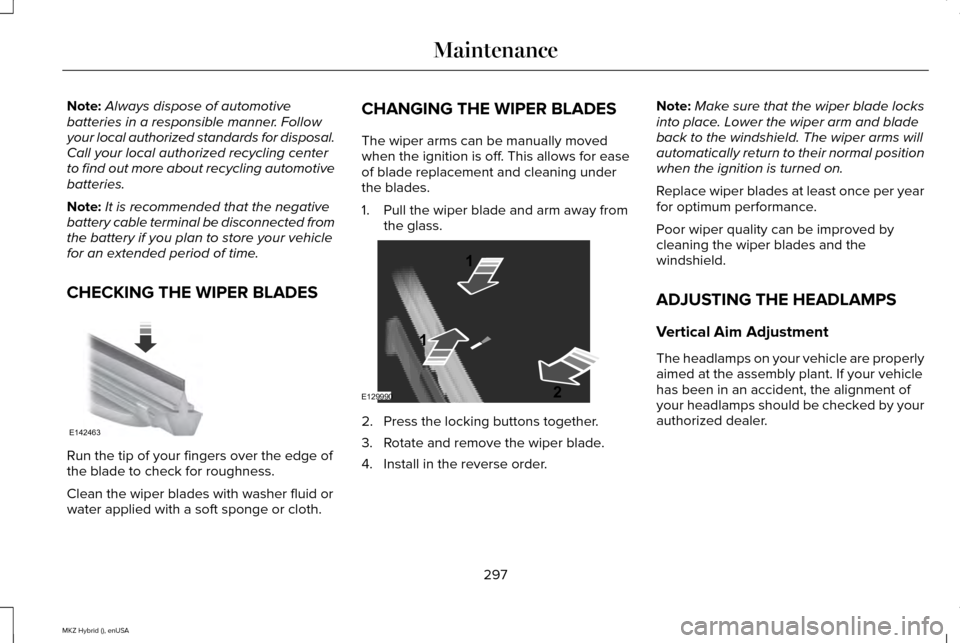
CHECKING THE WIPER BLADES Run the tip of your fingers over the edge of
the blade to check for roughness.
Clean the wiper blades with washer fluid or
water applied with a soft sponge or cloth. CHANGING THE WIPER BLADES
The wiper arms can be manually moved
when the ignition is off. This allows for ease
of blade replacement and cleaning under
the blades.
1. Pull the wiper blade and arm away from
the glass. 2. Press the locking buttons together.
3. Rotate and remove the wiper blade.
4. Install in the reverse order.Note:
Make sure that the wiper blade locks
into place. Lower the wiper arm and blade
back to the windshield. The wiper arms will
automatically return to their normal position
when the ignition is turned on.
Replace wiper blades at least once per year
for optimum performance.
Poor wiper quality can be improved by
cleaning the wiper blades and the
windshield.
ADJUSTING THE HEADLAMPS
Vertical Aim Adjustment
The headlamps on your vehicle are properly
aimed at the assembly plant. If your vehicle
has been in an accident, the alignment of
your headlamps should be checked by your
authorized dealer.
297
MKZ Hybrid (), enUSA MaintenanceE142463 E129990
1
1 2