2015 LINCOLN MKC display
[x] Cancel search: displayPage 90 of 490

AUTOWIPERS (If Equipped)
Note: Fully defrost the windshield before
switching on the windshield wipers.
Note: Make sure you switch off the
windshield wipers before entering a car
wash.
Note: Clean the windshield and wiper blades
if they begin to leave streaks or smears. If
that does not resolve the issue, install new
wiper blades.
Note: If you switch autolamps on in
conjunction with autowipers, your low beam
headlamps will illuminate automatically when
the rain sensor activates the windshield
wipers continuously.
Note: Wet or winter driving conditions with
ice, snow or salty road mist can cause
inconsistent and unexpected wiping or
smearing. In these conditions, you can do the following
to help keep your windshield clear:
•
Lower the sensitivity of the autowipers
to reduce the amount of smearing.
• Switch to normal or high-speed wipe.
• Switch the autowipers off. Highest sensitivity
A
OnB
Lowest sensitivity
C The autowipers feature uses a rain sensor.
You will find it in the area around the interior
mirror. The rain sensor monitors the amount
of moisture on the windshield and
automatically turns on the wipers. It will
adjust the wiper speed by the amount of
moisture that the sensor detects on the
windshield.
Note:
This autowiper feature is automatically
set to on and remains on until you switch it
off in the information display. You can also
switch the feature back on at any time.
See
General Information (page 87).
Use the rotary control to adjust the sensitivity
of the rain sensor. Set the control to low
sensitivity, and the wipers will turn on when
the rain sensor detects a large amount of
moisture on the windshield. Set the control
to high sensitivity, and the wipers will turn
on when the rain sensor detects a small
amount of moisture on the windshield.
87
MKC (TME), enUSA Wipers and WashersA
C
B
E169315
Page 91 of 490

Note:
When you set the wiper system to
intermittent wipe and the autowiper system
is on, the autowiper sensitivity setting adjusts
the wiper speed according to the moisture
on the windshield only. Use the wiper lever
to wipe the windshield on-demand.
Keep the outside of the windshield clean.
The rain sensor is very sensitive. If the area
around the mirror is dirty, then the wipers
may operate if dirt, mist or insects hit the
windshield.
WINDSHIELD WASHERS
Note: Do not operate the washers when the
washer reservoir is empty. This may cause
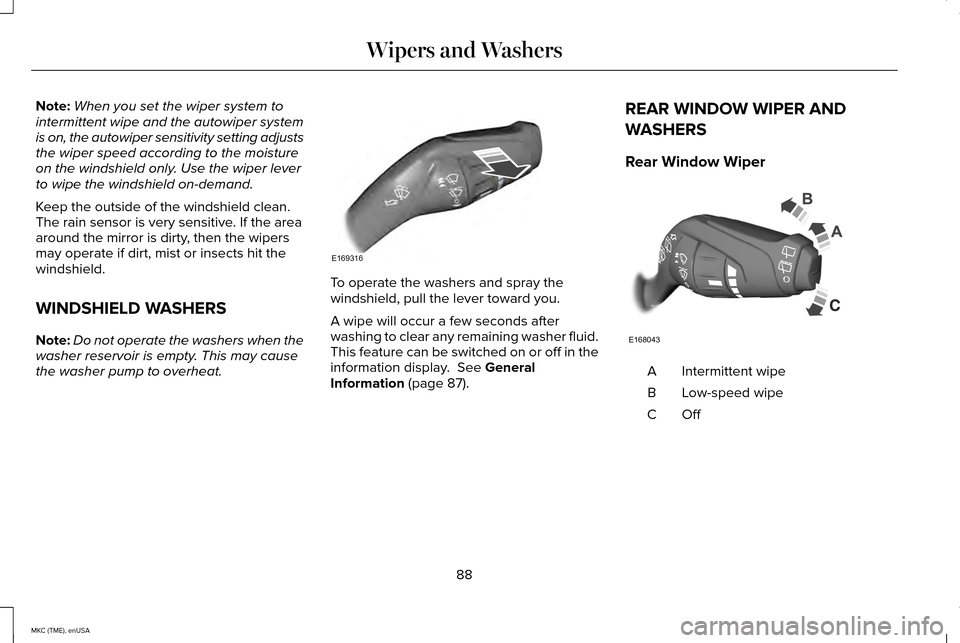
the washer pump to overheat. To operate the washers and spray the
windshield, pull the lever toward you.
A wipe will occur a few seconds after
washing to clear any remaining washer fluid.
This feature can be switched on or off in the
information display. See General
Information (page 87). REAR WINDOW WIPER AND
WASHERS
Rear Window Wiper
Intermittent wipe
A
Low-speed wipe
B
OffC
88
MKC (TME), enUSA Wipers and WashersE169316 E168043
Page 94 of 490

AUTOLAMPS (If Equipped)
WARNING
The daytime running lamps system
does not activate the tail lamps and
may not provide adequate lighting during
low visibility driving conditions. Also, the
autolamps switch position may not activate
the headlamps in all low visibility conditions,
such as daytime fog. Always ensure that your
headlamps are switched to auto or on, as
appropriate, during all low visibility
conditions. Failure to do so may result in a
collision. When the lighting control is in the autolamps
position, the headlamps will automatically
turn on in low light situations or when wipers
activate.
If equipped, the following also activate when
the lighting control is in the autolamps
position and you switch them on in the
information display:
•
Configurable daytime running lamps.
• Automatic high beam control.
• Adaptive headlamp control.
The headlamps remain on for a period of
time after you switch the ignition off. Use the
information display controls to adjust the
period of time that the headlamps remain
on.
See Information Displays (page 112).
Note: With the headlamps in the autolamps
position, you cannot switch the high beam
headlamps on until the autolamps system
turns the headlamps on. Note:
If the lighting control switch is in the
autolamps position and the headlamps are
off, the parking lamps will light as signature
lighting. If the headlamps are on, or the
lighting control switch is in the parking lamps
position, the parking lamps will not light as
signature lighting.
Windshield Wiper Activated Headlamps
The windshield wiper activated headlamps
turn on within 10 seconds when you switch
the windshield wipers on and the lighting
control switch is in the autolamps position.
They will turn off approximately 60 seconds
after you switch the windshield wipers off.
The headlamps will not turn on by wiper
activation:
• During a mist wipe.
• When the wipers are on to clear washer
fluid during a wash condition.
• If the wipers are in intermittent mode.
Note: If you have autolamps and autowipers
switched on, the low beam headlamps will
turn on automatically when the windshield
wipers operate continuously.
91
MKC (TME), enUSA LightingE142451
Page 96 of 490

Type 2 - Configurable
Note:
If this type is equipped, you are able
to switch the daytime running lamps on or
off using the information display controls.
See Information Displays (page 112).
When the daytime running lamps are
switched on in the information display and
you switch the ignition to the on position with
the lighting control in the autolamps position,
the daytime running lamps turn on whenever
the headlamps are off.
The other lighting control switch positions
do not activate the daytime running lamps
and can be used to temporarily override
autolamp control.
When switched off in the information display,
the daytime running lamps are off in all
lighting control switch positions. AUTOMATIC HIGH BEAM
CONTROL
(If Equipped)
The system will automatically turn on your
high beams if it is dark enough and no other
traffic is present. When it detects the
headlights of an approaching vehicle, the tail
lamps of the preceding vehicle or street
lighting, the system will turn off the high
beams before they distract other drivers. The
low beams remain on.
Note: If it appears that automatic control of
the high beams is not functioning properly,
check the windshield in front of the camera
for a blockage. A clear view of the road is
required for proper system operation. Have
any windshield damage in the area of the
camera ’s field-of-view repaired.
Note: If the system detects a blockage such
as bird droppings, bug splatter, snow or ice,
and you do not observe changes, the system
will go into low beam mode until you clear
the blockage. A message may also appear
in the instrument cluster display noting the
front camera is blocked. Note:
Typical road dust, dirt and water spots
will not affect the performance of the
automatic high beam system . However, in
cold or inclement weather conditions, you
will notice a decrease in the availability of
the high beam system, especially at start up.
If you want to change the beam state
independently of the system, you may switch
the high beams on or off using the
multifunction switch. Automatic control will
resume when conditions are correct.
Note: Modification of the vehicle ride height
such as using much larger tires, may
degrade feature performance.
A camera sensor, centrally mounted behind
the windshield of your vehicle, continuously
monitors conditions to decide when to switch
the high beams off and on.
Once the system is active, the high beams
will switch on if:
• the ambient light level is low enough
• there is no traffic in front of the vehicle
• the vehicle speed is greater than 25 mph
(40 km/h)
93
MKC (TME), enUSA Lighting
Page 97 of 490

The high beams will switch off if:
•
the system detects the headlamps of an
approaching vehicle or the tail lamps of
a preceding vehicle.
• vehicle speed falls below 16 mph
(25 km/h)
• the ambient light level is high enough
that high beams are not required
• the system detects severe rain, snow or
fog
• the camera is blocked
Activating the System
Switch on the system using the information
display and autolamps.
See Information
Displays (page 112). See Autolamps (page
91). Switch the lighting control to the autolamps
position.
Manually Overriding the System When the automatic control has activated
the high beams, pushing or pulling the stalk
will provide a temporary override to low
beam.
Use the information display menu to
permanently deactivate the system, or turn
the lighting control switch from autolamps to
headlamps.
DIRECTION INDICATORS
Push the lever up or down to use the
direction indicators.
94
MKC (TME), enUSA LightingE142451 E169254 E170427
Page 101 of 490

Window Lock
Press the control to lock or unlock the rear
window controls. It will illuminate when you
lock the rear window controls.
Accessory Delay
You can use the window switches for several
minutes after you switch the ignition off or
until you open either front door.
GLOBAL OPENING AND CLOSING
You can use the remote control to operate
the windows with the ignition off. Note:
You can switch this feature on and off
in the information display or contact an
authorized dealer. See General Information
(page 112).
Note: To operate this feature, make sure the
accessory delay is not switched on.
Opening the Windows
You can open the windows only for a short
time after you unlock your vehicle with the
remote control. After you unlock your vehicle,
press and hold the remote control unlock
button to open the windows. Release the
button once movement starts. Press the lock
or unlock button to stop movement.
Closing the Windows WARNING
When closing the windows, you should
verify they are free of obstructions and
make sure that children and pets are not in
the proximity of the window openings. To close the windows, press and hold the
remote control lock button. Release the
button once movement starts. Press the lock
or unlock button to stop movement.
EXTERIOR MIRRORS
Power Exterior Mirrors
WARNING
Do not adjust the mirrors when your
vehicle is moving.
98
MKC (TME), enUSA Windows and MirrorsE144072
Page 102 of 490

Left-hand mirror.
A
Adjustment control.
B
Right-hand mirror.
C
To adjust a mirror:
1. Select the mirror you want to adjust. The
control will light.
2. Adjust the position of the mirror.
3. Press the mirror control again. Fold-Away Exterior Mirrors (If Equipped)
Push the mirror toward the door window
glass. Make sure that you fully engage the
mirror in its support when returning it to its
original position.
Auto-Folding Mirrors (If Equipped)
The exterior mirrors fold in toward the glass
automatically when you place the
transmission into park (P), open a front door
and then lock your vehicle by using either
the lock button on the door or with the lock
button on your remote transmitter.
Auto-folding mirrors unfold and return to their
original position automatically after you
unlock your vehicle, and then open and close
the driver's door.
You can switch this feature on and off
through the information display. See General
Information
(page 112). You can fold the mirrors on demand by
pressing the door lock control located on the
door. The control will light and the mirrors
will fold in toward the glass. Press the control
again to unfold the mirrors. The control light
will turn off.
Note:
If you use the control to fold the
mirrors on demand and the auto fold feature
is switched on, you must use the control
again to unfold them.
99
MKC (TME), enUSA Windows and MirrorsE144073 E170431
Page 108 of 490

GAUGES
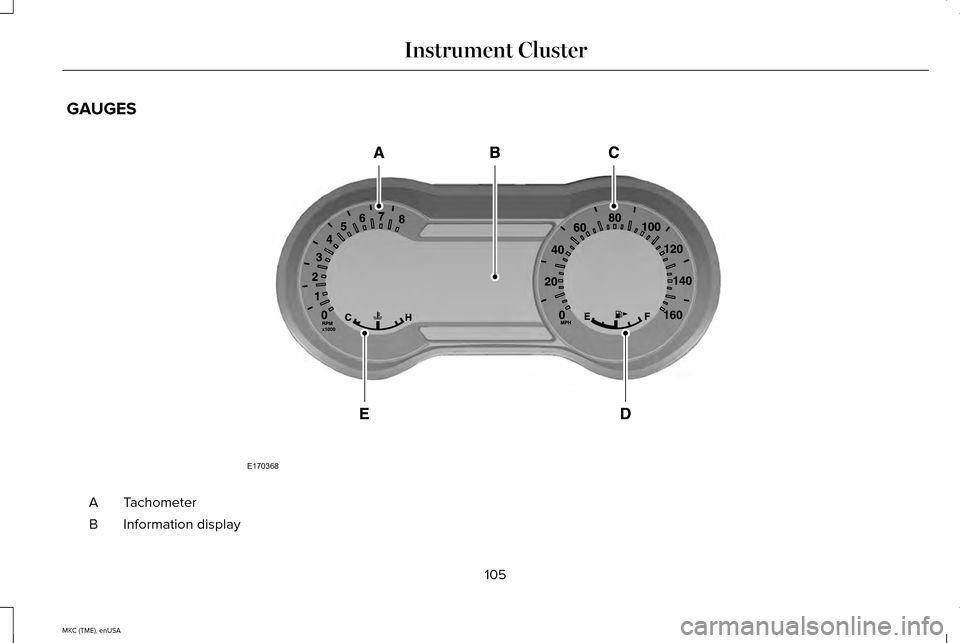
Tachometer
A
Information display
B
105
MKC (TME), enUSA Instrument ClusterE170368