Page 541 of 886
5413-4. Using the audio system
3
Interior features Type B
“PWR VOL” knob
Track selector button Playback button Search playback button
Random playback button Repeat play button Te x t b u t t o n
Pow e r Vo l u m e Playback/Pause button
Album selector buttons
BT·A menu knob
Page 611 of 886
6113-7. Other interior features
3
Interior features Clock The clock can be adjusted by pressing the buttons.
With a navigation system
Refer to the “Navigation System Owner’s Manual”.
With the Lexus Display Audio system
Adjusts the hours
Adjusts the minutes
Without a navigation system or the Lexus Display Audio system
Adjusts the hours
Adjusts the minutes
Page 629 of 886
6293-7. Other interior features
3
Interior features
Removing the luggage covers
Front luggage cover
Press the buttons to remove the
luggage cover.■ Luggage cover (if equipped)
Push from above until the claws
on both sides are securely
locked in position.
Pull out the luggage cover and
hook it onto the anchors. STEP 1
STEP 2
Page 632 of 886
6323-7. Other interior features
Garage door opener The garage door opener (HomeLink
Universal Transceiver) is manufactured
under license from HomeLink
.
Programming the HomeLink
(for U.S.A. owners)
The HomeLink
compatible transceiver in your vehicle has 3 buttons
which can be programmed to operate 3 different devices. Refer to the
programming method below appropriate for the device.
Indicator
Buttons
■ Programming the HomeLink
Point the remote control transmit-
ter for the device 1 to 3 in. (25 to
75 mm) from the HomeLink
control buttons.
Keep the HomeLink
indicator
light in view while programming.The garage door opener can be pr ogrammed to operate garage doors,
gates, entry doors, door locks, home lighting systems, security systems, and
other devices.
STEP 1
Page 633 of 886

6333-7. Other interior features
3
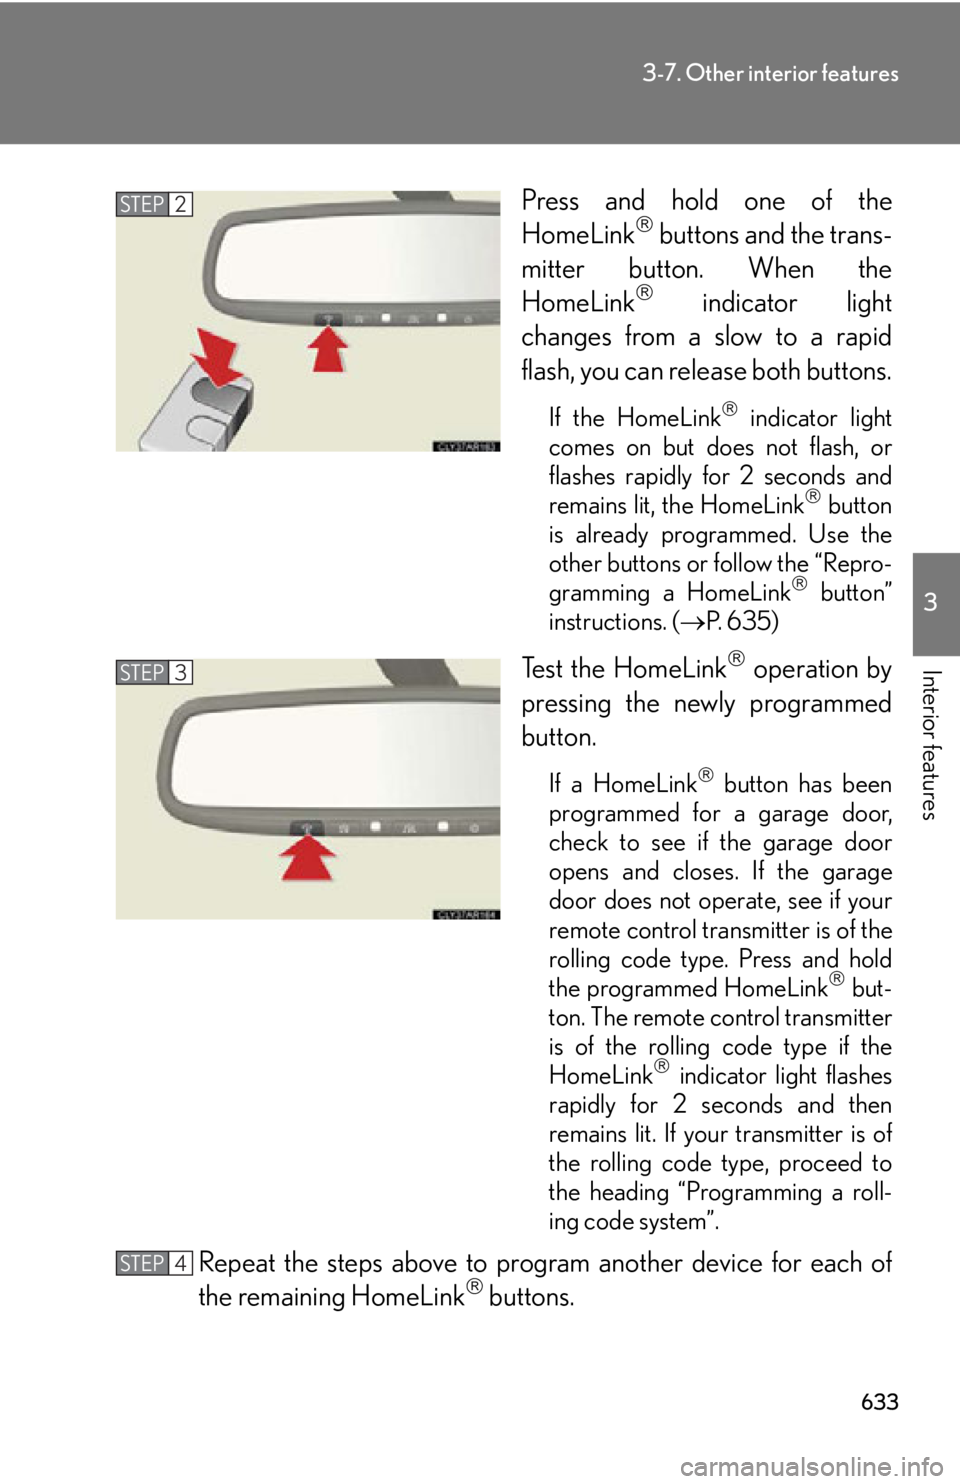
Interior features Press and hold one of the
HomeLink
buttons and the trans-
mitter button. When the
HomeLink
indicator light
changes from a slow to a rapid
flash, you can release both buttons. If the HomeLink
indicator light
comes on but does not flash, or
flashes rapidly for 2 seconds and
remains lit, the HomeLink
button
is already programmed. Use the
other buttons or follow the “Repro-
gramming a HomeLink
button”
instructions. ( P. 6 3 5 )
Test the HomeLink
operation by
pressing the newly programmed
button. If a HomeLink
button has been
programmed for a garage door,
check to see if the garage door
opens and closes. If the garage
door does not operate, see if your
remote control transmitter is of the
rolling code type. Press and hold
the programmed HomeLink
but-
ton. The remote control transmitter
is of the rolling code type if the
HomeLink
indicator light flashes
rapidly for 2 seconds and then
remains lit. If your transmitter is of
the rolling code type, proceed to
the heading “Programming a roll-
ing code system”.
Repeat the steps above to program another device for each of
the remaining HomeLink
buttons.STEP 2
STEP 3
STEP 4
Page 634 of 886

6343-7. Other interior features
■ Programming a Rolling Code system (for U.S.A. owners)
If your device is Rolling Code eq uipped, follow the steps under the
heading “Programming the HomeLink
” before proceeding with the
steps listed below.
Locate the learn button on th e ceiling mounted garage door
opener motor. The exact location and color of the button may
vary by brand of garage door opener motor. Refer to the operation manual supplied with the garage door opener
for the location of the learn button.
Press the learn button. Following this step, you have 30 se conds in which to initiate step 3
below.
Press and hold the vehi cle’s programmed HomeLink
button for
2 seconds and release it. Repeat this step once again. The garage
door may open. If the garage door opens, the programming process is complete. If the
door does not open, press and release the button a third time. This third
press and release will complete the programming process by opening
the garage door.
The ceiling mounted garage door op ener motor should now recognize
the HomeLink
signal and operate the garage door.
Repeat the steps above to prog ram another rolling code system
for any of the remaining HomeLink
buttons.
■ Programming an entry gate (for U .S.A. owners)/Programming all
devices in the Canadian market
Place your transmitter 1 to 3 in. (25 to 75 mm) away from the sur-
face of the HomeLink
.
Keep the HomeLink
indicator light in view while programming.
Press and hold the selected HomeLink
button.
Repeatedly press and release (cyc le) the device’s remote control
button for two seconds each until step 4 is completed.
When the indicator light on the HomeLink
compatible trans-
ceiver starts to flash rapidly, release the buttons.STEP 1
STEP 2
STEP 3
STEP 4
STEP 1
STEP 2
STEP 3
STEP 4
Page 635 of 886

6353-7. Other interior features
3
Interior features Test the operation of the HomeLink
by pressing the newly pro-
grammed button. Check to see if the gate/device operates cor-
rectly.
Repeat the steps above to program another device for each of
the remaining HomeLink
buttons.
■ Programming other devices
To program other devices such as home security systems, home door
locks or lighting, contact your auth orized Lexus dealer for assistance.
■ Reprogramming a button
The individual HomeLink
buttons cannot be erased but can be
reprogrammed. To reprogram a button, follow the “Reprogramming a
HomeLink
button” instructions.
Operating HomeLink
Press the appropriate HomeLink
button. The HomeLink
indicator
light should turn on. The HomeLink
compatible transceiver in your vehicle continues to send a
signal for up to 20 seconds as long as the button is pressed.
Reprogramming a HomeLink
button
Press and hold the desired HomeLink
button. After 20 seconds, the
HomeLink
indicator light will st art flashing slowly. Next, while still press-
ing and holding the HomeLink
button, press and hold the button on the
transmitter until the HomeLink
indicator light chan ges from a slow to a
rapid flash. STEP 5
STEP 6
Page 877 of 886

875Alphabetical index
Fuel
Capacity................................................ 808
Fuel gauge ................................................191
Fuel pump shut off system .............743
Information............................................. 818
Refueling ................................................. 105
Type........................................................... 818
Fuel door....................................................105
Fuel filler door..........................................105
Fuel pump shut off system .................743
Fuses.......................................................... 703
Garage door opener...........................632
Gauges........................................................ 191
Glove box ............................................... 599
Hands-free system for
mobile phone* ........................433, 560
Hazard lights
Switch ......................................................734
Head restraints
Adjustment ............................................... 81
Headlight aim .......................................... 717
Headlight cleaner .................................226
Headlights
Discharge headlight
precautions ........................................732
Replacing light bulbs ......................... 719
Switch .......................................................... 211
Wattage ................................................... 817
Head-up display
Display contrast adjustment
switch ................................................... 206
Display position adjustment
switch ................................................... 206 Head-up display main switch ..... 206
Heaters
Seat heaters ......................................... 620
Side mirrors* ......................................... 361
Steering wheel...................................... 619
Hill-start assist control ........................ 276
Hood .......................................................... 667
Hooks
Cargo ...................................................... 627
Coat..........................................................623
Horn ............................................................ 190
HUD
Display contrast adjustment
switch................................................... 206
Display position adjustment
switch................................................... 206
Head-up display main switch ..... 206
I/M test...................................................... 663
Identification
Engine..................................................... 807
Vehicle ................................................... 807
Ignition switch.......................................... 165
Illuminated entry system ....................595
Immobilizer system .................................110
Indicator lights......................................... 194
Initialization
Items to initialize .................................847
Inside rear view mirror .......................... 92
Instrument panel light control
buttons .................................................... 192G
H
*: For vehicles with a navigation system, refer to the “Navigation System Owner’s Manual”. I
Page:
< prev 1-8 9-16 17-24