Page 7 of 480
7
❖❖Please see this page instead of page 4-2 in owner's manual.
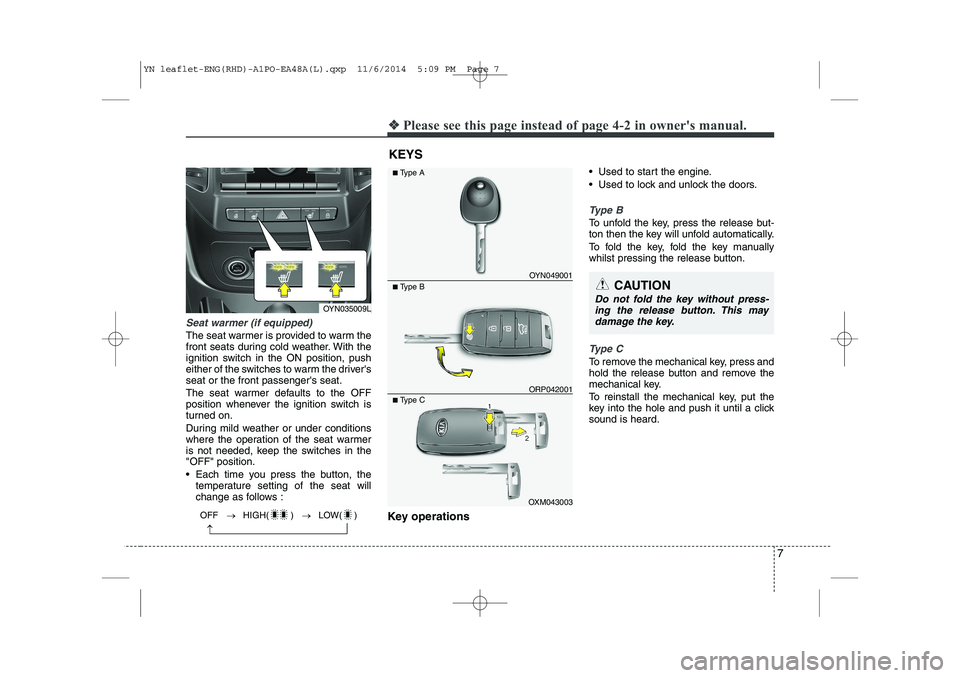
Seat warmer (if equipped)
The seat warmer is provided to warm the
front seats during cold weather. With the
ignition switch in the ON position, push
either of the switches to warm the driver'sseat or the front passenger's seat.
The seat warmer defaults to the OFF
position whenever the ignition switch is
turned on.
During mild weather or under conditions
where the operation of the seat warmer
is not needed, keep the switches in the"OFF" position.
Each time you press the button, the
temperature setting of the seat will
change as follows :
Key operations Used to start the engine.
Used to lock and unlock the doors.
Type B
To unfold the key, press the release but-
ton then the key will unfold automatically.
To fold the key, fold the key manually
whilst pressing the release button.
Type C
To remove the mechanical key, press and
hold the release button and remove the
mechanical key.
To reinstall the mechanical key, put the
key into the hole and push it until a clicksound is heard.
KEYS
CAUTION
Do not fold the key without press-
ing the release button. This may damage the key.
OYN049001
■ Type A
■ Type B
OXM043003
■
Type C
ORP042001
OYN035009L
OFF HIGH( ) LOW( )
YN leaflet-ENG(RHD)-A1PO-EA48A(L).qxp 11/6/2014 5:09 PM Page 7
Page 8 of 480

❖❖Please see this page instead of page 4-5 in owner's manual.
8
Remote keyless entry system operations
Lock (1)
All doors are locked if the lock button is pressed.
If all doors are closed, the hazard warning
lights blink once to indicate that all doors are
locked. If any door is opened when the lock
button is pressed, all doors will not lock.
Unlock (2)
All doors are unlocked if the unlock but- ton is pressed.
The hazard warning lights will blink twice
to indicate that all doors are unlocked.
After depressing this button, the doors
will be locked automatically unless you
open any door within 30 seconds.
Tailgate unlock (3, if equipped)
The tailgate is unlocked if the button is
pressed for more than 1 second.
The hazard warning lights will blink twice
to indicate that the tailgate is unlocked.
After depressing this button, the tailgate
will be locked automatically unless you
open the tailgate within 30 seconds.
Also, once the tailgate is opened and
then closed, the tailgate will be locked
automatically. ❈The word “HOLD” is written on the but-
ton to inform you that you must press
and hold the button for 1 second. Battery replacement
The transmitter uses a 3 volt lithium bat-
tery which will normally last for several
years. When replacement is necessary,
use the following procedure.
1. Insert a slim tool into the slot and gen-
tly pry open the transmitter centre
cover (1).
2. Replace the battery with new one. When replacing the battery, make sure
the battery position.
3. Install the battery in the reverse order of removal.
For transmitter replacement, we recom-
mend that you contact an authorised Kia
dealer.
REMOTE KEYLESS ENTRY (IF EQUIPPED) ORP042235
OXM043002
■
Type A
■ Type B
OYDDCO2005
YN leaflet-ENG(RHD)-A1PO-EA48A(L).qxp 11/6/2014 5:09 PM Page 8
Page 11 of 480

❖❖Please see this page instead of page 4-33 in owner's manual.
Tilt steering
To change the steering wheel angle, pull
down the lock release lever (1), adjust
the steering wheel to the desired angle
(2) and height (3), then pull up the lock-
release lever (4) to lock the steering
wheel in place. Be sure to adjust the
steering wheel to the desired position
before driving. Heated steering wheel (if equipped)
With the ignition switch in the ON posi-
tion, pressing the heated steering wheel
button warms the steering wheel.
✽✽
NOTICE
The heated steering wheel will turn off
automatically approximately 30 minutes
after the heated steering wheel is turned
on.
Horn
To sound the horn, press the horn sym-
bol on your steering wheel.
Check the horn regularly to be sure it
operates properly.
✽✽ NOTICE
To sound the horn, press the area indi-
cated by the horn symbol on your steer-
ing wheel (see illustration). The horn will
operate only when this area is pressed.
STEERING WHEEL
OYN045028ROYN045146L
CAUTION
Do not install any grip to operate the steering wheel. This causes damage
to the heated steering wheel system.
11
CAUTION
Do not strike the horn severely tooperate it, or hit it with your fist. Do not press on the horn with a sharp-pointed object.
YN leaflet-ENG(RHD)-A1PO-EA48A(L).qxp 11/6/2014 5:10 PM Page 11
Page 12 of 480
12
❖❖Please see this page instead of page 4-40 in owner's manual.
INSTRUMENT CLUSTER
OYN045042L/OYN045043L* The actual cluster in the vehicle may differ from the illustration.
■
Diesel Engine
Type A
Type B
1. Tachometer
2. Turn signal indicators
3. Speedometer
4. Warning and indicator lights
5. Automatic transaxle shift position indicator* or Manual transaxle shift indicator*
6. Odometer/Tripmeter*
7. Fuel gauge* if equipped
YN leaflet-ENG(RHD)-A1PO-EA48A(L).qxp 11/6/2014 5:10 PM Page 12
Page 14 of 480

14
Rear window defroster
The defroster heats the window to
remove frost, fog and thin ice from the
interior and exterior of the rear window,
whilst engine is running.
To activate the rear window defroster,
press the rear window defroster button
located in the centre facia switch panel.The indicator on the rear window
defroster button illuminates when thedefroster is ON.
If there is heavy accumulation of snow on
the rear window, brush it off before oper-
ating the rear defroster.
The rear window defroster automatically
turns off after approximately 20 minutes
or when the ignition switch is turned off.
To turn off the defroster, press the rear
window defroster button again.
Outside mirror defroster
(if equipped)
If your vehicle is equipped with outside
mirror defrosters, they will operate at the
same time when you turn on the rear
window defroster.
Front windscreen deicer (if equipped)
If your vehicle is equipped with front
windscreen deicer, they will operate at
the same time when you turn on the rear
window defroster.
DEFROSTER
❖❖
Please see this page instead of page 4-72 in owner's manual.
OYN045050L
OYN045051L
■Type A
■ Type B
YN leaflet-ENG(RHD)-A1PO-EA48A(L).qxp 11/6/2014 5:10 PM Page 14
Page 20 of 480
20
❖❖Please see this page instead of page 4-82 in owner's manual.
AUTOMATIC CLIMATE CONTROL SYSTEM (IF EQUIPPED)
OYN045062L/OYN045141L
1. AUTO (automatic control) button
2. Temperature control knob
3. OFF button
4. Mode selection button
5. Fan speed control knob
6. Air conditioning button
7. Front windscreen defroster button
8. Rear window defroster button
9. Air intake control button
10. A/C display*
11. Climate button*
* if equipped
■
Type A
■Type B
YN leaflet-ENG(RHD)-A1PO-EA48A(L).qxp 11/6/2014 5:11 PM Page 20
Page 21 of 480

21
Automatic heating and air condi- tioning
1. Push the AUTO button. It is indicatedby AUTO on the display. The modes,
fan speeds, air intake and air-condi-tioning will be controlled automatically
by temperature setting. 2. Turn the temperature control knob to
set the desired temperature.
✽✽ NOTICE
To turn the automatic operation off, select any button of the following:- Mode selection button
- Front windscreen defrost button
- Fan speed control button
The selected function will be con-
trolled manually whilst other func-
tions operate automatically.
For your convenience and to improve the effectiveness of the climate con-
trol, use the AUTO button and set the
temperature to 22°C/71°F (23°C/73°F
-Except Europe).
Manual heating and air condition- ing
Mode selection
The mode selection button controls the
direction of the air flow through the venti-lation system.
Refer to the illustration in the “Manual cli- mate control system”.
If you push the button once, the corre-
sponding switch will turn on, and if you
push the button again, the switch will turn
off.
OYN045069LOYN045066LOYN045143L
YN leaflet-ENG(RHD)-A1PO-EA48A(L).qxp 11/6/2014 5:11 PM Page 21
Page 22 of 480

22
Face-Level (B, D)
Air flow is directed toward the upper body
and face. Additionally, each outlet can becontrolled to direct the air dischargedfrom the outlet.
Floor-Level (C, E, A, D)
Most of the air flow is directed to the
floor.
Defrost-Level (A, D)
Most of the air flow is directed to thewindscreen.
Also you may select 2~3 modes at the
same time for desired air flow.
- face ( ) + floor ( ) mode
- face ( ) + defrost ( ) mode
- floor ( ) + defrost ( ) mode
- face ( ) + floor ( ) + defrost ( ) mode Maximum (MAX) defrost mode
When you select the MAX defrost mode,
the following system settings will bemade automatically;
the air conditioning system will be
turned on.
the outside(fresh) air position will be selected.
the fan speed will be set to the high speed.
To turn the MAX defrost mode off, press
the mode button or MAX defrost button
again or AUTO button.
Temperature control
The temperature will increase to the
maximum (HI) by turning the knob to the
right extremely.
The temperature will decrease to the
minimum (Lo) by turning the knob to the
left extremely.
When turning the knob, the temperature
will increase or decrease by 0.5°C/1°F.
When set to the lowest temperature set-
ting, the air conditioning will operate con-
tinuously.
OYN045065LOYN045142L
YN leaflet-ENG(RHD)-A1PO-EA48A(L).qxp 11/6/2014 5:11 PM Page 22

