2015 KIA VENGA automatic
[x] Cancel search: automaticPage 66 of 480

66
❖❖Please see this page instead of page 8-4 in owner's manual.
RECOMMENDED LUBRICANTS AND CAPACITIES
To help achieve proper engine and powertrain performance and durability, use only lubricants of the proper quality.
The correct lubricants also help promote engine efficiency that results in improved fuel economy.
* 1
Refer to the recommended SAE viscosity numbers on the next page.
* 2
Engine oils labeled Energy Conserving Oil are now available. Along with other additional benefits, they contribute to fuel economy by reducing
the amount of fuel necessary to overcome engine friction. Often, these improvements are difficult to measure in everyday driving, but in a year’s
time, they can offer significant cost and energy savings.
* 3
If the API service SM engine oil is not available in your country, you are able to use API service SL.
LubricantVolumeClassification
Engine oil *1 *2
(drain and refill) Recommends -
For Europe
Petrol Engine3.3 l(3.5 US qt.)
For Europe
API Service SL or SM, ACEA A3 or above
Use the engine oils approved by Kia Motors.
Consult an authorised Kia dealer for details.
Except Europe
API Service SM* 3
, ILSAC GF-4 or above
Diesel Engine5.3 l(5.6 US qt.)
With DPF (Diesel Particulate filter) ;
ACEA C3 or C2
Without DPF (Diesel Particulate filter) ;
ACEA B4
Engine oil consumptionNormal driving conditionMAX. 1 l/ 1,500 km-
Severe driving conditionMAX. 1 l/ 1,000 km-
Manual transaxle fluid
Petrol Engine
1.9 l~ 2.0 l
(2.0 ~ 2.1 US qt.)
Kia Genuine Transaxle Oil,
API GL-4, SAE 70W1.8 l~ 1.9 l
(1.9 ~ 2.0 US qt.)
Diesel Engine1.7 l~ 1.8 l
(1.8 ~ 1.9 US qt.)
Automatic transaxle fluid6.8 l(7.2 US qt.)DIAMOND ATF SP-III, SK ATF SP-III
1.4L
1.6L
YN leaflet-ENG(RHD)-A1PO-EA48A(L).qxp 11/6/2014 5:14 PM Page 66
Page 74 of 480

13
Introduction
Leaded (if equipped)
For some countries, your vehicle is
designed to use leaded petrol. When you
are going to use leaded petrol, we rec-
ommend that you ask to an authorised
Kia dealer. Octane Rating of leaded petrol is same
with unleaded one.
Petrol containing alcohol andmethanol
Gasohol, a mixture of petrol and ethanol
(also known as grain alcohol), and petrolor gasohol containing methanol (also
known as wood alcohol) are being mar-
keted along with or instead of leaded orunleaded petrol. Do not use gasohol containing more than 10% ethanol, and do not use petrol or
gasohol containing any methanol. Either
of these fuels may cause drivability prob-lems and damage to the fuel system,engine control system and emission con-trol system.
Discontinue using gasohol of any kind if
drivability problems occur.
Vehicle damage or drivability problems
may not be covered by the manufacturer’s
warranty if they result from the use of: 1. Gasohol containing more than 10%
ethanol.
2. Petrol or gasohol containing methanol.
3. Leaded fuel or leaded gasohol.Other fuels
Using fuels such as
- Silicone (Si) contained fuel,
- MMT (Manganese, Mn) contained fuel,
- Ferrocene (Fe) contained fuel, and
- Other metalic additives contained fuels,
may cause vehicle and engine damage
or cause plugging, misfiring, poor accel-
eration, engine stalling, catalyst melting,
abnormal corrosion, life cycle reduction,etc.
Also, the Malfunction Indicator Lamp
(MIL) may illuminate.
✽✽
NOTICE
Damage to the fuel system or perform-
ance problem caused by the use of these
fuels may not be covered by your New
Vehicle Limited Warranty.
WARNING
• Do not "top off" after the nozzle automatically shuts off when refuelling.
Always check that the fuel cap is installed securely to prevent fuel
spillage in the event of an acci-dent.
CAUTION
NEVER USE LEADED FUEL. The
use of leaded fuel is detrimental to
the catalytic converter and willdamage the engine control sys-tem’s oxygen sensor and affect emission control.
Never add any fuel system cleaningagents to the fuel tank other thanwhat has been specified. (We rec-ommend that you consult an
authorised Kia.)
CAUTION
Never use gasohol which contains methanol. Discontinue use of anygasohol product which impairs dri-
vability.
YN RHD 1.QXP 11/20/2014 6:12 PM Page 3
Page 92 of 480

39
Safety features of your vehicle
Seat warmer (if equipped)
The seat warmer is provided to warm the
front seats during cold weather. With the
ignition switch in the ON position, push
either of the switches to warm the driver'sseat or the front passenger's seat.
The seat warmer defaults to the OFF
position whenever the ignition switch is
turned on.
During mild weather or under conditions
where the operation of the seat warmer
is not needed, keep the switches in the"OFF" position.
Each time you press the button, thetemperature setting of the seat will
change as follows :
✽✽ NOTICE
With the seat warmer switch in the ON position, the heating system in the
seat turns off or on automatically
depending on the seat temperature.
If the seat warmer doesn't work when
the ambient temperature is below 21
°C (70 °F), have the system checked
by an authorised dealer.WARNING - Seat warmer
burns
Passengers should use extreme
caution when using seat warmers
due to the possibility of excess
heating or burns. The occupants
must be able to feel if the seat isbecoming too warm and to turn the
seat warmer off. The seat warmer
may cause burns even at low tem-
peratures, especially if used for
long periods of time. In particular,
the driver must exercise extreme
care for the following types of pas-
sengers:
1. Infants, children, elderly or dis- abled persons, or hospital outpa- tients
2. Persons with sensitive skin or those that burn easily
3. Fatigued individuals
4. Intoxicated individuals
5. Individuals taking medication that can cause drowsiness or
sleepiness (sleeping pills, cold
tablets, etc.)
OYN035009L
CAUTION
When cleaning the seats, do not
use an organic solvent such asthinner, benzene, alcohol andpetrol. Doing so may damage the surface of the heater or seats.
To prevent overheating the seat warmer, do not place anything onthe seats that insulates against heat, such as blankets, cushions
or seat covers whilst the seatwarmer is in operation.
Do not place heavy or sharp objects on seats equipped withseat warmers. Damage to the seat
warming components could occur.
OFF HIGH( ) LOW( )
YN RHD 3.QXP 11/20/2014 7:16 PM Page 9
Page 95 of 480

Safety features of your vehicle
12
3
Headrest
The rear seat(s) is equipped with head-
rests in all the seating positions for the
occupant's safety and comfort.
The headrest not only provides comfort
for passengers, but also helps to protect
the head and neck in the event of a colli-sion.
OPA039053
* if equipped
*
WARNING -
Cargo loading
Make sure the engine is off, the
automatic transaxle is in P (Park)
or the manual transaxle is in R
(Reverse) or 1st, and the parking
brake is securely applied whenever
loading or unloading cargo. Failure
to take these steps may allow the
vehicle to move if shift lever is inad-
vertently moved to another posi-tion.
WARNING - Cargo
Cargo should always be secured to
prevent it from being thrown about
the vehicle in a collision and caus-
ing injury to the vehicle occupants.Special care of objects should betaken when placing them in the rear
seats, since those may hit the front
seat occupants in a frontal colli-sion.
CAUTION - Rear seat belts
When returning the rear seatbacks
to the upright position, remember
to return the rear shoulder belts totheir proper position.WARNING
When you return the rear seatback to its upright position after being
folded down:
Be careful not to damage the seat
belt webbing or buckle. Do not
allow the seat belt webbing or
buckle to get caught or pinched in
the rear seat. Ensure that the seat-
back is completely locked into its
upright position by pushing on the
top of the seatback. Otherwise, in
an accident or sudden stop, the
seat could fold down and allow
cargo to enter the passenger com-
partment, which could result in
serious injury or death.
CAUTION - Damaging rear
seat belt buckles
When you fold the rear seatback or put luggage on the rear seat cush-ion, insert the buckle in the pocket
between the rear seatback and cushion. Doing so can prevent thebuckle from being damaged by therear seatback or luggage.
YN RHD 3.QXP 11/20/2014 7:16 PM Page 12
Page 100 of 480

317
Safety features of your vehicle
If you continue not to fasten the seat belt
and you drive over 9km/h, the illuminated
warning light will start to blink until you
drive under 6km/h.
If you continue not to fasten the seat belt
and you drive over 20km/h the seat belt
warning chime will sound for approxi-mately 100 seconds and the correspon-
ding warning light will blink.
✽✽NOTICE
You can find the front passenger’s seat belt warning light on the centre
fascia panel.
Although the front passenger seat is
not occupied, the seat belt warning
light will blink or illuminate for 6 sec-
onds.
The front passenger's seat belt warn-
ing may operate when luggage is
placed on the front passenger seat.
Lap/shoulder belt
To fasten your seat belt:
To fasten your seat belt, pull it out of the
retractor and insert the metal tab (1) into
the buckle (2). There will be an audible
"click" when the tab locks into the buckle. The seat belt automatically adjusts to the proper length only after the lap belt por-
tion is adjusted manually so that it fits
snugly around your hips. If you lean for-
ward in a slow, easy motion, the belt will
extend and let you move around. If there
is a sudden stop or impact, however, the
belt will lock into position. It will also lock
if you try to lean forward too quickly.
✽✽ NOTICE
If you are not able to pull out the safety
belt from the retractor, firmly pull the
belt out and release it. Then you will be
able to pull the belt out smoothly.
You can adjust the height of the shoulder
belt anchor to one of 4 positions for max-
imum comfort and safety.If the height of the adjusting seat belt is
too near your neck, you will not be getting
the most effective protection. The shoul-
der portion should be adjusted so that it
lies across your chest and midway over
your shoulder nearest the door and not
your neck.
OUN026100
Front seat
B180A01NF-1/H
WARNING
Riding in an improper position
adversely affects the front passen-
ger's seat belt warning system. It is
important for the driver to instruct
the passenger as to the properseating instructions as contained
in this manual.
YN RHD 3.QXP 11/20/2014 7:16 PM Page 17
Page 103 of 480
Safety features of your vehicle
20
3
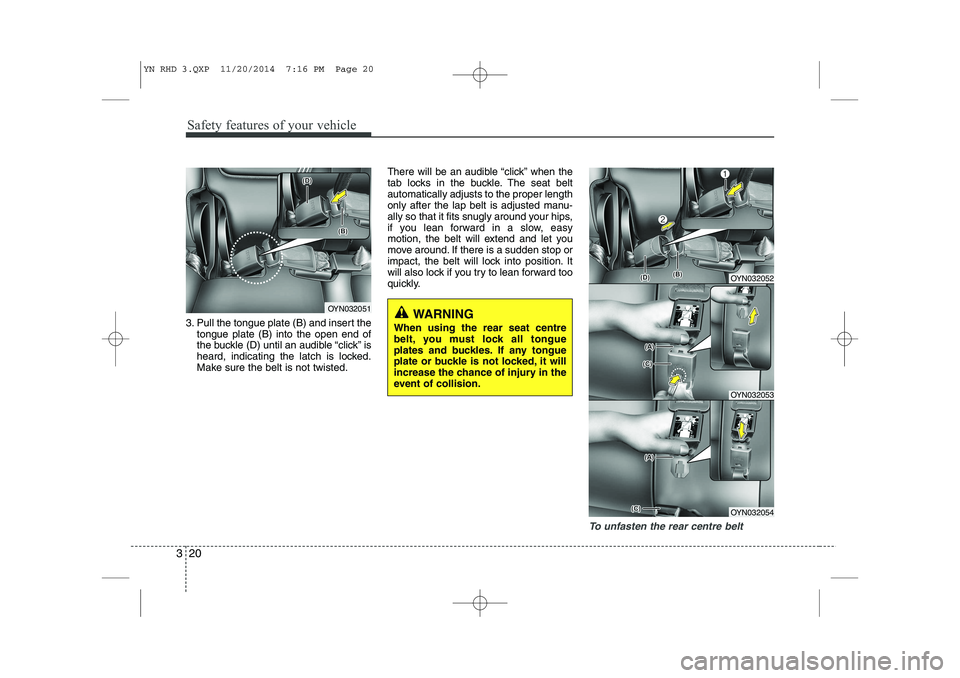
3. Pull the tongue plate (B) and insert the
tongue plate (B) into the open end of
the buckle (D) until an audible “click” is
heard, indicating the latch is locked.
Make sure the belt is not twisted. There will be an audible “click” when the
tab locks in the buckle. The seat beltautomatically adjusts to the proper length
only after the lap belt is adjusted manu-
ally so that it fits snugly around your hips,
if you lean forward in a slow, easy
motion, the belt will extend and let you
move around. If there is a sudden stop or
impact, the belt will lock into position. It
will also lock if you try to lean forward too
quickly.
To unfasten the rear centre belt
OYN032051WARNING
When using the rear seat centre
belt, you must lock all tongue
plates and buckles. If any tongue
plate or buckle is not locked, it will
increase the chance of injury in the
event of collision.
OYN032052
OYN032053
OYN032054
YN RHD 3.QXP 11/20/2014 7:16 PM Page 20
Page 104 of 480
321
Safety features of your vehicle
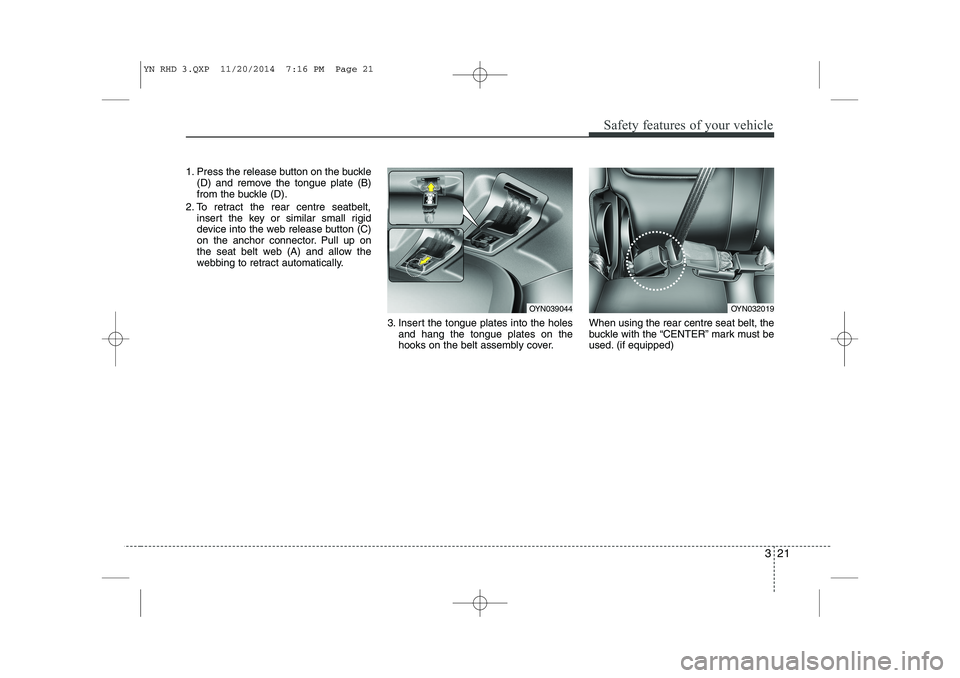
1. Press the release button on the buckle(D) and remove the tongue plate (B)
from the buckle (D).
2. To retract the rear centre seatbelt, insert the key or similar small rigid
device into the web release button (C)
on the anchor connector. Pull up on
the seat belt web (A) and allow the
webbing to retract automatically.
3. Insert the tongue plates into the holesand hang the tongue plates on the
hooks on the belt assembly cover. When using the rear centre seat belt, the
buckle with the “CENTER” mark must be
used. (if equipped)
OYN039044OYN032019
YN RHD 3.QXP 11/20/2014 7:16 PM Page 21
Page 113 of 480

Safety features of your vehicle
30
3
Installing a child restraint system by
lap/shoulder belt
To install a child restraint system on the
outboard or centre rear seats, do the fol-
lowing:
1. Place the child restraint system in the seat and route the lap/shoulder belt
around or through the restraint, follow-
ing the restraint manufacturer’s
instructions. Be sure the seat belt web-bing is not twisted. 2. Fasten the lap/shoulder belt latch into
the buckle. Listen for the distinct “click”sound.Position the release button so that it is
easy to access in case of an emergency.
3. Buckle the seat belt and allow the seat belt to take up any slack. After installa-
tion of the child restraint system, try to
move it in all directions to be sure the
child restraint system is securelyinstalled.
If you need to tighten the belt, pull more
webbing toward the retractor. When you
unbuckle the seat belt and allow it to
retract, the retractor will automatically
revert back to its normal seated passen-
ger emergency locking usage condition.
E2MS103005MMSA3030E2BLD310
YN RHD 3.QXP 11/20/2014 7:16 PM Page 30