Page 211 of 499
Features of your vehicle
124
4
Digital clock (if equipped)
Whenever the battery terminals or
related fuses are disconnected, you
must reset the time.
For details, refer to the audio in the
end of this section.
❈ The actual feature may differ from the
illustration.
Clothes hanger (if equipped)
WARNING- Electric shock
Do not put a finger or a foreign
element (pen, etc.) into a power
outlet and do not touch with a
wet hand. You may get an elec-
tric shock.
SL_USA_RADIO/QOSL040112
CAUTION- Hangingclothing
Do not hang heavy clothes, since
those may damage the hook.WARNING- Clock
Setting Distraction
Do not adjust the clock while
driving. Such adjustments may
distract you for too long from the
roadway and lead to a collision.
Page 236 of 499

4149
Features of your vehicle
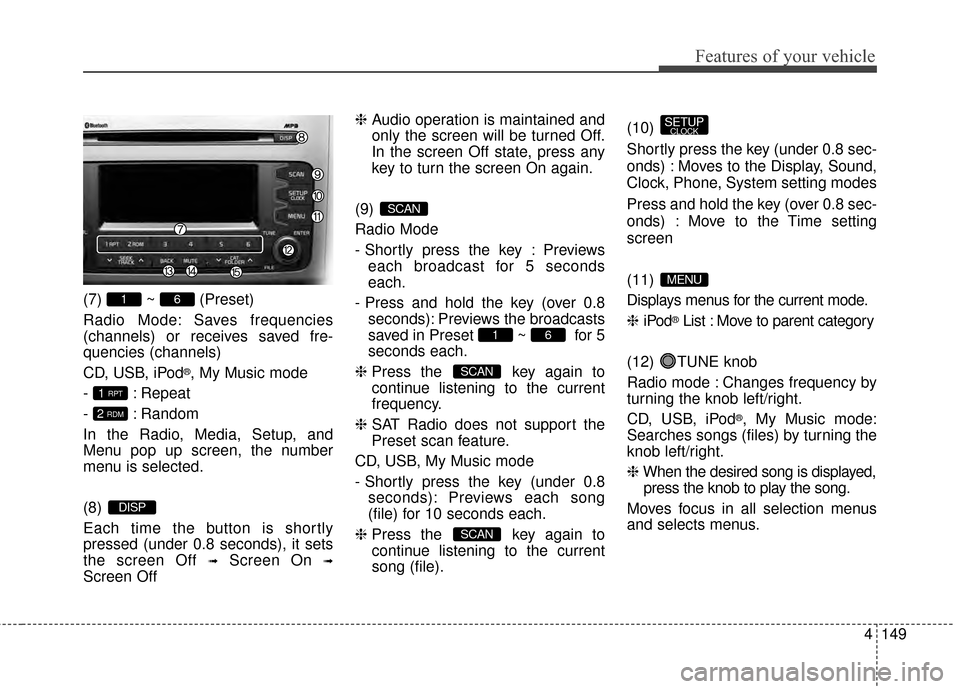
(7) ~ (Preset)
Radio Mode: Saves frequencies
(channels) or receives saved fre-
quencies (channels)
CD, USB, iPod
®, My Music mode
- : Repeat
- : Random
In the Radio, Media, Setup, and
Menu pop up screen, the number
menu is selected.
(8)
Each time the button is shortly
pressed (under 0.8 seconds), it sets
the screen Off
➟Screen On ➟
Screen Off ❈
Audio operation is maintained and
only the screen will be turned Off.
In the screen Off state, press any
key to turn the screen On again.
(9)
Radio Mode
- Shortly press the key : Previews each broadcast for 5 seconds
each.
- Press and hold the key (over 0.8 seconds): Previews the broadcasts
saved in Preset ~ for 5
seconds each.
❈ Press the key again to
continue listening to the current
frequency.
❈ SAT Radio does not support the
Preset scan feature.
CD, USB, My Music mode
- Shortly press the key (under 0.8 seconds): Previews each song
(file) for 10 seconds each.
❈ Press the key again to
continue listening to the current
song (file). (10)
Shortly press the key (under 0.8 sec-
onds) : Moves to the Display, Sound,
Clock, Phone, System setting modes
Press and hold the key (over 0.8 sec-
onds) : Move to the Time setting
screen
(11)
Displays menus for the current mode.
❈
iPod
®List : Move to parent category
(12) TUNE knob
Radio mode : Changes frequency by
turning the knob left/right.
CD, USB, iPod
®, My Music mode:
Searches songs (files) by turning the
knob left/right.
❈ When the desired song is displayed,
press the knob to play the song.
Moves focus in all selection menus
and selects menus.
MENU
SETUPCLOCK
SCAN
SCAN
61
SCAN
DISP
2 RDM
1 RPT
61
Page 238 of 499
4151
Features of your vehicle
SETUP
Display Settings
Press the key Select [Display]
through TUNE knob or key
Select menu through TUNE knob
Mode Pop up
[Mode Pop up] Changes /
selection mode
or key to display the mode
change pop up screen.
Media Display
When playing an MP3 file, select the
desired display info from ‘Folder/File’
or ‘Album/Artist/Song’.
MEDIA
RADIO
OffOn
1
SETUPCLOCK
Page 239 of 499
Features of your vehicle
152
4
SOUND SETTINGS
Press the key Select [Sound]
through TUNE knob or key
Select menu through TUNE knob
Sound Settings
This menu allows you to set the ‘Bass,
Middle, Treble’ and the Sound Fader and
Balance.
Select [Sound Settings] Select
menu through
TUNE knobTu r n
TUNE knobleft/right to set
Bass, Middle, Treble : Selects the sound tone.
Fader, Balance : Moves the sound fader and balance.
Default : Restores default settings.
❈ Back : While adjusting values,
pressing the TUNE knob will
restore the parent menu. Speed Dependent Volume Control
This feature is used to automatically
control the volume level according to
the speed of the vehicle.
Select [Speed Dependent Vol.] Set
[Off/On] of
TUNEknob
Voice Recognition Volume
Adjusts voice recognition volume.
Select [Voice Recognition Vol.] Set
volume of
TUNEknob
2
SETUPCLOCK
Page 240 of 499
4153
Features of your vehicle
CLOCK SETTINGS
Press the key Select [Clock]
through TUNE knob or key
Select menu through TUNE knob
Clock Settings
This menu is used to set the time.
Select [Clock Settings] Set throughTUNE knob Press TUNE knob
❈Adjust the number currently in
focus to set the [hour] and press
the tune knob to set the [minute]
and [AM/PM].
Calendar Settings
This menu is used to set the date
(MM/DD/YYYY).
Select [Calendar Settings] Set through
TUNE knob Press TUNE knob
❈Adjust the number currently in
focus to make the settings and
press the tune knob to move to the
next setting. (Set in order of
Year/Month/Day)
Time Format
This function is used to set the
12/24 hour time format of the
audio system. Select [Time
Format] Set 12Hr / 24Hr through
TUNEknob
Clock Display when Power is OFF
Select [Clock Disp.(Pwr Off) Set
/through TUNEknob
: Displays time/date on screen
: Turn off.Off
On
OffOn
3
SETUPCLOCK
Page 241 of 499
![KIA Sportage 2015 QL / 4.G Owners Manual Features of your vehicle
154
4
SYSTEM SETTINGS
Press the key Select
[System] Select menu through
TUNE knob
Memory Information
Displays currently used memory and
total system memory.
Select [Memory KIA Sportage 2015 QL / 4.G Owners Manual Features of your vehicle
154
4
SYSTEM SETTINGS
Press the key Select
[System] Select menu through
TUNE knob
Memory Information
Displays currently used memory and
total system memory.
Select [Memory](/manual-img/2/2970/w960_2970-240.png)
Features of your vehicle
154
4
SYSTEM SETTINGS
Press the key Select
[System] Select menu through
TUNE knob
Memory Information
Displays currently used memory and
total system memory.
Select [Memory Information] OK
The currently used memory is dis-
played on the left side while the total
system memory is displayed on the
right side.
Prompt Feedback
This feature is used to change voice
command feedback between Normal
and Expert modes.
Select [Prompt Feedback] Set
through
TUNEknob
: This mode is for beginner
users and provides detailed instruc-
tions during voice command opera-
tion. : This mode is for expert users
and omits some information during
voice command operation. (When
using Expert mode, guidance
instructions can be heard through
the [Help] or [Menu] commands.
Language
This menu is used to set the display
and voice recognition language.
Select [Language]
Set through TUNE knob
❈ The system will reboot after the
language is changed.
❈ Language support by region
- English, Francais, Espanol
SETUPCLOCK
Page 254 of 499

4167
Features of your vehicle
Bluetooth®Wireless Technology
AUDIO
What is Bluetooth®Wireless
Technology
?
Bluetooth®Wireless Technology allows
devices to be connected in a short dis-
tance, including hands-free devices,
stereo headsets, wireless remote con-
trollers, etc. For more infor mation, visit
theBluetooth®Wireless Technologywebsite atwww.Bluetooth.com
Before using Bluetooth®Wireless
Technology audio features
Bluetooth®Wireless Technology
audio may not be supported depend-
ing on the compatibility of your
Bluetooth®Wireless Technology
mobile phone.
Bluetooth®Wireless
Technology audio, you must first
pair and connect the
Bluetooth®
Wireless Technology mobile phone.
Bluetooth®word mark and
logos are registered trademarks
owned by Bluetooth SIG, Inc. and
any use of such marks by Kia is
under license. Other trademarks
and trade names are those of their
respective owners. A Bluetooth®
enabled cell phone is required to
use
Bluetooth®Wireless Technology
Bluetooth®Wireless Technology
audio can be used only when the
[Audio Streaming] of Phone is turned .
❈ Setting Bluetooth®Wireless Technology
Audio Streaming : Press the
key Select [Phone] Select
[Audio Streaming] through the
TUNE knob Set
/OffOn
SETUPCLOCK
On
WARNING
Driving while distracted can
result in a loss of vehicle control
that may lead to an accident,
severe personal injury, and
death. The driver’s primary
responsibility is in the safe and
legal operation of a vehicle, and
use of any handheld devices,
other equipment, or vehicle sys-
tems which take the driver’s
eyes, attention and focus away
from the safe operation of a vehi-
cle or which are not permissible
by law should never be used dur-
ing operation of the vehicle.
Page 260 of 499
![KIA Sportage 2015 QL / 4.G Owners Manual 4173
Features of your vehicle
Pairing through [PHONE]
Setup
Press the key Select
[Phone] Select [Pair Phone]
Select TUNE knob
1. The following steps are the sameas those described in the section
"W KIA Sportage 2015 QL / 4.G Owners Manual 4173
Features of your vehicle
Pairing through [PHONE]
Setup
Press the key Select
[Phone] Select [Pair Phone]
Select TUNE knob
1. The following steps are the sameas those described in the section
"W](/manual-img/2/2970/w960_2970-259.png)
4173
Features of your vehicle
Pairing through [PHONE]
Setup
Press the key Select
[Phone] Select [Pair Phone]
Select TUNE knob
1. The following steps are the sameas those described in the section
"When No Devices have been
Paired" on the previous page.
Bluetooth®Wireless Technology
features supported within the vehi-
cle are as follows. Some features
may not be supported depending
on your
Bluetooth®Wireless
Technology device.
- Outgoing/Incoming Handsfree calls
- Operations during a call (Switch to Private, Switch to call waiting,
MIC on/off)
- Downloading Call History
- Downloading Mobile Contacts
-
Bluetooth®Wireless Technology
device auto connection
- Bluetooth Audio Streaming
Bluetooth®Wireless
Technology devices can be paired
to the Car Handsfree system.
Bluetooth®device can be
connected at a time.
one
Bluetooth®Wireless
Technology device can be connect-
ed at a time.
while a
Bluetooth®Wireless
Technology device is connected.
Bluetooth®Wireless
Technology Handsfree and
Bluetooth audio related features
are supported.
possible only within devices that
support Handsfree or audio fea-
tures, such as a
Bluetooth®
Wireless Technology mobile phone
or a Bluetooth audio device.
Bluetooth®Wireless
Technology device becomes dis-
connected due to being out of com-
munication range, turning the
device OFF, or a
Bluetooth®
Wireless Technology communica-
tion error, corresponding
Bluetooth®
Wireless Technology devices are
automatically searched and recon-
nected.
due to communication errors
between the car Handsfree and the
Bluetooth®Wireless Technology
device, reset the device by turning
off and back on again. Upon reset-
ting
Bluetooth®Wireless
Technology device, the system will
be restored.
SETUPCLOCK