Page 210 of 499

4123
Features of your vehicle
The ticket holder (5) is provided for
holding a tollgate ticket. (if equipped)
* The actual sunvisor lamp in thevehicle may differ from the illustra-
tion.
D280500AEN
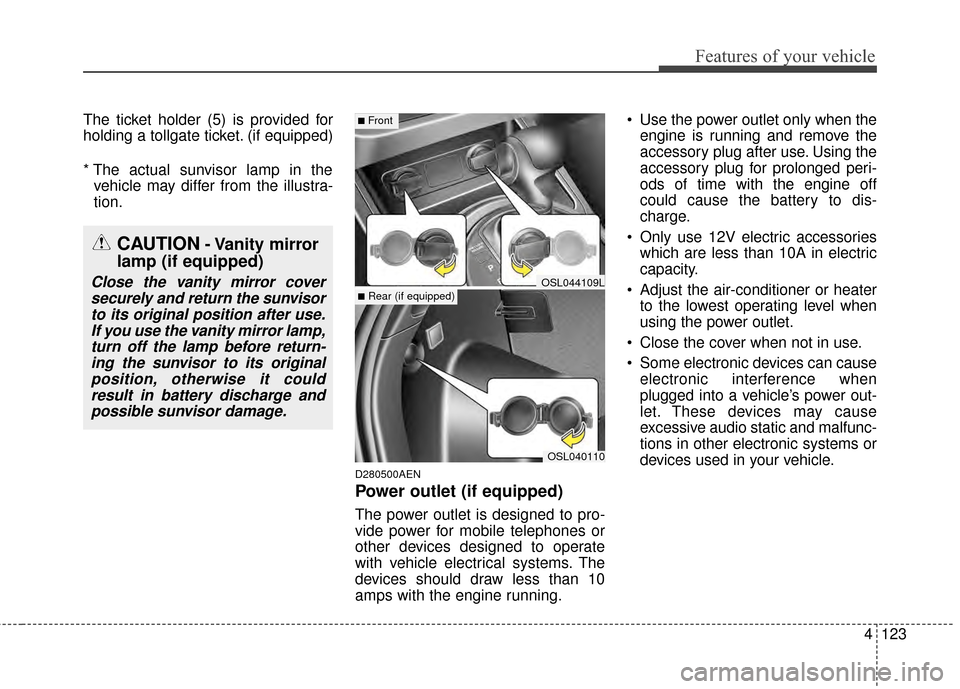
Power outlet (if equipped)
The power outlet is designed to pro-
vide power for mobile telephones or
other devices designed to operate
with vehicle electrical systems. The
devices should draw less than 10
amps with the engine running. Use the power outlet only when the
engine is running and remove the
accessory plug after use. Using the
accessory plug for prolonged peri-
ods of time with the engine off
could cause the battery to dis-
charge.
Only use 12V electric accessories which are less than 10A in electric
capacity.
Adjust the air-conditioner or heater to the lowest operating level when
using the power outlet.
Close the cover when not in use.
Some electronic devices can cause electronic interference when
plugged into a vehicle’s power out-
let. These devices may cause
excessive audio static and malfunc-
tions in other electronic systems or
devices used in your vehicle.
OSL040110
■Front
■Rear (if equipped)OSL044109L
CAUTION- Vanity mirror
lamp (if equipped)
Close the vanity mirror cover
securely and return the sunvisorto its original position after use.If you use the vanity mirror lamp,turn off the lamp before return-ing the sunvisor to its originalposition, otherwise it couldresult in battery discharge andpossible sunvisor damage.
Page 212 of 499

4125
Features of your vehicle
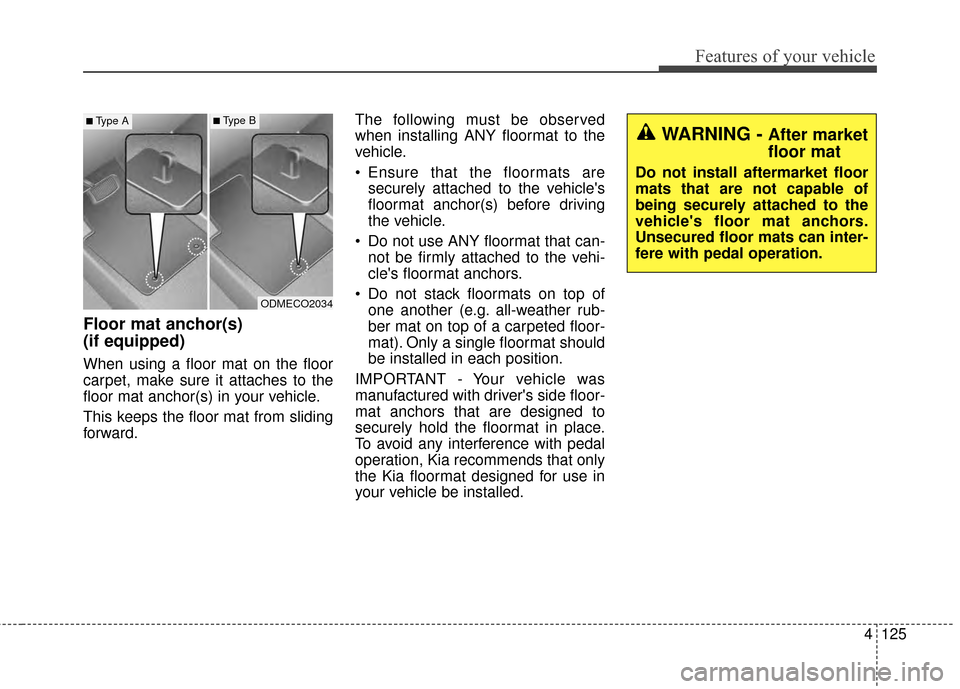
Floor mat anchor(s)
(if equipped)
When using a floor mat on the floor
carpet, make sure it attaches to the
floor mat anchor(s) in your vehicle.
This keeps the floor mat from sliding
forward.The following must be observed
when installing ANY floormat to the
vehicle.
Ensure that the floormats are
securely attached to the vehicle's
floormat anchor(s) before driving
the vehicle.
Do not use ANY floormat that can- not be firmly attached to the vehi-
cle's floormat anchors.
Do not stack floormats on top of one another (e.g. all-weather rub-
ber mat on top of a carpeted floor-
mat). Only a single floormat should
be installed in each position.
IMPORTANT - Your vehicle was
manufactured with driver's side floor-
mat anchors that are designed to
securely hold the floormat in place.
To avoid any interference with pedal
operation, Kia recommends that only
the Kia floormat designed for use in
your vehicle be installed.
ODMECO2034
■Type A■Type B
WARNING - After market
floor mat
Do not install aftermarket floor
mats that are not capable of
being securely attached to the
vehicle's floor mat anchors.
Unsecured floor mats can inter-
fere with pedal operation.
Page 213 of 499
Features of your vehicle
126
4
D281000AHM
Luggage net holder
(if equipped)
To keep items from shifting in the
cargo area, you can use the holders
located in the cargo area to attach
the luggage net. If necessary, contact your authorized
Kia dealer to obtain a luggage net.
Cargo security screen
(if equipped)
Use the cargo security screen to
hide items stored in the cargo area.
OSL040115
WARNING- Luggage net
Always keep your face and
body out of the luggage net
recoil path and avoid using the
luggage net when the straps
have visible signs of wear or
damage. The luggage net can
snap and cause injuries.
OSL040113
OSL040114
Page 214 of 499
4127
Features of your vehicle
To use the cargo security screen,
pull the handle backward and insert
the edges into the slots.When not in use, place the cargo
security screen on the lower portion
of the cargo area.
WARNING- Cargo secu-
rity screen
Do not place objects on the
cargo security screen. Such
objects may be thrown about
inside the vehicle and possibly
injure vehicle occupants during
an accident or when braking.
CAUTION
Since the cargo security screen
may be damaged or malformed,do not put the luggage on itwhen it is used.
OSL040117OSL040116
Page 215 of 499
Features of your vehicle
128
4
D290100AAM
Roof rack (if equipped)
If the vehicle has a roof rack, you can
load cargo on top of your vehicle.
✽ ✽
NOTICE
If the vehicle is equipped with a sun-
roof, be sure not to position cargo
onto the roof rack in such a way that
it could interfere with sunroof oper-
ation.
When carrying large objects on the
roof rack, make sure they do not
exceed the overall roof length or
width.
When you are carrying cargo on the roof rack, do not operate the
sunroof (if equipped).
The following specification is the maximum weight that can be
loaded onto the roof rack.
Distribute the load as evenly as
possible on the roof rack and
secure the load firmly.
EXTERIOR FEATURES
CAUTION- Loading roofrack
When carrying cargo on the roof
rack, take the necessary precau-tions to make sure the cargodoes not damage the roof of thevehicle.
OSL040150
ROOF 100 kg (220 lbs.)
RACK EVENLY DISTRIBUTED
Page 216 of 499
4129
Features of your vehicle
Loading cargo or luggage in excess
of the specified weight limit on the
roof rack may damage your vehicle.
Severe wind updrafts, caused by
passing vehicles or natural causes,
can cause sudden upward pressure
on items loaded on the roof rack.
This is especially true when carrying
large, flat items such as wood panels
or mattresses.This could cause the items to fall off
the roof rack and cause damage to
your vehicle or others around you.
To prevent damage or loss of cargo
while driving, check frequently
before or while driving to make sure
the items on the roof rack are
securely fastened.
WARNING- Driving withroof load
Always drive slow and turn cor-
ners carefully when carrying
items on the roof rack. The vehi-
cle center of gravity will be
higher when items are loaded
onto the roof rack.
Page 258 of 499

4171
Features of your vehicle
Pairing Key / Key
on the Steering Remote
Controller
When No Devices have beenPaired
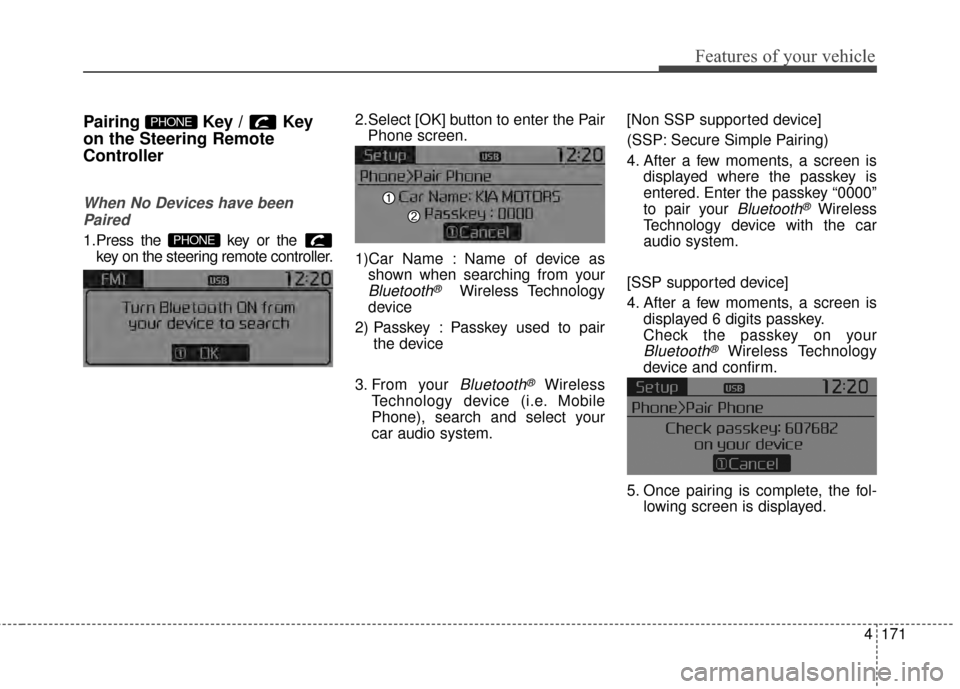
1.Press the key or the key on the steering remote controller.
The following screen is displayed. 2.Select [OK] button to enter the Pair
Phone screen.
1)Car Name : Name of device as shown when searching from your
Bluetooth®Wireless Technology
device
2) Passkey : Passkey used to pair the device
3. From your
Bluetooth®Wireless
Technology device (i.e. Mobile
Phone), search and select your
car audio system. [Non SSP supported device]
(SSP: Secure Simple Pairing)
4. After a few moments, a screen is
displayed where the passkey is
entered. Enter the passkey “0000”
to pair your
Bluetooth®Wireless
Technology device with the car
audio system.
[SSP supported device]
4. After a few moments, a screen is displayed 6 digits passkey.
Check the passkey on your
Bluetooth®Wireless Technology
device and confirm.
5. Once pairing is complete, the fol- lowing screen is displayed.
PHONE
PHONE
Page 273 of 499

Features of your vehicle
186
4
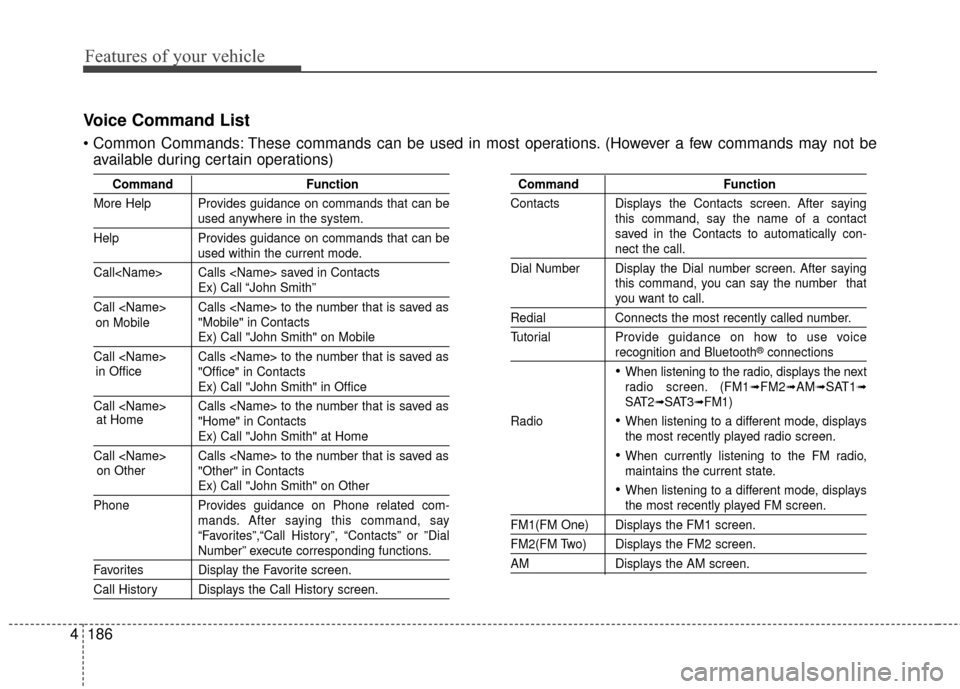
Voice Command List
These commands can be used in most operations. (However a few commands may not be
available during certain operations)
Command Function
More Help Provides guidance on commands that can be
used anywhere in the system.
Help Provides guidance on commands that can be
used within the current mode.
Call Calls saved in Contacts
Ex) Call “John Smith”
Call Calls to the number that is saved as "Mobile" in Contacts
Ex) Call "John Smith" on Mobile
Call Calls to the number that is saved as "Office" in Contacts
Ex) Call "John Smith" in Office
Call Calls to the number that is saved as "Home" in Contacts
Ex) Call "John Smith" at Home
Call Calls to the number that is saved as "Other" in Contacts
Ex) Call "John Smith" on Other
Phone Provides guidance on Phone related com- mands. After saying this command, say
“Favorites”,“Call History”, “Contacts” or ”Dial
Number” execute corresponding functions.
Favorites Display the Favorite screen.
Call History Displays the Call History screen.
Command Function
Contacts Displays the Contacts screen. After saying this command, say the name of a contact
saved in the Contacts to automatically con-
nect the call.
Dial Number Display the Dial number screen. After saying this command, you can say the number that
you want to call.
RedialConnects the most recently called number.
Tutorial Pro vide guidance on how to use voice
recognition and Bluetooth®connections
When listening to the radio, displays the next
radio screen. (FM1➟FM2➟AM➟SAT1➟SAT2➟SAT3➟FM1)
Radio
When listening to a different mode, displays
the most recently played radio screen.
When currently listening to the FM radio,
maintains the current state.
When listening to a different mode, displaysthe most recently played FM screen.
FM1(FM One) Displays the FM1 screen.
FM2(FM Two) Displays the FM2 screen.
AM Displays the AM screen.
in Office
at Home
on Other
on Mobile