Page 22 of 46

20
Standard Audio System*
– FM/AM/Sirius®/Media (USB, iPod®, Aux, BT Audio, My Music)
RADIO
MEDIA
PHONE
SETUPCLOCK
DISP
SCAN
MENU
BACK
12 34
56RPT RDMSEEKTRACKC ATFOLDER
VOLPOWERPUSHPUSHENTERTUNE
FILE
Bluetooth®
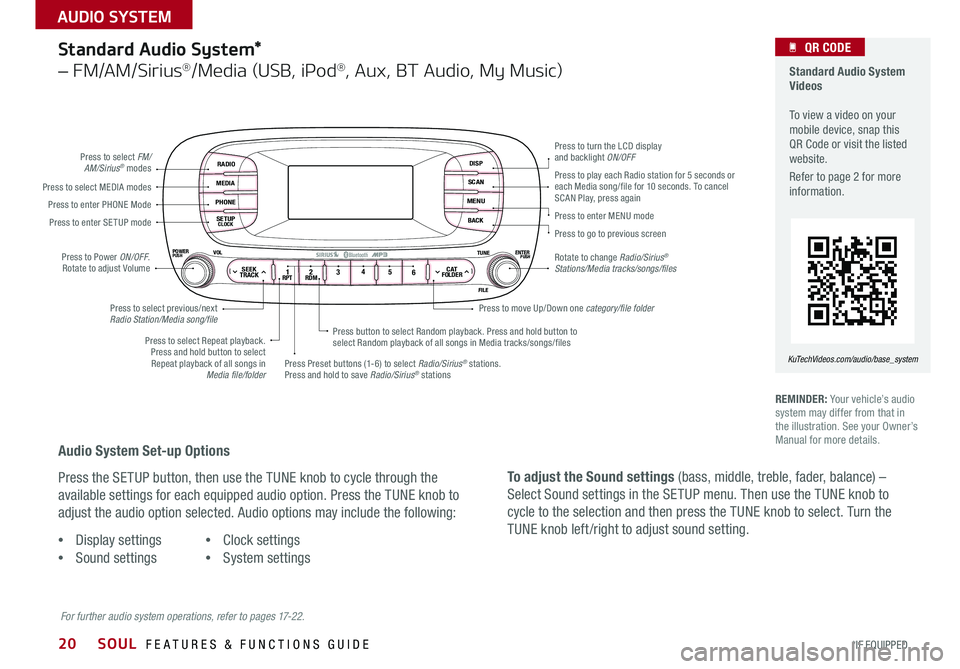
Press to select FM/AM/Sirius® modes
Press to Power ON/OFF Rotate to adjust Volume
Press Preset buttons (1-6) to select Radio/Sirius® stations Press and hold to save Radio/Sirius® stations
Press to select Repeat playback Press and hold button to select Repeat playback of all songs in Media file/folder
Press button to select Random playback Press and hold button to select Random playback of all songs in Media tracks/songs/files
Press to select MEDIA modesPress to play each Radio station for 5 seconds or each Media song/file for 10 seconds To cancel SCAN Play, press againPress to enter PHONE Mode
Press to enter SE TUP mode
Press to select previous/next Radio Station/Media song/file
Press to enter MENU mode
Press to go to previous screen
Rotate to change Radio/Sirius® Stations/Media tracks/songs/files
Press to turn the LCD display and backlight ON/OFF
Press to move Up/Down one category/file folder
For further audio system operations, refer to pages 17-22.
REMINDER: Your vehicle’s audio system may differ from that in the illustration See your Owner’s Manual for more details
Standard Audio System Videos To view a video on your mobile device, snap this QR Code or visit the listed website
Refer to page 2 for more information
KuTechVideos.com/audio/base_system
QR CODE
Audio System Set-up Options
Press the SETUP button, then use the TUNE knob to cycle through the
available settings for each equipped audio option Press the TUNE knob to
adjust the audio option selected Audio options may include the following:
To adjust the Sound settings (bass, middle, treble, fader, balance) –
Select Sound settings in the SETUP menu Then use the TUNE knob to
cycle to the selection and then press the TUNE knob to select Turn the
TUNE knob left /right to adjust sound setting •Display settings
•Sound settings
•Clock settings
•System settings
SOUL FEATURES & FUNCTIONS GUIDE
*IF EQUIPPED
AUDIO SYSTEM
Page 25 of 46

23
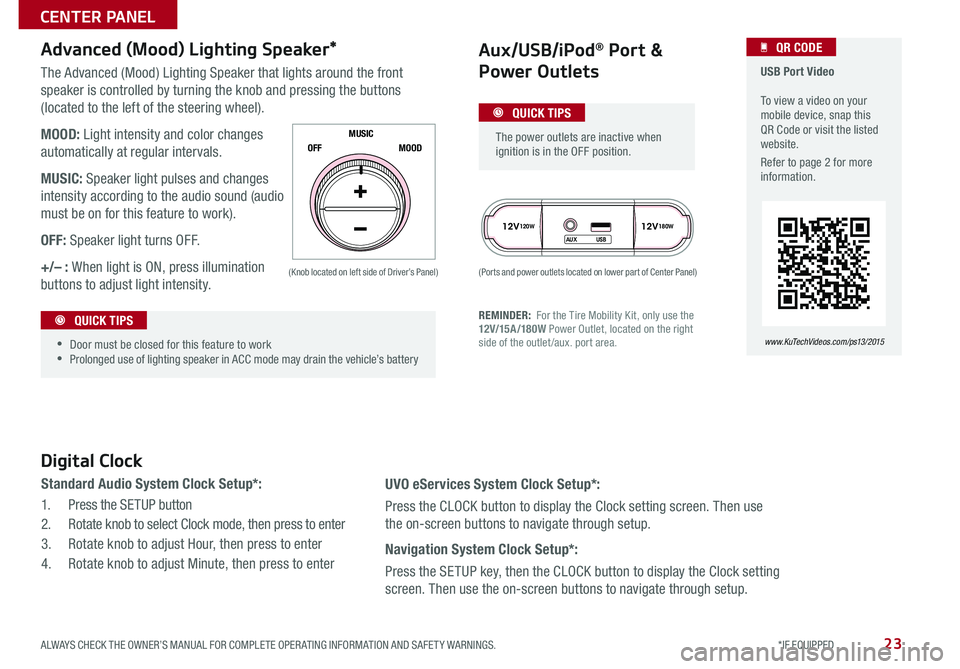
The Advanced (Mood) Lighting Speaker that lights around the front
speaker is controlled by turning the knob and pressing the buttons
(located to the left of the steering wheel)
MOOD: Light intensity and color changes
automatically at regular intervals
MUSIC: Speaker light pulses and changes
intensity according to the audio sound (audio
must be on for this feature to work)
OFF: Speaker light turns OFF
+/– : When light is ON, press illumination
buttons to adjust light intensity
12V120W12V180W
AUX USB
Aux/USB/iPod® Port &
Power Outlets
Digital Clock
Standard Audio System Clock Setup*:
1 Press the SETUP button
2 Rotate knob to select Clock mode, then press to enter
3 Rotate knob to adjust Hour, then press to enter
4 Rotate knob to adjust Minute, then press to enter
Advanced (Mood) Lighting Speaker*
OFF MOOD
MUSIC
REMINDER: For the Tire Mobility Kit, only use the 12V/15A/180W Power Outlet, located on the right side of the outlet /aux
port area
(Ports and power outlets located on lower part of Center Panel) (Knob located on left side of Driver’s Panel)
UVO eServices System Clock Setup*:
Press the CLOCK button to display the Clock setting screen Then use
the on-screen buttons to navigate through setup
Navigation System Clock Setup*:
Press the SETUP key, then the CLOCK button to display the Clock setting
screen Then use the on-screen buttons to navigate through setup
•
•Door must be closed for this feature to work •Prolonged use of lighting speaker in ACC mode may drain the vehicle’s battery
The power outlets are inactive when ignition is in the OFF position
USB Port Video To view a video on your mobile device, snap this QR Code or visit the listed website
Refer to page 2 for more information
www. KuTechVideo s.c om/p s13/2015
QR CODE
QUICK TIPS
QUICK TIPS
ALWAYS CHECK THE OWNER’S MANUAL FOR COMPLETE OPER ATING INFORMATION AND SAFET Y WARNINGS. *IF EQUIPPED
CENTER PANEL
Page 26 of 46

24
Automatic Climate Control*
( Type B)
Climate Control Auto Function:
1 Press AUTO to select Full Auto Operation
2 Press MODE buttons to control which vents air flows through
Defrost Outside Windshield:
1 Set Fan Speed to the highest position
2 Set Temperature to Hot
3 Press the Defrost button
Defog Inside Windshield:
1 Set desired fan Fan Speed
2 Set desired Temperature
3 Press the Defrost button
REMINDERS:
• Warm air may flow in through vents if Recirculated Air button is not pressed ON (LED lit)
• Your Manual Climate Control system may differ from those in the illustrations See your Owner’s Manual for more details
Air Flow Modes
To select Air Flow Modes, press the
mode selection buttons:
Face-Level
Bi-Level
F lo o r- L evel
Floor/Defrost-Level
AUTO
OFF
FRONT
REAR
A/C MODE
CLIMATE
P A SSE NGE R
A IR BA GactiveECO
Fan Speed Control buttons
Mode Selection button
Display CLIMATE control information
Rear Windshield Defroster buttonAutomatic Climate Control button Recirculated Air button
Front Windshield Defroster buttonAir Conditioning ON/OFF button Temperature Control knob
System OFF button
•
•Keep inside glass as clean as possible to reduce window fogging
•Defrost mode activates A /C and opens Fresh Air Vent •During Auto Operation the A /C indicator will NOT illuminate The fan speed, air intake, air flow and air conditioning may automatically engage at any time to reach desired temperature and reduce humidity
QUICK TIPS
SOUL FEATURES & FUNCTIONS GUIDE
*IF EQUIPPED
CENTER PANEL
Page 27 of 46

25
A/CMAX01
2
3
4REA RA/C
PA SSEN GER
A IR BAG
Manual Climate Control*
Defrost Outside Windshield:
1 Set Fan Speed to the highest position
2 Set Temperature to Hot
3 Rotate knob to the Front Defroster mode
Defog Inside Windshield:
1 Set Fan Speed to desired position
2 Set desired Temperature
3 Rotate knob to the Front Defroster mode
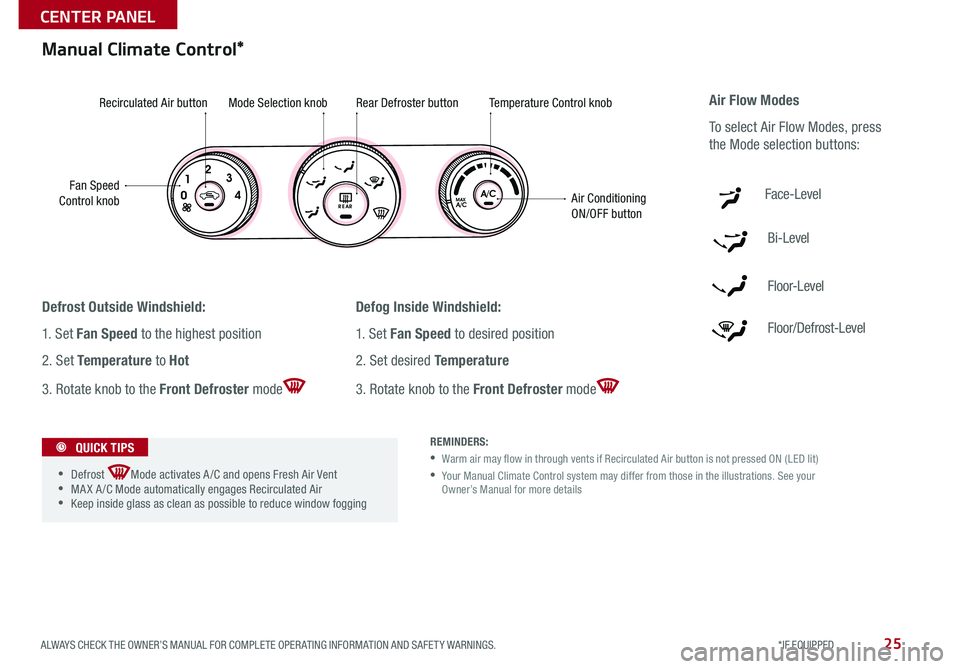
Fan Speed Control knob
Recirculated Air buttonMode Selection knobRear Defroster buttonTemperature Control knob
Air Conditioning ON/OFF button
REMINDERS:
• Warm air may flow in through vents if Recirculated Air button is not pressed ON (LED lit)
• Your Manual Climate Control system may differ from those in the illustrations See your Owner’s Manual for more details
Air Flow Modes
To select Air Flow Modes, press
the Mode selection buttons:
Face-Level
Bi-Level
F lo o r- L evel
Floor/Defrost-Level
•
•Defrost Mode activates A /C and opens Fresh Air Vent •MA X A /C Mode automatically engages Recirculated Air •Keep inside glass as clean as possible to reduce window fogging
QUICK TIPS
ALWAYS CHECK THE OWNER’S MANUAL FOR COMPLETE OPER ATING INFORMATION AND SAFET Y WARNINGS. *IF EQUIPPED
CENTER PANEL
Page 36 of 46

34
Panoramic Sunroof Operation*
The sunroof operation is controlled through a multidirectional switch/lever and the sunshade is controlled thought the OPEN/CLOSE buttons
The ignition needs to be in the ON position to operate the Sunroof and Sunshade
Sunroof Open Warning*
If the Sunroof is not fully closed, the warning will chime and display on the LCD screen* when:
ROOMDOOR
OPEN
CLOSE
•The ignition is turned off (Smart Key*)
•The ignition key is removed
•The driver’s door is opened
Slide the Sunroof:
•Open: Slide the lever A backward
•Close: Slide the lever A forward
REMINDER: If closed, the Sunshade will also open when lever is pressed backward
Tilt the Sunroof:
•Raise: Push lever A upward
•Lower: Pull lever A downward
•Auto Close: Press the CLOSE toggle button B
REMINDER: If closed, the Sunshade will also open when lever is pressed backward
Slide the Sunshade:
•Open: Press the OPEN toggle button B
•Close: Press the CLOSE toggle button B
REMINDERS:
•If open, the Sunroof will also close when the toggle button is pressed
•Sunshade needs to remain OPEN while Sunroof is open and vehicle is moving
B
A
To stop the Sunroof/Sunshade at any position, push or pull the sunroof control lever in any direction
QUICK TIPS
SOUL FEATURES & FUNCTIONS GUIDE
*IF EQUIPPED
OTHER KEY FEATURES