2015 KIA Soul EV charging
[x] Cancel search: chargingPage 383 of 407
38
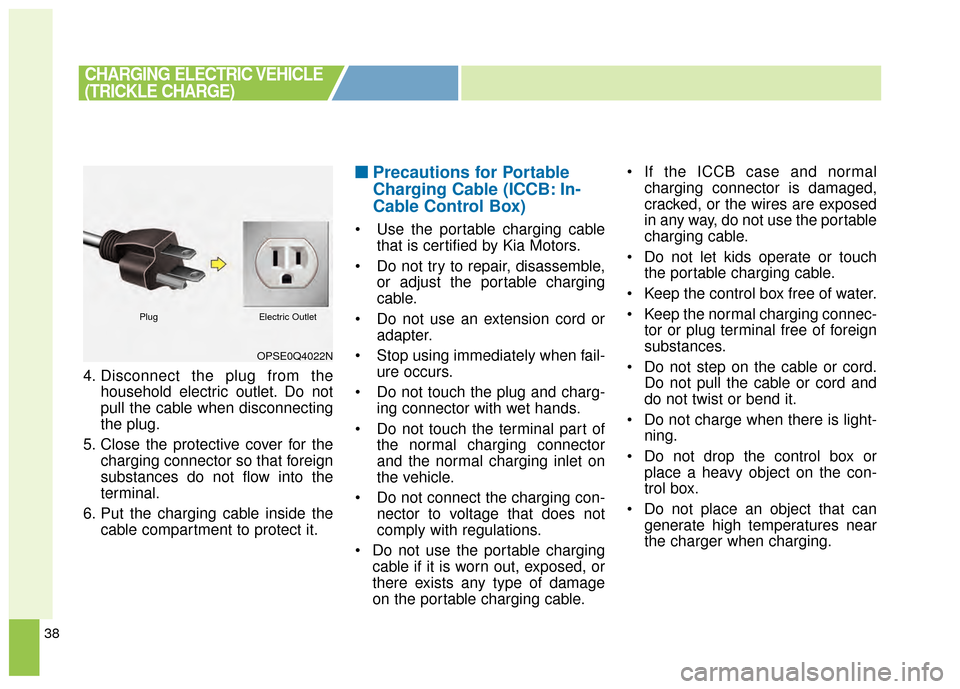
4. Disconnect the plug from thehousehold electric outlet. Do not
pull the cable when disconnecting
the plug.
5. Close the protective cover for the charging connector so that foreign
substances do not flow into the
terminal.
6. Put the charging cable inside the cable compartment to protect it.
■ ■Precautions for Portable
Charging Cable (ICCB: In-
Cable Control Box)
Use the portable charging cable
that is certified by Kia Motors.
Do not try to repair, disassemble, or adjust the portable charging
cable.
Do not use an extension cord or adapter.
Stop using immediately when fail- ure occurs.
Do not touch the plug and charg- ing connector with wet hands.
Do not touch the terminal part of the normal charging connector
and the normal charging inlet on
the vehicle.
Do not connect the charging con- nector to voltage that does not
comply with regulations.
Do not use the portable charging cable if it is worn out, exposed, or
there exists any type of damage
on the portable charging cable. If the ICCB case and normal
charging connector is damaged,
cracked, or the wires are exposed
in any way, do not use the portable
charging cable.
Do not let kids operate or touch the portable charging cable.
Keep the control box free of water.
Keep the normal charging connec- tor or plug terminal free of foreign
substances.
Do not step on the cable or cord. Do not pull the cable or cord and
do not twist or bend it.
Do not charge when there is light- ning.
Do not drop the control box or place a heavy object on the con-
trol box.
Do not place an object that can generate high temperatures near
the charger when charging.
CHARGING ELECTRIC VEHICLE
(TRICKLE CHARGE)
OPSE0Q4022N
PlugElectric Outlet
Page 385 of 407
40
❈For vehicles with Shift Lock, you
have to press the POWER button
to the ON position, press and
hold the brake pedal, then press
the unlock button on the shift
lever while it is placed in P (Park)
in order to move the shift lever to
R (Reverse).
While the charging cable is con- nected, you cannot use the shift
lever for safety reasons.
11.Release the parking brake and slowly release the brake pedal.
Check if the vehicle slowly moves
forward, then press the accelera-
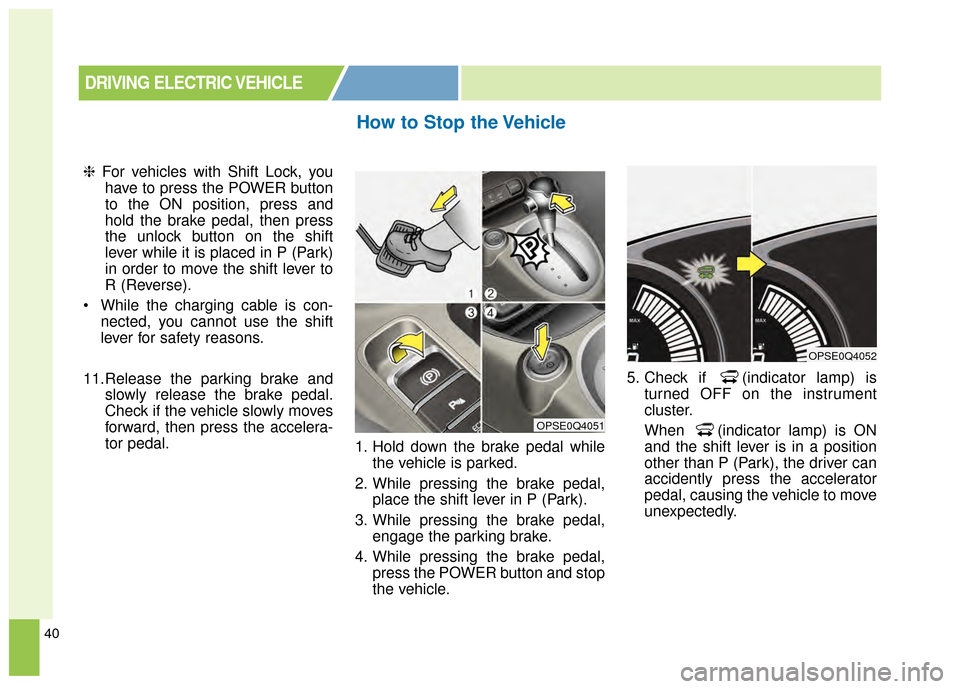
tor pedal. 1. Hold down the brake pedal while
the vehicle is parked.
2. While pressing the brake pedal, place the shift lever in P (Park).
3. While pressing the brake pedal, engage the parking brake.
4. While pressing the brake pedal, press the POWER button and stop
the vehicle. 5. Check if (indicator lamp) is
turned OFF on the instrument
cluster.
When (indicator lamp) is ON
and the shift lever is in a position
other than P (Park), the driver can
accidently press the accelerator
pedal, causing the vehicle to move
unexpectedly.
How to Stop the Vehicle
DRIVING ELECTRIC VEHICLE
OPSE0Q4051
OPSE0Q4052
Page 388 of 407
43
If you operate the air conditioner/heater too much, the driving battery
uses too much electricity. This may
reduce the distance to empty.
Therefore, it is recommended that
you set the cabin temperature to
(23°C (73°F)) AUTO. This setting
that has been certified by various
assessment tests to maintain opti-
mal energy consumption rates while
keeping the temperature fresh.
Turn OFF the heater and air con-
ditioner if you do not need them.
Press and hold the accelerator pedal to maintain speed and drive
economically.
Gradually press and release the accelerator pedal when accelerat-
ing or decelerating.
Always maintain specified tire pressures.
Do not use unnecessary electrical components while driving.
Do not load unnecessary items in the vehicle trunk.
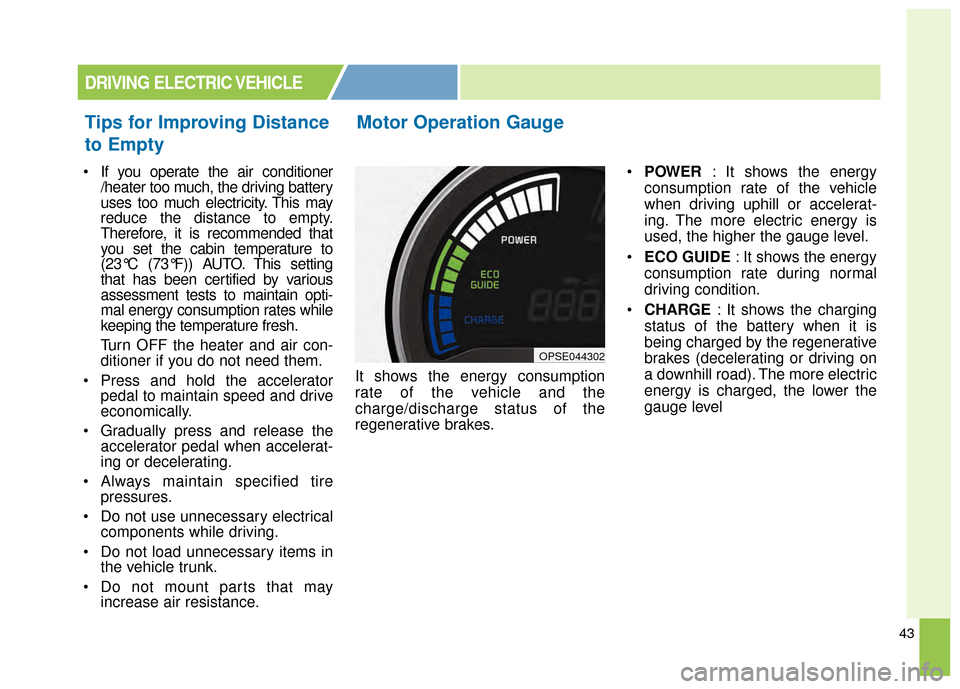
Do not mount parts that may increase air resistance. It shows the energy consumption
rate of the vehicle and the
charge/discharge status of the
regenerative brakes.
POWER : It shows the energy
consumption rate of the vehicle
when driving uphill or accelerat-
ing. The more electric energy is
used, the higher the gauge level.
ECO GUIDE : It shows the energy
consumption rate during normal
driving condition.
CHARGE : It shows the charging
status of the battery when it is
being charged by the regenerative
brakes (decelerating or driving on
a downhill road). The more electric
energy is charged, the lower the
gauge level
Motor Operation Gauge
DRIVING ELECTRIC VEHICLE
OPSE044302
Tips for Improving Distance
to Empty
Page 389 of 407
![KIA Soul EV 2015 2.G Owners Manual 44
State of charge (SOC) gauge
for high voltage battery
It shows the charging status of thehigh voltage battery.
[MIN] position on the indicator
indicates that there is not enough
energy in the high KIA Soul EV 2015 2.G Owners Manual 44
State of charge (SOC) gauge
for high voltage battery
It shows the charging status of thehigh voltage battery.
[MIN] position on the indicator
indicates that there is not enough
energy in the high](/manual-img/2/2969/w960_2969-388.png)
44
State of charge (SOC) gauge
for high voltage battery
It shows the charging status of thehigh voltage battery.
[MIN] position on the indicator
indicates that there is not enough
energy in the high voltage battery.
[MAX] position indicates that the
driving battery is fully charged.
When driving on highways or motorways, make sure to check in
advance if the driving battery is
charged enough. When there are 4 gauge bars (near
the "MIN" area) on the high voltage
charge indicator, the warning lamp
turns ON to alert you of the battery
level.
When the warning lamp turns ON, the
vehicle can drive an additional 20~40
km (12.4~24.8 miles) (depending on
the driving speed, heater/air condition-
er, weather, driving style, and other
factors). Charging is required. When there are 1-2 gauge bars left
for the high voltage battery, the vehi-
cle speed is limited and then eventu-
ally the vehicle will be turned OFF.
Charge the vehicle immediately.
OPSE044305
DRIVING ELECTRIC VEHICLE
OPSE044303
Page 391 of 407
46
■
■Power limited
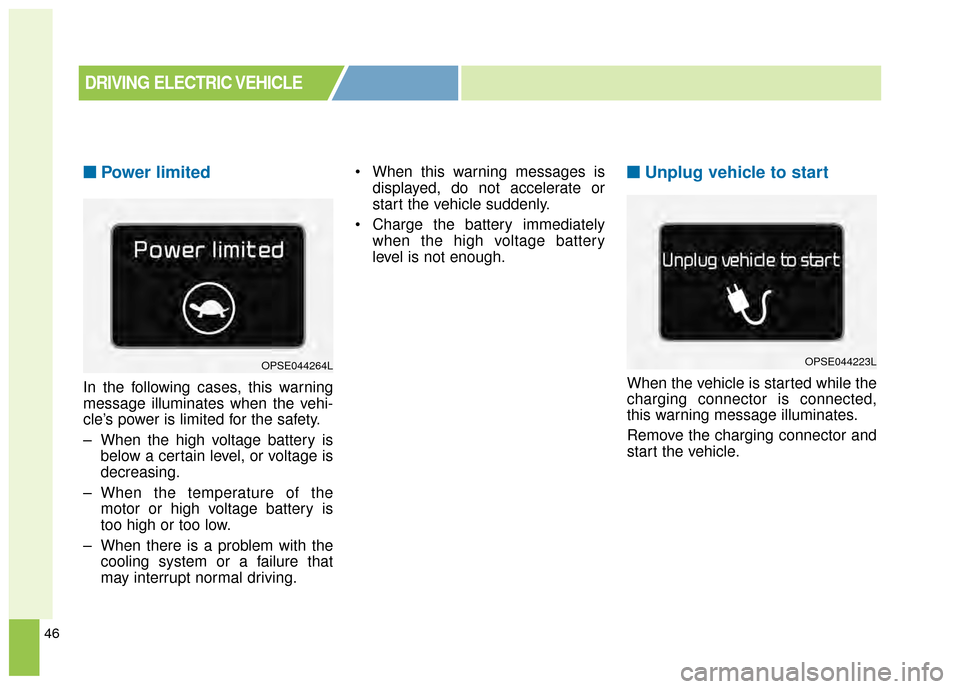
In the following cases, this warning
message illuminates when the vehi-
cle’s power is limited for the safety.
– When the high voltage battery is
below a certain level, or voltage is
decreasing.
– When the temperature of the motor or high voltage battery is
too high or too low.
– When there is a problem with the cooling system or a failure that
may interrupt normal driving. When this warning messages is
displayed, do not accelerate or
start the vehicle suddenly.
Charge the battery immediately when the high voltage battery
level is not enough.
■ ■Unplug vehicle to start
When the vehicle is started while the
charging connector is connected,
this warning message illuminates.
Remove the charging connector and
start the vehicle.
DRIVING ELECTRIC VEHICLE
OPSE044264LOPSE044223L
Page 392 of 407
47
■
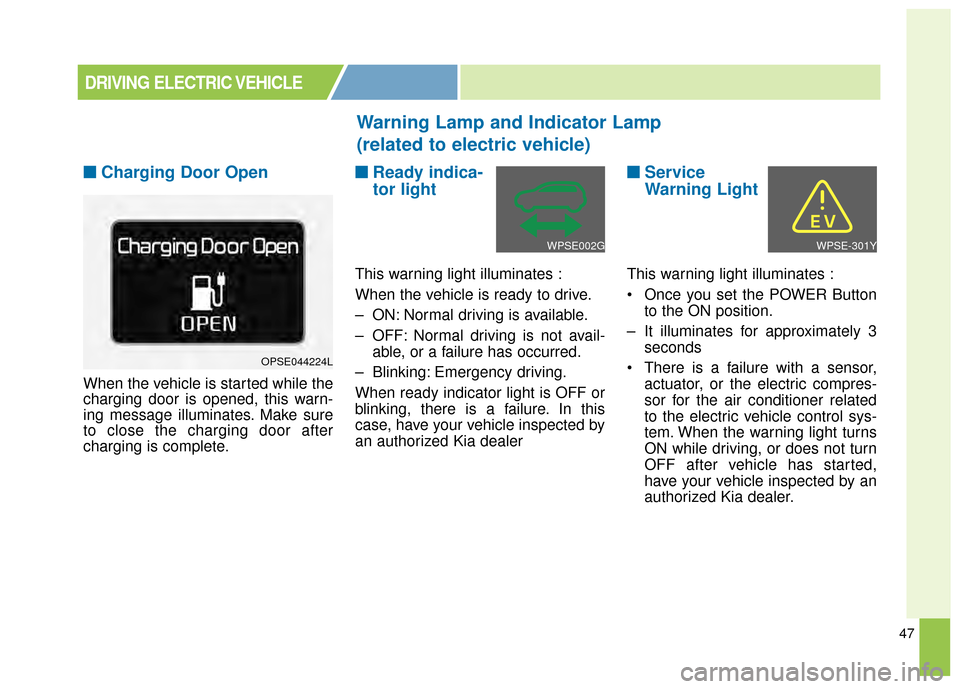
■Charging Door Open
When the vehicle is started while the
charging door is opened, this warn-
ing message illuminates. Make sure
to close the charging door after
charging is complete.
■ ■Ready indica-
tor light
This warning light illuminates :
When the vehicle is ready to drive.
– ON: Normal driving is available.
– OFF: Normal driving is not avail-
able, or a failure has occurred.
– Blinking: Emergency driving.
When ready indicator light is OFF or
blinking, there is a failure. In this
case, have your vehicle inspected by
an authorized Kia dealer
■ ■ Service
Warning Light
This warning light illuminates :
Once you set the POWER Button
to the ON position.
– It illuminates for approximately 3 seconds
There is a failure with a sensor, actuator, or the electric compres-
sor for the air conditioner related
to the electric vehicle control sys-
tem. When the warning light turns
ON while driving, or does not turn
OFF after vehicle has started,
have your vehicle inspected by an
authorized Kia dealer.
Warning Lamp and Indicator Lamp
(related to electric vehicle)
DRIVING ELECTRIC VEHICLE
OPSE044224L
WPSE002GWPSE-301Y
Page 393 of 407
48
■
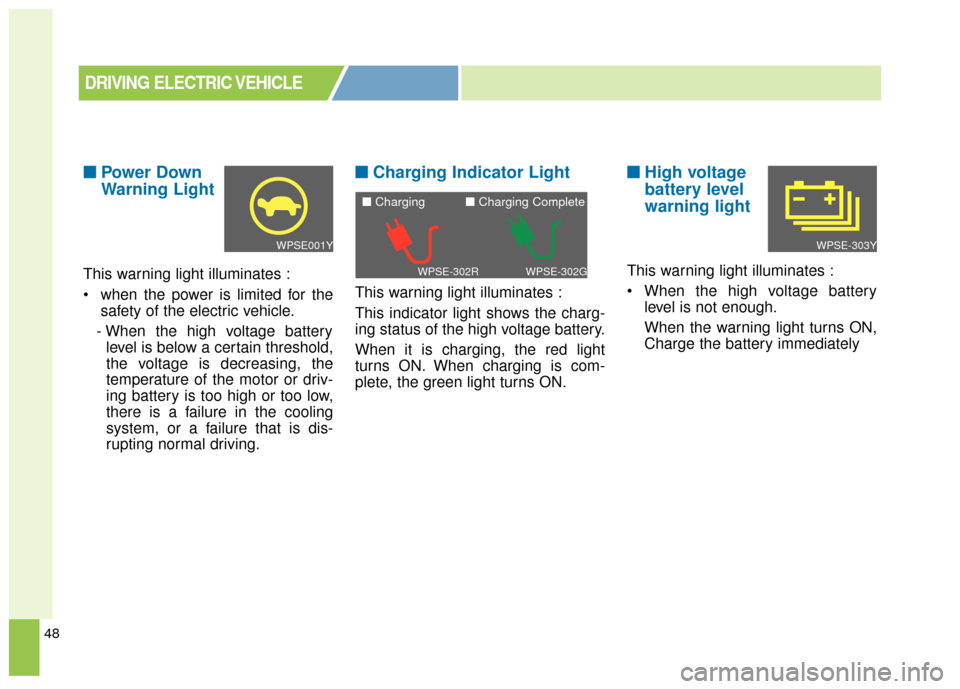
■Power Down
Warning Light
This warning light illuminates :
when the power is limited for the
safety of the electric vehicle.
- When the high voltage battery level is below a certain threshold,
the voltage is decreasing, the
temperature of the motor or driv-
ing battery is too high or too low,
there is a failure in the cooling
system, or a failure that is dis-
rupting normal driving.
■ ■ Charging Indicator Light
This warning light illuminates :
This indicator light shows the charg-
ing status of the high voltage battery.
When it is charging, the red light
turns ON. When charging is com-
plete, the green light turns ON.
■ ■High voltage
battery level
warning light
This warning light illuminates :
When the high voltage battery
level is not enough.
When the warning light turns ON,
Charge the battery immediately
DRIVING ELECTRIC VEHICLE
WPSE001Y
WPSE-302GWPSE-302R
■ Charging ■ Charging Complete
WPSE-303Y
Page 401 of 407
Index
2I
Active ECO system. . . . . . . . . . . . . . . . . . . . . . . . . . . . 5-10Active ECO operation . . . . . . . . . . . . . . . . . . . . . . . 5-10
Air bag - advanced supplemental restraint system . . . . 3-34 Adding equipment to or modifying your airbag-equipped vehicle . . . . . . . . . . . . . . . . . . . . . . . 3-57
Air bag warning label. . . . . . . . . . . . . . . . . . . . . . . . 3-57
Air bag warning light . . . . . . . . . . . . . . . . . . . . . . . . 3-37
Curtain air bag . . . . . . . . . . . . . . . . . . . . . . . . . . . . . 3-50
Do not installing a child restraint on a front passenger's seat . . . . . . . . . . . . . . . . . . . . . . . . . . . 3-37
Driver's and passenger's front air bag . . . . . . . . . . . 3-46
How does the air bag system operate . . . . . . . . . . . 3-35
Inflation and non-inflation conditions of the air bag . . 3-51
Occupant Detection System (ODS) . . . . . . . . . . . . . 3-41
Side air bag. . . . . . . . . . . . . . . . . . . . . . . . . . . . . . . . 3-49
SRS Care . . . . . . . . . . . . . . . . . . . . . . . . . . . . . . . . . 3-56
SRS components and functions . . . . . . . . . . . . . . . . 3-38
Air conditioning system . . . . . . . . . . . . . . . . . . . . . . . . . 8-3
Appearance care . . . . . . . . . . . . . . . . . . . . . . . . . . . . . . 7-68 Exterior care . . . . . . . . . . . . . . . . . . . . . . . . . . . . . . . 7-68
Interior care . . . . . . . . . . . . . . . . . . . . . . . . . . . . . . . 7-73
Audio system . . . . . . . . . . . . . . . . . . . . . . . . . . . . . . . 4-116 Antenna . . . . . . . . . . . . . . . . . . . . . . . . . . . . . . . . . 4-116
Audio remote control . . . . . . . . . . . . . . . . . . . . . . . 4-117
Aux, USB and iPod
®port . . . . . . . . . . . . . . . . . . . 4-118
Speaker lights . . . . . . . . . . . . . . . . . . . . . . . . . . . . . 4-119 Auto defogging system . . . . . . . . . . . . . . . . . . . . . . . . 4-105
Automatic climate control system . . . . . . . . . . . . . . . . 4-88
Automatic heating and air conditioning. . . . . . . . . . 4-89
Checking the amount of air conditioner refrigerantand compressor lubricant . . . . . . . . . . . . . . . . . . . 4-101
Climate control air filter. . . . . . . . . . . . . . . . . . . . . 4-100
Manual heating and air conditioning . . . . . . . . . . . . 4-90
System operation . . . . . . . . . . . . . . . . . . . . . . . . . . . 4-98
Battery. . . . . . . . . . . . . . . . . . . . . . . . . . . . . . . . . . . . \
. . 7-31 Battery recharging . . . . . . . . . . . . . . . . . . . . . . . . . . 7-32
For best battery service . . . . . . . . . . . . . . . . . . . . . . 7-31
Reset items . . . . . . . . . . . . . . . . . . . . . . . . . . . . . . . . 7-33
Before driving . . . . . . . . . . . . . . . . . . . . . . . . . . . . . . . . . 5-3 Before entering vehicle . . . . . . . . . . . . . . . . . . . . . . . 5-3
Before starting . . . . . . . . . . . . . . . . . . . . . . . . . . . . . . 5-3
Necessary inspections . . . . . . . . . . . . . . . . . . . . . . . . 5-3
Brake fluid . . . . . . . . . . . . . . . . . . . . . . . . . . . . . . . . . . 7-23\
Checking the brake fluid level . . . . . . . . . . . . . . . . . 7-23
Brake system. . . . . . . . . . . . . . . . . . . . . . . . . . . . . . . . . 5-16 Anti-lock brake system (ABS) . . . . . . . . . . . . . . . . . 5-22
Electric parking brake (EPB) . . . . . . . . . . . . . . . . . . 5-18
Electronic stability control (ESC) . . . . . . . . . . . . . . 5-24
Good braking practices . . . . . . . . . . . . . . . . . . . . . . 5-30
Hill-start assist control (HAC) . . . . . . . . . . . . . . . . . 5-29
Power brakes . . . . . . . . . . . . . . . . . . . . . . . . . . . . . 5-16
A
B