Page 758 of 846

75
Maintenance
While operating your vehicle:
Note any changes in the sound of theexhaust or any smell of exhaust fumes
in the vehicle.
Check for vibrations in the steering wheel. Notice any increased steering
effort or looseness in the steering
wheel, or change in its straight-aheadposition.
Notice if your vehicle constantly turns slightly or “pulls” to one side when trav-
elling on smooth, level road.
When stopping, listen and check for unusual sounds, pulling to one side,
increased brake pedal travel or “hard-
to-push” brake pedal.
If any slipping or changes in the oper- ation of your transaxle occurs, check
the transaxle fluid level.
Check manual transaxle operation, including clutch operation.
Check automatic transaxle P (Park) function.
Check parking brake.
Check for fluid leaks under your vehicle (water dripping from the air condition-
ing system during or after use is nor-mal).
At least monthly:
Check coolant level in the enginecoolant reservoir.
Check the operation of all exterior lights, including the stoplights, turn sig-
nals and hazard warning flashers.
Check the inflation pressures of all tyres including the spare.
At least twice a year
(i.e., every Spring and Fall):
Check radiator, heater and air condi- tioning hoses for leaks or damage.
Check windscreen washer spray and wiper operation. Clean wiper blades
with clean cloth dampened with wash-er fluid.
Check headlight alignment.
Check muffler, exhaust pipes, shields and clamps.
Check the lap/shoulder belts for wear and function.
Check for worn tyres and loose wheel lug nuts.
At least once a year:
Clean body and door drain holes.
Lubricate door hinges and checks, andbonnet hinges.
Lubricate door and bonnet locks and latches.
Lubricate door rubber weatherstrips.
Check the air conditioning system.
Inspect and lubricate automatic transaxle linkage and controls.
Clean battery and terminals.
Check the brake fluid level.
Page 791 of 846

Maintenance
38
7
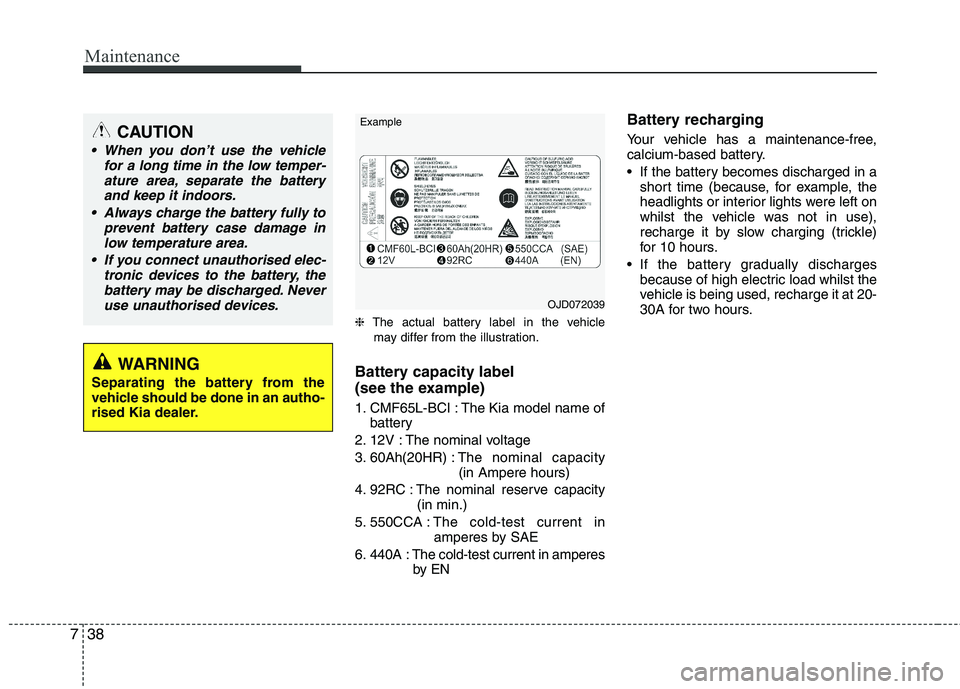
❈ The actual battery label in the vehicle
may differ from the illustration.
Battery capacity label
(see the example)
1. CMF65L-BCI : The Kia model name of battery
2. 12V : The nominal voltage
3. 60Ah(20HR) : The nominal capacity
(in Ampere hours)
4. 92RC : The nominal reserve capacity (in min.)
5. 550CCA : The cold-test current in
amperes by SAE
6. 440A : The cold-test current in amperes by EN Battery recharging
Your vehicle has a maintenance-free,
calcium-based battery.
If the battery becomes discharged in a
short time (because, for example, the
headlights or interior lights were left on
whilst the vehicle was not in use),
recharge it by slow charging (trickle)
for 10 hours.
If the battery gradually discharges because of high electric load whilst the
vehicle is being used, recharge it at 20-
30A for two hours.
CAUTION
When you don’t use the vehicle
for a long time in the low temper-
ature area, separate the batteryand keep it indoors.
Always charge the battery fully to prevent battery case damage in
low temperature area.
If you connect unauthorised elec- tronic devices to the battery, thebattery may be discharged. Never use unauthorised devices.
WARNING
Separating the battery from the
vehicle should be done in an autho-
rised Kia dealer.
OJD072039
Example
Page 803 of 846

Maintenance
50
7
FUSES
A vehicle’s electrical system is protected
from electrical overload damage by
fuses.
This vehicle has 2 fuse panels, one locat-
ed in the driver’s side panel bolster,
another is in the engine compartment.
If any of your vehicle’s lights, acces-
sories, or controls do not work, check the
appropriate circuit fuse. If a fuse has
blown, the element inside the fuse will bemelted.
If the electrical system does not work,
first check the driver’s side fuse panel.
Always replace a blown fuse with one of
the same rating.
Before replacing a blown fuse, discon-
nect the negative battery cable.
If the replacement fuse blows, this indi-
cates an electrical problem. Avoid using
the system involved and immediately
consult an authorised Kia dealer.
Four kinds of fuses are used: blade typefor lower amperage rating, cartridge type, and fusible link for higher amperage rat-ings.
✽✽ NOTICE
The actual fuse/relay panel label may
differ from equipped items
WARNING - Fuse replace-
ment
Never replace a fuse with any- thing but another fuse of the same rating.
A higher capacity fuse could cause damage and possibly a fire.
Never install a wire instead of the proper fuse - even as a temporary
repair. It may cause extensive
wiring damage and a possible fire.
Do not arbitrarily modify or add-on electric wiring of the vehicle.
CAUTION
Do not use a screwdriver or any
other metal object to remove fusesbecause it may cause a short circuitand damage the system.
OTA070039
Blade type
Cartridge type
Fusible link B
BBBlllloooowwwwnnnn
BBBBlllloooowwwwnnnn
BBBBlllloooowwwwnnnn
Page 805 of 846

Maintenance
52
7
If you do not have a spare, use a fuse of
the same rating from a circuit you maynot need for operating the vehicle, suchas the cigarette lighter fuse.
If the headlights or other electrical com-
ponents do not work and the fuses are
OK, check the fuse panel in the engine
compartment. If a fuse is blown, it mustbe replaced.
Memory fuse
Your vehicle is equipped with a memory
fuse to prevent battery discharge if your
vehicle is parked without being operated
for prolonged periods. Use the following
procedures before parking the vehicle for
prolonged periods.
1. Turn off the engine.
2. Turn off the headlights and tail lights.
3. Open the driver’s side panel cover and pull up the memory fuse.
✽✽ NOTICE
If the memory fuse is pulled up from the fuse panel, the warning chime,
audio, clock and interior lamps, etc.,
will not operate. Some items must be
reset after replacement. Refer to
“Battery” in this section.
Even when the memory fuse is pulled
up, the battery can still be discharged
by operation of the headlights or other
electrical devices.
OTA070020R
Page 814 of 846

761
Maintenance
LIGHT BULBS
Use only the bulbs of the specifiedwattage.
✽✽ NOTICE
After, driving in heavy rain or washing
the vehicle, headlight and taillight lenses
could appear frosty. This condition is
caused by the temperature difference
between the lamp inside and outside.
This is similar to the condensation on
your windows inside your vehicle during
the rain and doesn’t indicate a problem
with your vehicle. If the water leaks into
the lamp bulb circuitry, have the vehicle
checked by an authorised Kia dealer.
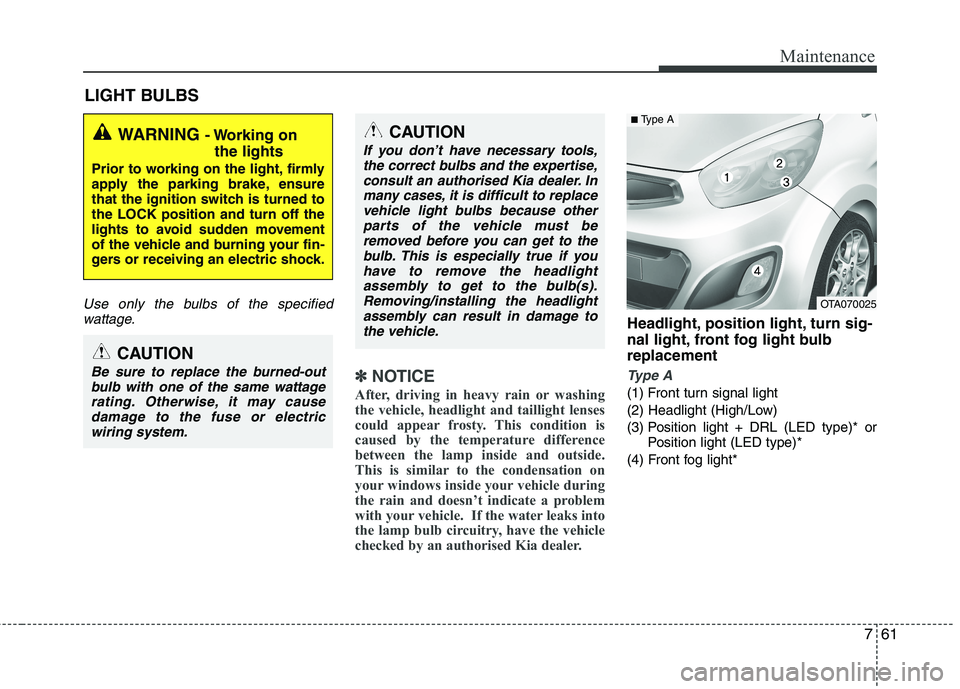
Headlight, position light, turn sig-
nal light, front fog light bulbreplacement
Type A
(1) Front turn signal light
(2) Headlight (High/Low)
(3) Position light + DRL (LED type)* or Position light (LED type)*
(4) Front fog light*
WARNING - Working on
the lights
Prior to working on the light, firmly
apply the parking brake, ensure
that the ignition switch is turned tothe LOCK position and turn off the
lights to avoid sudden movement
of the vehicle and burning your fin-
gers or receiving an electric shock.
CAUTION
Be sure to replace the burned-out bulb with one of the same wattagerating. Otherwise, it may causedamage to the fuse or electricwiring system.
CAUTION
If you don’t have necessary tools,the correct bulbs and the expertise,
consult an authorised Kia dealer. Inmany cases, it is difficult to replacevehicle light bulbs because other parts of the vehicle must be
removed before you can get to thebulb. This is especially true if youhave to remove the headlight
assembly to get to the bulb(s).Removing/installing the headlightassembly can result in damage tothe vehicle.
OTA070025
■ Type A
Page 821 of 846
Maintenance
68
7
Interior light bulb replacement
1. Using a flat-blade screwdriver, gently
pry the lens from the interior light housing.
2. Remove the bulb by pulling it straight out.
3. Install a new bulb in the socket.
4. Align the lens tabs with the interior light housing notches and snap the
lens into place.Map lamp
Room lamp
OTA070037/ORB070064
CAUTION
Use care not to dirty or damagelens, lens tab, and plastic housings.
WARNING
Prior to working on the Interior
Lights, ensure that the “OFF” but-
ton is depressed to avoid burning
your fingers or receiving an electric
shock.