Page 14 of 846
Safety features of your vehicle
2
3
Driver’s seat
(1) Forward and rearward
(2) Seatback angle(3) Seat cushion height*
(4) Seat warmer*(5) Headrest
Front passenger’s seat
(6) Forward and rearward
(7) Seatback angle
(8) Seat warmer*
(9) Walk-in seat (for 3 door vehicle only)(10) Headrest Rear seat (11) Headrest*
(12) Seatback folding*
* : if equipped
SEATS
OTA032001L
WARNING
- Loose objects
Loose objects in the driver’s foot
area could interfere with the opera-
tion of the foot pedals, possibly
causing an accident. Do not place
anything under the front seats.
Page 17 of 846

35
Safety features of your vehicle
Seatback angle
To recline the seatback:
1. Lean forward slightly and lift up on theseatback recline lever.
2. Carefully lean back on the seat and adjust the seatback of the seat to the
position you desire.
3. Release the lever and make sure the seatback is locked in place. (The lever
MUST return to its original position for
the seatback to lock.)
Seat cushion height (for driver’s seat)
(if equipped)
To change the height of the seat cushion,
push the lever that is located on the out-
side of the seat cushion upwards or
downwards.
• To lower the seat cushion, push the lever down several times.
To raise the seat cushion, pull the lever up several times. Headrest
The driver's and front passenger's seats
are equipped with a headrest for the
occupant's safety and comfort.
The headrest not only provides comfort
for the driver and front passenger, but
also helps to protect the head and neck
in the event of a collision.
OPA039052OTA030003LOTA030004L
Page 18 of 846
Safety features of your vehicle
6
3
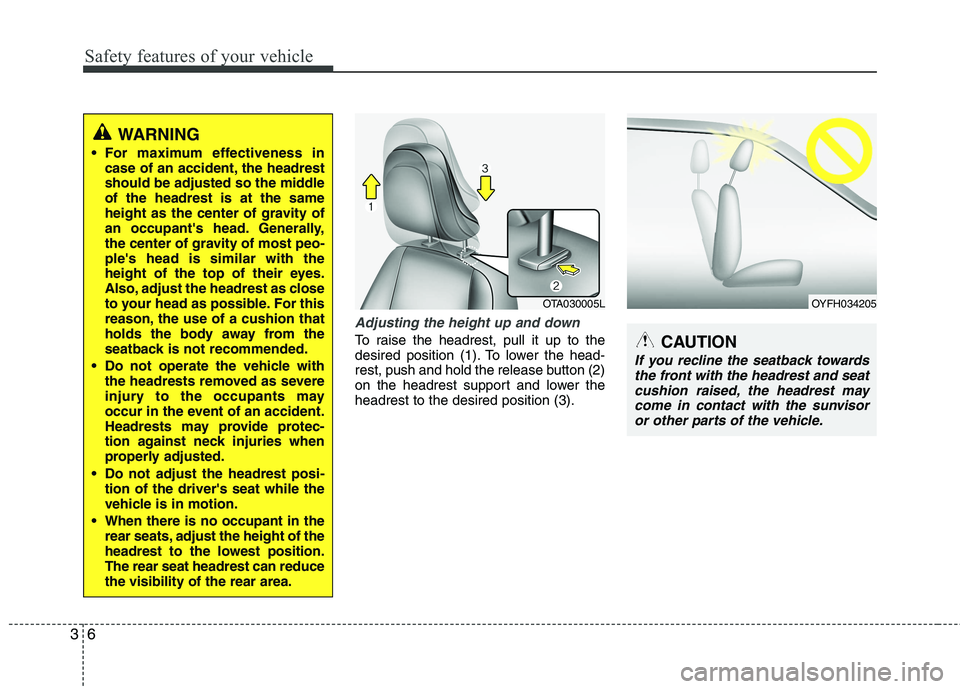
Adjusting the height up and down
To raise the headrest, pull it up to the
desired position (1). To lower the head-
rest, push and hold the release button (2)
on the headrest support and lower theheadrest to the desired position (3).
WARNING
For maximum effectiveness in case of an accident, the headrest
should be adjusted so the middleof the headrest is at the same
height as the center of gravity of
an occupant's head. Generally,
the center of gravity of most peo-ple's head is similar with the
height of the top of their eyes.
Also, adjust the headrest as close
to your head as possible. For this
reason, the use of a cushion that
holds the body away from the
seatback is not recommended.
Do not operate the vehicle with the headrests removed as severe
injury to the occupants may
occur in the event of an accident.
Headrests may provide protec-
tion against neck injuries when
properly adjusted.
Do not adjust the headrest posi- tion of the driver's seat while the
vehicle is in motion.
When there is no occupant in the rear seats, adjust the height of the
headrest to the lowest position.The rear seat headrest can reducethe visibility of the rear area.
OTA030005L
CAUTION
If you recline the seatback towards
the front with the headrest and seat cushion raised, the headrest may come in contact with the sunvisoror other parts of the vehicle.
OYFH034205
Page 19 of 846
37
Safety features of your vehicle
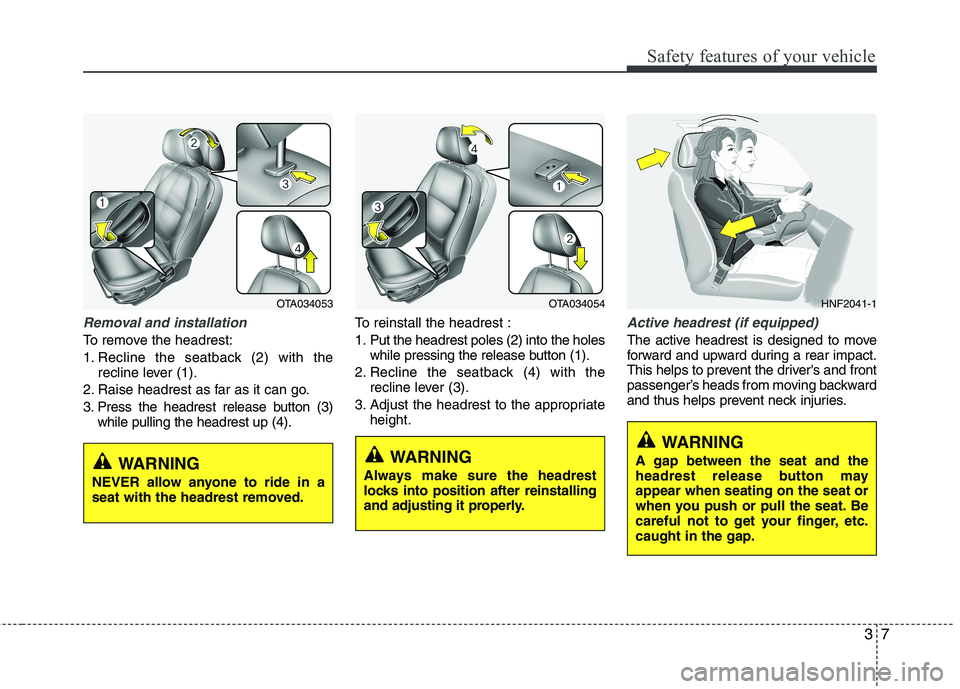
Removal and installation
To remove the headrest:
1. Recline the seatback (2) with therecline lever (1).
2. Raise headrest as far as it can go.
3. Press the headrest release button (3) while pulling the headrest up (4). To reinstall the headrest :
1. Put the headrest poles (2) into the holes
while pressing the release button (1).
2. Recline the seatback (4) with the recline lever (3).
3. Adjust the headrest to the appropriate height.
Active headrest (if equipped)
The active headrest is designed to move
forward and upward during a rear impact.
This helps to prevent the driver's and front
passenger’s heads from moving backward
and thus helps prevent neck injuries.
HNF2041-1
WARNING
A gap between the seat and the
headrest release button mayappear when seating on the seat or
when you push or pull the seat. Be
careful not to get your finger, etc.caught in the gap.
OTA034053
WARNING
NEVER allow anyone to ride in a
seat with the headrest removed.WARNING
Always make sure the headrest
locks into position after reinstalling
and adjusting it properly.
OTA034054
Page 22 of 846
Safety features of your vehicle
10
3
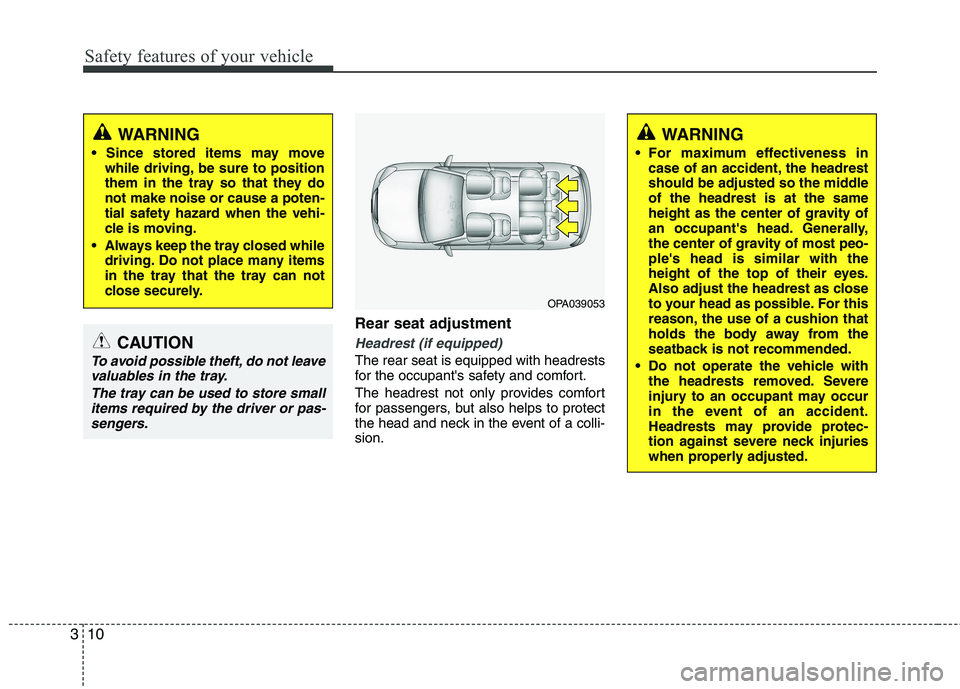
Rear seat adjustment
Headrest (if equipped)
The rear seat is equipped with headrests
for the occupant's safety and comfort.
The headrest not only provides comfort
for passengers, but also helps to protect
the head and neck in the event of a colli-sion.
WARNING
For maximum effectiveness in case of an accident, the headrest
should be adjusted so the middleof the headrest is at the same
height as the center of gravity of
an occupant's head. Generally,
the center of gravity of most peo-ple's head is similar with the
height of the top of their eyes.
Also adjust the headrest as close
to your head as possible. For this
reason, the use of a cushion that
holds the body away from the
seatback is not recommended.
Do not operate the vehicle with the headrests removed. Severe
injury to an occupant may occur
in the event of an accident.
Headrests may provide protec-
tion against severe neck injuries
when properly adjusted.
OPA039053
WARNING
while driving, be sure to position
them in the tray so that they donot make noise or cause a poten-
tial safety hazard when the vehi-
cle is moving.
Always keep the tray closed while driving. Do not place many items
in the tray that the tray can not
close securely.
CAUTION
To avoid possible theft, do not leave
valuables in the tray.
The tray can be used to store smallitems required by the driver or pas-
sengers.
Page 23 of 846
311
Safety features of your vehicle
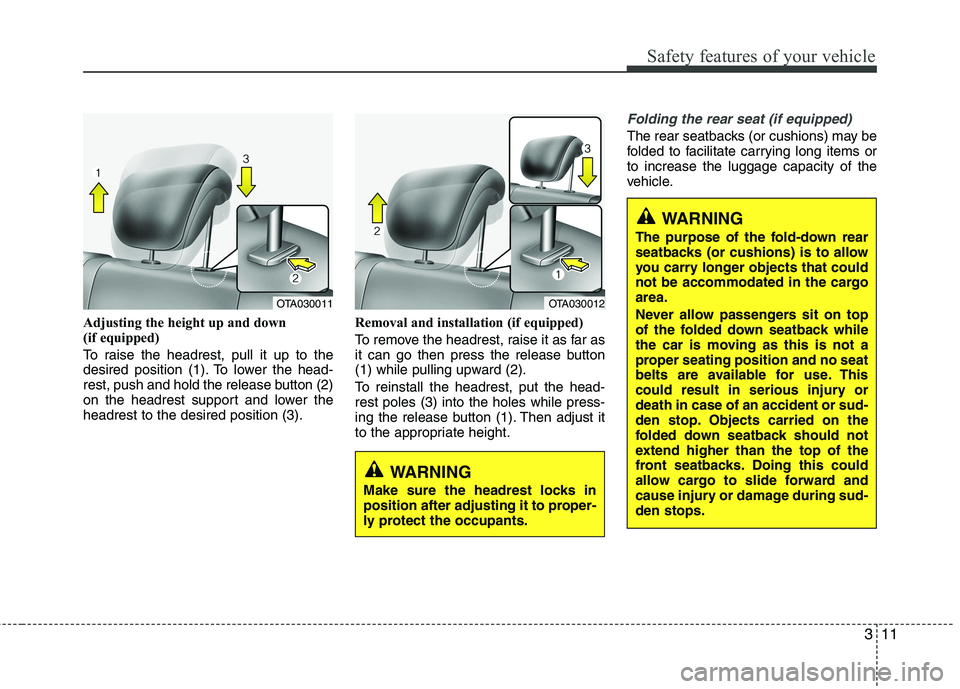
Adjusting the height up and down
(if equipped)
To raise the headrest, pull it up to the
desired position (1). To lower the head-
rest, push and hold the release button (2)
on the headrest support and lower theheadrest to the desired position (3).Removal and installation (if equipped)
To remove the headrest, raise it as far as
it can go then press the release button
(1) while pulling upward (2).
To reinstall the headrest, put the head- rest poles (3) into the holes while press-
ing the release button (1). Then adjust it
to the appropriate height.
Folding the rear seat (if equipped)
The rear seatbacks (or cushions) may be
folded to facilitate carrying long items orto increase the luggage capacity of the
vehicle.
WARNING
The purpose of the fold-down rear
seatbacks (or cushions) is to allow
you carry longer objects that could
not be accommodated in the cargoarea.
Never allow passengers sit on top
of the folded down seatback while
the car is moving as this is not a
proper seating position and no seat
belts are available for use. This
could result in serious injury ordeath in case of an accident or sud-
den stop. Objects carried on the
folded down seatback should not
extend higher than the top of the
front seatbacks. Doing this could
allow cargo to slide forward and
cause injury or damage during sud-den stops.
OTA030011
WARNING
Make sure the headrest locks in
position after adjusting it to proper-
ly protect the occupants.
OTA030012
Page 24 of 846
Safety features of your vehicle
12
3
To fold the rear seat cushion and seat back:
The rear seatbacks may be folded for-
ward to provide additional cargo space
and to provide access to the cargo area.
To raise the seatback, lift and push it
firmly until it clicks into place.
When you return the seatback to its upright position, reposition the rear
safety belts so that they can be used
by rear seat passengers.
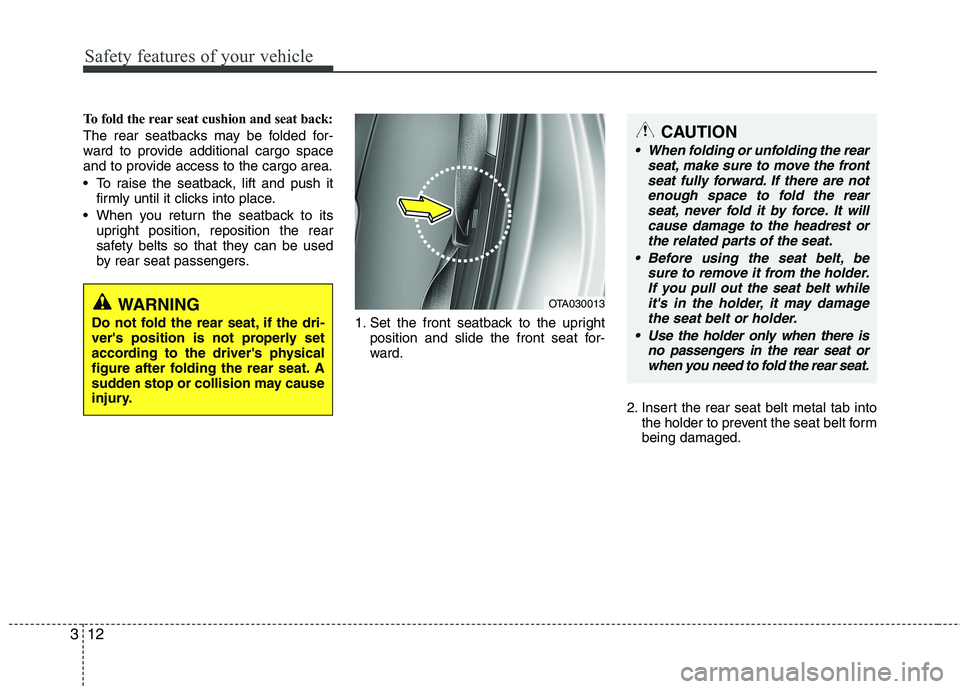
1. Set the front seatback to the uprightposition and slide the front seat for-
ward.
2. Insert the rear seat belt metal tab intothe holder to prevent the seat belt formbeing damaged.CAUTION
When folding or unfolding the rear
seat, make sure to move the front
seat fully forward. If there are not enough space to fold the rearseat, never fold it by force. It willcause damage to the headrest or
the related parts of the seat.
Before using the seat belt, be sure to remove it from the holder.If you pull out the seat belt while
it's in the holder, it may damage the seat belt or holder.
Use the holder only when there is no passengers in the rear seat orwhen you need to fold the rear seat.
OTA030013WARNING
Do not fold the rear seat, if the dri-
ver's position is not properly set
according to the driver's physical
figure after folding the rear seat. A
sudden stop or collision may cause
injury.
Page 26 of 846
Safety features of your vehicle
14
3
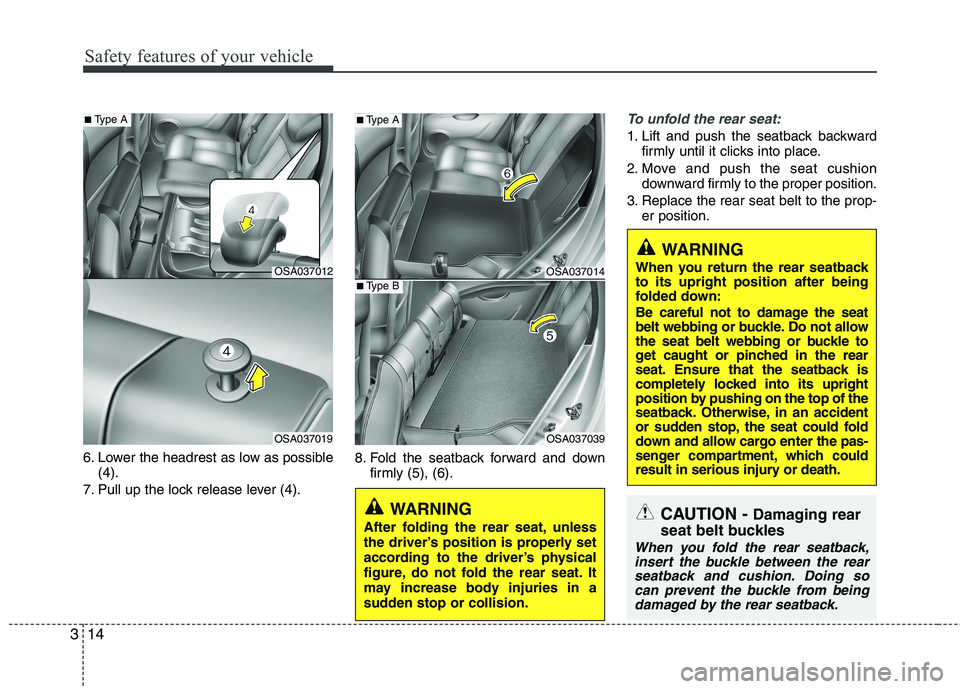
6. Lower the headrest as low as possible
(4).
7. Pull up the lock release lever (4). 8. Fold the seatback forward and down
firmly (5), (6).
To unfold the rear seat:
1. Lift and push the seatback backwardfirmly until it clicks into place.
2. Move and push the seat cushion downward firmly to the proper position.
3. Replace the rear seat belt to the prop- er position.
CAUTION - Damaging rear
seat belt buckles
When you fold the rear seatback, insert the buckle between the rear
seatback and cushion. Doing socan prevent the buckle from beingdamaged by the rear seatback.
WARNING
When you return the rear seatback to its upright position after being
folded down:
Be careful not to damage the seat
belt webbing or buckle. Do not allow
the seat belt webbing or buckle to
get caught or pinched in the rear
seat. Ensure that the seatback is
completely locked into its upright
position by pushing on the top of the
seatback. Otherwise, in an accident
or sudden stop, the seat could fold
down and allow cargo enter the pas-
senger compartment, which could
result in serious injury or death.
OSA037014
OSA037039
■ Type A
■Type B
WARNING
After folding the rear seat, unless
the driver’s position is properly set
according to the driver’s physical
figure, do not fold the rear seat. It
may increase body injuries in a
sudden stop or collision.
OSA037012
■ Type A
OSA037019