2015 KIA MORNING run flat
[x] Cancel search: run flatPage 304 of 420
What to do in an emergency
8 6
(Continued)
Be sure to use the correct
front and rear jacking posi-
tions on the vehicle; never
use the bumpers or any other
part of the vehicle for jacking
support.
The vehicle can easily roll off
the jack causing serious
injury or death.
Do not get under a vehicle
that is supported by a jack.
Do not start or run the engine
whilst the vehicle is on the
jack.
Do not allow anyone to remain
in the vehicle whilst it is on
the jack.
Make sure any children pres-
ent are in a secure place away
from the road and from the
vehicle to be raised with the
jack.
IF YOU HAVE A FLAT TYRE
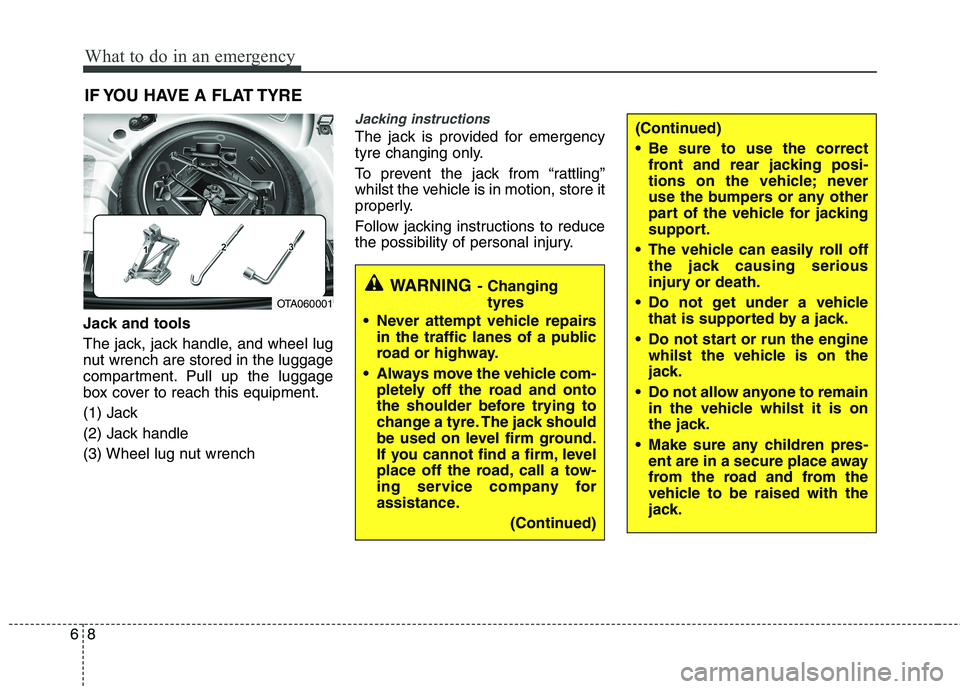
Jack and tools
The jack, jack handle, and wheel lug
nut wrench are stored in the luggage
compartment. Pull up the luggage
box cover to reach this equipment.
(1) Jack
(2) Jack handle
(3) Wheel lug nut wrench
Jacking instructions
The jack is provided for emergency
tyre changing only.
To prevent the jack from “rattling”
whilst the vehicle is in motion, store it
properly.
Follow jacking instructions to reduce
the possibility of personal injury.
WARNING- Changing
tyres
Never attempt vehicle repairs
in the traffic lanes of a public
road or highway.
Always move the vehicle com-
pletely off the road and onto
the shoulder before trying to
change a tyre. The jack should
be used on level firm ground.
If you cannot find a firm, level
place off the road, call a tow-
ing service company for
assistance.
(Continued)
OTA060001
Page 313 of 420
617
What to do in an emergency
IF YOU HAVE A FLAT TYRE (WITH TYREMOBILITYKIT, IF EQUIPPED)
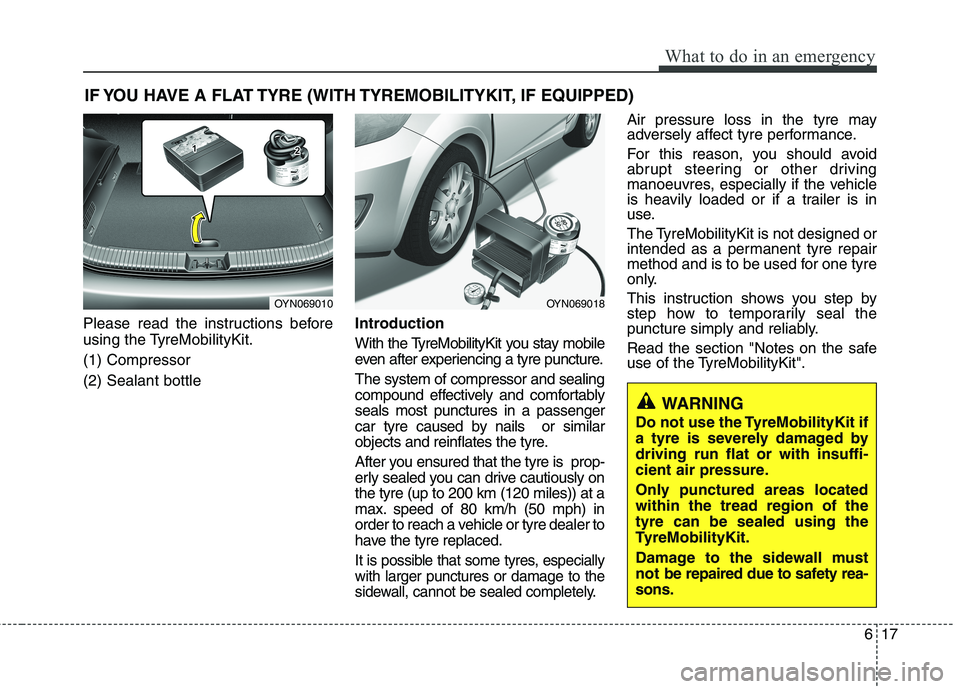
Please read the instructions before
using the TyreMobilityKit.
(1) Compressor
(2) Sealant bottleIntroduction
With the TyreMobilityKit you stay mobile
even after experiencing a tyre puncture.
The system of compressor and sealing
compound effectively and comfortably
seals most punctures in a passenger
car tyre caused by nails or similar
objects and reinflates the tyre.
After you ensured that the tyre is prop-
erly sealed you can drive cautiously on
the tyre (up to 200 km (120 miles)) at a
max. speed of 80 km/h (50 mph) in
order to reach a vehicle or tyre dealer to
have the tyre replaced.
It is possible that some tyres, especially
with larger punctures or damage to the
sidewall, cannot be sealed completely.
Air pressure loss in the tyre may
adversely affect tyre performance.
For this reason, you should avoid
abrupt steering or other driving
manoeuvres, especially if the vehicle
is heavily loaded or if a trailer is in
use.
The TyreMobilityKit is not designed or
intended as a permanent tyre repair
method and is to be used for one tyre
only.
This instruction shows you step by
step how to temporarily seal the
puncture simply and reliably.
Read the section "Notes on the safe
use of the TyreMobilityKit".
OYN069010OYN069018
WARNING
Do not use the TyreMobilityKit if
a tyre is severely damaged by
driving run flat or with insuffi-
cient air pressure.
Only punctured areas located
within the tread region of the
tyre can be sealed using the
TyreMobilityKit.
Damage to the sidewall must
not be repaired due to safety rea-
sons.
Page 315 of 420
619
What to do in an emergency
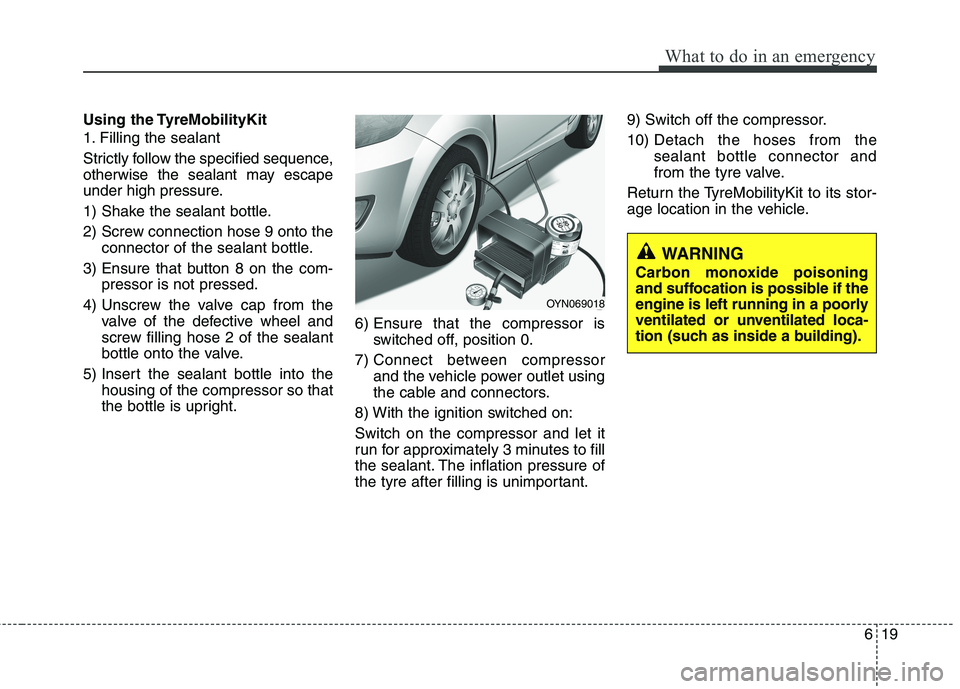
Using the TyreMobilityKit
1. Filling the sealant
Strictly follow the specified sequence,
otherwise the sealant may escape
under high pressure.
1) Shake the sealant bottle.
2) Screw connection hose 9 onto the
connector of the sealant bottle.
3) Ensure that button 8 on the com-
pressor is not pressed.
4) Unscrew the valve cap from the
valve of the defective wheel and
screw filling hose 2 of the sealant
bottle onto the valve.
5) Insert the sealant bottle into the
housing of the compressor so that
the bottle is upright.6) Ensure that the compressor is
switched off, position 0.
7) Connect between compressor
and the vehicle power outlet using
the cable and connectors.
8) With the ignition switched on:
Switch on the compressor and let it
run for approximately 3 minutes to fill
the sealant. The inflation pressure of
the tyre after filling is unimportant.9) Switch off the compressor.
10) Detach the hoses from the
sealant bottle connector and
from the tyre valve.
Return the TyreMobilityKit to its stor-
age location in the vehicle.
WARNING
Carbon monoxide poisoning
and suffocation is possible if the
engine is left running in a poorly
ventilated or unventilated loca-
tion (such as inside a building).
OYN069018
Page 316 of 420
What to do in an emergency
20 6
Distributing the sealant
Immediately drive approximately 3 km
(2 miles) to evenly distribute the
sealant in the tyre.Producing the tyre inflation pres-
sure
1) After driving approximately 3 km (2
miles), stop at a suitable location.
2) Connect connection hose 9 of the
compressor directly to the tyre
valve.
3) Connect between compressor
and the vehicle power outlet using
the cable and connectors.
4) Adjust the tyre inflation pressure
to 220 kPa (32 psi). With the igni-
tion switched on, proceed as fol-
lows.
- To increase the inflation pres-
sure:Switch on the compressor,
position I. To check the current
inflation pressure setting, briefly
switch off the compressor.- To reduce the inflation pres-
sure:Press the button 8 on the
compressor.
WARNING
Do not let the compressor run for
more than 10 minutes, otherwise
the device will overheat and may
be damaged.
WARNING
The tyre inflation pressure must
be at least 220 kPa (32 psi). If it is
not, do not continue driving. Call
for road side service or towing.
CAUTION
Do not exceed a speed of 60
km/h (35 mph). If possible, do
not fall below a speed of 20
km/h (12 mph).
While driving, if you experience
any unusual vibration, ride dis-
turbance or noise, reduce your
speed and drive with caution
until you can safely pull off of
the side of the road.
Call for road side service or tow-
ing.
CAUTION
If the inflation pressure is not
maintained, drive the vehicle a
second time, refer to Distributing
the sealant. Then repeat steps 1
to 4.
Use of the TyreMobilityKit may
be ineffectual for tyre damage
larger than approximately 4 mm
(0.16 in).
Please contact the nearest Kia
A/S centre, or a workshop that
works according to Kia repair
procedures with corresponding-
ly trained personnel if the tyre
cannot be made roadworthy
with the TyreMobilityKit.
Page 317 of 420

621
What to do in an emergency
Notes on the safe use of the
TyreMobilityKit
Park your car at the side of the
road so that you can work with the
TyreMobilityKit away from moving
traffic. Place your warning triangle
in a prominent place to make pass-
ing vehicles aware of your location.
To be sure your vehicle won't
move, even when you're on fairly
level ground, always set your park-
ing brake.
Only use the TyreMobilityKit for
sealing/inflation passenger car
Tyres. Do not use on motorcycles,
bicycles or any other type of Tyres.
Do not remove any foreign objects-
such as nails or screws -that have
penetrated the tyre.
Before using the TyreMobilityKit,
read the precautionary advice
printed on the sealant bottle!
Provided the car is outdoors, leave
the engine running. Otherwise
operating the compressor may
eventually drain the car battery. Never leave the TyreMobilityKit
unattended whilst it is being used.
Do not leave the compressor run-
ning for more than 10 min. at a time
or it may overheat.
Do not use the TyreMobilityKit if the
ambient temperature is below -30°C
(-22°F).
Do not use the sealing compound
after its expiration date which can
be found on the label of the bottle.
Keep away from children.Technical Data
System voltage: DC 12 V
Working voltage: DC 10 - 15 V
Amperage rating: max. 15 A
Suitable for use at temperatures:
-30 ~ +70°C (-22 ~ +158°F)
Max. working pressure:
6 bar (87 psi)
Size
Compressor: 170 x 150 x 60 mm
(6.7 x 5.9 x 2.4 in.)
Sealant bottle: 85 x 77 ø mm
(3.3 x 3.0 ø in.)
Compressor weight:
0.8 kg (1.8 lbs)
Sealant volume:
200 ml (12.2 cu. in.)
❈Sealing compound and spare
parts can be obtained and
replaced at an authorised vehicle
or tyre dealer. Empty sealing com-
pound bottles may be disposed of
at home. Liquid residue from the
sealing compound should be dis-
posed of by your vehicle or tyre
dealer or in accordance with local
waste disposal regulations.
Page 319 of 420
623
What to do in an emergency
✽ ✽
NOTICE
If the TPMS indicator does not illu-
minate for 3 seconds when the igni-
tion switch is turned to the ON posi-
tion or engine is running, or if it
comes on after blinking for approxi-
mately one minute, we recommend
that you contact an authorized Kia
dealer.
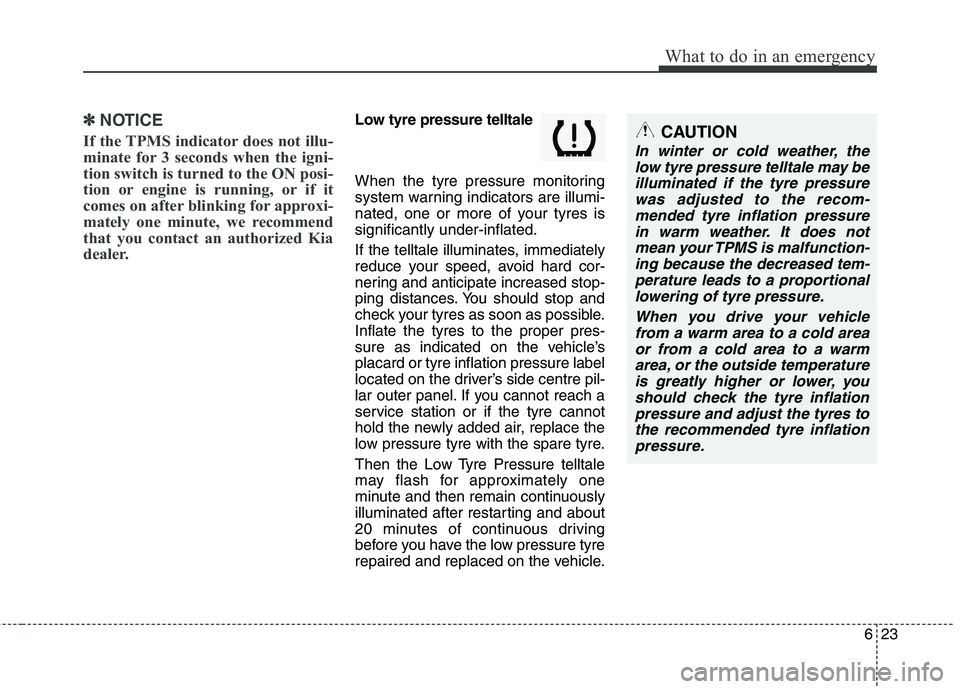
Low tyre pressure telltale
When the tyre pressure monitoring
system warning indicators are illumi-
nated, one or more of your tyres is
significantly under-inflated.
If the telltale illuminates, immediately
reduce your speed, avoid hard cor-
nering and anticipate increased stop-
ping distances. You should stop and
check your tyres as soon as possible.
Inflate the tyres to the proper pres-
sure as indicated on the vehicle’s
placard or tyre inflation pressure label
located on the driver’s side centre pil-
lar outer panel. If you cannot reach a
service station or if the tyre cannot
hold the newly added air, replace the
low pressure tyre with the spare tyre.
Then the Low Tyre Pressure telltale
may flash for approximately one
minute and then remain continuously
illuminated after restarting and about
20 minutes of continuous driving
before you have the low pressure tyre
repaired and replaced on the vehicle.CAUTION
In winter or cold weather, the
low tyre pressure telltale may be
illuminated if the tyre pressure
was adjusted to the recom-
mended tyre inflation pressure
in warm weather. It does not
mean your TPMS is malfunction-
ing because the decreased tem-
perature leads to a proportional
lowering of tyre pressure.
When you drive your vehicle
from a warm area to a cold area
or from a cold area to a warm
area, or the outside temperature
is greatly higher or lower, you
should check the tyre inflation
pressure and adjust the tyres to
the recommended tyre inflation
pressure.
Page 331 of 420
Maintenance
4 7
OWNER MAINTENANCE
The following lists are vehicle checks and
inspections that should be performed by
the owner or an authorised Kia dealer at
the frequencies indicated to help ensure
safe, dependable operation of your vehi-
cle.
Any adverse conditions should be
brought to the attention of your dealer as
soon as possible.
These Owner Maintenance Checks are
generally not covered by warranties and
you may be charged for labour, parts and
lubricants used.Owner maintenance schedule
When you stop for fuel:
Check the engine oil level.
Check coolant level in coolant reser-
voir.
Check the windscreen washer fluid
level.
Look for low or under-inflated tyres.
Check the radiator and condenser.
Check if the front of the radiator and
condenser are clean and not blocked
with leaves, dirt or insects etc.
If any of the above parts are extremely
dirty or you are not sure of their condi-
tion, take your vehicle to an authorised
Kia dealer.
WARNING- Maintenance
work
Performing maintenance work on
a vehicle can be dangerous. You
can be seriously injured whilst
performing some maintenance
procedures. If you lack sufficient
knowledge and experience or the
proper tools and equipment to do
the work, have it done by an
authorised Kia dealer.
Working under the bonnet with
the engine running is dangerous.
It becomes even more dangerous
when you wear jewelry or loose
clothing. These can become
entangled in moving parts and
result in injury. Therefore, if you
must run the engine whilst work-
ing under the bonnet, make cer-
tain that you remove all jewelry
(especially rings, bracelets,
watches, and necklaces) and all
neckties, scarves, and similar
loose clothing before getting
near the engine or cooling fans.
WARNING
Be careful when checking your
engine coolant level when the
engine is hot. Scalding hot coolant
and steam may blow out under
pressure. This could cause burns
or other serious injury.
Page 414 of 420
I3
Index
Cargo weight ..................................................................5-55
Central door lock switch ................................................4-16
Changing tyres ..................................................................6-9
Chains
Tyre chains ................................................................5-44
Checking tyre inflation pressure ....................................7-41
Child restraint system ....................................................3-28
Lap belt......................................................................3-31
Lap/shoulder belt ......................................................3-30
Child-protector rear door lock ........................................4-17
Climate control system (Automatic) ..............................4-90
Air conditioning ........................................................4-95
Automatic heating and air conditioning....................4-91
Manual heating and air conditioning ........................4-92
Climate control system (Manual) ..................................4-81
Air conditioning ........................................................4-86
Climate control air filter............................................4-88
Heating and air conditioning ....................................4-82
Cigarette lighter ............................................................4-101
Climate control air filter ........................................4-88, 7-32
Clock (Digital) ..............................................................4-104
Clothes hanger ..............................................................4-105
Combined instrument, see instrument cluster ................4-41
Coolant ............................................................................7-23
Cooling fluid, see engine coolant ..................................7-23
Crankcase emission control system ................................7-75
Cup holder ....................................................................4-102
Curtain air bag ................................................................3-52Dashboard, see instrument cluster ..................................4-41
Daytime running light ....................................................4-67
Declaration of conformity ................................................8-7
Defogging (Windscreen) ................................................4-97
Defogging logic (Windscreen)........................................4-99
Defroster (Rear window) ................................................4-80
Defrosting (Windscreen) ................................................4-97
Digital clock..................................................................4-104
Dimensions ......................................................................8-2
Displays, see instrument cluster ....................................4-41
Door locks ......................................................................4-14
Central door lock switch ..........................................4-16
Child-protector rear door lock ..................................4-17
Drink holders, see cup holders ....................................4-102
Driver's air bag ................................................................3-46
Driving at night ..............................................................5-40
Driving in flooded areas ................................................5-42
Driving in the rain ..........................................................5-41D