2015 KIA MORNING ESP
[x] Cancel search: ESPPage 138 of 420
465
Features of your vehicle
✽ ✽
NOTICE
This system can only sense objects with-
in the range and location of the sensors;
It can not detect objects in other areas
where sensors are not installed. Also,
small or slim objects, such as poles or
objects located between sensors may not
be detected by the sensors.
Always visually check behind the vehi-
cle when backing up.
Be sure to inform any drivers of the
vehicle that may be unfamiliar with the
system regarding the systems capabili-
ties and limitations.
Self-diagnosis
If you don’t hear an audible warning
sound or if the buzzer sounds intermit-
tently when shifting the gear to the R
(Reverse) position, this may indicate a
malfunction in the rear parking assist sys-
tem. If this occurs, have your vehicle
checked by an authorised Kia dealer as
soon as possible.
WARNING
Pay close attention when the vehi-
cle is driven close to objects on the
road, particularly pedestrians, and
especially children. Be aware that
some objects may not be detected
by the sensors, due to the object’s
distance, size or material, all of
which can limit the effectiveness of
the sensor. Always perform a visu-
al inspection to make sure the vehi-
cle is clear of all obstructions
before moving the vehicle in any
direction.
WARNING
Your new vehicle warranty does not
cover any accidents or damage to
the vehicle or injuries to its occu-
pants due to a rear parking assist
system malfunction. Always drive
safely and cautiously.
Page 140 of 420
467
Features of your vehicle
Battery saver function
The purpose of this feature is to pre-
vent the battery from being dis-
charged. The system automatically
turns off the parking lights when the
driver removes the ignition key (smart
key: turns off the engine) and opens
the driver-side door.
With this feature, the parking lights will
be turned off automatically if the driver
parks on the side of road at night.
If necessary, to keep the lights on
when the ignition key is removed,
(smart key: turns off the engine) per-
form the following:
1) Open the driver-side door.
2) Turn the parking lights OFF and ON
again using the light switch on the
steering column.
Headlight escort function
(if equipped)
The headlights (and/or taillights) will
remain on for approximately 20 minutes
after the ignition key is removed when
the engine is turned off. However, if the
driver’s door is opened and closed, the
headlights are turned off after 30 sec-
onds.
The headlights can be turned off by
pressing the lock button on the transmit-
ter (or smart key) twice or turning off the
light switch from the headlight or Auto
light position.
Headlight welcome function
(if equipped)
When the headlight switch is in the ON or
AUTO position and all doors (and tail-
gate) are closed and locked, if you press
the door unlock button on the transmitter
(or smart key), the headlights will come
on for about 15 seconds.
If the headlight switch is in the AUTO
position, the function can only operate at
night.
At this time, if you press the door unlock
button again or door lock button on the
transmitter (or smart key), the headlights
will turn off immediately.
Daytime running light
(if equipped)
Daytime Running Lights (DRL) can make
it easier for others to see the front of your
vehicle during the day. DRL can be help-
ful in many different driving conditions,
and it is especially helpful after dawn and
before sunset.
The DRL system will make the head-
lights light turn OFF when:
1. The position or head light switch is ON.
2. Engine off or ACC.
LIGHTING
CAUTION
If the driver gets out of the vehicle
through other doors (except dri-
ver's door), the battery saver func-
tion does not operate and the head-
light escort function does not turn
off automatically. Therefore, It caus-
es the battery to be discharged. In
this case, make sure to turn off the
lamp before getting out of the vehi-
cle.
Page 171 of 420
Features of your vehicle
98 4
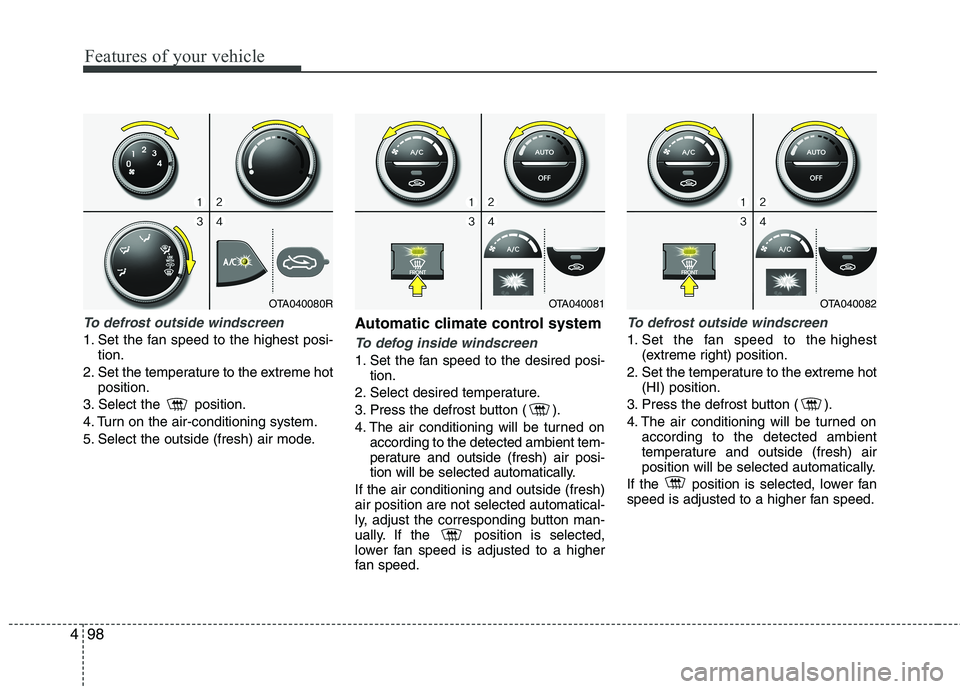
To defrost outside windscreen
1. Set the fan speed to the highest posi-
tion.
2. Set the temperature to the extreme hot
position.
3. Select the position.
4. Turn on the air-conditioning system.
5. Select the outside (fresh) air mode.
Automatic climate control system
To defog inside windscreen
1. Set the fan speed to the desired posi-
tion.
2. Select desired temperature.
3. Press the defrost button ( ).
4. The air conditioning will be turned on
according to the detected ambient tem-
perature and outside (fresh) air posi-
tion will be selected automatically.
If the air conditioning and outside (fresh)
air position are not selected automatical-
ly, adjust the corresponding button man-
ually. If the position is selected,
lower fan speed is adjusted to a higher
fan speed.
To defrost outside windscreen
1. Set the fan speed to the highest
(extreme right) position.
2. Set the temperature to the extreme hot
(HI) position.
3. Press the defrost button ( ).
4. The air conditioning will be turned on
according to the detected ambient
temperature and outside (fresh) air
position will be selected automatically.
If the position is selected, lower fan
speed is adjusted to a higher fan speed.
OTA040081OTA040082OTA040080R
Page 188 of 420
4115
Features of your vehicle
To increase the BASS, rotate the knob
clockwise, whilst to decrease the BASS,
rotate the knob counterclockwise.
To increase the MIDDLE, rotate the knob
clockwise, whilst to decrease the MID-
DLE, rotate the knob counterclockwise.
To increase the TREBLE, rotate the knob
clockwise, whilst to decrease the TRE-
BLE, rotate the knob counterclockwise.
Turn the control knob clockwise to
emphasize rear speaker sound(front
speaker sound will be attenuated).
When the control knob is turned counter-
clockwise, front speaker sound will be
emphasized(rear speaker sound will be
attenuated).
Rotate the knob clockwise to emphasize
right speaker sound(left speaker sound
will be attenuated).
When the control knob is turned counter
clockwise, left speaker sound will be
emphasized(right speaker sound will be
attenuated).
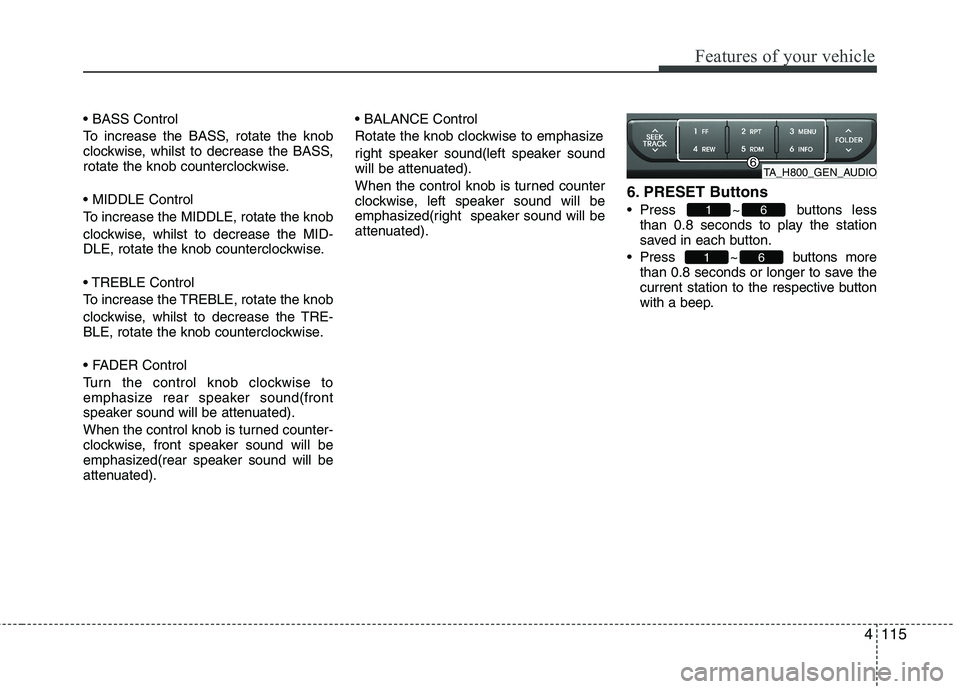
6. PRESET Buttons
Press ~ buttons less
than 0.8 seconds to play the station
saved in each button.
Press ~ buttons more
than 0.8 seconds or longer to save the
current station to the respective button
with a beep.
61
61
TA_H800_GEN_AUDIO
Page 197 of 420
Features of your vehicle
124 4
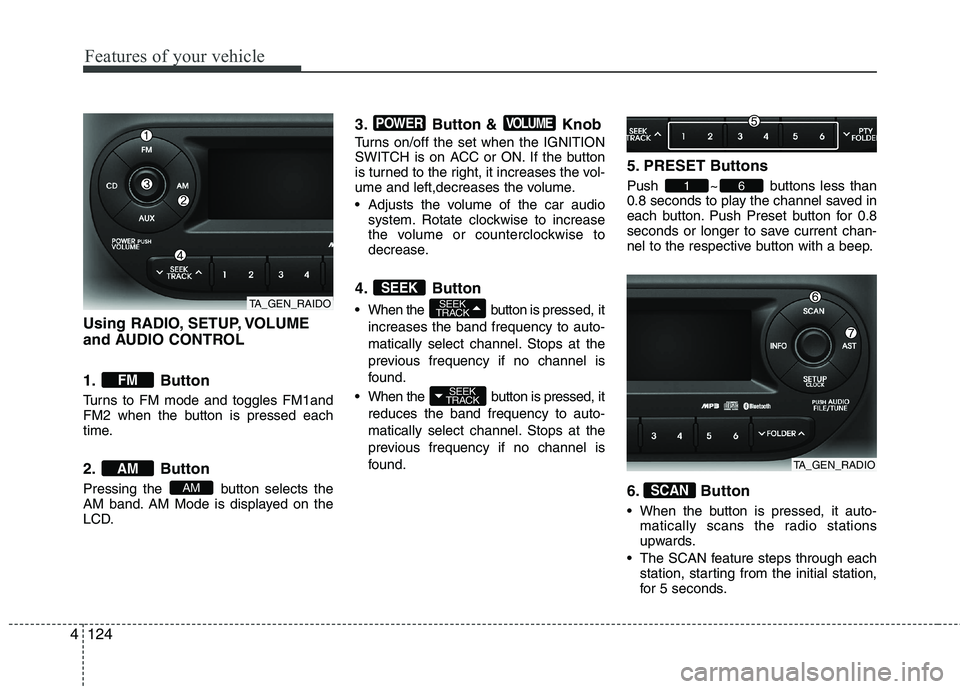
Using RADIO, SETUP, VOLUME
and AUDIO CONTROL
1. Button
Turns to FM mode and toggles FM1and
FM2 when the button is pressed each
time.
2. Button
Pressing the button selects the
AM band. AM Mode is displayed on the
LCD.
3. Button & Knob
Turns on/off the set when the IGNITION
SWITCH is on ACC or ON. If the button
is turned to the right, it increases the vol-
ume and left,decreases the volume.
Adjusts the volume of the car audio
system. Rotate clockwise to increase
the volume or counterclockwise to
decrease.
4. Button
When the button is pressed, it
increases the band frequency to auto-
matically select channel. Stops at the
previous frequency if no channel is
found.
When the button is pressed, it
reduces the band frequency to auto-
matically select channel. Stops at the
previous frequency if no channel is
found.
5. PRESET Buttons
Push ~ buttons less than
0.8 seconds to play the channel saved in
each button. Push Preset button for 0.8
seconds or longer to save current chan-
nel to the respective button with a beep.
6. Button
When the button is pressed, it auto-
matically scans the radio stations
upwards.
The SCAN feature steps through each
station, starting from the initial station,
for 5 seconds.
SCAN
61
SEEK
TRACK
SEEK
TRACKSEEK
VOLUMEPOWER
AM
AM
FM
TA_GEN_RAIDO
TA_GEN_RADIO
Page 216 of 420
4143
Features of your vehicle
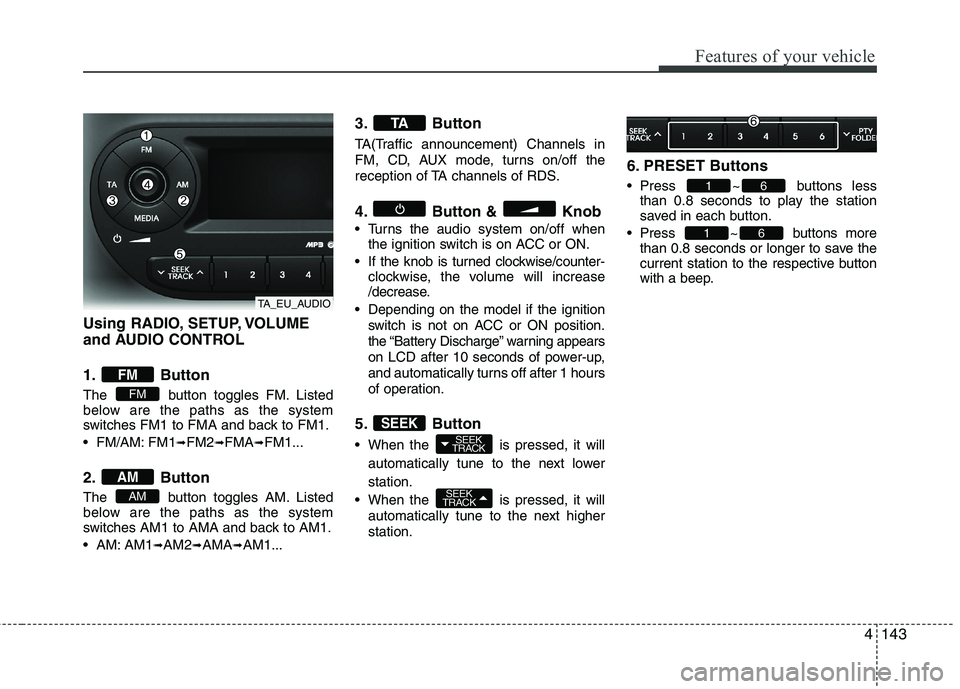
Using RADIO, SETUP, VOLUME
and AUDIO CONTROL
1. Button
The button toggles FM. Listed
below are the paths as the system
switches FM1 to FMA and back to FM1.
FM/AM: FM1
➟FM2➟FMA➟FM1...
2. Button
The button toggles AM. Listed
below are the paths as the system
switches AM1 to AMA and back to AM1.
AM: AM1
➟AM2➟AMA➟AM1...
3. Button
TA(Traffic announcement) Channels in
FM, CD, AUX mode, turns on/off the
reception of TA channels of RDS.
4. Button & Knob
Turns the audio system on/off when
the ignition switch is on ACC or ON.
If the knob is turned clockwise/counter-
clockwise, the volume will increase
/decrease.
Depending on the model if the ignition
switch is not on ACC or ON position.
the “Battery Discharge” warning appears
on LCD after 10 seconds of power-up,
and automatically turns off after 1 hours
of operation.
5. Button
When the is pressed, it will
automatically tune to the next lower
station.
When the is pressed, it will
automatically tune to the next higher
station.
6. PRESET Buttons
Press ~ buttons less
than 0.8 seconds to play the station
saved in each button.
Press ~ buttons more
than 0.8 seconds or longer to save the
current station to the respective button
with a beep.
61
61
SEEK
TRACK
SEEK
TRACKSEEK
TA
AM
AM
FM
FM
TA_EU_AUDIO
Page 233 of 420
Features of your vehicle
160 4
■Bluetooth®Wireless Technology
Language Setting
The system language can be changed by
the following steps:
1. Power on the audio system with the
volume set to an audible level.
2. Press and hold button on the
steering wheel until the audio displays
“Please Wait”.
- The
Bluetooth®Wireless Technology
system will reply in currently selected
language that it is changing to the next
language.
- System language cycles between
FRENCH/GERMAN/UK ENGLISH
SPANISH/DUTCH/ITALIAN/DANISH/
RUSSIAN/POLISH/SWEDISH.
3. When completed, the audio display
returns to normal.
4. Repeat steps 2 and 3 for the next lan-
guage selection.
NOTE:
The phone needs to be paired again
after changing system language.
- Avoid resting your thumb or finger
on the button as the language
could unintentionally change.
■Voice Recognition Activation
in the Bluetooth®Wireless Technology
System can be activated in the follow-
ing conditions:
- Button Activation
The voice recognition system will be
active when the button is pressed
and after the sound of a Beep.
- Active Listening
The voice recognition system will be
active for a period of time when the
Voice Recognition system has asked
for a customer response.
from zero to nine whilst number greater
than ten will not be recognized.
system will announce "Pardon" or No
input voice signal from microphone. (No
response)
tion mode in following cases : When
pressing the button and saying
cancel following the beep. When not
making a call and pressing the
button. When voice recognition has
failed 3 consecutive times. At any time if you say “help”, the sys-
tem will announce what commands are
available.
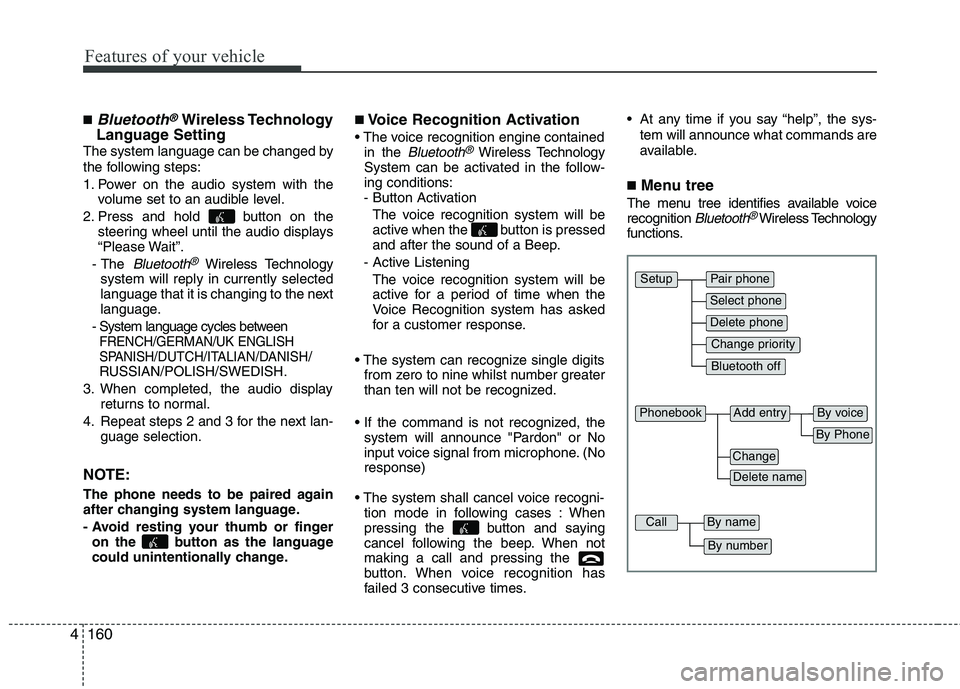
■Menu tree
The menu tree identifies available voice
recognition Bluetooth®Wireless Technology
functions.
Pair phone
Select phone
Change priority
Delete phone
Bluetooth off
Setup
Add entryPhonebook
Change
Delete name
By Phone
By voice
CallBy name
By number
Page 238 of 420
4165
Features of your vehicle
✽ ✽
NOTICE
- The system can recognize single digits
from zero to nine. Numbers that are
ten or greater cannot be recognized.
- You can enter each digit individually
or group digits together in preferred
string lengths.
- To speed up input, it is a good idea to
group all digits into a continuous
string.
- Recommend to enter the numbers con-
stituted an grouping within all digit
numbers to dial 995 / 734 / 0000
- The display corresponding to each
operation appears on the screen as fol-
lows:
Input operation example:
1. Say: “Nine, nine, five”
➟ Display: “995”
2. And say: “Seven, three, four”
➟ Display: “995734”
1. Press button.
2. Say “Phonebook”.
3. Say “Add Entry” after prompt.
4. Say “By Phone” to proceed.
5. Say “Yes” to confirm.
6. Your phone will start to transfer
phone/contact list to the audio system.
This process may take over 10 minutes
depending on the phone model and
number of entries
7. Wait till the audio displays “Transfer
Complete” message.
Changing Name
The registered names can be modified.
1. Press button.
2. Say “Phonebook”.
3. Say “Change Name” after prompt.
4. Say the name of the entry (voice tag).
5. Say “Yes” to confirm.
6. Say new desired name.Deleting Name
The registered names can be deleted.
1. Press button.
2. Say “Phonebook”.
3. Say “Delete Name” after prompt.
4. Say the name of the entry (voice tag).
5. Say “Yes” to confirm.
■Making a Phone Call
A phone call can be made by speaking
names registered in the audio system.
1. Press button.
2. Say “Call”.
3. Say “Name” when prompted.
4. Say desired name (voice tag).
5. Say desired location (phone number
type). Only stored locations can be
selected.
6. Say “Yes” to confirm and make a call.
✽ ✽
Tip
A shortcut to each of the following func-
tions is available:
1. Say “Call Name”
2. Say “Call
3. Say “Call