2015 KIA CEED tow
[x] Cancel search: towPage 1060 of 1210
What to do in an emergency
30
6
CAUTION
Failure to place the transaxle shift
lever in N (Neutral) may cause inter-
nal damage to the transaxle.
OJD062008
■ Rear (3 Door and 5 Door)
OJD062012
■Rear (wagon)
■ Front
OJD062009
OJD062010
When towing your vehicle in an emer- gency without wheel dollies :
1. Set the ignition switch in the ACC posi-
tion.
2. Place the transaxle shift lever in N (Neutral).
3. Release the parking brake.
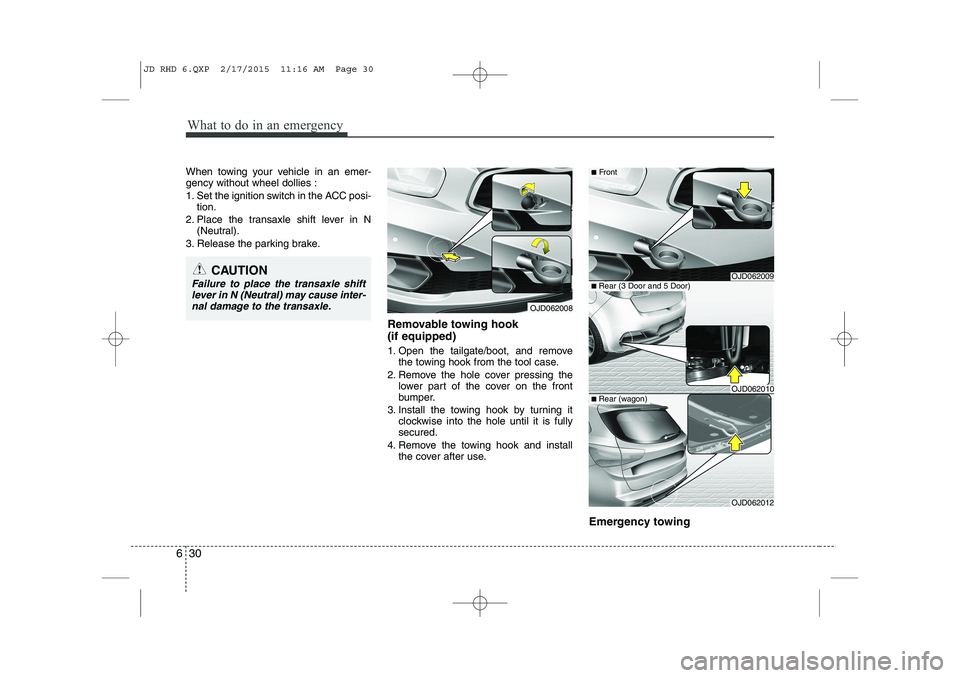
Removable towing hook (if equipped)
1. Open the tailgate/boot, and removethe towing hook from the tool case.
2. Remove the hole cover pressing the lower part of the cover on the front
bumper.
3. Install the towing hook by turning it clockwise into the hole until it is fullysecured.
4. Remove the towing hook and install the cover after use.
Emergency towing
JD RHD 6.QXP 2/17/2015 11:16 AM Page 30
Page 1061 of 1210
631
What to do in an emergency
CAUTION
Attach a towing strap to the towhook.
Using a portion of the vehicle other than the tow hooks for tow-ing may damage the body of yourvehicle.
Use only a cable or chain specifi- cally intended for use in towingvehicles. Securely fasten thecable or chain to the towing hookprovided.WARNING
Use extreme caution when towing
the vehicle.
Avoid sudden starts or erratic driving manoeuvres which would
place excessive stress on the
emergency towing hook and tow-
ing cable or chain. The hook and
towing cable or chain may break
and cause serious injury or dam-
age.
If the disabled vehicle is unable to be moved, do not forcibly con-
tinue the towing. We recommend
that you contact an authorised
Kia dealer or a commercial tow
truck service for assistance.
Tow the vehicle as straight ahead as possible.
Keep away from the vehicle dur- ing towing.
If towing is necessary, we recommend
you to have it done by an authorised
Kia dealer or a commercial tow truck
service.
If towing service is not available in an
emergency, your vehicle may be tem-
porarily towed using a cable or chain
secured to the emergency towing hook
under the front (or rear) of the vehicle.
Use extreme caution when towing the
vehicle. A driver must be in the vehicle to
steer it and operate the brakes.
Towing in this manner may be done only
on hard-surfaced roads for a short dis-
tance and at low speed. Also, the wheels,
axles, power train, steering and brakes
must all be in good condition.
Do not use the towing hooks to pull a
vehicle out of mud, sand or other con-
ditions from which the vehicle cannot
be driven out under its own power.
Avoid towing a vehicle heavier than the vehicle doing the towing.
The drivers of both vehicles should com- municate with each other frequently. Before emergency towing, check that
the hook is not broken or damaged.
Fasten the towing cable or chain securely to the hook.
Do not jerk the hook. Apply steady and even force.
To avoid damaging the hook, do not pull from the side or at a vertical angle.
Always pull straight ahead.
JD RHD 6.QXP 2/17/2015 11:16 AM Page 31
Page 1062 of 1210
What to do in an emergency
32
6
OXM069009
CAUTION - Automatic
transaxle / Double clutch transmission
If the car is being towed with all four wheels on the ground, it can
be towed only from the front. Be sure that the transaxle is in neu-tral. Be sure the steering isunlocked by placing the ignition
switch in the ACC position. Adriver must be in the towed vehi- cle to operate the steering and
brakes.
To avoid serious damage to the automatic transaxle, limit thevehicle speed to 15 km/h (10 mph) and drive less than 1.5 km (1 mile)
when towing.
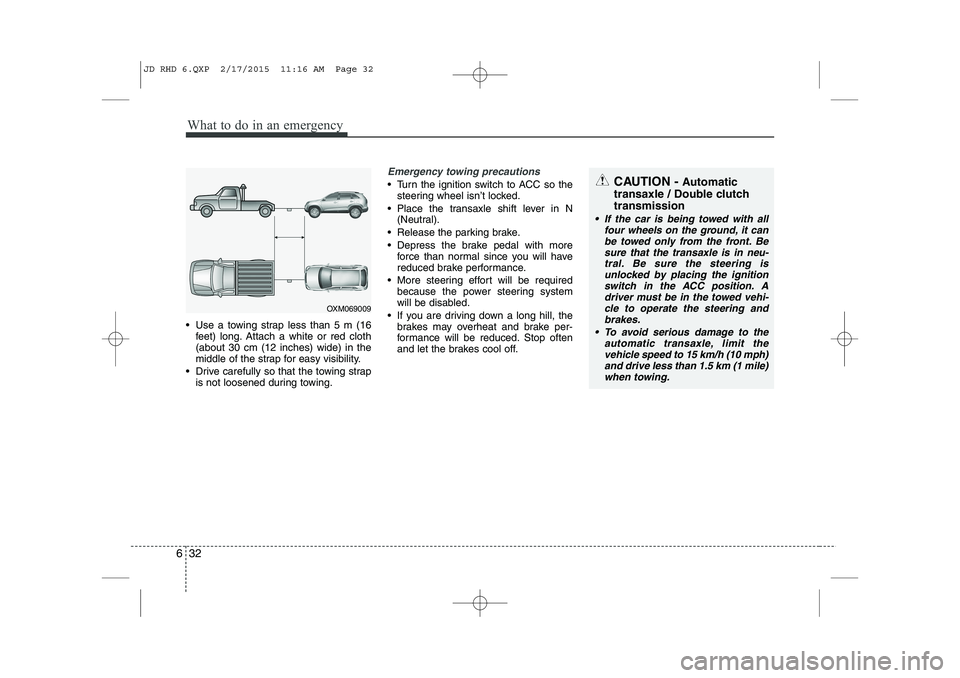
Use a towing strap less than 5 m (16 feet) long. Attach a white or red cloth (about 30 cm (12 inches) wide) in the
middle of the strap for easy visibility.
Drive carefully so that the towing strap is not loosened during towing.
Emergency towing precautions
Turn the ignition switch to ACC so thesteering wheel isn’t locked.
Place the transaxle shift lever in N (Neutral).
Release the parking brake.
Depress the brake pedal with more force than normal since you will have
reduced brake performance.
More steering effort will be required because the power steering system
will be disabled.
If you are driving down a long hill, the brakes may overheat and brake per-
formance will be reduced. Stop often
and let the brakes cool off.
JD RHD 6.QXP 2/17/2015 11:16 AM Page 32
Page 1063 of 1210
633
What to do in an emergency
EMERGENCY COMMODITY (IF EQUIPPED)
There are some emergency commodities
in the vehicle to help you respond to theemergency situation.
Fire extinguisher
If there is small fire and you know how to
use the fire extinguisher, take the follow-
ing steps carefully.
1. Pull the pin at the top of the extin- guisher that keeps the handle from being accidentally pressed.
2. Aim the nozzle toward the base of the fire.
3. Stand approximately 2.5 m (8 ft) away from the fire and squeeze the handle
to discharge the extinguisher. If you
release the handle, the discharge will
stop.
4. Sweep the nozzle back and forth at the base of the fire. After the fire appears
to be out, watch it carefully since it
may re-ignite. First aid kit
There are some items such as scissors,
bandage and adhesive tape and etc. in
the kit to give first aid to an injured per-son.
Triangle reflector
Place the triangle reflector on the road to
warn oncoming vehicles during emer-
gencies, such as when the vehicle is
parked by the roadside due to any prob-
lems.
Tyre pressure gauge (If equipped)
Tyres normally lose some air in day-to-
day use, and you may have to add a few
pounds of air periodically and it is not
usually a sign of a leaking tyre, but of
normal wear. Always check tyre pressurewhen the tyres are cold because tyre
pressure increases with temperature. To check the tyre pressure, take the fol-
lowing steps:
1. Unscrew the inflation valve cap that is
located on the rim of the tyre.
2. Press and hold the gauge against the tyre valve. Some air will escape as you
begin and more will escape if you don't
press the gauge in firmly.
3. A firm non-leaking push will activate the gauge.
4. Read the tyre pressure on the gauge to know whether the tyre pressure is
low or high.
5. Adjust the tyre pressures to the speci- fied pressure. Refer to “Tyres and
wheels” in section 8.
6. Reinstall the inflation valve cap.
JD RHD 6.QXP 2/17/2015 11:16 AM Page 33
Page 1085 of 1210
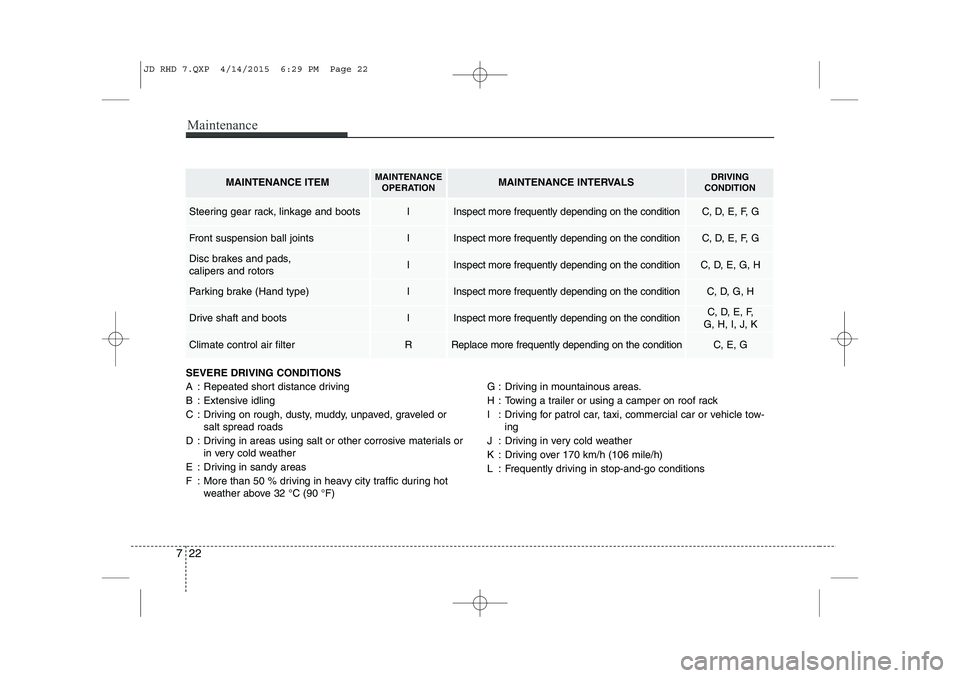
Maintenance
22
7
SEVERE DRIVING CONDITIONS
A : Repeated short distance driving
B : Extensive idling
C : Driving on rough, dusty, muddy, unpaved, graveled or
salt spread roads
D : Driving in areas using salt or other corrosive materials or in very cold weather
E : Driving in sandy areas
F : More than 50 % driving in heavy city traffic during hot weather above 32 °C (90 °F) G : Driving in mountainous areas.
H : Towing a trailer or using a camper on roof rack
I : Driving for patrol car, taxi, commercial car or vehicle tow-
ing
J : Driving in very cold weather
K : Driving over 170 km/h (106 mile/h)
L : Frequently driving in stop-and-go conditions
MAINTENANCE ITEMMAINTENANCE OPERATIONMAINTENANCE INTERVALSDRIVING
CONDITION
Steering gear rack, linkage and bootsIInspect more frequently depending on the conditionC, D, E, F, G
Front suspension ball jointsIInspect more frequently depending on the conditionC, D, E, F, G
Disc brakes and pads, calipers and rotorsIInspect more frequently depending on the conditionC, D, E, G, H
Parking brake (Hand type)IInspect more frequently depending on the conditionC, D, G, H
Drive shaft and bootsIInspect more frequently depending on the conditionC, D, E, F,
G, H, I, J, K
Climate control air filter RReplace more frequently depending on the conditionC, E, G
JD RHD 7.QXP 4/14/2015 6:29 PM Page 22
Page 1097 of 1210
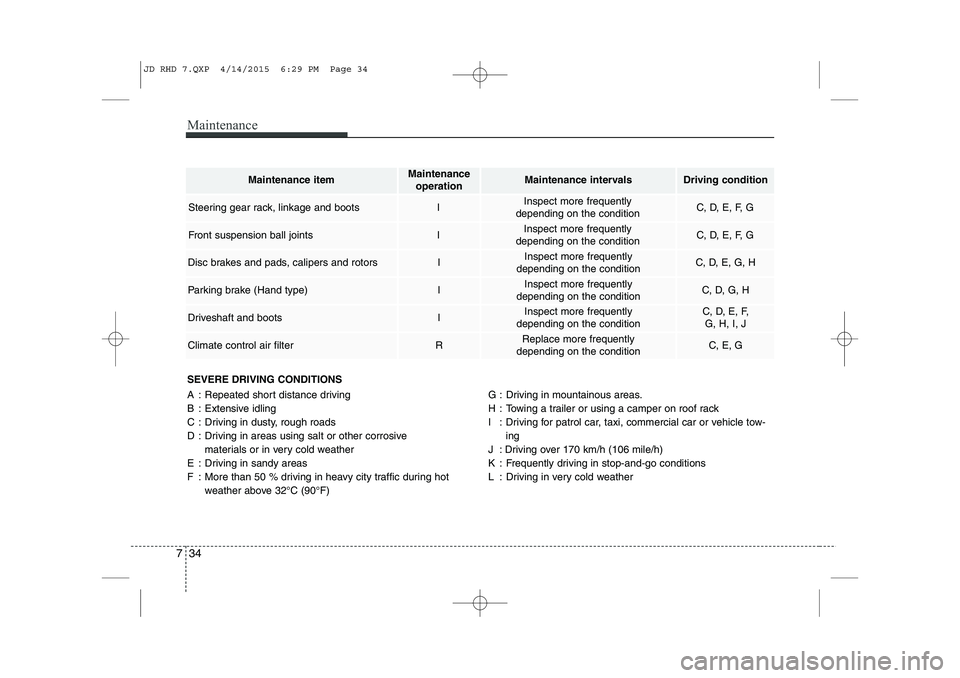
Maintenance
34
7
SEVERE DRIVING CONDITIONS
A : Repeated short distance driving
B : Extensive idling
C : Driving in dusty, rough roads
D : Driving in areas using salt or other corrosive
materials or in very cold weather
E : Driving in sandy areas
F : More than 50 % driving in heavy city traffic during hot weather above 32°C (90°F) G : Driving in mountainous areas.
H : Towing a trailer or using a camper on roof rack
I : Driving for patrol car, taxi, commercial car or vehicle tow-
ing
J : Driving over 170 km/h (106 mile/h)
K : Frequently driving in stop-and-go conditions
L : Driving in very cold weather
Maintenance itemMaintenance operationMaintenance intervalsDriving condition
Steering gear rack, linkage and bootsIInspect more frequently
depending on the conditionC, D, E, F, G
Front suspension ball jointsIInspect more frequently
depending on the conditionC, D, E, F, G
Disc brakes and pads, calipers and rotorsIInspect more frequently
depending on the conditionC, D, E, G, H
Parking brake (Hand type)IInspect more frequently
depending on the conditionC, D, G, H
Driveshaft and bootsIInspect more frequently
depending on the conditionC, D, E, F, G, H, I, J
Climate control air filterRReplace more frequently
depending on the conditionC, E, G
JD RHD 7.QXP 4/14/2015 6:29 PM Page 34
Page 1103 of 1210
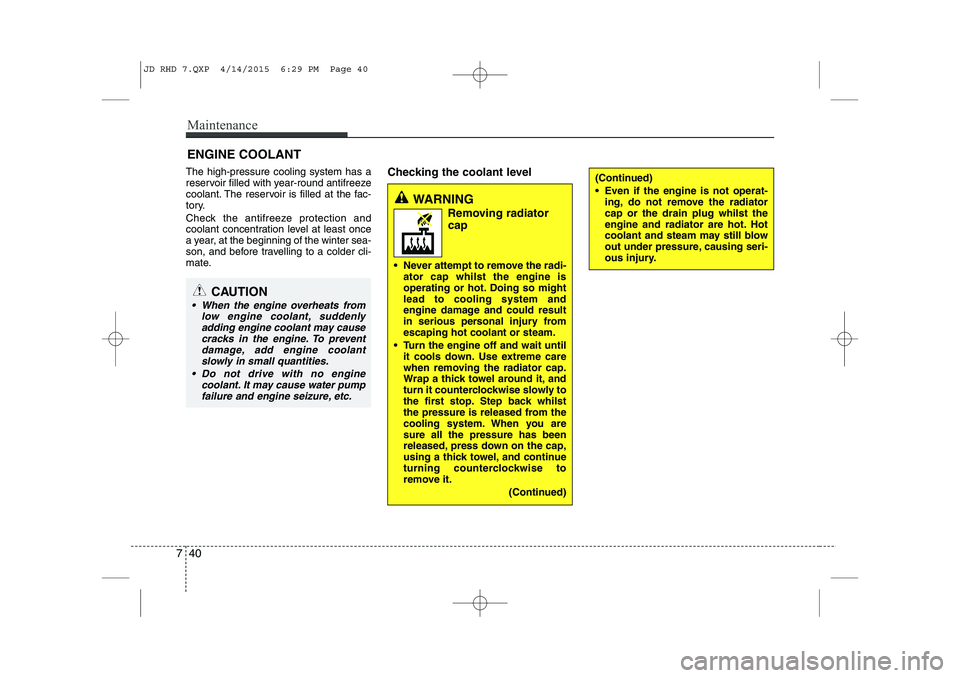
Maintenance
40
7
(Continued)
Even if the engine is not operat-
ing, do not remove the radiator cap or the drain plug whilst the
engine and radiator are hot. Hot
coolant and steam may still blow
out under pressure, causing seri-
ous injury.
ENGINE COOLANT
The high-pressure cooling system has a
reservoir filled with year-round antifreeze
coolant. The reservoir is filled at the fac-
tory.
Check the antifreeze protection and
coolant concentration level at least once
a year, at the beginning of the winter sea-
son, and before travelling to a colder cli-
mate. Checking the coolant level
WARNING
Removing radiatorcap
Never attempt to remove the radi- ator cap whilst the engine is
operating or hot. Doing so mightlead to cooling system and
engine damage and could result
in serious personal injury fromescaping hot coolant or steam.
Turn the engine off and wait until it cools down. Use extreme care
when removing the radiator cap.
Wrap a thick towel around it, and
turn it counterclockwise slowly to
the first stop. Step back whilst
the pressure is released from the
cooling system. When you aresure all the pressure has been
released, press down on the cap,
using a thick towel, and continue
turning counterclockwise to
remove it.
(Continued)
CAUTION
When the engine overheats fromlow engine coolant, suddenlyadding engine coolant may causecracks in the engine. To prevent
damage, add engine coolantslowly in small quantities.
Do not drive with no engine coolant. It may cause water pump
failure and engine seizure, etc.
JD RHD 7.QXP 4/14/2015 6:29 PM Page 40
Page 1209 of 1210
Index
12
I
Tilt and telescopic steering . . . . . . . . . . . . . . . . . . . 4-38
Storage compartment . . . . . . . . . . . . . . . . . . . . . . . . 4-152 Centre console storage . . . . . . . . . . . . . . . . . . . . . . 4-152
Cool box . . . . . . . . . . . . . . . . . . . . . . . . . . . . . . . . . . 4-153
Glove box . . . . . . . . . . . . . . . . . . . . . . . . . . . . . . . . . 4-153
Luggage side tray . . . . . . . . . . . . . . . . . . . . . . . . . 4-155
Luggage tray . . . . . . . . . . . . . . . . . . . . . . . . . . . . . . 4-154
Sliding armrest . . . . . . . . . . . . . . . . . . . . . . . . . . . . 4-152
Sunglass holder . . . . . . . . . . . . . . . . . . . . . . . . . . . . 4-154
Sunroof, see panorama sunroof. . . . . . . . . . . . . . . . . 4-33
Sunvisor . . . . . . . . . . . . . . . . . . . . . . . . . . . . . . . . . . . 4-158
Tachometer (Normal vision) . . . . . . . . . . . . . . . . . . . 4-47
Tachometer (Super vision) . . . . . . . . . . . . . . . . . . . . . 4-61
Tailgate . . . . . . . . . . . . . . . . . . . . . . . . . . . . . . . . . . . . . 4-22
Tether anchor system . . . . . . . . . . . . . . . . . . . . . . . . . 3-36
Theft-alarm system . . . . . . . . . . . . . . . . . . . . . . . . . . . 4-14
Tilt and telescopic steering. . . . . . . . . . . . . . . . . . . . . 4-38
Towing . . . . . . . . . . . . . . . . . . . . . . . . . . . . . . . . . . . . . 6-29
Trailer towing . . . . . . . . . . . . . . . . . . . . . . . . . . . . . . . 5-71
Transaxle
Automatic transaxle . . . . . . . . . . . . . . . . . . . . . . . . . 5-23
Double clutch transmission . . . . . . . . . . . . . . . . . . . 5-23
Manual transaxle . . . . . . . . . . . . . . . . . . . . . . . . . . . 5-20
Trip computer (Normal vision) . . . . . . . . . . . . . . . . . 4-51 Service mode . . . . . . . . . . . . . . . . . . . . . . . . . . . . . . . 4-55
User Settings . . . . . . . . . . . . . . . . . . . . . . . . . . . . . . . 4-56
Trip computer (Super vision) . . . . . . . . . . . . . . . . . . 4-67
Driving information mode . . . . . . . . . . . . . . . . . . . . 4-68
Lane Departure Warning System Mode . . . . . . . . 4-69
Service mode . . . . . . . . . . . . . . . . . . . . . . . . . . . . . . . 4-70
User Settings . . . . . . . . . . . . . . . . . . . . . . . . . . . . . . . 4-71
Turn signals . . . . . . . . . . . . . . . . . . . . . . . . . . . . . . . . 4-115
Tyre chains. . . . . . . . . . . . . . . . . . . . . . . . . . . . . . . . . . 5-68
Tyre pressure monitoring system (TPMS) . . . . . . . . 6-24
Tyre rotation . . . . . . . . . . . . . . . . . . . . . . . . . . . . . . . . 7-59
Tyre specification and pressure label . . . . . . . . . . . . 8-12
Tyres and wheels . . . . . . . . . . . . . . . . . . . . . . . . . 7-56, 8-7
Checking tyre inflation pressure . . . . . . . . . . . . . . . 7-58
Compact spare tyre replacement . . . . . . . . . . . . . . 7-62
Low aspect ratio tyre . . . . . . . . . . . . . . . . . . . . . . . . 7-67
Recommended cold tyre inflation pressures . . . . . 7-56
Tyre care . . . . . . . . . . . . . . . . . . . . . . . . . . . . . . . . . . 7-56
Tyre maintenance . . . . . . . . . . . . . . . . . . . . . . . . . . . 7-62
Tyre replacement . . . . . . . . . . . . . . . . . . . . . . . . . . . 7-60
Tyre rotation . . . . . . . . . . . . . . . . . . . . . . . . . . . . . . . 7-59
Tyre sidewall labeling . . . . . . . . . . . . . . . . . . . . . . . . 7-62
Tyre traction . . . . . . . . . . . . . . . . . . . . . . . . . . . . . . . 7-62
Wheel alignment and tyre balance . . . . . . . . . . . . . 7-60
Wheel replacement . . . . . . . . . . . . . . . . . . . . . . . . . . 7-62
T
JD RHD Index.QXP 2/17/2015 12:03 PM Page 12