2015 JEEP WRANGLER set clock
[x] Cancel search: set clockPage 52 of 156

Uconnect® 130
NOTE:
• Your radio has many features that add to the comfort and convenience for you and
your passengers.
• Some of these radio features should not be used when driving because they take
your eyes from the road or your attention from driving.
Clock Setting
1. Push and hold the TIME button until the hours blink.
2. Turn the TUNE/SCROLL control knob to set the hours.
3. Push the TUNE/SCROLL control knob until the minutes begin to blink.
Uconnect® 130
1 — CD Eject Button2 — Seek Down Button3 — Seek Up Button4 — AM/FM Button5 — Disc Mode Button6 — AUX Mode Button7 — Rewind Button8 — Fast Forward Button
9 — Set Clock Button10 — Audio Settings/Rotate To Tune11 — Audio Jack12 — Radio Sales Code13 — Set Preset/CD Random Play14 — Station Presets Buttons15 — ON/OFF/Rotate For Volume
ELECTRONICS
50
Page 54 of 156
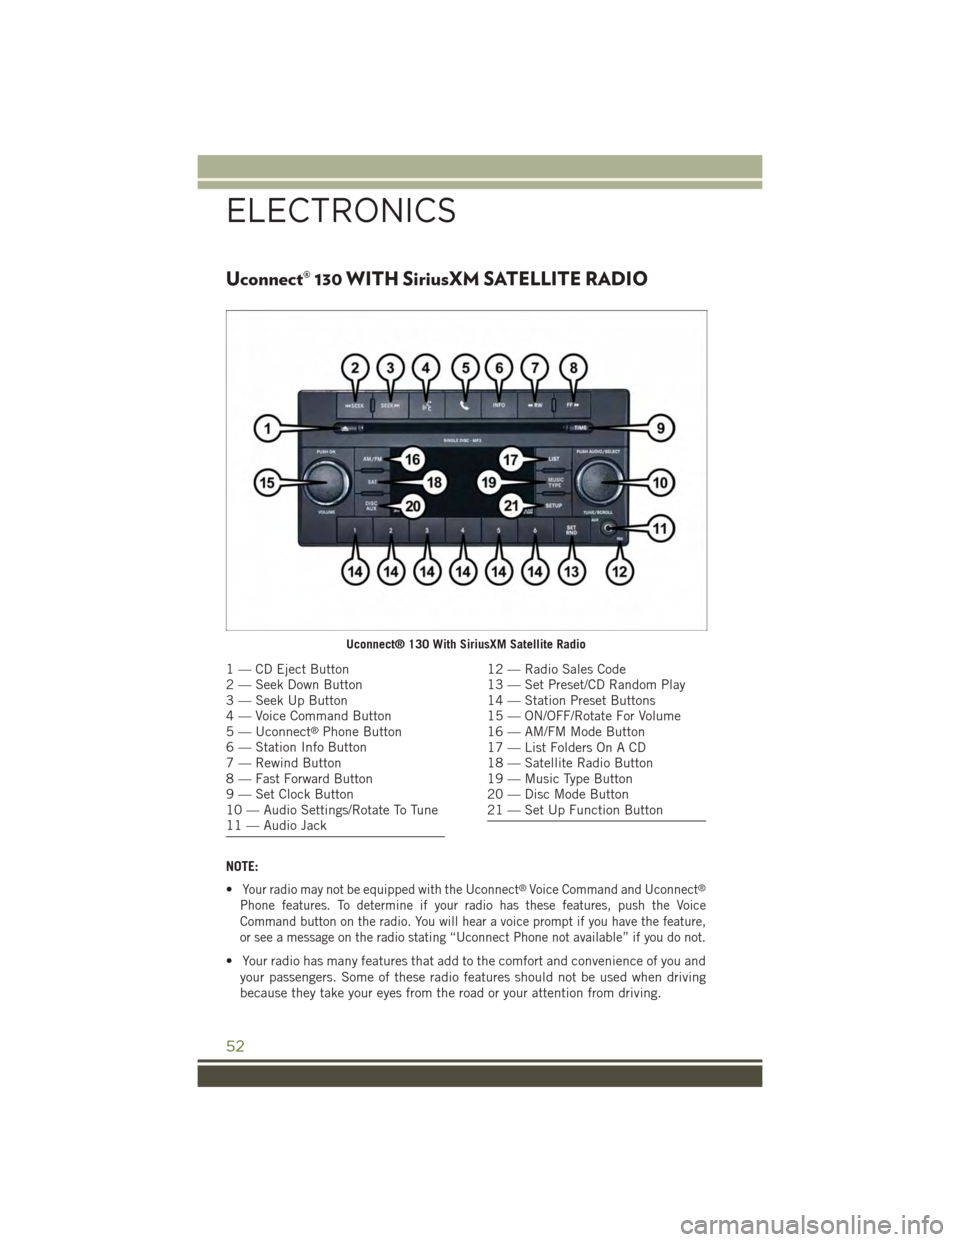
Uconnect® 130 WITH SiriusXM SATELLITE RADIO
NOTE:
•Your radio may not be equipped with the Uconnect®Voice Command and Uconnect®
Phone features. To determine if your radio has these features, push the Voice
Command button on the radio. You will hear a voice prompt if you have the feature,
or see a message on the radio stating “Uconnect Phone not available” if you do not.
• Your radio has many features that add to the comfort and convenience of you and
your passengers. Some of these radio features should not be used when driving
because they take your eyes from the road or your attention from driving.
Uconnect® 130 With SiriusXM Satellite Radio
1 — CD Eject Button2 — Seek Down Button3 — Seek Up Button4 — Voice Command Button5 — Uconnect®Phone Button6 — Station Info Button7 — Rewind Button8 — Fast Forward Button9 — Set Clock Button10 — Audio Settings/Rotate To Tune11 — Audio Jack
12 — Radio Sales Code13 — Set Preset/CD Random Play14 — Station Preset Buttons15 — ON/OFF/Rotate For Volume16 — AM/FM Mode Button17 — List Folders On A CD18 — Satellite Radio Button19 — Music Type Button20 — Disc Mode Button21 — Set Up Function Button
ELECTRONICS
52
Page 55 of 156
Clock Setting
1. Push and hold the TIME button until the hours blink.
2. Turn the TUNE/SCROLL control knob to set the hours.
3. Push the TUNE/SCROLL control knob until the minutes begin to blink.
4. Turn the TUNE/SCROLL control knob to set the minutes.
5. Push the TUNE/SCROLL control knob to save the changes.
6. Push any button/knob or wait five seconds to exit.
Equalizer, Balance And Fade
1. Push the TUNE/SCROLL control knob and “BASS” will display.
2. Rotate the TUNE/SCROLL control knob to select the desired setting.
3.Continue pushing the TUNE/SCROLL control knob to display and set “MID RANGE,”
“TREBLE,” “BALANCE” and “FADE.”
Radio Operation
Seek Up/Down Buttons
• Push to seek through radio stations in AM, FM, or SAT bands.
• Hold either button to bypass stations without stopping.
Store Radio Presets
• Push the SET/RND or SET (depending on the radio) button once and SET 1 will
show in the display. Then select a preset button (1–6).
• A second station may be added to each push button. Push the SET/RND or SET
(depending on the radio) button twice and SET 2 will show in the display. Then
select a preset button (1–6).
Music Type
NOTE:
The Music Type function only operates when in FM mode.
• Push the MUSIC TYPE button to activate this mode. Push the MUSIC TYPE button
again or turn the TUNE/SCROLL control knob to select the desired music type
(Adult Hits, Country, Jazz, Oldies, Rock, etc.).
• When a music type is chosen and the Music type is displayed, Push either SEEK
button and the radio will only search for stations with the selected music type.
SETUP Button
• Pushing the SETUP button allows you to select between items that are available
in that particular mode.
• Turn the TUNE/SCROLL control knob to scroll through the entries. Push the
AUDIO/SELECT button to select an entry and make changes.
ELECTRONICS
53
Page 57 of 156
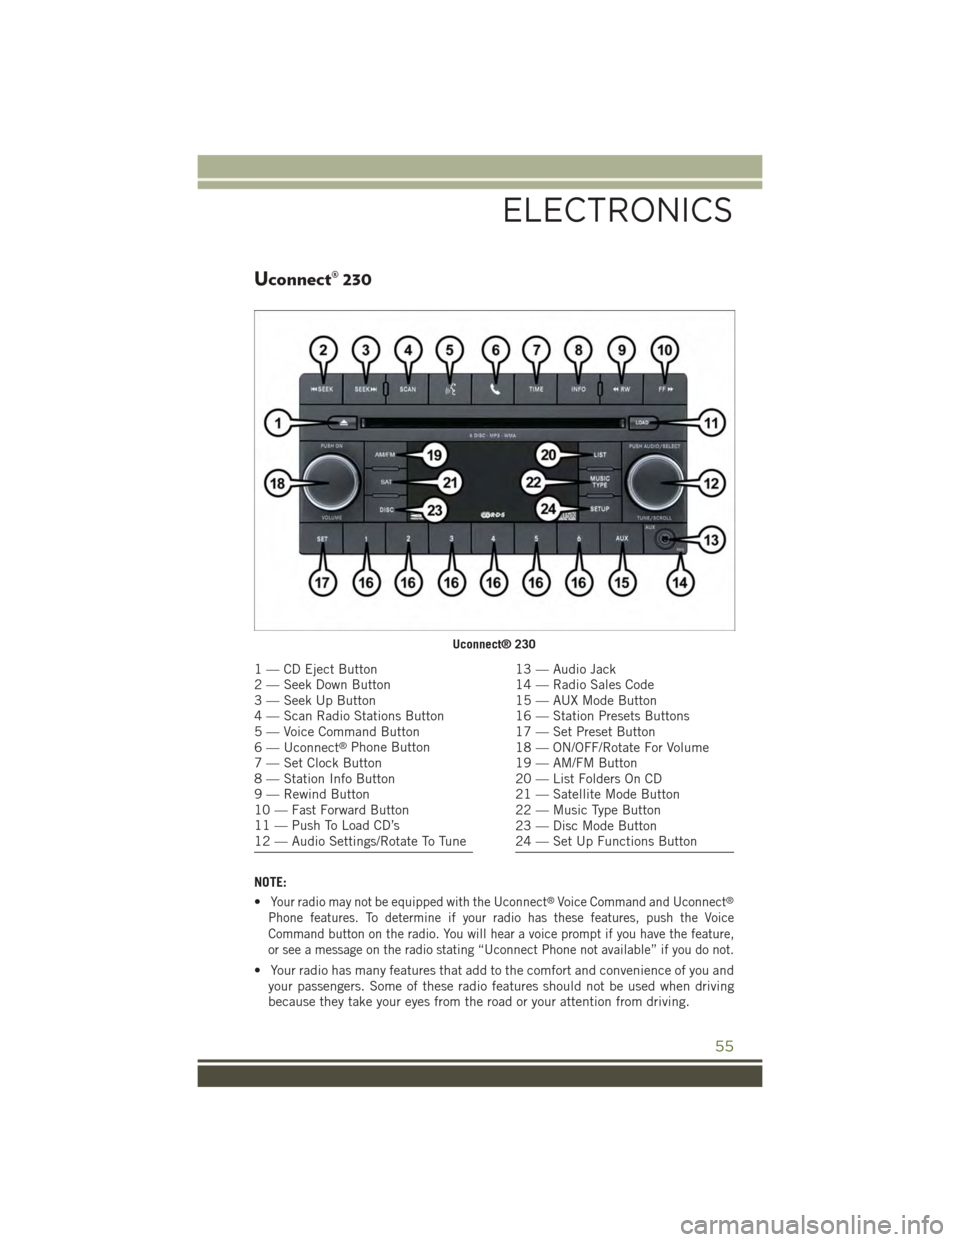
Uconnect® 230
NOTE:
•Your radio may not be equipped with the Uconnect®Voice Command and Uconnect®
Phone features. To determine if your radio has these features, push the Voice
Command button on the radio. You will hear a voice prompt if you have the feature,
or see a message on the radio stating “Uconnect Phone not available” if you do not.
• Your radio has many features that add to the comfort and convenience of you andyour passengers. Some of these radio features should not be used when drivingbecause they take your eyes from the road or your attention from driving.
Uconnect® 230
1 — CD Eject Button2 — Seek Down Button3 — Seek Up Button4 — Scan Radio Stations Button5 — Voice Command Button6 — Uconnect®Phone Button7 — Set Clock Button8 — Station Info Button9 — Rewind Button10 — Fast Forward Button11 — Push To Load CD’s12 — Audio Settings/Rotate To Tune
13 — Audio Jack14 — Radio Sales Code15 — AUX Mode Button16 — Station Presets Buttons17 — Set Preset Button18 — ON/OFF/Rotate For Volume19 — AM/FM Button20 — List Folders On CD21 — Satellite Mode Button22 — Music Type Button23 — Disc Mode Button24 — Set Up Functions Button
ELECTRONICS
55
Page 58 of 156
Clock Setting
1. Push and hold the TIME button until the hours blink.
2. Turn the TUNE/SCROLL control knob to set the hours.
3. Push the TUNE/SCROLL control knob until the minutes begin to blink.
4. Turn the TUNE/SCROLL control knob to set the minutes.
5. Push the TUNE/SCROLL control knob to save the changes.
6. Push any button/knob or wait five seconds to exit.
Equalizer, Balance And Fade
1. Push the TUNE/SCROLL control knob and “BASS” will display.
2. Rotate the TUNE/SCROLL control knob to select the desired setting.
3.Continue pushing the TUNE/SCROLL control knob to display and set “MID RANGE,”
“TREBLE,” “BALANCE” and “FADE.”
Radio Operation
Seek Up/Down Buttons
• Push to seek through radio stations in AM, FM, or SAT bands.
• Hold either button to bypass stations without stopping.
Store Radio Presets
•Push the SET button once and SET 1 will show in the display. Then select button (1–6).
• A second station may be added to each push button. Push the SET button twice
and SET 2 will show in the display. Then select button (1–6).
Music Type
NOTE:
The Music Type function only operates when in FM mode.
• Push the MUSIC TYPE button to activate this mode. Push the MUSIC TYPE buttonagain or turn the TUNE/SCROLL control knob to select the desired music type(Adult Hits, Country, Jazz, Oldies, Rock, etc.).
• Once a music type is chosen and the music type is displayed, push the SEEKbutton and the radio will only search for stations with the selected music type.
SETUP Button
• Pushing the SETUP button allows you to select between items that are available
in that particular mode.
• Turn the TUNE/SCROLL control knob to scroll through the entries. Push the
AUDIO/SELECT button to select an entry and make changes.
SiriusXM Satellite Radio
SiriusXM services require subscriptions, sold separately after the 12-month trial
included with the new vehicle purchase.If you decide to continue your service at the
end of your trial subscription, the plan you choose will automatically renew and bill at
ELECTRONICS
56
Page 60 of 156
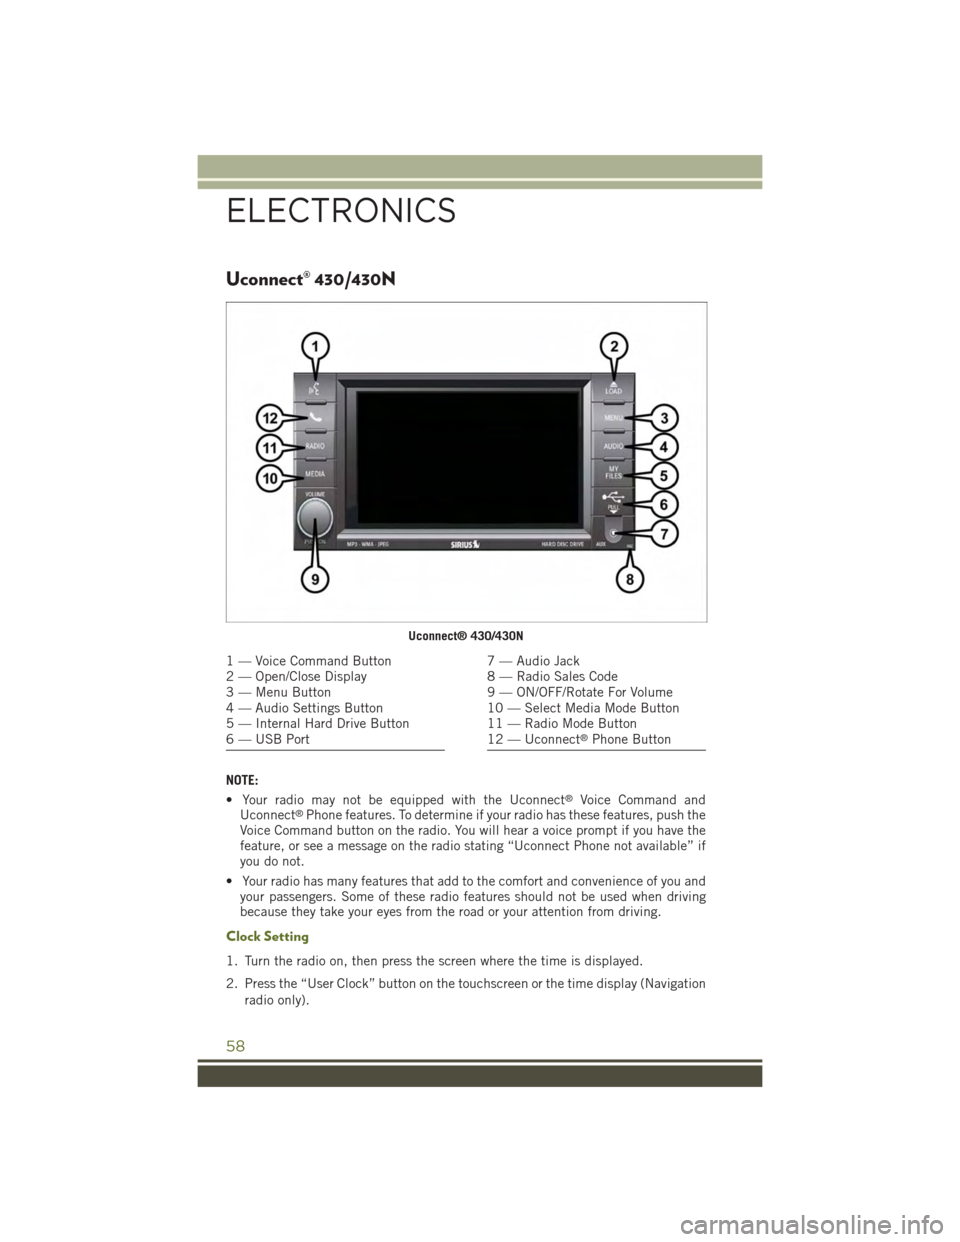
Uconnect® 430/430N
NOTE:
• Your radio may not be equipped with the Uconnect®Voice Command andUconnect®Phone features. To determine if your radio has these features, push theVoice Command button on the radio. You will hear a voice prompt if you have thefeature, or see a message on the radio stating “Uconnect Phone not available” ifyou do not.
• Your radio has many features that add to the comfort and convenience of you andyour passengers. Some of these radio features should not be used when drivingbecause they take your eyes from the road or your attention from driving.
Clock Setting
1. Turn the radio on, then press the screen where the time is displayed.
2. Press the “User Clock” button on the touchscreen or the time display (Navigation
radio only).
Uconnect® 430/430N
1 — Voice Command Button2 — Open/Close Display3 — Menu Button4 — Audio Settings Button5 — Internal Hard Drive Button6 — USB Port
7 — Audio Jack8 — Radio Sales Code9 — ON/OFF/Rotate For Volume10 — Select Media Mode Button11 — Radio Mode Button12 — Uconnect®Phone Button
ELECTRONICS
58
Page 71 of 156

Uconnect® 730N
NOTE:
Your radio has many features that add to the comfort and convenience of you and your
passengers. Some of these radio features should not be used when driving because
they take your eyes from the road or your attention from driving.
Clock Setting
1. Turn the radio on, then press the screen where the time is displayed.
2. Press the “User Clock” button on the touchscreen.
3. To adjust the hours, press either the “Hour Forward” or “Hour Backward” button
on the touchscreen.
4. To adjust the minutes, press either the “Minute Forward” or “Minute Backward”
button on the touchscreen.
5. To save the new time setting, press the screen where the word “Save” is displayed.
Uconnect® 730N
1 — Open/Close Display7 — Audio Jack2 — Voice Command Button8 — Radio Sales Code3 — Uconnect®Phone Button9 — ON/OFF/Rotate For Volume4 — Menu Button10 — Media Mode Button5 — Navigation Button11 — Seek Down Button6 — USB Port12 — Seek Up Button
ELECTRONICS
69
Page 114 of 156

JACKING AND TIRE CHANGING
Jack Location
• The jack and lug wrench are located in the rear storage compartment.
NOTE:
Turn the black plastic wing nut counter clockwise to loosen the jack from the storage
bin.
Spare Tire Stowage
•To remove the spare tire from the car-
rier, remove the tire cover, if equipped,
and remove the lug nuts with the lug
wrench turning them counterclockwise.
NOTE:
If you have added aftermarket accesso-
ries to the spare tire mounted carrier, it
cannot exceed a gross weight of 85 lbs
(38.5 kg) including the weight of the
spare tire.
Preparations For Jacking
1. Park on a firm, level surface. Avoid ice
or slippery areas.
2. Turn on the Hazard Warning flasher.
3. Set the parking brake.
4. Shift the automatic transmission into PARK, or a manual transmission into
REVERSE.
5. Turn the ignition to LOCK.
Block both the front and rear of the wheel
diagonally opposite of the jacking posi-
tion. For example, if changing the right
front tire, block the left rear wheel.
NOTE:
Passengers should not remain in the ve-
hicle when the vehicle is being jacked.
Plastic Wing Nut Location
Wheel Blocked
WHAT TO DO IN EMERGENCIES
112