2015 JEEP RENEGADE ignition
[x] Cancel search: ignitionPage 62 of 220

Enabling And Disabling ParkSense®
ParkSense®can be enabled and disabled with the ParkSense®switch.
When the ParkSense®switch is pressed to disable the system, the instrument cluster
will display the “PARKSENSE OFF” message for approximately five seconds. Refer to
“Electronic Vehicle Information Center (EVIC)” or “Driver Information Display (DID)”
in “Getting To Know Your Instrument Panel” in your owner’s manual on the DVD for
further information. When the shift lever is moved to REVERSE and the system is
disabled, the EVIC/DID will display the “PARKSENSE OFF” message for as long as
the vehicle is in REVERSE.
The ParkSense®switch LED will be ON when ParkSense®is disabled or requires
service. The ParkSense®switch LED will be OFF when the system is enabled. If the
ParkSense®switch is pushed, and requires service, the ParkSense®switch LED will
blink momentarily, and then the LED will be ON.
ParkSense will remember the previous state when the vehicle is switch off.
CAUTION!
After turning off the ignition, the ParkSense®remains in this setting until the next
key cycle, even in the case of changing the setting of starting MAR/RUN to
STOP/OFF and then again in MAR/RUN.
Service The ParkSense® Rear Park Assist System
During vehicle start up, when the ParkSense®Rear Park Assist System has detected
a faulted condition, the instrument cluster will actuate a single chime, once per
ignition cycle, and it will display the “PARKSENSE UNAVAILABLE WIPE REAR
SENSORS” or the “PARKSENSE UNAVAILABLE SERVICE REQUIRED” message.
Refer to “Electronic Vehicle Information Center (EVIC) or Driver Information Display
(DID)” in your owner’s manual on the DVD for further information. When the shift
lever is moved to REVERSE and the system has detected a faulted condition, the
EVIC/DID will display the "PARKSENSE UNAVAILABLE WIPE REAR SENSORS" or
"PARKSENSE UNAVAILABLE SERVICE REQUIRED" message for as long as the
vehicle is in REVERSE. Under this condition, ParkSense®will not operate.
If “PARKSENSE UNAVAILABLE WIPE REAR SENSORS” appears in the Electronic
Vehicle Information Center (EVIC) or Driver Information Display (DID) make sure the
outer surface and the underside of the rear fascia/bumper is clean and clear of snow,
ice, mud, dirt or other obstructions and then cycle the ignition. If the message
continues to appear, see an authorized dealer.
If “PARKSENSE UNAVAILABLE SERVICE REQUIRED” appears in the EVIC/DID, see
an authorized dealer.
OPERATING YOUR VEHICLE
60
Page 64 of 220

If it’s necessary to keep the trailer hitch and hitch ball assembly mounted for a long
period, it is possible to filter out the trailer hitch and hitch ball assembly presence in
sensor field of view. The filtering operation must be performed only by an authorized
dealer.
PARKVIEW® REAR BACK UP CAMERA
The ParkView®Rear Back Up Camera that allows you to see an on-screen image of
your vehicle's rear surroundings when the shift lever is put into REVERSE. The image
will be displayed on the touchscreen display along with a note to “check entire
surroundings” across the top of the screen. After five seconds this note will
disappear. The ParkView®camera is located above the rear license plate.
When the vehicle is shifted out of RE-
VERSE (with camera delay turned OFF),
the rear camera mode is exited and the
navigation or audio screen appears again.
When the vehicle is shifted out of RE-
VERSE (with camera delay turned ON),
the camera image will continue to be
displayed for up to 10 seconds after
shifting out of REVERSE unless the ve-
hicle speed exceeds 8 mph (13 km/h),
the vehicle is shifted into PARK or the
ignition is switched to the STOP/OFF po-
sition.
A touchscreen button to disable the camera is available when the vehicle is not in
REVERSE. Display of the camera image after shifting out of REVERSE can be
disabled via Uconnect®Settings.
When enabled, active guide lines are overlaid on the image to illustrate the width of
the vehicle and its projected backup path based on the steering wheel position.
When enabled, fixed guide lines are overlaid on the image to illustrate the width of
the vehicle.
Different colored zones indicate the distance to the rear of the vehicle.
The following table shows the approximate distances for each zone:
ZoneDistance to the rear of the vehicle
Red0-1ft(0-30cm)
Yellow1 ft - 3 ft (30 cm - 1 m)
Green3 ft or greater (1 m or greater)
NOTE:
If snow, ice, mud, or any foreign substance builds up on the camera lens, clean
the lens, rinse with water, and dry with a soft cloth. Do not cover the lens.
Parking Camera
OPERATING YOUR VEHICLE
62
Page 132 of 220

Refer to theUnderstand The Features Of Your Vehiclesection of your vehicle's Owner's
Manual on the DVD for further details.
NOTE:
• The Uconnect®Phone requires a mobile phone equipped with the Bluetooth®
Hands-Free Profile, Version 1.0 or higher.
• Most mobile phones/devices are compatible with the Uconnect®system, however
some mobile phones/devices may not be equipped with all of the required features
to utilize all of the Uconnect®system features.
• For Uconnect®Customer Care:
• U.S. residents visit UconnectPhone.com or call 1-877-855-8400.
• Canadian Residents visit UconnectPhone.com or call, 1-800-465-2001 (Eng-
lish) or 1-800-387-9983 (French).
Pairing (Wirelessly Connecting) Your Mobile Phone To The Uconnect® System
Mobile phone pairing is the process of establishing a wireless connection between a
cellular phone and the Uconnect system.
NOTE:
• To use the Uconnect®Phone feature, you first must determine if your mobile
phone and software are compatible with the Uconnect®system. Please visit
UconnectPhone.com for complete mobile phone compatibility information.
• Mobile phone pairing is not available while the vehicle is in motion.
• A maximum of 10 mobile phones can be paired to the Uconnect®system.
Start Pairing Procedure On The Radio
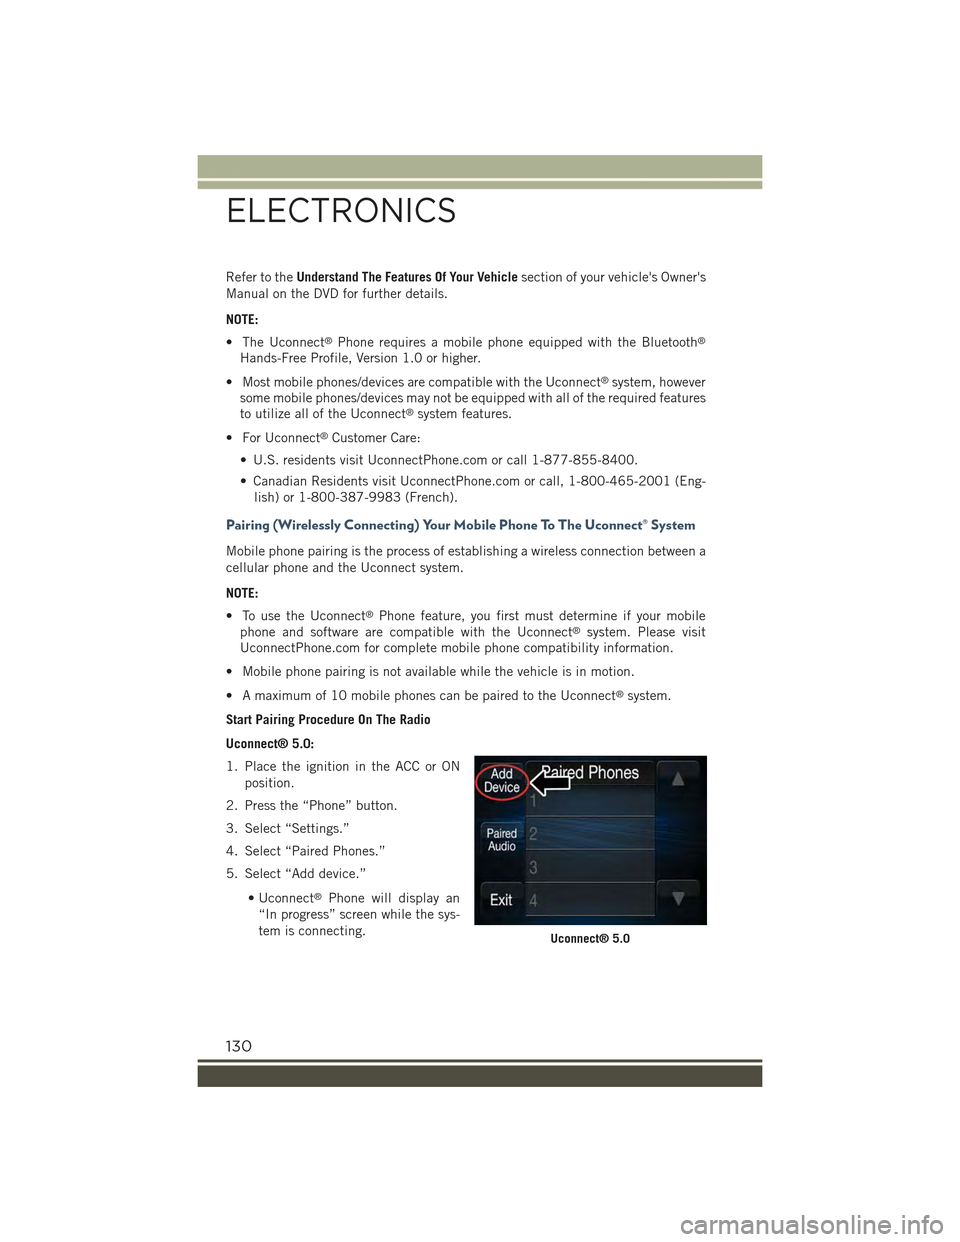
Uconnect® 5.0:
1. Place the ignition in the ACC or ON
position.
2. Press the “Phone” button.
3. Select “Settings.”
4. Select “Paired Phones.”
5. Select “Add device.”
• Uconnect®Phone will display an
“In progress” screen while the sys-
tem is connecting.Uconnect® 5.0
ELECTRONICS
130
Page 133 of 220

Uconnect® 6.5AN:
1. Place the ignition in the ACC or ON
position.
2. Press the “Phone” button in the Menu
Bar on the touchscreen.
3. Select “Settings.”
4. Select “Paired Phones.”
5. Select “Add device.”
• Uconnect®Phone will display an
“In progress” screen while the sys-
tem is connecting.
Pair Your iPhone®:
To search for available devices on your
Bluetooth®enabled iPhone®:
1. Press the Settings button.
2. Select Bluetooth®.
• Ensure the Bluetooth®feature is
enabled. Once enabled, the mobile
phone will begin to search for
Bluetooth®connections.
3. When your mobile phone finds the
Uconnect®system, select
“Uconnect.”
Complete The iPhone® Pairing Procedure:
1. When prompted on the mobile phone,
accept the connection request from
Uconnect®Phone.
NOTE:
Some mobile phones will require you to
enter the PIN number.
Uconnect® 6.5AN
Bluetooth® On/Uconnect Device
Pairing Request
ELECTRONICS
131
Page 136 of 220

Voice Command Tips
• Speaking complete names (i.e; Call John Doe vs. Call John) will result in greater
system accuracy.
• You can “link” commands together for faster results. Say “Call John Doe, mobile,”
for example.
• If you are listening to available voice command options, you do not have to listen
to the entire list. When you hear the command that you need, push the
button on the steering wheel, wait for the beep and say your command.
Changing The Volume
• Start a dialogue by pushing the Phone button, then say a command for
example - "Help."
• Use the radio VOLUME/MUTE rotary knob to adjust the volume to a comfortable
level while the Uconnect®system is speaking. Please note the volume setting for
Uconnect®is different than the audio system.
NOTE:
To access help, push the Uconnect®Phone buttonon the steering wheel and
say "help." Press the display or press either the Phoneor VRbutton and
say "cancel" to cancel the help session.
Incoming Text Messages
After pairing your Uconnect®system with a Bluetooth®enabled mobile device with
the Message Access Profile (MAP), the Uconnect®system can announce a new
incoming text message and read it to you over the vehicle’s audio system.
NOTE:
Only incoming text messages received during the current ignition cycle can be
viewed/read.
To enable incoming text messaging:
iPhone®
1. Press the settings button on the mobile phone.
2. Select Bluetooth®.
• Ensure Bluetooth is enabled, and the mobile phone is paired to the Uconnect®
system.
3. Selectlocated under DEVICES next to Uconnect.
ELECTRONICS
134
Page 137 of 220

4. Turn “Show Notifications” to On.
Android Devices
1. Push the Menu button on the mobile phone.
2. Select Settings.
3. Select Connections.
4. Turn “Show Notifications” to On.
• A pop up will appear asking you to accept a request for permission to connect
to your messages. Select “Don’t ask again” and press OK.
NOTE:
All incoming text messages received dur-
ing the current ignition cycle will be de-
leted from the Uconnect®system when
the ignition is turned to the Off position.
Enable iPhone® Incoming Text Messages
Enable Android Device Incoming TextMessages
ELECTRONICS
135
Page 153 of 220

Active Drive With Low Control — (Trailhawk models only)
The 4WD LOW mode helps to improve the
off-road performance in all modes. To
enable 4WD Low please follow the steps
below:
Enabling 4WD LOW
With the vehicle stationary, the ignition in
the MAR/RUN or with the engine run-
ning, shift the transmission into DRIVE,
REVERSE or NEUTRAL and press the
button once 4WD LOW. The EVIC/DID
will display the message "4WD LOW"
once the shift is complete.
NOTE:
The lights on the Selec-Terrain™ switch
may blink until the shift is complete.
Disabling 4WD LOW
To disable the 4WD LOW mode, the vehicle must be stationary and the transmission
shifted into NEUTRAL. Press the 4WD LOW button once.
Selec-Terrain™ Switch (Trailhawk)
OFF-ROAD CAPABILITIES
151
Page 158 of 220

ROADSIDE ASSISTANCE
Dial toll-free 1-800-521-2779 for U.S. Residents or 1-800-363-4869 for Canadian
Residents.
• Provide your name, vehicle identification number, license plate number, and your
location, including the telephone number from which you are calling.
• Briefly describe the nature of the problem and answer a few simple questions.
• You will be given the name of the service provider and an estimated time of arrival.
If you feel you are in an “unsafe situation”, please let us know. With your consent,
we will contact local police or safety authorities.
INSTRUMENT CLUSTER WARNING LIGHTS
- Low Fuel Warning Light
This warning light indicates when the fuel level reaches approximately 2.0 gal (7.8 L).
This light will turn on and a single chime will sound.
-ChargingSystemLight
This light shows the status of the electrical charging system. If the charging system
light remains on, it means that the vehicle is experiencing a problem with the
charging system.
We recommend you do not continue driving if the charging system light is on. Have
the vehicle serviced immediately.
- Oil Pressure Warning Light
This light indicates low engine oil pressure. If the light turns on while driving, stop
the vehicle and shut off the engine as soon as possible. A chime will sound for four
minutes when this light turns on.
We recommend you do not operate the vehicle or engine damage will occur. Have the
vehicle serviced immediately.
- Anti-Lock Brake (ABS) Light
This light monitors the Anti-Lock Brake System (ABS). The light will turn on when the
ignition switch is turned to the MAR/RUN position and may stay on for as long as four
seconds.
If the ABS light remains on or turns on while driving, it indicates that the Anti-Lock
portion of the brake system is not functioning and that service is required. However,
the conventional brake system will continue to operate normally if the BRAKE
warning light is not on.
WHAT TO DO IN EMERGENCIES
156