2015 JEEP RENEGADE buttons
[x] Cancel search: buttonsPage 93 of 220
•iHeartRadio— iHeartRadio provides instant access to more than 1,500 live radiostations from across the country and allows listeners to create custom musicstations inspired by their favorite artists or songs.
•Pandora®— Pandora®gives people the music and comedy they love anytime,anywhere. Personalized stations launch instantly, with the input of a favorite artist,track, comedian, or genre.
•Slacker Radio— Enjoy millions of songs and hundreds of handcrafted stations.
NOTE:
For detailed information on how to use Via Mobile apps visit the Mopar OwnerConnect website (moparownerconnect.com) and log in using the username and
password you set up when registering for Uconnect®Access.
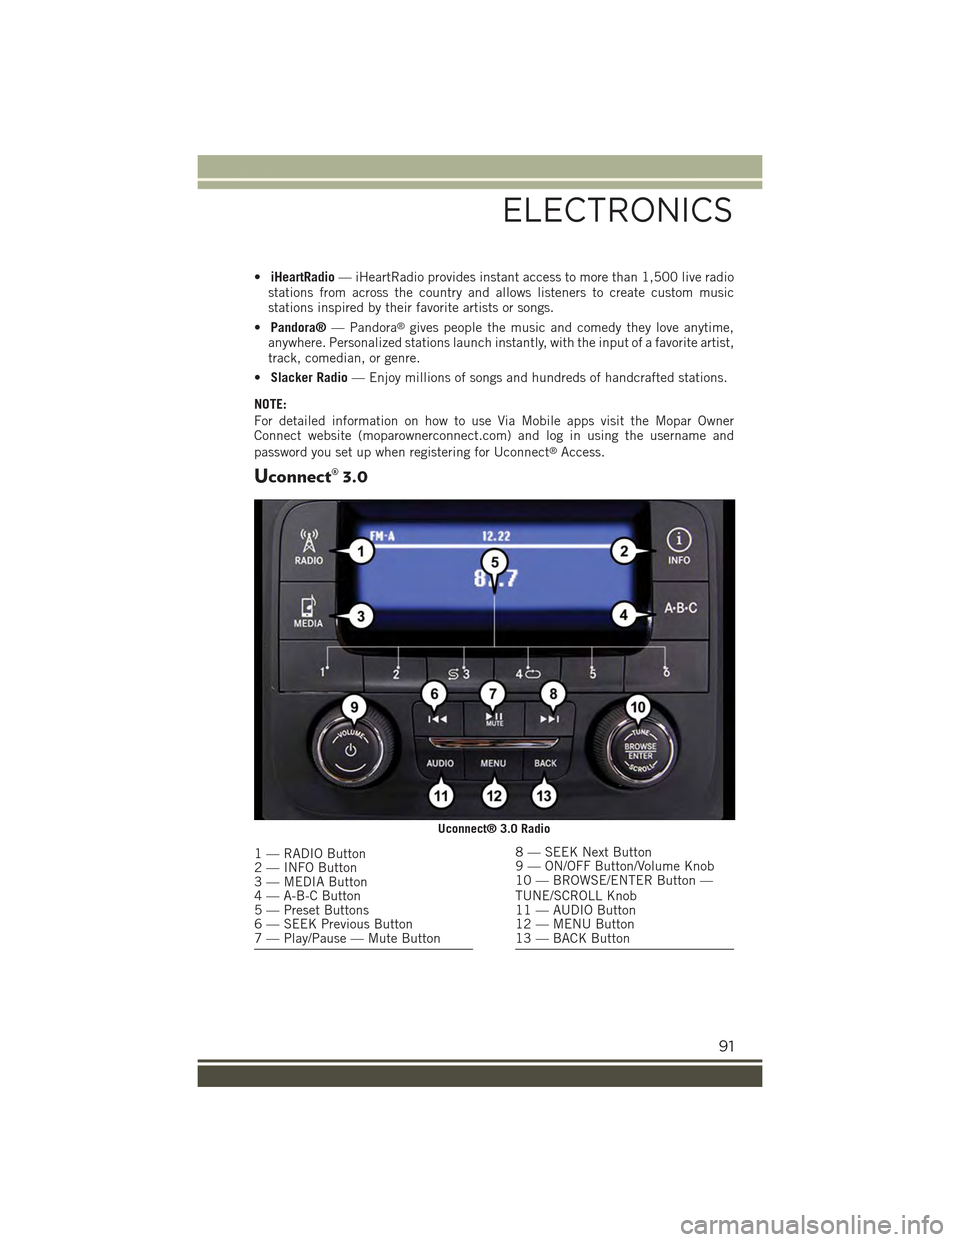
Uconnect® 3.0
Uconnect® 3.0 Radio
1 — RADIO Button2 — INFO Button3 — MEDIA Button4 — A-B-C Button5 — Preset Buttons6 — SEEK Previous Button7 — Play/Pause — Mute Button
8 — SEEK Next Button9 — ON/OFF Button/Volume Knob10 — BROWSE/ENTER Button —TUNE/SCROLL Knob11 — AUDIO Button12 — MENU Button13 — BACK Button
ELECTRONICS
91
Page 94 of 220
Clock Setting
1. Push the Menu button at the bottom of the radio, and push the Enter/Browse
button for System Settings. Next, select the Time and Format setting and then
select Set Time by pushing the Enter/Browse button.
2. Adjust the hours or minutes by turning the Tune/Scroll knob, then pushing the
Enter/Browse button to move to the next entry. You can also select 12hr or 24hr
format by turning the Tune/Scroll knob, then pushing the Enter/Browse button on
the desired selection.
3. Once the time is set push the “Back” button to exit the time screen.
Audio
• Push the AUDIO button on the radio faceplate.
The Audio Menu shows the following options for you to customize your audio settings.
Treble, Mid, Bass, Fade, Balance, Speed Adjusted Volume, Loudness
• Select the desired setting to adjust, then push the ENTER/BROWSE button. Turnthe TUNE/SCROLL knob to adjust the setting + or - 9. Push the “Back” buttonwhen done.
Radio Operation
Seek Previous/Next Buttons
• Push to seek through radio stations in AM, FM or SXM bands.
• Hold either button to bypass stations without stopping.
Store Radio Presets
• The Presets are available for all Radio Modes, and are activated by pushing any of
the six Preset buttons.
• When you are receiving a station that you wish to commit into memory, push and
hold the desired numbered button for more than two seconds, or until you hear a
confirmation beep.
• The Radio stores up to 18 presets in each of the Radio modes. Push the A-B-C
button on the faceplate to select the A, B or C preset list.
ELECTRONICS
92
Page 95 of 220
USB/Audio Jack (AUX) Operation
USB/iPod®
• USB/iPod®Mode is entered by either inserting a USB Jump Drive or iPod®cable
into the USB port or by pushing the MEDIA button located left of the display. Once
in Media Mode, select “USB/iPod” for the source.
• Push the MEDIA button, then select “USB/iPod” to change the mode to the USB
device if the device is connected, allowing the music from your portable device to
play through the vehicle's speakers.
Audio Jack (AUX)
The AUX allows a portable device such as an MP3 player or an iPod®to be plugged
into the radio and utilize the vehicle’s audio system, using a 3.5 mm audio cable, to
amplify the source and play through the vehicle’s speakers.
• If the audio cable is connected to the AUX jack and portable device, push the
MEDIA button, then press the “Source” button on the touchscreen and select
“AUX” to change the mode to auxiliary device. This allows the music from your
portable device to play through the vehicle's speakers.
The functions of the portable device are controlled using the device buttons, not the
buttons on the radio. The volume may be controlled using the radio or portable
device.
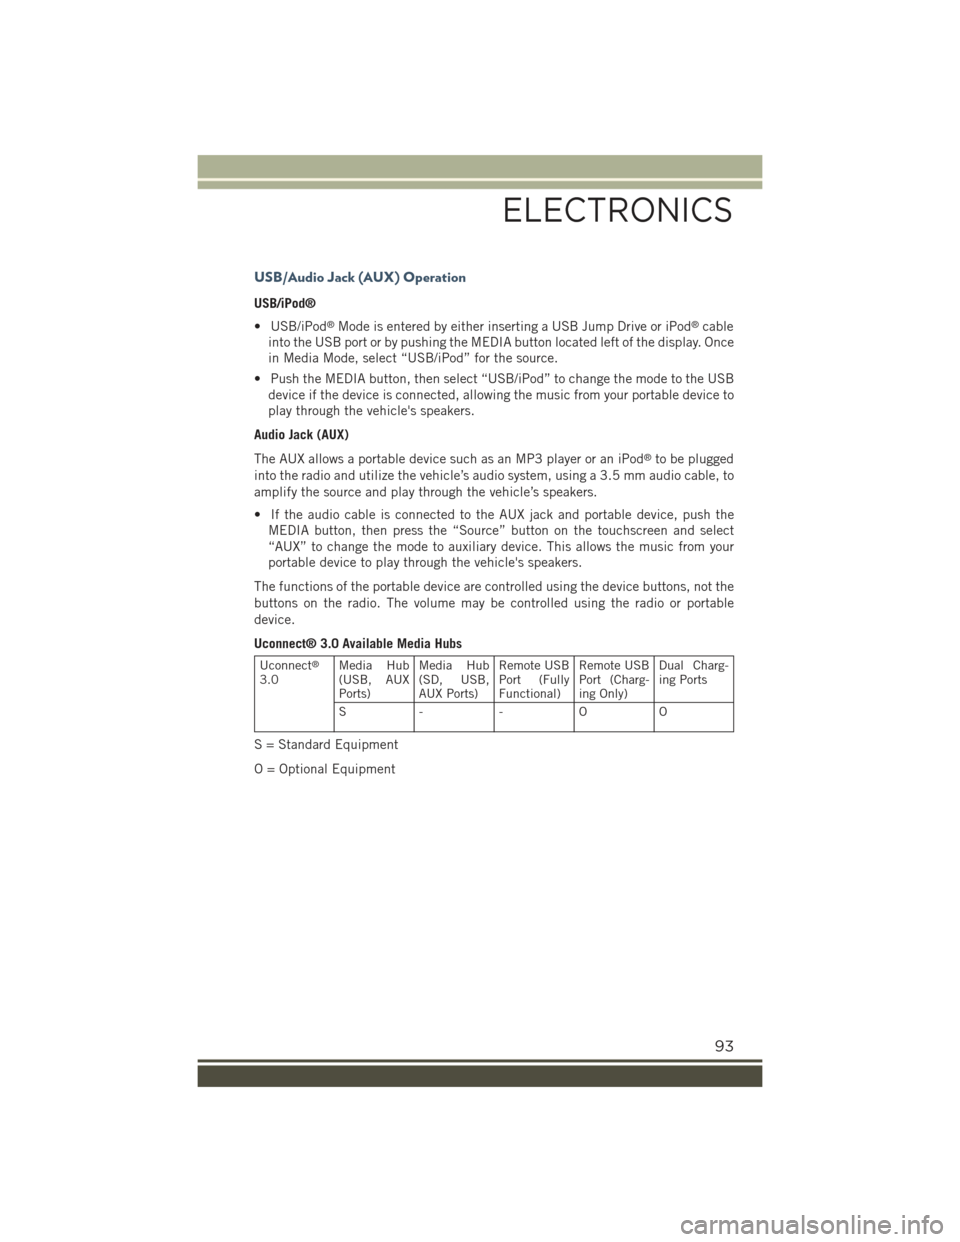
Uconnect® 3.0 Available Media Hubs
Uconnect®
3.0Media Hub(USB, AUXPorts)
Media Hub(SD, USB,AUX Ports)
Remote USBPort (FullyFunctional)
Remote USBPort (Charg-ing Only)
Dual Charg-ing Ports
S- - OO
S = Standard Equipment
O = Optional Equipment
ELECTRONICS
93
Page 97 of 220
3. Press the “Up” or “Down” arrows to adjust the hours or minutes, then select the
“AM” or “PM” button on the touchscreen. You can also select 12hr or 24hr
format by pressing the desired button on the touchscreen.
4. Once the time is set press the “Done” button on the touchscreen to exit the time
screen.
NOTE:
In the Clock Setting Menu you can also select Display Clock. Display Clock turns the
clock display in the status bar on or off.
Equalizer, Balance And Fade
1. Push the MORE button on the faceplate below the display then press the
“Setting” button on the touchscreen.
2. Scroll down and press the “Audio” button on the touchscreen to open the Audio
menu.
3. The Audio Menu shows the following options for you to customize your audio
settings.
Equalizer
• Press the “Equalizer” button on the touchscreen to adjust the Bass, Mid and
Treble. Use the “+” or “-” button on the touchscreen to adjust the equalizer to your
desired settings.
Balance/Fade
• Press the “Balance/Fade” button on the touchscreen to adjust the sound from the
speakers. Use the arrow buttons on the touchscreen to adjust the sound level from
the front and rear or right and left side speakers. Press the Center “C” button on
the touchscreen to reset the balance and fade to the factory setting.
Speed Adjusted Volume — If Equipped
• Press the “Speed Adjusted Volume” button on the touchscreen to select between
OFF, 1, 2 or 3. This will decrease the radio volume relative to a decrease in vehicle
speed.
Loudness
• Press the “Loudness” button on the touchscreen to select the Loudness feature.
When this feature is activated it improves sound quality at lower volumes.
Surround Sound — If Equipped
• Press the “Surround Sound” button on the touchscreen, select On or Off followed
by pressing the back arrow button on the touchscreen. When this feature is
activated, it provides simulated surround sound mode.
ELECTRONICS
95
Page 98 of 220

Radio Operation
Store Radio Presets
The Radio stores up to 12 presets in each of the Radio modes. Four presets are visible
at the top of the radio screen. Pressing the “All” button on the touchscreen on the
radio home screen will display all of the preset stations for that mode.
• When you are receiving a station that you wish to commit into memory, press and
hold the desired numbered button on the touchscreen for more than two seconds,
or until you hear a confirmation beep.
Seek Next/Previous Buttons
• Press to seek through radio stations in AM, FM or SXM bands.
• Hold either button to bypass stations without stopping.
Radio Operation
1 — Radio Station Preset2 — All Presets3 — Seek Next4 — Audio Settings
5 — Station Information6 — Direct Tune7 — Radio Band8 — Seek Previous
ELECTRONICS
96
Page 103 of 220

Get Started
1. VisitUconnectPhone.comto check mobile device and feature compatibility and to
find phone pairing instructions.
2. Reduce background noise. Wind and passenger conversations are examples of
noise that may impact recognition.
3. Speak clearly at a normal pace and volume while facing straight ahead. The
microphone is positioned on the rearview mirror and aimed at the driver.
4. Each time you give a Voice Command, you must first press either the VR or Phone
button, wait untilafterthe beep, then say your Voice Command.
5. You can interrupt the help message or system prompts by pressing the VR or
Phone button and saying a Voice Command from current category.
All you need to control your Uconnect®system with your voice are the buttons on your
steering wheel.
Uconnect® VR/Phone Buttons
1 — Push To Initiate Or To Answer A Phone Call, Send Or Receive A Text2 — Push For Voice Recognition (VR)3 — Push To End Call
ELECTRONICS
101
Page 109 of 220
Setting The Time
Model 6.5AN synchronizes time automatically via GPS, so should not require any
time adjustment. If you do need to set the time manually, follow the instructions
below.
• For Model 6.5AN, turn the unit on, then press the time display at the top of the
screen, a pop-up will ask if you want to set the time. Press “Yes.”
• If the time is not displayed at the top of the screen, press the Settings button. In
the Settings screen, press the “Clock” button on the touchscreen, then select
“ON” for “Show Time Status.”
• Press “+” or “–” next to Set Time Hours and Set Time Minutes to adjust the time.
• If these features are not available, press “Off” for Sync with GPS.
• Press “X” to exit out of the Clock Setting screen.
Audio Settings
• Press the “Audio” button on the touchscreen to activate the Audio settings screen
to adjust Balance\Fade, Equalizer, and Speed Adjusted Volume.
• You can return to the Radio screen by pressing the “X” or back arrow located at the
top right.
Balance/Fade
• Press the “Balance/Fade” button on the touchscreen to Balance audio between
the front speakers or fade the audio between the rear and front speakers.
• Pressing the “Front,” “Rear,” “Left,” or “Right” buttons on the touchscreen or
press and drag the Speaker Icon to adjust the Balance/Fade.
Equalizer
• Press the “Equalizer” button on the touchscreen to activate the Equalizer screen.
• Press the “+” or “-” buttons on the touchscreen, or press and drag over the level
bar for each of the equalizer bands. The level value, which spans between plus or
minus 9, is displayed at the bottom of each of the Bands.
Speed Adjusted Volume — If Equipped
• Press the “Speed Adjusted Volume” button on the touchscreen to activate the
Speed Adjusted Volume screen. The Speed Adjusted Volume is adjusted by
pressing the “+” and “–” buttons or by pressing and dragging over the level bar.
This alters the automatic adjustment of the audio volume with variation to vehicle
speed.
Surround Sound — If Equipped
• Press the “Surround Sound” button on the touchscreen, select “On” or “Off”
followed by pressing the back arrow button on the touchscreen. When this feature
is activated, it provides simulated surround sound mode.
ELECTRONICS
107
Page 110 of 220

Radio
• To access the Radio mode, press the RADIO button below the screen.
Selecting Radio Stations
• Press the desired radio band (AM, FM or SXM) button.
Seek Next/Seek Previous
• Press the “Seek Arrow” buttons on the touchscreen for less than two seconds to
seek through radio stations.
• Press and hold either Seek Arrow button on the touchscreen for more than two
seconds to bypass stations without stopping. The radio will stop at the next
listenable station once the Seek Arrow button on the touchscreen is released.
Direct Tune
• Tune directly to a radio station by pressing the “Tune” button on the touchscreen
on the screen, and entering the desired station number.
Uconnect® 6.5AN Radio
1 — Radio Station Presets2 — Toggle Presets3 — HD Radio Available4 — Audio Settings5 — Seek Next
6 — Direst Tune Radio Stations7 — Seek Previous8 — Browse/Manage Presets9 — Radio Bands
ELECTRONICS
108