Page 292 of 717
INSTRUMENT PANEL FEATURES
1 — Air Outlet6 — Lower Switch Bank11 — Hood Release2 — Instrument Cluster7 — Hazard Switch12 — Fuel Door Release3—Radio8—StorageBin(SDCard,AUX,USBMediaHub) 13—HeadlightSwitch4—GloveCompartment9—ESCButton14 — Dimmer Control5 — Climate Controls10 — Ignition Switch
290 UNDERSTANDING YOUR INSTRUMENT PANEL
Page 338 of 717

the scale between the “+” and “–” buttons on the
touchscreen. Press the back arrow/Done button on the
touchscreen to return to the previous menu.
•Balance/Fade
This feature allows you to adjust the Balance and Fade
settings. Press and drag the speaker icon or use the
arrows to adjust, tap the “C” icon to readjust to the center.
Press the back arrow/Done button on the touchscreen to
return to the previous menu.
•Speed Adjusted Volume
This feature increases or decreases volume relative to
vehicle speed. To change the Speed Adjusted Volume
press the “Speed Adjusted Volume” button on the touch-
screen and select from “Off,” “1,” “2” or “3” buttons on
the touchscreen. Press the back arrow/Done button on
the touchscreen to return to the previous menu.
•Surround Sound — If Equipped
This feature provides simulated surround sound mode.
To make your selection, press the “Surround Sound”
button on the touchscreen, select “On” or “Off.” Press the
back arrow/Done button on the touchscreen to return to
the previous menu.
•AUX Volume Offset — If Equipped
This feature provides the ability to tune the audio level
for portable devices connected through the AUX input.
To make your selection, press the “AUX Volume Offset”
button on the touchscreen, select “On” or “Off.” Press the
back arrow/Done button on the touchscreen to return to
the previous menu.
•Loudness — If Equipped
This feature improves sound quality at lower volumes.
To make your selection, press the “Loudness” button on
336 UNDERSTANDING YOUR INSTRUMENT PANEL
Page 359 of 717

•Surround Sound — If Equipped
This feature provides simulated surround sound mode.
To make your selection, press the “Surround Sound”
button on the touchscreen, select “On” or “Off.” Press the
back arrow button on the touchscreen to return to the
previous menu.
•AUX Volume Offset — If Equipped
This feature provides the ability to tune the audio level
for portable devices connected through the AUX input.
To make your selection, press the AUX Volume Match
button on the touchscreen, choose a level from –3 to +3.
Press the back arrow button on the touchscreen to return
to the previous menu.
•Loudness — If Equipped
Loudness improves sound quality at lower volumes. To
make your selection, press the “Loudness” button on the
touchscreen, then choose “Yes” or “No.” Press the back
arrow button on the touchscreen to return to the previous
menu.
Phone/Bluetooth®
After pressing the “Phone/Bluetooth®” button on the
touchscreen the following settings will be available:
•Paired Phones
This feature shows which phones are paired to the
Phone/Bluetooth® system. For further information, refer
to the Uconnect® Supplement Manual.
•Paired Audio Sources
This feature shows which audio devices are paired to the
Phone/Bluetooth® system. For further information, refer
to the Uconnect® Supplement Manual.
4
UNDERSTANDING YOUR INSTRUMENT PANEL 357
Page 367 of 717
Using The Remote Control
•Select an audio channel (Rear 1 for driver’s side rear
screen and Rear 2 for passenger’s side rear screen),
then press the source key and using the up and down
arrows, highlight disc from the menu and press the OK
button.
•Press the popup/menu key to navigate the disc menu
and options.
Play Video Games
Connect the video game console to the Audio/Video
RCA/HDMI input jacks located on the side of each seat.
Audio/Video RCA/HDMI Jacks (AUX/HDMI Jacks) on
the side of each seat enable the monitor to display video
directly from a video camera, connect video games for
display on the screen, or play music directly from an MP3
player.
Audio/Video RCA/HDMI Input Jacks
4
UNDERSTANDING YOUR INSTRUMENT PANEL 365
Page 368 of 717

When connecting an external source to the AUX/HDMI
input, ensure to follow the standard color coding for the
audio/video jacks:
1. HDMI Input
2. Right audio in (red)
3. Left audio in (white)
4. Video in (yellow)
NOTE:Certain high-end video games, such as Playsta-
tion4 and XBox One will exceed this power limit of the
vehicle’s Power Inverter.
Play A DVD/Blu-ray™ Disc Using The
Touchscreen Radio
1. Insert the DVD/Blu-ray™ Disc with the label facing as
indicated on the DVD/Blu-ray™ Disc player. The
radio automatically selects the appropriate mode after
the disc is recognized and displays the menu screen or
starts playing the first track.
2. To watch a DVD/Blu-ray™ Disc on Rear 1 (driver’s
side rear passenger) ensure the Remote Control and
Headphone channel selector switch is on Rear 1.
3. To watch a DVD/Blu-ray™ Disc on Rear 2 (passen-
ger ’s side rear passenger) ensure the Remote Control
and Headphone channel selector switch is on Rear 2.
Using The Remote Control
1. Push the SOURCE button on the Remote Control.
2. While looking at Rear 1 or 2, highlight DISC by either
pushing Up/Down/Left/Right buttons, then push
ENTER/OK.
366 UNDERSTANDING YOUR INSTRUMENT PANEL
Page 377 of 717
Display Settings
When watching a video source (Blu-ray™ Disc or DVD
Video with the disc in Play mode, Aux Video, etc.),
pushing the remote control’s SETUP button activates the
Display Settings menu. These settings control the appear-
ance of the video on the screen. The factory default
settings are already set for optimum viewing, so there is
no need to change these settings under normal circum-
stances.
To change the settings, push the remote control’s naviga-
tion buttons ($,#) to select an item, then push the
remote control’s navigation buttons (!,") to change the
value for the currently selected item. To reset all values
back to the original settings, select the Default Settings
menu option and push the remote control’s ENTER/OK
button.
Disc Features control the remote Blu-ray™ Disc player’s
settings of DVD being watched in the remote player.Video Screen Display Settings
4
UNDERSTANDING YOUR INSTRUMENT PANEL 375
Page 383 of 717

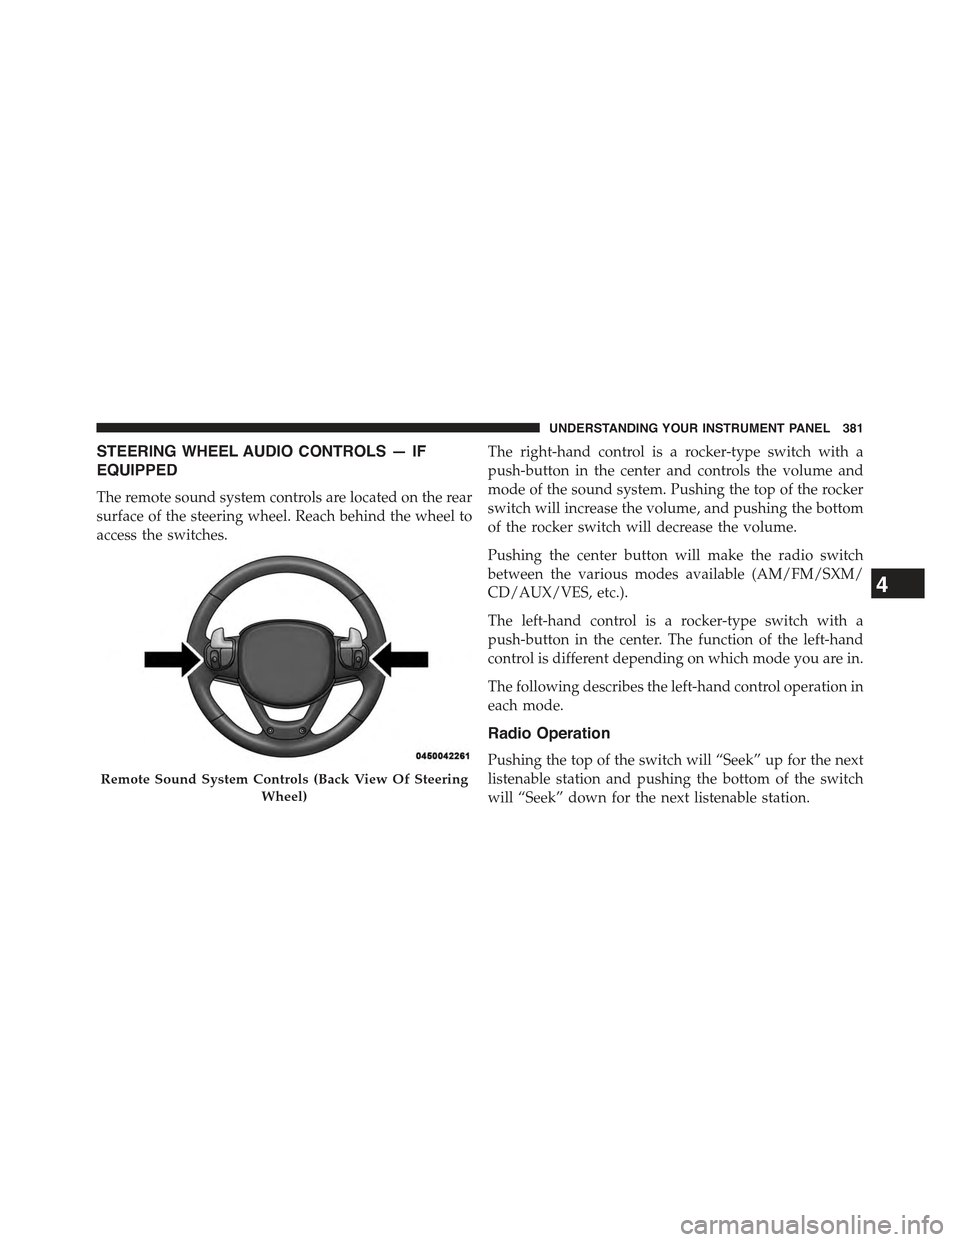
STEERING WHEEL AUDIO CONTROLS — IF
EQUIPPED
The remote sound system controls are located on the rear
surface of the steering wheel. Reach behind the wheel to
access the switches.
The right-hand control is a rocker-type switch with a
push-button in the center and controls the volume and
mode of the sound system. Pushing the top of the rocker
switch will increase the volume, and pushing the bottom
of the rocker switch will decrease the volume.
Pushing the center button will make the radio switch
between the various modes available (AM/FM/SXM/
CD/AUX/VES, etc.).
The left-hand control is a rocker-type switch with a
push-button in the center. The function of the left-hand
control is different depending on which mode you are in.
The following describes the left-hand control operation in
each mode.
Radio Operation
Pushing the top of the switch will “Seek” up for the next
listenable station and pushing the bottom of the switch
will “Seek” down for the next listenable station.
Remote Sound System Controls (Back View Of Steering
Wheel)
4
UNDERSTANDING YOUR INSTRUMENT PANEL 381
Page 386 of 717

This device complies with Part 15 of the FCC Rules and
with Industry Canada license-exempt RSS standard(s).
Operation is subject to the following two conditions:
1. this device may not cause harmful interference, and
2. this device must accept any interference received,
including interference that may cause undesired op-
eration.
Le présent appareil est conforme aux CNR d’Industrie
Canada applicables aux appareils radio exempts de li-
cence. L’exploitation est autorisée aux deux conditions
suivantes: (1) l’appareil ne doit pas produire de brouil-
lage, et (2) l’utilisateur de l’appareil doit accepter tout
brouillage radioélectrique subi, même si le brouillage est
susceptible d’en compromettre le fonctionnement.
NOTE:
•This equipment has been tested and found to comply
with the limits for a Class B digital device, pursuant to
Part 15 of the FCC Rules. These limits are designed to
provide reasonable protection against harmful inter-
ference in a residential installation. This equipment
generates, uses and can radiate radio frequency energy
and, if not installed and used in accordance with the
instructions, may cause harmful interference to radio
communications. However, there is no guarantee that
interference will not occur in a particular installation.
•If this equipment does cause harmful interference to
radio or television reception, which can be determined
by turning the equipment off and on, the user is
encouraged to try to correct the interference by one or
more of the following measures:
•Increase the separation between the equipment and
receiver.
384 UNDERSTANDING YOUR INSTRUMENT PANEL