2015 JEEP GRAND CHEROKEE door lock
[x] Cancel search: door lockPage 313 of 717
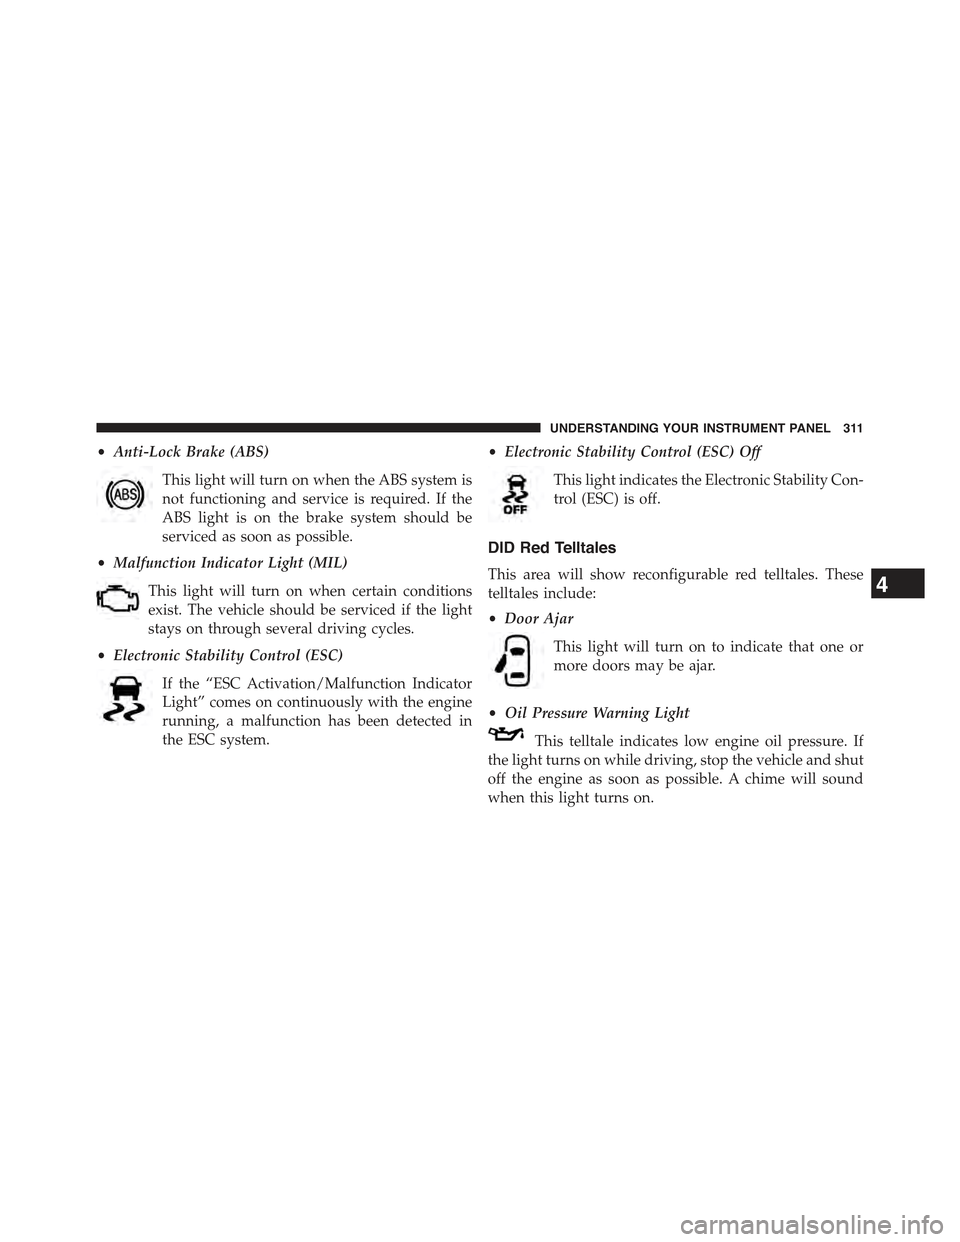
•Anti-Lock Brake (ABS)
This light will turn on when the ABS system is
not functioning and service is required. If the
ABS light is on the brake system should be
serviced as soon as possible.
•Malfunction Indicator Light (MIL)
This light will turn on when certain conditions
exist. The vehicle should be serviced if the light
stays on through several driving cycles.
•Electronic Stability Control (ESC)
If the “ESC Activation/Malfunction Indicator
Light” comes on continuously with the engine
running, a malfunction has been detected in
the ESC system.
•Electronic Stability Control (ESC) Off
This light indicates the Electronic Stability Con-
trol (ESC) is off.
DID Red Telltales
This area will show reconfigurable red telltales. These
telltales include:
•Door Ajar
This light will turn on to indicate that one or
more doors may be ajar.
•Oil Pressure Warning Light
This telltale indicates low engine oil pressure. If
the light turns on while driving, stop the vehicle and shut
off the engine as soon as possible. A chime will sound
when this light turns on.
4
UNDERSTANDING YOUR INSTRUMENT PANEL 311
Page 324 of 717
Buttons On The Touchscreen
Buttons on the touchscreen are accessible on the
Uconnect® display.
Customer Programmable Features — Uconnect®
5.0 Personal Settings
Push the MORE button on the faceplate to display the
menu setting screen. In this mode the Uconnect® system
allows you to access programmable features that may be
equipped such as Display, Voice, Clock & Date, Safety &
Assistance, Lights, Doors & Locks, Auto-On Comfort,
Engine Off Options, Suspension, Compass Settings, Au-
dio, Phone/Bluetooth®, Sirius Setup, Restore Settings,
and Clear Personal Data.
NOTE:Only one touchscreen area may be selected at a
time.
When making a selection, press the button on the touch-
screen to enter the desired mode. Once in the desired
mode, press and release the preferred setting and make
your selection. Once the setting is complete, either press
the Back Arrow/Done button on the touchscreen or the
Back button on the faceplate to return to the previous
menu or press the “X” button on the touchscreen to close
out of the settings screen. Pressing the Up or Down
Arrow buttons on the right side of the screen will allow
you to toggle up or down through the available settings.
NOTE:All settings should be changed with the ignition
in the “Run” position.
Display
After pressing the “Display” button on the touchscreen
the following settings will be available.
•Display Mode
When in this display you may select the “Auto” or
“Manual” display settings. To change Mode status, press
322 UNDERSTANDING YOUR INSTRUMENT PANEL
Page 330 of 717
•Headlight Illumination On Approach
When this feature is selected, it allows the adjustment of
the amount of time the headlights remain on after the
doors are unlocked with the Remote Keyless Entry (RKE)
transmitter. To change the Illuminated Approach status,
press the “Illuminated Approach” button and choose
either 0 sec, 30 sec, 60 sec or 90 seconds. Press the back
arrow button on the touchscreen to return to the previous
menu.
•Headlights With Wipers — If Equipped
When this feature is selected, and the headlight switch is
in the AUTO position, the headlights will turn on ap-
proximately 10 seconds after the wipers are turned on.
The headlights will also turn off when the wipers are
turned off if they were turned on by this feature. To make
your selection, press the “Lights w/Wipers” button on
the touchscreen and make your selection. Press the back
arrow button on the touchscreen to return to the previous
menu.
•Auto High Beams — If Equipped
When this feature is selected, the high beam headlights
will activate/deactivate automatically under certain con-
ditions. To make your selection, press the “Auto High
Beams” button on the touchscreen and make your selec-
tion. Press the back arrow button on the touchscreen to
return to the previous menu. Refer to “Lights/Auto High
Beams — If Equipped” in “Understanding The Features
Of Your Vehicle” for further information.
•Daytime Running Lights — If Equipped
When this feature is selected, the headlights will turn on
whenever the engine is running. To make your selection,
328 UNDERSTANDING YOUR INSTRUMENT PANEL
Page 331 of 717
press the “Daytime Running Lights” button on the touch-
screen and make your selection. Press the back arrow
button on the touchscreen to return to the previous
menu.
•Flash Lights With Lock
When this feature is selected, the headlights will flash
when the doors are locked or unlocked with the Remote
Keyless Entry (RKE) transmitter. This feature may be
selected with or without the sound horn on lock feature
selected. To make your selection, press the “Flash Lights
w/Lock” button on the touchscreen and make your
selection. Press the back arrow button on the touchscreen
to return to the previous menu.
Doors & Locks
After pressing the “Doors & Locks” button on the touch-
screen the following settings will be available.
•Auto Door Locks
When this feature is selected, all doors will lock auto-
matically when the vehicle reaches a speed of 15 mph
(24 km/h). To make your selection, press the “Auto Door
Locks” button on the touchscreen and select from “On”
or “Off.” Press the back arrow button on the touchscreen
to return to the previous menu.
•Auto Unlock On Exit
When this feature is selected, all doors will unlock when
the vehicle is stopped and the transmission is in the
PARK or NEUTRAL position and the driver’s door is
opened. To make your selection, press the “Auto Unlock
On Exit” button on the touchscreen and select from “On”
or “Off.” Press the back arrow button on the touchscreen
to return to the previous menu.
4
UNDERSTANDING YOUR INSTRUMENT PANEL 329
Page 332 of 717
•Flash Lights w/Lock
When this feature is selected, the exterior lights will flash
when the doors are locked or unlocked with the Remote
Keyless Entry (RKE) transmitter or the Passive Entry
Feature. To make your selection, press the “Flash Lights
w/Lock” button on the touchscreen and select from “On”
or “Off.” Press the back arrow button on the touchscreen
to return to the previous menu.
•Horn w/Lock
When this feature is selected, the horn will sound when
the Key Fob Lock button is pressed. To make your
selection, press the “Sound Horn With Lock” button on
the touchscreen and select from “Off,” ”1st Press,” or
“2nd Press.” Press the back arrow button on the touch-
screen to return to the previous menu.
•Horn w/Remote Start — If Equipped
When this feature is selected, the horn will sound when
the remote start is activated. To make your selection,
press the “Horn w/Remote Start” button on the touch-
screen and select from “On” or “Off.” Press the back
arrow button on the touchscreen to return to the previous
menu.
•Remote Door Unlock
When “Remote Door Unlock” is selected, you may
choose from “Driver” or “All.” Select “All” to have all
doors unlock with the first push of the Key Fob. Select
“Driver” to have the only the driver door open with the
first push of the key fob.
330 UNDERSTANDING YOUR INSTRUMENT PANEL
Page 333 of 717
NOTE:Passive Entry — If Equipped. If “All” is selected,
all doors will unlock no matter which Passive Entry door
handle is grasped. If “Driver” is selected, only the
driver ’s door will unlock when the driver ’s door is
grasped.
•Passive Entry
This feature allows you to lock and unlock the vehicle’s
door(s) without having to press the Remote Keyless
Entry (RKE) transmitter lock or unlock buttons. To make
your selection, press the “Passive Entry” button on the
touchscreen and select from “On” or “Off. Press the back
arrow button on the touchscreen to return to the previous
menu. Refer to “Keyless Enter-N-Go™” in “Things To
Know Before Starting Your Vehicle” for further informa-
tion.
•Memory Linked to Fob — If Equipped
This feature provides automatic driver seat positioning to
enhance driver mobility when entering and exiting the
vehicle. To make your selection, press the “Memory
Linked to Fob” button on the touchscreen and select from
“On” or “Off.” Press the back arrow button on the
touchscreen to return to the previous menu.
NOTE:The seat will return to the memorized seat
location if “Memory Linked to Fob” is set to (ON) when
the Remote Keyless Entry (RKE) transmitter is used to
unlock the door. Refer to “Driver Memory Seat” in
“Understanding The Features Of Your Vehicle” for fur-
ther information.
•Power Lift Gate Alert — If Equipped
This feature plays an alert when the power lift gate is
raising or lowering. To make your selection, press the
“Power Lift Gate Alert” button on the touchscreen and
select from “On” or “Off.” Press the back arrow button on
the touchscreen to return to the previous menu.
4
UNDERSTANDING YOUR INSTRUMENT PANEL 331
Page 341 of 717

Customer Programmable Features —
Uconnect® 8.4 Personal Settings
Press the “Apps” or the “Controls” button on the touch-
screen, then press the “Settings” button on the touch-
screen to display the menu setting screen. In this mode
the Uconnect® system allows you to access program-
mable features that may be equipped such as Display,
Voice, Clock, Safety & Driving Assistance, Lights, Doors
& Locks, Auto-On Comfort, Engine Off Options, Suspen-
sion, Audio, Phone/Bluetooth®, SiriusXM Setup, Restore
Settings, Clear Personal Data, and System Information.
NOTE:Only one category may be selected at a time.
To adjust the setting of a programmable feature, press the
desired setting option. Once in the desired setting option,
press and release the preferred setting until a check-mark
appears next to the setting, showing that the setting has
been selected.
Once the setting is complete, press the Back Arrow
button on the touchscreen to return to the previous menu
or press the X button on the touchscreen to close out of
the settings screen. Pressing the Up or Down Arrow
button on the right side of the screen will allow you to
toggle up or down through the list of available settings.
Display
After pressing the “Display” button on the touchscreen
the following settings will be available.
•Display Mode
When in this display you may select one of the auto
display settings. To change Mode status, select from
“Day,” “Night” or “Auto” until a check-mark appears
next to the setting, showing that setting has been se-
lected. Then press the arrow back button on the touch-
screen.
4
UNDERSTANDING YOUR INSTRUMENT PANEL 339
Page 350 of 717

had been selected. Press the back arrow button on the
touchscreen to return to the previous menu.
•Hill Start Assist — If Equipped
When this feature is selected, the Hill Start Assist (HSA)
system is active. Refer to “Electronic Brake Control
System” in “Starting And Operating” for system function
and operating information. To make your selection, press
the “Hill Start Assist” button on the touchscreen, until a
check-mark appears next to setting, indicating that the
setting had been selected. Press the back arrow button on
the touchscreen to return to the previous menu.
Lights
After pressing the Lights button on the touchscreen the
following settings will be available.
•Headlight Off Delay
When this feature is selected, it allows adjustment of the
amount of time the headlights remain on after the engine
is shut off. To change the Headlights Off Delay setting,
press the “+” or “-” button on the touchscreen to select
your desired time interval, and choose either 0 sec, 30 sec,
60 sec or 90 seconds. Press the back arrow button on the
touchscreen to return to the previous menu, or push the
back button on the faceplate.
•Headlight Illumination On Approach
When this feature is selected, the headlights will activate
and remain on for 0, 30, 60, or 90 seconds when the doors
are unlocked with the Remote Keyless Entry (RKE)
transmitter. To change the Illuminated Approach status,
press the “+” or “–” button on the touchscreen to select
your desired time interval. Press the back arrow button
on the touchscreen to return to the previous menu, or
push the back button on the faceplate.
348 UNDERSTANDING YOUR INSTRUMENT PANEL