Page 209 of 717
WARNING!
When the ACC system is resumed, the driver must
ensure that there are no pedestrians, vehicles or
objects in the path of the vehicle. Failure to follow
these warnings can result in a collision and death or
serious personal injury.
Adaptive Cruise Control (ACC) Menu
The DID displays the current ACC system settings. The
DID is located in the center of the instrument cluster. The
information it displays depends on ACC system status.
Press the ADAPTIVE CRUISE CONTROL (ACC) ON/
OFF button (located on the steering wheel) until one of
the following displays in the DID:
Adaptive Cruise Control Off
When ACC is deactivated, the display will read “Adap-
tive Cruise Control Off.”
Adaptive Cruise Control Ready
When ACC is activated but the vehicle speed setting has
not been selected, the display will read “Adaptive Cruise
Control Ready.”
Press the SET + or the SET- button (located on the
steering wheel) and the following will display in the DID:
ACC SET
When ACC is set, the set speed will display in the
instrument cluster.
The ACC screen may display once again if any ACC
activity occurs, which may include any of the following:
•Distance Setting Change
•System Cancel
•Driver Override
•System Off
3
UNDERSTANDING THE FEATURES OF YOUR VEHICLE 207
Page 245 of 717

PARKVIEW® REAR BACK UP CAMERA — IF
EQUIPPED
Your vehicle may be equipped with the ParkView® Rear
Back Up Camera that allows you to see an on-screen
image of the rear surroundings of your vehicle whenever
the shift lever/gear selector is put into REVERSE. The
image will be displayed on the Navigation/Multimedia
radio display screen along with a caution note to “check
entire surroundings” across the top of the screen. After
five seconds this note will disappear. The ParkView®
camera is located on the rear of the vehicle above the rear
License plate.
When the vehicle is shifted out of REVERSE (with camera
delay turned OFF), the rear camera mode is exited and
the navigation or audio screen appears again.
When the vehicle is shifted out of REVERSE (with camera
delay turned ON), the rear view image with dynamic
grid lines will be displayed for up to 10 seconds after
shifting out of#REVERSE#unless the forward vehicle
speed exceeds 8 mph (13 km/h), the transmission is
shifted into#PARK#or the ignition is switched to the OFF
position.
NOTE:The ParkView® Rear Back Up Camera has pro-
grammable modes of operation that may be selected
through the Uconnect® System. Refer to “Uconnect®
Settings” in “Understanding Your Instrument Panel” for
further information.
When enabled, active guide lines are overlaid on the
image to illustrate the width of the vehicle and its
projected backup path based on the steering wheel
position. The active guide lines will show separate zones
that will help indicate the distance to the rear of the
vehicle while a dashed center-line will indicate the center
3
UNDERSTANDING THE FEATURES OF YOUR VEHICLE 243
Page 290 of 717
!Uconnect® RADIOS — IF EQUIPPED........359
!iPod®/USB/MP3 CONTROL — IF EQUIPPED . . .359
!Uconnect® REAR SEAT ENTERTAINMENT
SYSTEM — IF EQUIPPED.................360
▫Getting Started.......................360
▫Dual Video Screen.....................362
▫Blu-ray™ Disc Player...................362
▫Play Video Games.....................365
▫Play A DVD/Blu-ray™ Disc Using The
Touchscreen Radio.....................366
▫Important Notes For Dual Video Screen
System.............................368
▫Blu-ray™ Disc Player Remote Control — If
Equipped...........................369
▫Replacing The Remote Control Batteries......370
▫Headphones Operation.................371
▫Controls............................372
▫Replacing The Headphone Batteries.........373
▫Unwired® Stereo Headphone Lifetime Limited
Warranty...........................373
!STEERING WHEEL AUDIO CONTROLS — IF
EQUIPPED...........................381
▫Radio Operation......................381
▫CD Player...........................382
!CD/DVD/Blu-ray™ Disc MAINTENANCE . . . .382
!RADIO OPERATION AND MOBILE PHONES . .383
▫Regulatory And Safety Information.........383
288 UNDERSTANDING YOUR INSTRUMENT PANEL
Page 304 of 717
The DID Menu items consists of the following:
•Digital Speedometer
•Vehicle Info
•Terrain — If Equipped
•SRT Performance— If Equipped
•Driver Assist
•Fuel Economy
•Trip
•Stop/Start — If Equipped
•Audio
•Stored Messages
•Screen Setup
•Speed Warning — If Equipped
The system allows the driver to select information by
pushing the following buttons mounted on the steering
wheel:
DID Buttons
302 UNDERSTANDING YOUR INSTRUMENT PANEL
Page 334 of 717
Auto Comfort Systems — If Equipped
After pressing the “Auto-On Comfort & Remote Start”
button on the touchscreen the following settings will be
available:
•Auto-On Driver Heated/Ventilated Seat & Steering
Wheel With Vehicle Start — If Equipped
When this feature is selected the driver’s heated seat and
heated steering wheel will automatically turn ON when
temperatures are below 40° F (4.4° C). When tempera-
tures are above 80° F (26.7° C) the driver vented seat will
turn ON. To make your selection, press the “Auto Heated
Seats” button on the touchscreen, then select either “Off,”
“Remote Start” or “All Starts.” Press the back arrow
button on the touchscreen to return to the previous
menu.
Engine Off Options
After pressing the “Engine Off Options” button on the
touchscreen the following settings will be available.
•Easy Exit Seats — If Equipped
When this feature is selected, the Driver ’s seat will
automatically move rearward once the engine is shut off.
To make your selection, press the “Easy Exit Seats”
button on the touchscreen and make your selection. Press
the back arrow button on the touchscreen to return to the
previous menu.
•Headlight Off Delay
When this feature is selected, the driver can choose to
have the headlights remain on for 0, 30, 60, or 90 seconds
when exiting the vehicle. Press the “Headlight Off Delay”
button on the touchscreen and choose from “0,” “30,”
332 UNDERSTANDING YOUR INSTRUMENT PANEL
Page 355 of 717
NOTE:The seat will return to the memorized seat
location (if Recall Memory with Remote Key Unlock is set
to ON) when the Remote Keyless Entry (RKE) transmitter
is used to unlock the door. Refer to “Driver Memory
Seat” in “Understanding The Features Of Your Vehicle”
for further information.
•Power Lift Gate Chime — If Equipped
This feature plays an alert when the power lift gate is
raising or lowering. To make your selection, press the
“Power Lift Gate Chime” button on the touchscreen, until
a check-mark appears next to setting, showing that
setting has been selected. Press the back arrow button on
the touchscreen to return to the previous menu, or push
the back button on the faceplate.
Auto-On Comfort — If Equipped
After pressing the “Auto-On Comfort” button on the
touchscreen the following settings will be available:
•Auto-On Driver Heated/Ventilated Seat & Steering
Wheel With Vehicle Start — If Equipped
When this feature is selected the driver’s heated seat will
automatically turn on when temperatures are below 40° F
(4.4° C). When temperatures are above 80° F (26.7° C) the
driver vented seat will turn on. To make your selection,
press the “Auto-On Driver Heated/Ventilated Seat &
Steering Wheel With Vehicle Start” button on the touch-
screen, then select either “Off,” “Remote Start” or “All
Starts” until a check-mark appears next to setting, show-
ing that setting has been selected. Press the back arrow/
Done button on the touchscreen to return to the previous
menu.
4
UNDERSTANDING YOUR INSTRUMENT PANEL 353
Page 383 of 717
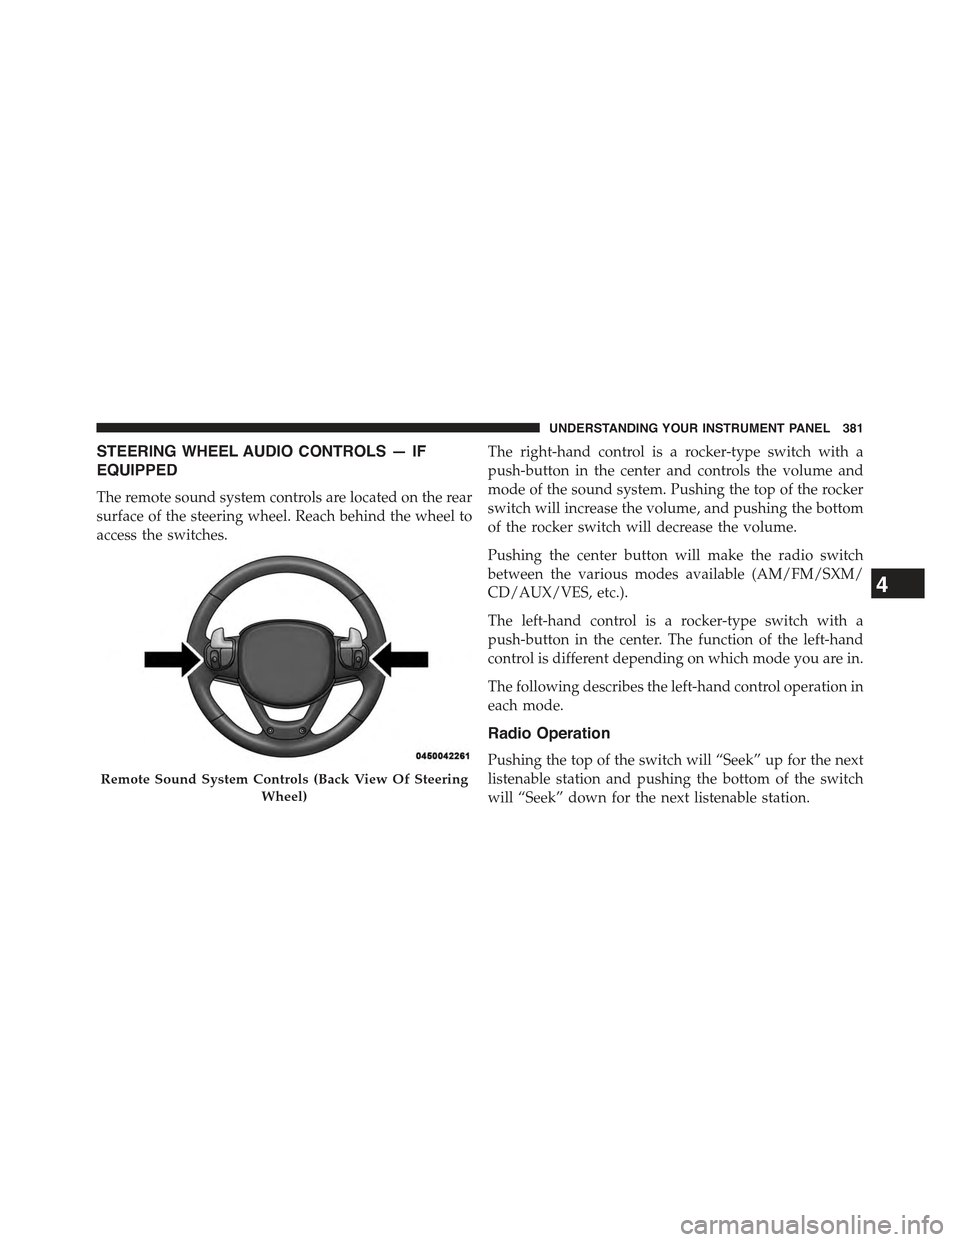
STEERING WHEEL AUDIO CONTROLS — IF
EQUIPPED
The remote sound system controls are located on the rear
surface of the steering wheel. Reach behind the wheel to
access the switches.
The right-hand control is a rocker-type switch with a
push-button in the center and controls the volume and
mode of the sound system. Pushing the top of the rocker
switch will increase the volume, and pushing the bottom
of the rocker switch will decrease the volume.
Pushing the center button will make the radio switch
between the various modes available (AM/FM/SXM/
CD/AUX/VES, etc.).
The left-hand control is a rocker-type switch with a
push-button in the center. The function of the left-hand
control is different depending on which mode you are in.
The following describes the left-hand control operation in
each mode.
Radio Operation
Pushing the top of the switch will “Seek” up for the next
listenable station and pushing the bottom of the switch
will “Seek” down for the next listenable station.
Remote Sound System Controls (Back View Of Steering
Wheel)
4
UNDERSTANDING YOUR INSTRUMENT PANEL 381
Page 400 of 717
If you see theicon on your touchscreen, you have
the Uconnect® 8.4AN system. If not, you have a
Uconnect® 8.4A system.
Get Started
All you need to control your Uconnect® system with
your voice are the buttons on your steering wheel.
1. VisitUconnectPhone.com to check mobile device
and feature compatibility and to find phone pair-
ing instructions.
2. Reduce background noise. Wind and passenger con-
versations are examples of noise that may impact
recognition.
3. Speak clearly at a normal pace and volume while
facing straight ahead. The microphone is positioned
on the rearview mirror and aimed at the driver.
4. Each time you give a Voice Command, you must first
push either the VR or Phone button, wait untilafter
the beep, then say your Voice Command.
5. You can interrupt the help message or system prompts
by pushing the VR or Phone button and saying a Voice
Command from current category.
398 UNDERSTANDING YOUR INSTRUMENT PANEL