Page 9 of 16

DRIVING AIDSDRIVING AIDS
9
Parking aids See page 2, item 14
When transmission R is selected, Parking aids at the rear
and front of the vehicle will activate.
1.
The
Touch screen will display a vehicle graphic and
indicate the appro
ximate distance to any object
detected.
Note: Sensors may activate when water, snow, or ice are
detected on their surfaces. Make sure that the sensors
are cleaned regularly.
An audible alert will increase in frequency as the object is
approached.
When moving forwards into a space, activate the front
sensors with the Parking aid switch in the facia panel.
The audible alert volume can be adjusted via the Touch
screen. Select the Home menu, then Setup followed by
System. Now select Volume presets. Use the + or - soft
keys, alongside Parking aid, to adjust the volume. Rear camera
Activates when transmission R is selected. The Touch
screen will display guidance lines to aid reversing.
The Rear camera view has priority over the Parking aid
view. To display the Parking aid view instead, touch the
screen.
1.
Brok
en line - full width of the vehicle.
2.
Solid line - projected re
versing path based on the
current steer
ing wheel position.
3.
P
arking sensor activation - shaded area indicates
which rear sensors are activ
e.
4.
Access guideline - do not re
verse beyond this point if
tr
unk access is required.
Valet mode
The glove box, Luggage compartment, and the Touch
screen can be security locked to deny access to a
parking attendant. Before handing over your Smart key,
remove the emergency key blade and keep it in a safe
place.
Selecting Valet mode
1.
F
rom the Touch screen, select Home menu.
2.
No
w select Valet.
3.
Enter a 4 digit PIN (personally chosen) and touch
OK.
Y
ou will be requested to confirm the PIN number.
4.
V
alet mode activated will be displayed. Deselecting Valet mode
1.
Select the
Valet screen.
2.
Enter y
our 4 digit PIN and touch OK.
3.
V
alet mode deactivated is displayed and the glove
bo
x and Luggage compartment are now accessible,
and all
Touch screen features are available.
Insert the emergency key blade back into the Smart key.
DSC. The default condition, at engine start, is DSC on.
DSC is designed to control the vehicle’s stability. It can be
switched off, if required.
Press and hold the switch for more than 3 seconds. The
DSC warning lamp will illuminate and the Message center
will display DSC Off until DSC is reinstated.
To turn DSC on again, press the switch for 1 second and
release. The Message center will display DSC On.
TracDSC is an alternative setting that adjusts the DSC
settings for maximum traction in difficult conditions.
TracDSC enables a more involving and focused driving
experience on a dry hard surface.
Note: Normal stability control may be impaired.
To select TracDSC, press and hold the DSC switch for
less than 3 seconds. The DSC Off lamp will illuminate
and the Message center will briefly display TracDSC.
Press and hold again to return to DSC.
Note: Cruise control cannot be used while DSC or
TracDSC is selected.
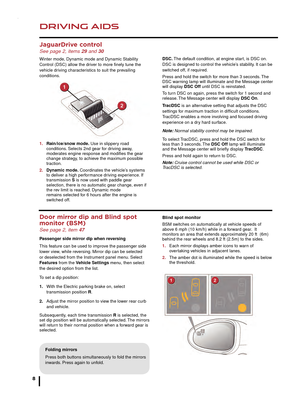
Blind spot monitor
BSM switches on automatically at vehicle speeds of
above 6 mph (10 km/h) while in a forward gear. It
monitors an area that extends approximately 20 ft (6m)
behind the rear wheels and 8.2 ft (2.5m) to the sides.
1. Each mirror displays amber icons to warn of
overtaking vehicles in adjacent lanes.
2. The amber dot is illuminated while the speed is below
the threshold.
Page 10 of 16

HEATING AND VENTILATION
10
AUDIO AND TOUCH SCREEN
Heating and ventilation See page 2, items 13, 20 and 32 to 38
1. Press to turn Climate control on.
2.
Settings
menu.
3.
Climate control on/off
.
4.
Air to the windshield.
5
.
Air distr
ibution. More than one setting can be
selected at the same time
. Depending on the setting,
the deplo
yable center vents may open or close.
Note: The center vents will always close automatically
when the Climate control or ignition is switched off.
6.
Synchroniz
es the left and right settings.
7.
T
emperature controls.
8.
Press to tur
n the seat heating on/off. Rotate to adjust
the temper
ature.
9.
A
UTO. This is the recommended operating mode.
A
utomatically adjusts the air conditioning, blower
speed, air intak
e and airflow distribution to maintain
the selected temper
ature(s). The deployable center
v
ents will open and close as required. Fogging will be
reduced.
Seat heating
Seat heating will operate only while the engine is
running. This is to prevent the battery becoming
discharged.
External water deposits
The system removes moisture from the air and
deposits the excess water beneath the vehicle. This is
normal and is no cause for concern.
Radio
On the Touch screen Home Menu, touch the Audio/
Video option. The last used audio source controls will be
displayed. Select Radio.
1. Touch to view and select wavebands.
2. Move up or down to the next or previous station.
3. View information broadcast by the radio station.
4. Settings menu. Select from RDS, Traffic, News, AF
and REG.
5. Station list (FM only). Select to view a list of available
stations. The list can be sorted by Frequency, Name
or Category, by selecting the appropriate soft key.
Touch to select the chosen station.
6. Frequency input. Enter a station frequency. When
the final digit is entered, the station will be tuned.
7. Preset soft keys. Can store 6 stations for each
waveband. Touch and hold a soft key to store the
current radio station.
Audio controls See page 2, items 18, 23 and 42
1. On/off and volume control.
2. Touch screen.
3. Press for the Audio/Video menu.
4. MODE. Short press to scroll through the audio/video
sources. While a source is displayed, long press to
scroll through sub selections.
5. Press to increase the volume.
10. Air conditioning on/off .
11.
Recirculation.
Helps to prevent fumes from entering
the v
ehicle. Prolonged use may cause the windows to
fog.
12.
Blo
wer speed. Rotate to adjust. Press to switch off the
Climate control.
13.
MAX.
Fastest method to remove frost or heavy
f
ogging from the windshield.
14.
F. Heated windshield.
15.
R.
Heated rear screen.
Page 11 of 16

HEATING AND VENTILATIONAUDIO AND TOUCH SCREEN
Seat heating
Seat heating will operate only while the engine is
running. This is to prevent the battery becoming
discharged.
External water deposits
The system removes moisture from the air and
deposits the excess water beneath the vehicle. This is
normal and is no cause for concern.
Radio
On the Touch screen Home Menu, touch the Audio/
Video option. The last used audio source controls will be
displayed. Select Radio.
1.
T
ouch to view and select wavebands.
2.
Mo
ve up or down to the next or previous station.
3.
Vie
w information broadcast by the radio station.
4.
Settings
menu. Select from RDS, Traffic, News, AF
and REG.
5.
Station list
(FM only). Select to view a list of available
stations
. The list can be sorted by Frequency, Name
or Category, by selecting the appropriate soft key.
T
ouch to select the chosen station.
6.
Frequenc
y input. Enter a station frequency. When
the final digit is entered, the station will be tuned.
7
.
Preset soft k
eys. Can store 6 stations for each
w
aveband. Touch and hold a soft key to store the
current r
adio station.
Audio controls See page 2, items 18, 23 and 42
1. On/off and v olume control.
2.
T
ouch screen.
3.
Press f
or the Audio/Video menu.
4.
MODE
. Short press to scroll through the audio/video
sources
. While a source is displayed, long press to
scroll through sub selections
.
5.
Press to increase the v
olume.6. Press to decrease the v olume.
7.
Seek up
. Short press to select the next preset or
tr
ack. Long press to select the next radio station or TV
channel.
8.
Seek do
wn. Short press to select the previous preset
or tr
ack. Long press to select the previous radio
station or
TV channel.10. Air conditioning on/off.
11. Recirculation. Helps to prevent fumes from entering
the vehicle. Prolonged use may cause the windows to
fog.
12. Blower speed. Rotate to adjust. Press to switch off the
Climate control.
13. MAX. Fastest method to remove frost or heavy
fogging from the windshield.
14. F. Heated windshield.
15. R. Heated rear screen.
11
Touch screen damage
The Touch screen requires only light touches.
Excess pressure could result in damage.
Page 12 of 16

AUDIO AND TOUCH SCREEN
12
AUDIO AND TOUCH SCREEN
CD player and portable media
The CD/DVD loading slot and the connecting ports for
portable media devices, are located inside the center
console cubby box.
1. CD/DVD loading slot.
2. CD/DVD eject button.
3. 3.5 mm AUX socket.
4. USB socket.
Satellite radio subscription service
Use channel 184 to preview satellite radio. When the
preview time expires, you will need to subscribe to
SIRIUS to enable further satellite reception.
1.
T
ouch to select the satellite bands. Touch the + icon to
mo
ve through SAT 1, 2 and 3.
2.
Use the seek arro
ws to move up or down to the next
or pre
vious channel.
3.
Channel inf
ormation. Select if there is more
inf
ormation than can fit in the display area.
4.
Channel presets
. Each S AT band has 6 preset soft
k
eys. Touch and hold a soft key to store the current
channel.
A brief touch will access the stored channel. 5.
Select to mak e personal settings in Options,
Channel skip and Parental lock areas.
6.
Vie
w a list of available categories.
7.
Select to access the touch pad.
Enter any 3 digit
channel n
umber then select OK.
8.
T
ouch to view a list of channel categories. Select one
to displa
y full details of that channel and the current
track.
9.
Store the currently pla
ying track to the song memory.
If the audio system subsequently finds a stored tr
ack
pla
ying on a subscribed channel, notification will be
given.
Note: Use the seek buttons on the steering wheel to find
preset channels.
Activating satellite radio
1.
Call SIRIUS on the displa
yed telephone number.
2.
Pro
vide them with the ID number, also displayed on
the T
ouch screen.
You will also need a credit card for payment. Make
sure you are parked with a clear view of the sky while
activation takes place. Activation can take up to 15
minutes.
Portable media
From the Audio/Video menu, select My music to display
the audio choice menu.
1.
T
ouch the Source icon to display all portable media
options
. Select an option.
2.
Settings
menu. Select to switch traffic and news
announcements on or off
.
3.
Depending on the selected mode
, this soft key will
be either
Track list or Browse. In Stored CD mode,
both soft k
eys will be displayed. Select Track list to
vie
w the current CD or Stored CD track list. Select a
tr
ack to start playback. Select Browse to view the
contents of the selected de
vice (iPod, USB and
Stored CD modes only). 4
. Upload is applicable to the Stored CD menu only. To
store a CD , select Upload alongside an empty slot.
There are 10 slots a
vailable.
5.
T
ouch and release to skip up or down to the next or
pre
vious track. Touch and hold to scan forwards or
bac
kwards, through the current track.
6.
Repeat
. Touch and release to repeat the current track
contin
uously. Touch and release again to repeat the
current stored CD
, current MP3 folder or the current
USB f
older. Touch and release a third time to cancel
Repeat mode
.
7.
P
ause/Play. Select to pause playback. Select again to
resume pla
yback.
8.
Vie
w information about the current track.
9.
Shuffle
. Touch and release once to play random
tr
acks from the current CD, MP3 folder, USB folder or
iP
od playlist. Touch and release again to play random
tr
acks from CD, MP3 disc, USB folders, or tracks on
the media de
vice, or tracks loaded onto the stored CD
store
. Touch and release a third time to cancel
Shuffle mode
.
Note: Repeat and Shuffle modes are not available for
Bluetooth® wireless technology devices.
Note: When connecting a Bluetooth wireless technology
device, use the Touch screen to operate and search the
device. Many of the controls are similar to CD operation.
Page 13 of 16

AUDIO AND TOUCH SCREENAUDIO AND TOUCH SCREEN
13
CD player and portable media
The CD/DVD loading slot and the connecting ports for
portable media devices, are located inside the center
console cubby box.
1.
CD/D
VD loading slot.
2.
CD/D
VD eject button.
3.
3.5 mm A
UX socket.
4.
USB soc
ket. The CD/DVD player will accommodate one CD or DVD
disc at a time, but with Stored CD, up to 10 CDs can be
loaded onto the virtual CD store. Use My music/Upload
to load discs. While a disc is loading, a % count up is
displayed on the soft key. If the hard drive is full, select
Replace to overwrite an existing CD.
The 3.5mm AUX socket allows extra equipment, e.g.,
a personal stereo, MP3 player, hand-held navigation
unit, etc., to be connected to the audio system. Devices
connected to the AUX socket are controlled only from the
device itself.
When connecting to the USB socket, use the cable
supplied with your media device. iPod and USB devices
can be operated from the Touch screen.
The system will play MP3, WMA, WAV and AAC files from
a memory stick, a USB controlled MP3 player or a cell
phone.
Some MP3 players use proprietary file systems that are
not supported by the vehicle’s system. MP3 players must
be set to Removable Device or Mass Storage Device
mode (see the manufacturer’s information). Only music
files added to the device while in this mode can be played
via the vehicle’s system.5.
Select to make personal settings in Options,
Channel skip and Parental lock areas.
6. View a list of available categories.
7. Select to access the touch pad. Enter any 3 digit
channel number then select OK.
8. Touch to view a list of channel categories. Select one
to display full details of that channel and the current
track.
9. Store the currently playing track to the song memory.
If the audio system subsequently finds a stored track
playing on a subscribed channel, notification will be
given.
Note: Use the seek buttons on the steering wheel to find
preset channels.
Activating satellite radio
1. Call SIRIUS on the displayed telephone number.
2. Provide them with the ID number, also displayed on
the Touch screen.
You will also need a credit card for payment. Make
sure you are parked with a clear view of the sky while
activation takes place. Activation can take up to 15
minutes.
4. Upload is applicable to the Stored CD menu only. To
store a CD, select Upload alongside an empty slot.
There are 10 slots available.
5. Touch and release to skip up or down to the next or
previous track. Touch and hold to scan forwards or
backwards, through the current track.
6. Repeat. Touch and release to repeat the current track
continuously. Touch and release again to repeat the
current stored CD, current MP3 folder or the current
USB folder. Touch and release a third time to cancel
Repeat mode.
7. Pause/Play. Select to pause playback. Select again to
resume playback.
8. View information about the current track.
9. Shuffle. Touch and release once to play random
tracks from the current CD, MP3 folder, USB folder or
iPod playlist. Touch and release again to play random
tracks from CD, MP3 disc, USB folders, or tracks on
the media device, or tracks loaded onto the stored CD
store. Touch and release a third time to cancel
Shuffle mode.
Note: Repeat and Shuffle modes are not available for
Bluetooth® wireless technology devices.
Note: When connecting a Bluetooth wireless technology
device, use the Touch screen to operate and search the
device. Many of the controls are similar to CD operation.
Page 14 of 16

NAVIGATION
14
TELEPHONE
Touch screen navigation
Note: To access navigation, press either the N AV hard
key or touch the Nav icon on the Home menu.
1.
Use to enter a ne
w destination. Provides a choice of
options when enter
ing a destination.
2.
Displa
ys previous destinations entered. Previous
destinations can be selected as a ne
w destination.
3.
T
urns the POI (Point Of Interest) icons on the map
on/off.
4.
When a destination is set, the J
aguar logo in this
position is replaced b
y a soft key which enables the
last v
oice instruction to be repeated.
5.
The soft k
ey is highlighted while Voice guidance is
enab
led. Touch to turn Voice guidance off.
6.
POI shor
tcuts: Touch an icon to list available POIs
that are close to the v
ehicle position.
7.
Use to calculate a detour from the current route
.
8.
Adv
ances to the main map screen.
9.
There are 2 na
vigation menu screens. Use the
More
... soft key to toggle between them. The second
map screen f
eatures the following soft keys:
Stored locations. Used to manage the stored data.
TMC (Traffic Message Channel). Provides data about
road conditions and any events on the route ahead that
may affect the current route.
Route options. Allows selection of various options for
the route.
Nav set-up. For setting personal preferences within the
Navigation system.
10.
Cancel current route guidance
.Selecting navigation
When navigation is selected after the ignition is turned
on, a caution screen is displayed. Touch Agree.
Note: At the first time of accessing the caution screen,
set the required language.
Setting a destination
Select Destination entry.
1.
Select
Address and enter address details using the
keypad.
2.
As each par
t of the address is refined, touch OK
or List to display all of the streets and towns that are
a
vailable for selection.
3.
If the house n
umber is not known, touch OK. The end
of the road is then used as the destination.
4
.
When the address entr
y fields are complete, press
OK
to move to the map screen.
Start guidance
The map screen will display the selected destination.
Touch GO to start route calculation. Touch Review route
if you want to take an alternative route.
Touch Go to start guidance.
Review route
There will be a choice of 3 routes or Change route. 3
routes will display 3 different route options on the map.
Select Route 1, 2 or 3 by touching the respective box
displayed on the right side of the map and then select
GO.
Bluetooth ® wireless technology
devices
See page 2, items 7, 17 and 43
Connection must be made with the ignition on or with the
engine running.
Use the following procedure in conjunction with your
phone manufacturer’s instructions.
Pairing and connecting using your phone
Note: The process of pairing and connecting a phone
to the vehicle will vary depending on the type of phone
used.
1. Switch the ignition on and make sure that the Touch
screen is active.
2. From the Home menu, select Phone.
3. If no phone is connected, select Search new,
otherwise select Change phone and then select
Search new.
4. Select the Device to vehicle option.
Note: The vehicle’s Bluetooth wireless technology
system is discoverable for only 3 minutes.
5. Using your phone, search for Bluetooth wireless
technology devices. On some phones, this is referred
to as a new paired device. See your phone’s operating
instructions for further information.
6. When the vehicle’s system is discovered, begin the
pairing process and follow the on-screen instructions.
7. When requested, enter a PIN of your choice into your
phone and the vehicle’s system. Select OK.
8. When your phone is paired and connected, a
confirmation message will be displayed.
Note: Some phones require the pairing to be set as
‘authorised’ or ‘trusted’ in order to automatically connect.
Please refer to your phone’s operating instructions for
further information.
Downloading phonebook entries
When a phone with phonebook download capability is
paired and connected, its phonebook directory can be
automatically downloaded to the vehicle’s system.
See PHONEBOOK in the Owner’s Handbook for more
information.
Bluetooth Connectivity
For the latest compatibility information, refer to the
Ownership section of the Jaguar website at www.
jaguar.com.
Country selection
On initial activation, make sure
that both the correct country
and search area have been
selected.
For more information, refer to
the Navigation section of the
Owner’s Handbook.
Page 15 of 16

NAVIGATIONTELEPHONE
15
Touch screen navigation
Telephone echo
If echo is experienced when using the phone, reduce
the audio system’s volume during the call.
Calls via the Touch screen
With a phone paired and connected, press the PHONE
button to the right of the Touch screen.
1.
Select
Digit Dial, Phonebook or Last 10. With
Digit
Dial selected, use the keypad to enter the number.
With
Phonebook selected, choose a number from
the do
wnloaded phonebook. Last 10 displays the
pre
vious 10 calls. Choose one to dial.
2.
T
o make the call, touch the connect icon .
The icon will change to a red connected call icon.
T
ouch again to end a call.
Phonebook
Last 10
Phone10:36
Digit Dial Settings
DeleteChange
phone
Name
01234567890_
Use
handsetPQRS
TUVWXYZ
1ABC
DEF
JKL MNO
GHI2
3
4 5
6
7 8
9
0 #
+
Selecting navigation
When navigation is selected after the ignition is turned
on, a caution screen is displayed. Touch Agree.
Note: At the first time of accessing the caution screen,
set the required language.
Setting a destination
Select Destination entry.
1.
Select Address and enter address details using the
keypad.
2. As each part of the address is refined, touch OK
or List to display all of the streets and towns that are
available for selection.
3. If the house number is not known, touch OK. The end
of the road is then used as the destination.
4. When the address entry fields are complete, press
OK to move to the map screen.
Start guidance
The map screen will display the selected destination.
Touch GO to start route calculation. Touch Review route
if you want to take an alternative route.
Touch Go to start guidance.
Review route
There will be a choice of 3 routes or Change route. 3
routes will display 3 different route options on the map.
Select Route 1, 2 or 3 by touching the respective box
displayed on the right side of the map and then select
GO.
Bluetooth ® wireless technology
devices
See page 2, items 7, 17 and 43
Connection must be made with the ignition on or with the
engine running.
Use the following procedure in conjunction with your
phone manufacturer’s instructions.
Pairing and connecting using your phone
Note: The process of pairing and connecting a phone
to the vehicle will vary depending on the type of phone
used.
1.
Switch the ignition on and mak
e sure that the Touch
screen is activ
e.
2.
F
rom the Home menu, select Phone.
3.
If no phone is connected, select
Search new,
otherwise select
Change phone and then select
Sear
ch new.
4.
Select the
Device to vehicle option.
Note: The vehicle’s Bluetooth wireless technology
system is discoverable for only 3 minutes.
5.
Using y
our phone, search for Bluetooth wireless
technology de
vices. On some phones, this is referred
to as a ne
w paired device. See your phone’s operating
instr
uctions for further information.
6.
When the v
ehicle’s system is discovered, begin the
pair
ing process and follow the on-screen instructions.
7.
When requested, enter a PIN of y
our choice into your
phone and the v
ehicle’s system. Select OK.
8.
When y
our phone is paired and connected, a
confir
mation message will be displayed.
Note: Some phones require the pairing to be set as
‘authorised’ or ‘trusted’ in order to automatically connect.
Please refer to your phone’s operating instructions for
further information.
Downloading phonebook entries
When a phone with phonebook download capability is
paired and connected, its phonebook directory can be
automatically downloaded to the vehicle’s system.
See PHONEBOOK in the Owner’s Handbook for more
information.
Bluetooth Connectivity
For the latest compatibility information, refer to the
Ownership section of the Jaguar website at www.
jaguar.com.
Calls via the steering wheel controls
1.
Press to ans
wer an incoming call. Press and
release to mak
e a call. Press and hold to display the
Phonebook.
2.
Press to mo
ve up a
displa
yed list. While
in a call, press to
increase the
volume.
3.
Press to mo
ve
do
wn a displayed
list.
While in a call,
press to decrease
the v
olume.
4.
Press to go to the
Last 10
list of dialed, received, or missed calls.
5.
Press to mo
ve through the Last 10 list. After the last
item, the list will e
xit.
Page 16 of 16
 from the re")
GAS STATION INFORMATION
16
Refueling
The vehicle must be in an unlocked condition before the
fuel filler flap can be opened. Press the fuel filler flap
firmly approximately 1.4 in (35mm) from the rear edge
and release. The correct fuel specification is shown on
the inside of the fuel filler flap.
Twist the cap counter-clockwise to release.
Use premium unleaded fuel with a minimum octane rating
of 91 AKI to achieve optimum performance, fuel economy,
and driveability.
A hook is provided on the flap hinge to hold the cap while
refueling. Replace the cap and turn it clockwise until it
clicks 3 times.Hood release
The hood release is located in the left side footwell.
Tire pressure label location
Tire pressures are shown on a label located in the
driver’s door opening.
Note: Tire pressures must be checked and adjusted
while the tires are cold.
Part No. JJM 18 96 35 151 © Jaguar Land Rover Limited.
If the vehicle can use E85 fuels (85% ethanol
content), it will be stated on a label on the back of
the fuel filler flap. When using E85 fuel, 1 in 4 tanks
of fuel must be non-E85 premium quality unleaded
fuel.
Note: Do not use E85 fuel in ambient temperatures
lower than 14° F (-10° C).
DO NOT use E85 fuels if it is not specified on a
label on the back of the fuel filler flap. Equipment
necessary for the use of fuels containing more than
15% ethanol is not fitted to this vehicle. If E85 fuels
are used, serious engine and fuel system damage
will occur.
Avoid using fuel containing methanol. If it is
unavoidable, do not use a fuel with more than
10% methanol content. The fuel must contain
co-solvents and corrosion inhibitors. Fuel system
damage and engine performance problems can
occur when methanol is used.
Unleaded fuels containing up to 15% MTBE can
be used.
Incorrect fueling
No responsibility is accepted for damage caused by
using incorrect fuels.
If the vehicle is filled with the wrong type of fuel:
• DO NOT start the engine!
• Call for qualified assistance!