Page 169 of 653
3-83
Convenient features of your vehicle
3
Turn signals and lane changesignals
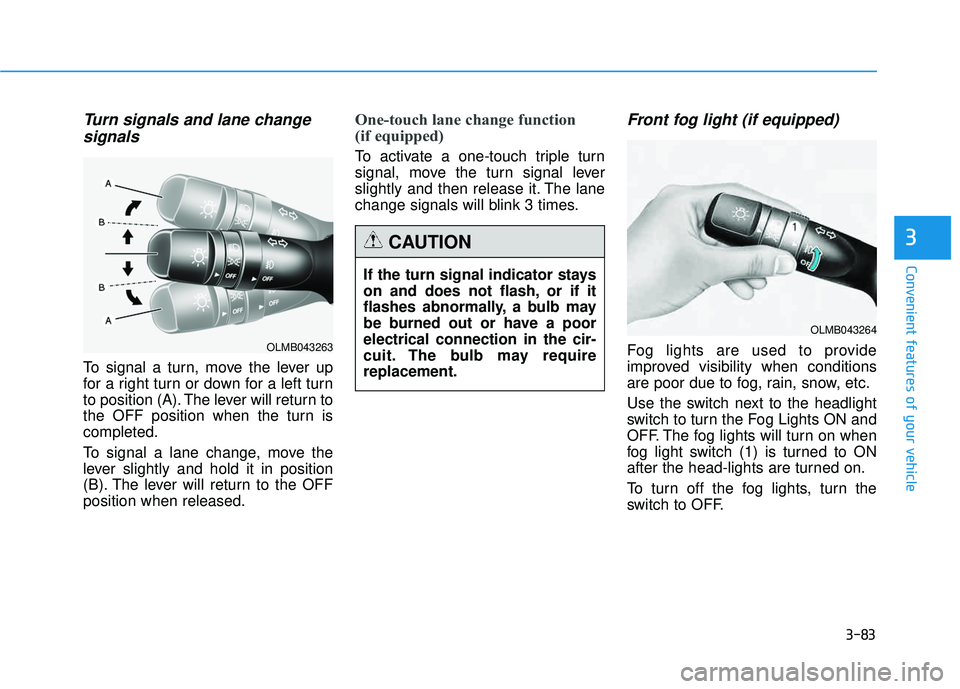
To signal a turn, move the lever up
for a right turn or down for a left turn
to position (A). The lever will return to
the OFF position when the turn iscompleted.
To signal a lane change, move the
lever slightly and hold it in position
(B). The lever will return to the OFFposition when released.
One-touch lane change function
(if equipped)
To activate a one-touch triple turn
signal, move the turn signal lever
slightly and then release it. The lane
change signals will blink 3 times.
Front fog light (if equipped)
Fog lights are used to provide
improved visibility when conditions
are poor due to fog, rain, snow, etc.
Use the switch next to the headlight
switch to turn the Fog Lights ON and
OFF. The fog lights will turn on when
fog light switch (1) is turned to ON
after the head-lights are turned on.
To turn off the fog lights, turn the
switch to OFF.
If the turn signal indicator stays
on and does not flash, or if it
flashes abnormally, a bulb may
be burned out or have a poorelectrical connection in the cir-
cuit. The bulb may requirereplacement.
CAUTION
OLMB043264
OLMB043263
Page 509 of 653
5-63
Driving your vehicle
5
Turn signals
When you tow a trailer, your vehicle
has to have a different turn signal
flasher and extra wiring. The green
arrows on your instrument panel will
flash whenever you signal a turn or
lane change. Properly connected,
the trailer lights will also flash to alert
other drivers you’re about to turn,
change lanes, or stop.
When towing a trailer, the green
arrows on your instrument panel will
flash for turns even if the bulbs on
the trailer are burned out. Thus, you
may think drivers behind you are
seeing your signals when, in fact,
they are not. It’s important to check
occasionally to be sure the trailer
bulbs are still working. You must also
check the lights every time you dis-connect and then reconnect the
wires.
Driving on hills
Reduce speed and shift to a lower
gear before you start down a long or
steep downgrade. If you don’t shift
down, you might have to use your
brakes so much that they would get
overheated and may not operate effi-
ciently.
On a long uphill grade, shift down
and reduce your speed to around 45mph (70 km/h) to reduce the possi-
bility of engine and transaxle over-heating.
If your trailer weighs more than the
maximum trailer weight without trail-
er brakes and you have an automat-
ic transaxle , you should drive in D
(Drive) when towing a trailer.
Operating your vehicle in D (Drive)
when towing a trailer will minimize
heat build-up and extend the life of
your transaxle .
Do not connect a trailer lighting
system directly to your vehi-
cle’s lighting system. Use an
approved trailer wiring harness.
Failure to do so could result in
damage to the vehicle electrical
system and/or personal injury.
Consult an authorized
HYUNDAI dealer for assistance.WARNING
Page 543 of 653
7
Snow tires .........................................................................7-60
Radial-ply tires ................................................................7-61
Low aspect ratio tires ....................................................7-61
FUSES ....................................................................7-63
Instrument panel fuse replacement ...........................7-64
Memory fuse (SHUNT connector) ..............................7-65
Engine compartment panel fuse replacement.........7-66
Fuse/Relay panel description ......................................7-68
LIGHT BULBS ........................................................7-74
Headlight, parking light, turn signal light,
side marker and front fog light bulb replacement ..7-74
Side repeater light replacement ..................................7-77
Rear combination light bulb replacement .................7-78
High mounted stop light ................................................7-80
License plate light bulb replacement .........................7-81
Interior light bulb replacement ....................................7-82
APPEARANCE CARE.............................................7-83
Exterior care ....................................................................7-83
Interior care......................................................................7-88
EMISSION CONTROL SYSTEM............................7-90
CALIFORNIA PERCHLORATE NOTICE ................7-94
Page 615 of 653
7-74
Maintenance
LLIIGG HH TT BB UU LLBB SS
Consult an authorized HYUNDAI
dealer to replace most vehicle light
bulbs. It is difficult to replace vehicle
light bulbs because other parts of the
vehicle must be removed before you
can get to the bulb. This is especially
true for removing the headlight
assembly to get to the bulb(s).
Removing/installing the headlight
assembly can result in damage to
the vehicle.
✽✽
NOTICE
After heavy driving, rain or wash-
ing, headlight and taillight lenses
could appear frosty. This condition
is caused by the temperature differ-
ence between the lamp inside and
the outside temperature. This is sim-
ilar to the condensation on your win-
dows inside your vehicle during the
rain and doesn’t indicate a problem
with your vehicle. If the water leaks
into the lamp bulb circuitry, have
your vehicle checked by an author-
ized HYUNDAI dealer.
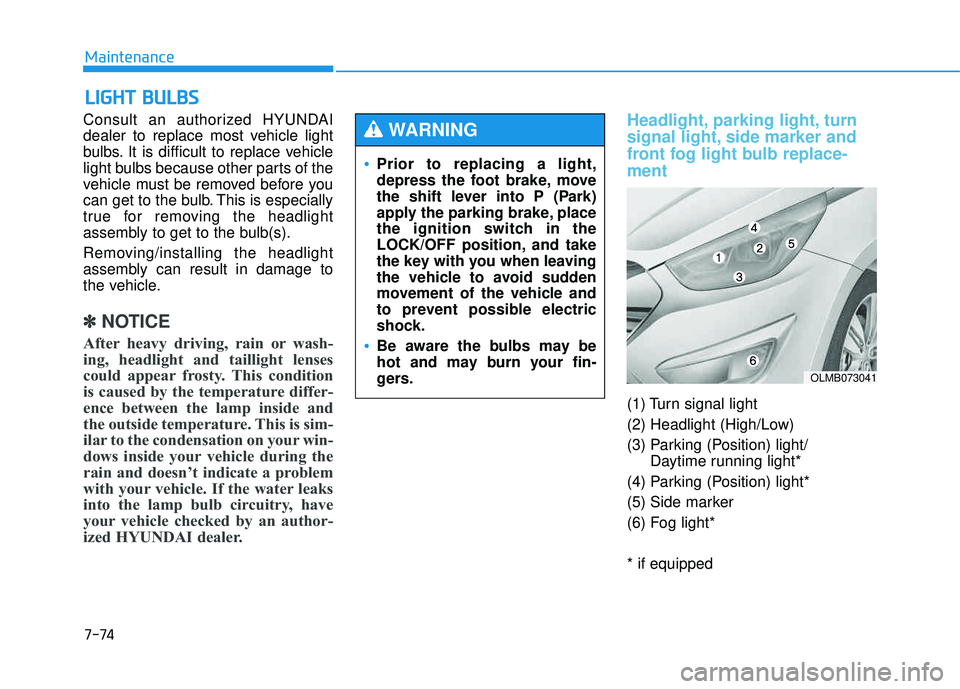
Headlight, parking light, turn
signal light, side marker and
front fog light bulb replace- ment
(1) Turn signal light
(2) Headlight (High/Low)
(3) Parking (Position) light/ Daytime running light*
(4) Parking (Position) light*
(5) Side marker
(6) Fog light* * if equipped
Prior to replacing a light,
depress the foot brake, move
the shift lever into P (Park)
apply the parking brake, place
the ignition switch in the
LOCK/OFF position, and take
the key with you when leaving
the vehicle to avoid sudden
movement of the vehicle and
to prevent possible electric
shock.
Be aware the bulbs may be
hot and may burn your fin-
gers.
WARNING
OLMB073041
Page 617 of 653
7-76
Maintenance
5. Remove the bulb by pulling it out.
6. Insert a new bulb into the socket.
7. Install the socket in the assemblyby aligning the tabs on the socket
with the slots in the assembly.
Push the socket into the assembly
and turn the socket clockwise.
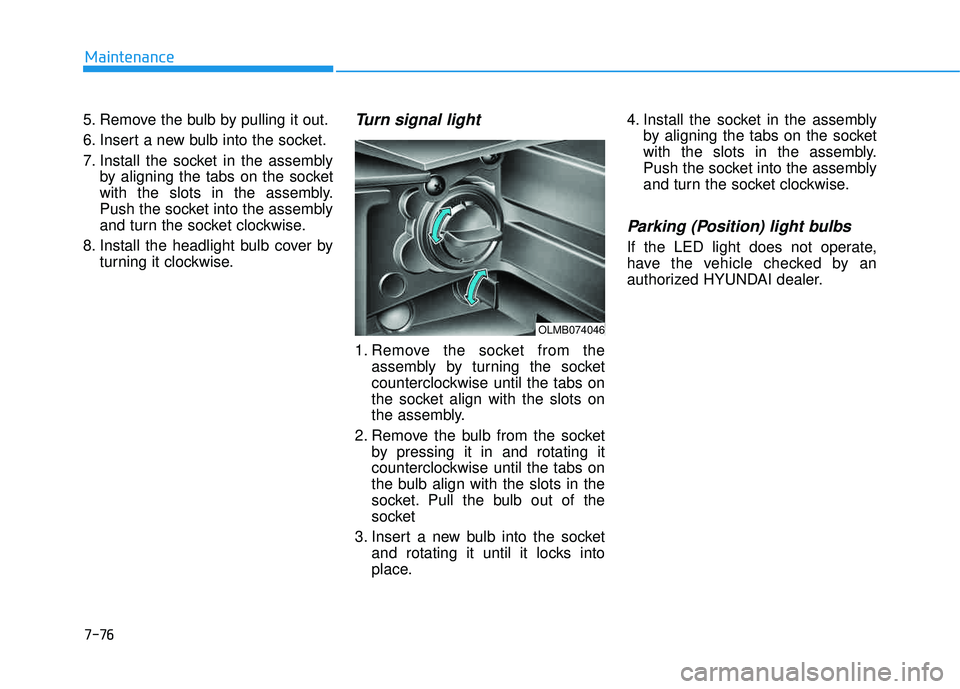
8. Install the headlight bulb cover by turning it clockwise.Turn signal light
1. Remove the socket from theassembly by turning the socket
counterclockwise until the tabs on
the socket align with the slots on
the assembly.
2. Remove the bulb from the socket by pressing it in and rotating it
counterclockwise until the tabs on
the bulb align with the slots in the
socket. Pull the bulb out of the
socket
3. Insert a new bulb into the socket and rotating it until it locks into
place. 4. Install the socket in the assembly
by aligning the tabs on the socket
with the slots in the assembly.
Push the socket into the assembly
and turn the socket clockwise.
Parking (Position) light bulbs
If the LED light does not operate,
have the vehicle checked by an
authorized HYUNDAI dealer.
OLMB074046
Page 619 of 653
7-78
Maintenance
Rear combination light bulb replacement
(1) Stop/tail light
(2) Turn signal light
(3) Back-up light
(4) Side marker
Outside light
Turn signal light and stop/tail light
1. Open the tailgate.
2. Loosen the lamp assembly retain-ing screws with a cross-tip screw-
driver. 3. Remove the rear combination
lamp assembly from the body of
the vehicle.
OLMB073047
OLMB073048
OLMB073049
Page 620 of 653
7-79
7
Maintenance
4. Remove the socket from theassembly by turning the socket
counterclockwise until the tabs on
the socket align with the slots on
the assembly.
5. Remove the bulb from the socket by pressing it in and rotating it
counterclockwise until the tabs on
the bulb align with the slots in the
socket. Pull the bulb out of the
socket.
6. Insert a new bulb into the socket and rotating it until it locks into
place. 7. Install the socket in the assembly
by aligning the tabs on the socket
with the slots in the assembly.
Push the socket into the assembly
and turn the socket clockwise.
8. Reinstall the lamp assembly to the body of the vehicle.
Inside light
Tail light and Back-up light
1. Open the tailgate.
2. Remove the service cover using aflat-blade screwdriver.
OLMB073050
Turn signal light
Stop/tail light
OLMB073051
Page 637 of 653
DDIIMM EENN SSIIOO NNSS
8-2
Specifications, Consumer information and Reporting safety defects
*1
: with roof rack
BB UU LLBB WW AATTTTAA GG EE
Item in (mm)
Overall length 173.6 (4410) Overall width 71.7 (1820)
Overall height 65.2 (1655)
66.3 (1685)*
1
Front tread 62.4 (1585) Rear tread 62.4 (1586)
Wheelbase 103.9 (2640)
Light Bulb Wattage (W)
Front Headlights (High/Low) 55/55
Front turn signal lights 28/8
Parking (Position) lights LED
Daytime running light* LED
Side repeater lights 5
Front side marker lights 5, LED
Front fog lights 27
Rear Stop and tail lights 28/8, LED
Rear turn signal lights 27
Back-up lights 16
Rear side marker lights 5, LED
High mounted stop light LED
License plate lights 5
Interior Map lamps 10
Room lamps 10
Luggage lamp 5
Glove box lamp 5
Vanity mirror lamps 5
* If equipped