Page 140 of 653
3-54
Convenient features of your vehicle
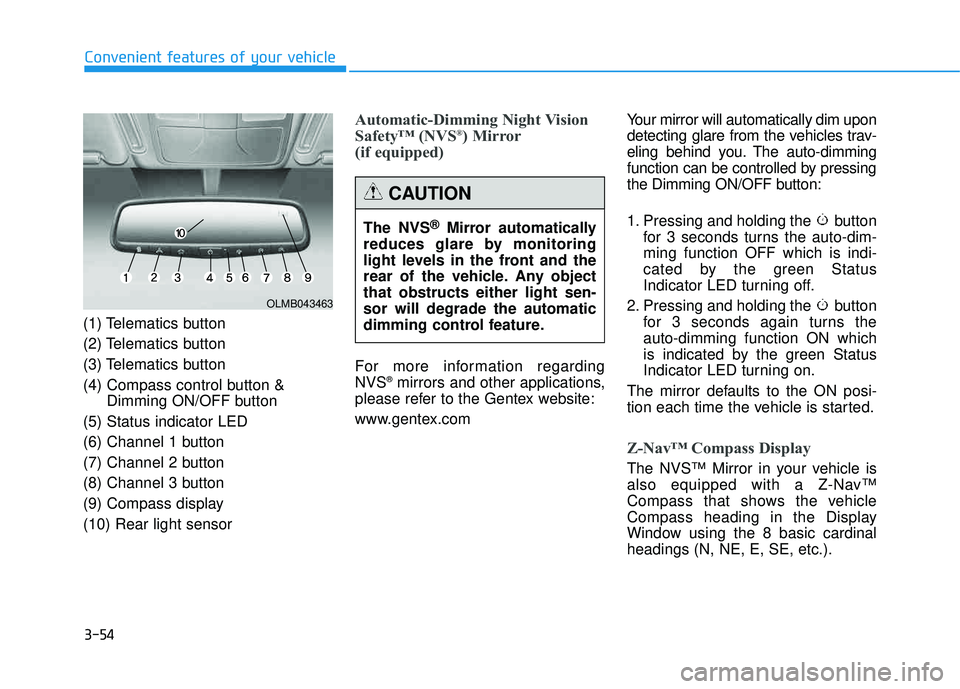
(1) Telematics button
(2) Telematics button
(3) Telematics button
(4) Compass control button &Dimming ON/OFF button
(5) Status indicator LED
(6) Channel 1 button
(7) Channel 2 button
(8) Channel 3 button
(9) Compass display(10) Rear light sensor
Automatic-Dimming Night Vision
Safety™ (NVS ®
) Mirror
(if equipped)
For more information regarding NVS ®
mirrors and other applications,
please refer to the Gentex website:
www.gentex.com Your mirror will automatically dim upon
detecting glare from the vehicles trav-
eling behind you. The auto-dimming
function can be controlled by pressing
the Dimming ON/OFF button:
1. Pressing and holding the button
for 3 seconds turns the auto-dim- ming function OFF which is indi-
cated by the green Status
Indicator LED turning off.
2. Pressing and holding the button for 3 seconds again turns theauto-dimming function ON which
is indicated by the green Status
Indicator LED turning on.
The mirror defaults to the ON posi-
tion each time the vehicle is started.
Z-Nav™ Compass Display
The NVS™ Mirror in your vehicle is
also equipped with a Z-Nav™
Compass that shows the vehicle
Compass heading in the Display
Window using the 8 basic cardinalheadings (N, NE, E, SE, etc.).
OLMB043463
The NVS ®
Mirror automatically
reduces glare by monitoring
light levels in the front and the
rear of the vehicle. Any objectthat obstructs either light sen-sor will degrade the automatic
dimming control feature.
CAUTION
Page 142 of 653
3-56
Convenient features of your vehicle
To adjust the Zone setting:
1. Determine the desired ZoneNumber based upon your current
location on the Zone Map.
2. Press and hold the button for 6 seconds, the current Zone
Number will appear on the display.
3. Pressing and holding the button again will cause the numbers to
increment (Note: they will repeat
…13, 14, 15, 1, 2, …). Releasing
the button when the desired Zone
Number appears on the display
will set the new Zone.
4. Within about 5 seconds the com- pass will start displaying a com-pass heading again.
There are some conditions that can
cause changes to the vehicle mag-
nets, such as installing a ski rack or
a CB antenna. Body repair work on
the vehicle can also cause changes
to the vehicle's magnetic field. In
these situations, the compass will
need to be re-calibrated to quickly
correct these changes. If you need to recalibrate the com-pass:
1. Press and hold the button for
more than 9 seconds. When the
compass memory is cleared a "C"
will appear in the display.
2. Drive the vehicle in 2 complete cir- cles at less than 5 mph (8 km/h).Integrated HomeLink ®
Wireless
Control System
The HomeLink ®
Wireless Control
System can replace up to three
hand-held radio-frequency (RF)
transmitters with a single built-in
device. This innovative feature will
learn the radio frequency codes of
most current transmitters to operate
devices such as gate operators,
garage door openers, entry door
locks, security systems, even home
lighting. Both standard and rolling
code-equipped transmitters can be
programmed by following the out-
lined procedures. Additional HomeLink ®
information
can be found at: www.homelink.com
or by calling 1-800-355-3515.
Page 144 of 653
3-58
Convenient features of your vehicle
Programming
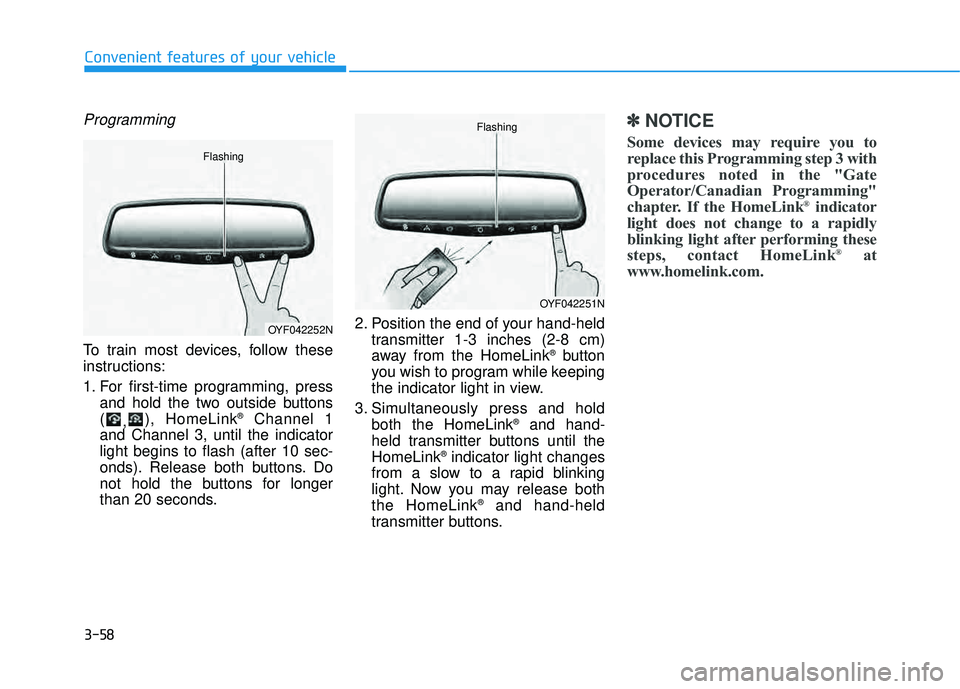
To train most devices, follow these
instructions:
1. For first-time programming, pressand hold the two outside buttons ( ,), HomeLink ®
Channel 1
and Channel 3, until the indicatorlight begins to flash (after 10 sec-
onds). Release both buttons. Do
not hold the buttons for longer
than 20 seconds. 2. Position the end of your hand-held
transmitter 1-3 inches (2-8 cm)
away from the HomeLink ®
button
you wish to program while keeping
the indicator light in view.
3. Simultaneously press and hold both the HomeLink ®
and hand-
held transmitter buttons until theHomeLink ®
indicator light changes
from a slow to a rapid blinking
light. Now you may release boththe HomeLink ®
and hand-held
transmitter buttons.
✽✽ NOTICE
Some devices may require you to
replace this Programming step 3 with
procedures noted in the "Gate
Operator/Canadian Programming"
chapter. If the HomeLink ®
indicator
light does not change to a rapidly
blinking light after performing these
steps, contact HomeLink ®
at
www.homelink.com.
OYF042252N
Flashing
OYF042251N
Flashing
Page 145 of 653
3-59
Convenient features of your vehicle
3
4. Firmly press, hold for 5 secondsand release the programmed HomeLink ®
button up to two sepa-
rate times to activate the door. If the
door does not activate, press and
hold the just-trained HomeLink ®
but-
ton and observe the indicator light.
stantly, programming is complete
and your device should activatewhen the HomeLink ®
button is
pressed and released.
for 2 seconds and then turns to a
constant light, continue with
"Programming" steps 5-7 to com-
plete the programming of a rolling
code equipped device (most com-
monly a garage door opener).
5. At the garage door opener receiv- er (motor-head unit) in the garage,
locate the "learn" or "smart" but-
ton. This can usually be foundwhere the hanging antenna wire isattached to the motor-head unit. 6. Firmly press and release the
"learn" or "smart" button. (The
name and color of the button vary
by manufacturer). There are 30seconds to initiate step 7.
7. Return to the vehicle and firmly press, hold for 2 seconds and
release the programmedHomeLink ®
button. Repeat the
"press/hold/release" sequence a
second time, and, depending on
the brand of the garage dooropener (or other rolling code
equipped device), repeat thissequence a third time to complete
the programming process.
HomeLink ®
should now activate your
rolling code equipped device.Gate operator & Canadian program-
ming
During programming, your handheld
transmitter may automatically stop
transmitting. Continue to press the
Integrated HomeLink ®
Wireless
Control System button (note steps 2
through 3 in the Programming portion
of this document) while you press
and re-press ("cycle") your handheld
transmitter every two seconds untilthe frequency signal has been
learned. The indicator light will flash
slowly and then rapidly after several
seconds upon successful training.
Operating HomeLink ®
To operate, simply press and release
the programmed HomeLink
®
button.
Activation will now occur for the
trained device (i.e. garage door
opener, gate operator, security sys-
tem, entry door lock, home/office
lighting, etc.). For convenience, the
hand-held transmitter of the device
may also be used at any time.
Page 146 of 653
3-60
Convenient features of your vehicle
Reprogramming a single HomeLink®
button
To program a device to HomeLink ®
using a HomeLink ®
button previously
trained, follow these steps:
1.Press and hold the desired HomeLink ®
button. DO NOT release
the button.
2.The indicator light will begin to flash after 20 seconds. Without releasing the HomeLink ®
button, proceed
with "Programming" step 2.
For questions or comments, contactHomeLink ®
at www
.homelink.comor
1-800-355-3515.
Erasing HomeLink®buttons
Individual buttons cannot be erased.
However, to erase all three pro-
grammed buttons:
1. Press and hold the two outer HomeLink ®
buttons until the indi-
cator light begins to flash after 10
seconds.
2. Release both buttons. Do not hold for longer than 20 seconds.
The Integrated HomeLink ®
Wireless
Control System is now in the training
(learn) mode and can be pro-
grammed at any time following the
appropriate steps in the
Programming chapters above. NVS
®
is a registered trademark and
Z-Nav™ is a trademark of the
Gentex Corporation, Zeeland,
Michigan. HomeLink ®
is a registered
trademark owned by Johnson
Controls, Incorporated, Milwaukee,Wisconsin.
Page 155 of 653
3-69
Convenient features of your vehicle
3
✽✽NOTICE
After washing the vehicle or after a
rain, be sure to wipe off the water on
the sunroof before operating the
sunroof.
To reset the sunroof
If the battery has been discharged or disconnected, or if the related fusehas been replaced or disconnected,
reset the Sunroof as follows:
1. The ignition switch must be in the ON position.
2. Open the roller blind.
3. Close the sunroof completely.
4. Release the control lever.
5. Push the control lever forward until the sunroof tilts and slightly moves
up and down. Then, release the
lever.
6. Push the control lever forward until the sunroof is operated as follows:
TILT OPEN �SLIDE OPEN �
SLIDE CLOSE
Then, release the control lever.
If the sunroof does not operate prop-
erly after resetting, have the system
checked by an authorized HYUNDAI
dealer.
Periodically remove any dirt
that may accumulate on the
sunroof guide rail or between
the sunroof and roof panel,
which can make a noise.
Do not try to open the sunroof when the temperature is
below freezing or when the
sunroof is covered with snow
or ice, the motor could be
damaged. In cold and wet cli-
mates, the sunroof may not
work properly.
To prevent damage to the sun-
roof and the motor, do not
continue to press the sunroof
control lever after the sunroof
is in the fully open, closed ortilt position(s).
CAUTION
Make sure heads, other body
parts or other objects are
safely out of the way before
closing the sunroof to avoid
injuries or vehicle damage.
Never adjust the sunroof or
roller blind while driving. This
may cause loss of vehicle con-
trol resulting in an accident.
To avoid serious injury or
death, do not extend your
head, arms or body outside
the sunroof while driving.
WARNING
Page 156 of 653
3-70
Convenient features of your vehicle
Sunroof open warming
If the driver removes the ignition key
(Smart key : turns off the engine) and
opens the driver’s side door whenthe sunroof is not fully closed, the
warning chime will sound for approx-imately 7 seconds and
- Type A : Sunroof Open WarningLight will illuminate or blink for
approximately 7 seconds.
- Type B : Sunroof Open image will appear on the LCD display.
Close the sunroof securely when
leaving your vehicle.
Roller blind
Open and close the roller blind man- ually using the handle (1).
Always open the roller blind before
opening or closing the sunroof.
✽✽ NOTICE
You may see wrinkles on the roller
blind. It is normal because of its
material characteristic.
■ Type B
■ Type A
WEL-400/OLMB043457
Use the handle when opening
and closing the roller blind. If
the handle is not used, it may
cause misalignment or damage.
CAUTION
OLMB043221
Page 157 of 653
3-71
Convenient features of your vehicle
3
Opening the hood
1. Park the vehicle and set the park-ing brake.
2. Pull the release lever located under the lower left corner of the dashboard to unlatch the hood.
The hood should pop up slightly. 3. Raise the hood slightly, pull the
secondary latch (1) inside of thehood center until it releases thehood and lift the hood (2). 4. Pull out the support rod and hold
the hood open with the supportrod (1).
HHOO OO DD
OLMB043216
OLMB043217OLMB043218
Grasp the support rod in the
area wrapped in rubber. The
rubber will help prevent you
from being burned by hot metalwhen the engine is hot.
WARNING