2015 Hyundai Sonata reset
[x] Cancel search: resetPage 347 of 603
4-94
Multimedia System
0~255
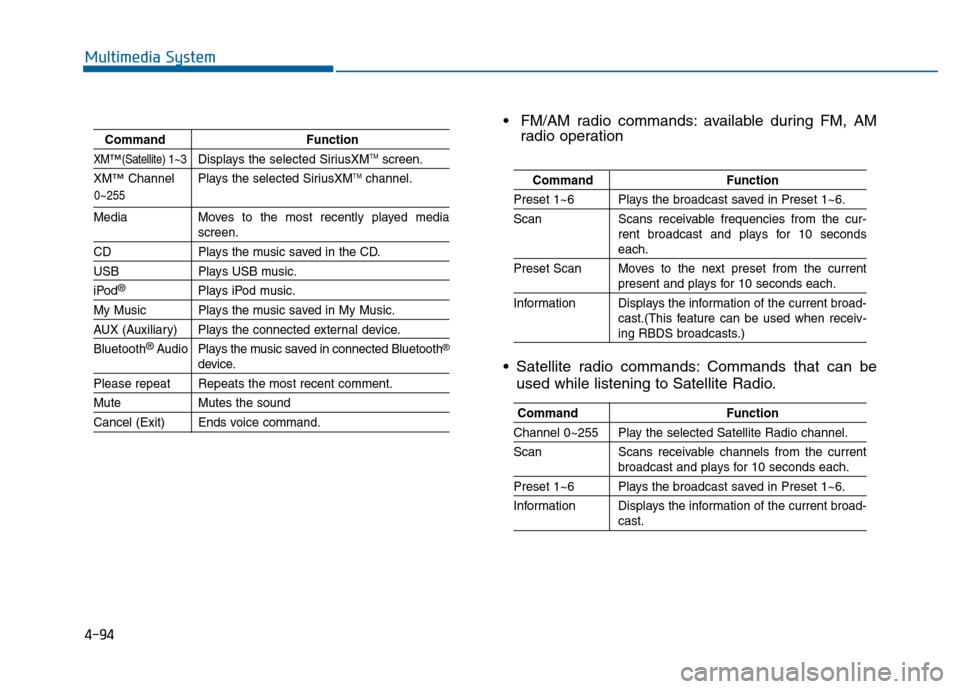
CommandFunction
XM™(Satellite) 1~3Displays the selected SiriusXMTMscreen.
XM
™Channel Plays the selected SiriusXMTMchannel.
Media Moves to the most recently played mediascreen.
CD Plays the music saved in the CD.
USBPlays USB music.
iPod®Plays iPod music.
My Music Plays the music saved in My Music.
AUX (Auxiliary) Plays the connected external device.
Bluetooth
®Audio Plays the music saved in connected Bluetooth®
device.
Please repeat Repeats the most recent comment.
Mute Mutes the sound
Cancel (Exit) Ends voice command.
FM/AM radio commands: available during FM, AM
radio operation
Satellite radio commands: Commands that can be used while listening to Satellite Radio.
Command Function
Preset 1~6 Plays the broadcast saved in Preset 1~6.
Scan Scans receivable frequencies from the cur-
rent broadcast and plays for 10 seconds
each.
Preset Scan Moves to the next preset from the current
present and plays for 10 seconds each.
Information Displays the information of the current broad- cast.(This feature can be used when receiv-
ing RBDS broadcasts.)
Command Function
Channel 0~255 Play the selected Satellite Radio channel.
Scan Scans receivable channels from the current
broadcast and plays for 10 seconds each.
Preset 1~6 Plays the broadcast saved in Preset 1~6.
Information Displays the information of the current broad-
cast.
Page 350 of 603
![Hyundai Sonata 2015 Owners Manual 4-97
Multimedia System
4
S
SE
E T
T U
U P
P
Starting Mode
Press the key to display the
Setup screen.
You can select and control options
related to [Display], [Sound], [Phone]
and [System].
Display Se Hyundai Sonata 2015 Owners Manual 4-97
Multimedia System
4
S
SE
E T
T U
U P
P
Starting Mode
Press the key to display the
Setup screen.
You can select and control options
related to [Display], [Sound], [Phone]
and [System].
Display Se](/manual-img/35/16796/w960_16796-349.png)
4-97
Multimedia System
4
S
SE
E T
T U
U P
P
Starting Mode
Press the key to display the
Setup screen.
You can select and control options
related to [Display], [Sound], [Phone]
and [System].
Display Settings
Adjusting the Brightness
Press the key Select
[Display] Select [Brightness]
Use the , buttons to adjust the
screen brightness or set the
Brightness on Automatic, Day, or
Night mode.
Press the button to reset.
1) Automatic : Adjusts the brightness
automatically
2) Day : Always maintains the bright- ness on high
3) Night : Always maintains the
brightness on low
Pop-up Mode
Press the key Select
[Display] Select [Mode Pop up]
This feature is used to display the
Pop-up Mode screen when entering
radio and media modes.
When this feature is turned on,
pressing the or key
will display the Pop-up Mode screen.
Information
The media Pop-up Mode screen can
be displayed only when two or more
media modes have been connected.
i
MEDIA RADIO
SETUP
Default
SETUP SETUP
Page 352 of 603
4-99
Multimedia System
4
Use the , , , buttons to
adjust the Fader/Balance settings.
Use the , buttons to adjust the
Bass/Middle/Treble settings.
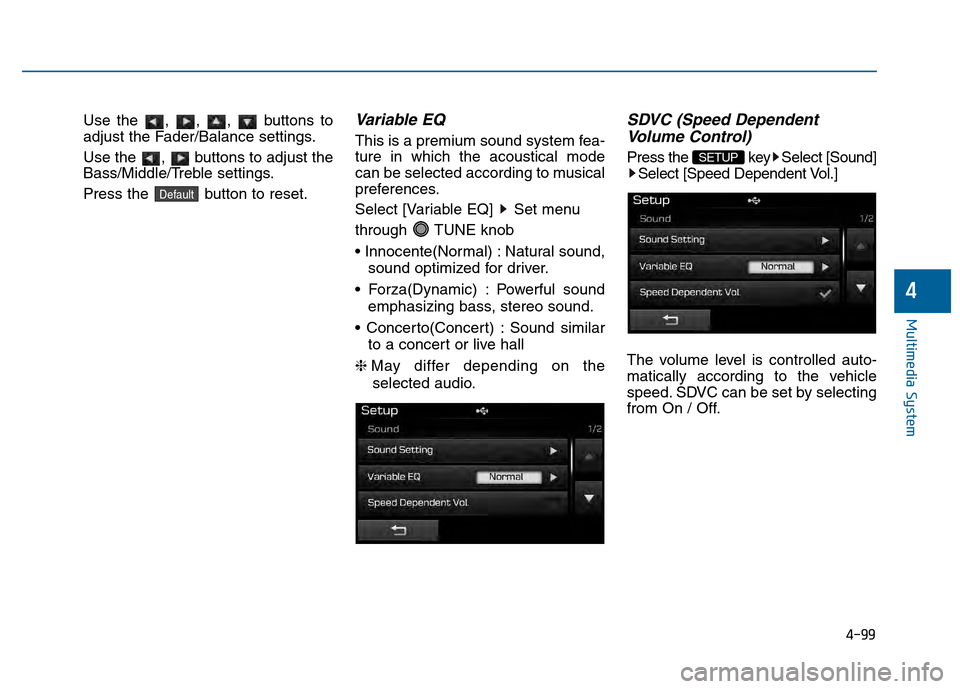
Press the button to reset.Variable EQ
This is a premium sound system fea-
ture in which the acoustical mode
can be selected according to musical
preferences.
Select [Variable EQ] Set menu
through TUNE knob
Natural sound,sound optimized for driver.
Powerful sound emphasizing bass, stereo sound.
Sound similar to a concert or live hall
❈ May differ depending on the
selected audio.
SDVC (Speed Dependent Volume Control)
Press the key Select [Sound]
Select [Speed Dependent Vol.]
The volume level is controlled auto-
matically according to the vehicle
speed. SDVC can be set by selecting
from On / Off.SETUP
Default
Page 411 of 603
5-53
Driving your vehicle
5
Decreasing the vehicle speedlower than the memory speed by
5 mph (10 km/h).
Decreasing the vehicle speed to less than approximately 20 mph
(30 km/h).
The ESC (Electronic Stability Control) is operating.
Downshifting to the 2nd gear in Sports Mode.
Information
Each of the above actions will cancel
Cruise Control operation (the SET
indicator light in the instrument clus-
ter will go off), but only pressing the
CRUISE button will turn the system
off. If you wish to resume Cruise
Control operation, push the lever up
(RES+) located on your steering
wheel. You will return to your previ-
ously preset speed, unless the system
was turned off using the CRUISE but-
ton.
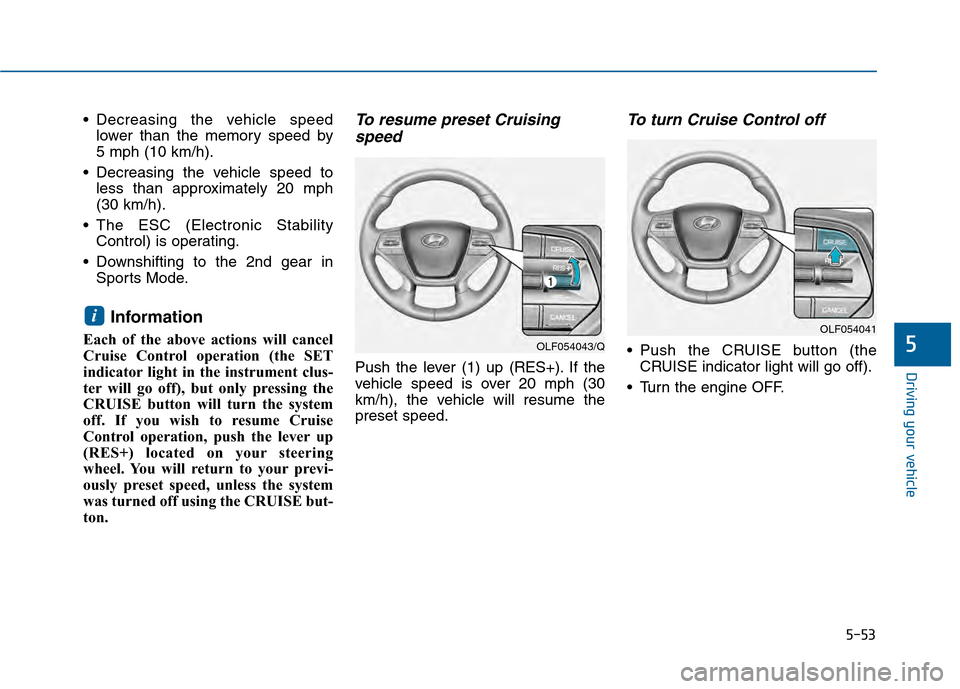
To resume preset Cruisingspeed
Push the lever (1) up (RES+). If the
vehicle speed is over 20 mph (30
km/h), the vehicle will resume the
preset speed.
To turn Cruise Control off
Push the CRUISE button (the
CRUISE indicator light will go off).
Turn the engine OFF.
i
OLF054043/Q
OLF054041
Page 488 of 603

7
Wiper Blades.........................................................7-36
Blade Inspection ..............................................................7-36
Blade Replacement .........................................................7-36
Battery...................................................................7-38
For Best Battery Service ..............................................7-39
Battery Recharging ........................................................7-39
Reset features .................................................................7-40
Tires and Wheels .................................................7-41
Tire Care ........................................................................\
....7-41
Recommended Cold Tire Inflation Pressures ...........7-42
Check Tire Inflation Pressure ......................................7-43
Tire Rotation...................................................................\
..7-44
Wheel Alignment and Tire Balance ............................7-45
Tire Replacement ............................................................7-45
Wheel Replacement ........................................................7-46
Tire Traction .....................................................................7-4\
6
Tire Maintenance ............................................................7-47
Tire Sidewall Labeling ....................................................7-47
Tire Terminology and Definitions................................7-51
All Season Tires ...............................................................7-54
Summer Tires ...................................................................7-54
Snow Tires ........................................................................\
7-54
Radial-Ply Tires ...............................................................7-55
Low Aspect Ratio Tires..................................................7-55
Fuses ......................................................................7-\
57
Instrument Panel Fuse Replacement..........................7-58
Engine Compartment Panel Fuse Replacement.......7-59
Fuse/Relay Panel Description ......................................7-61
Light Bulbs ............................................................7-69
Headlamp, Position Lamp, Turn Signal Lamp and
Side Marker Light Bulb Replacement ........................7-70
Side Repeater Lamp Replacement ..............................7-75
Rear Combination Light Bulb Replacement ..............7-76
High Mounted Stop Lamp .............................................7-80
License Plate Light Bulb Replacement ......................7-80
Interior Light Bulb Replacement .................................7-80
Appearance Care..................................................7-82
Exterior Care ....................................................................7-82\
Interior Care .....................................................................7-8\
7
Emission Control System ....................................7-89
Crankcase Emission Control System ..........................7-89
Evaporative Emission Control System Including
Onboard Refueling Vapor Recovery (ORVR)............7-89
Exhaust Emission Control System ..............................7-90
California Perchlorate Notice.............................7-93
Page 526 of 603
7-40
Maintenance
By jump starting
After a jump start from a good bat-
tery, drive the vehicle for 20-30 min-
utes before it is shutoff. The vehicle
may not restart if you shut it off
before the battery had a chance to
adequately recharge. See “Jump
Starting” in chapter 6 for more infor-
mation on jump starting procedures.
Information
An inappropriately dis-posed battery can be
harmful to the environ-
ment and human health.
Dispose the battery according to
your local law(s) or regulation.
Reset features
Some items need to be reset after
the battery has been discharged or
the battery has been disconnected.
See chapter 3 for:
Power Windows
Trip Computer
Climate Control System
Clock
Audio System
Sunroof
i
(Continued)
Watch the battery during
charging, and stop or reduce
the charging rate if the battery
cells begin boiling violently.
The negative battery cable
must be removed first and
installed last when the battery
is disconnected. Disconnect
the battery charger in the fol-
lowing order:
(1) Turn off the battery charger main switch.
(2) Unhook the negative
clamp from the negative
battery terminal.
(3) Unhook the positive clamp from the positive battery
terminal.
Always use a genuine HYUNDAI
approved battery when you
replace the battery.
Page 531 of 603
7-45
7
Maintenance
Wheel Alignment and Tire
Balance
The wheels on your vehicle were
aligned and balanced carefully at the
factory to give you the longest tire life
and best overall performance.
In most cases, you will not need to
have your wheels aligned again.
However, if you notice unusual tire
wear or your vehicle pulling one way
or the other, the alignment may need
to be reset.
If you notice your vehicle vibrating
when driving on a smooth road, your
wheels may need to be rebalanced.
Improper wheel weights can dam-
age your vehicle’s aluminum
wheels. Use only approved wheel
weights.
Tire Replacement
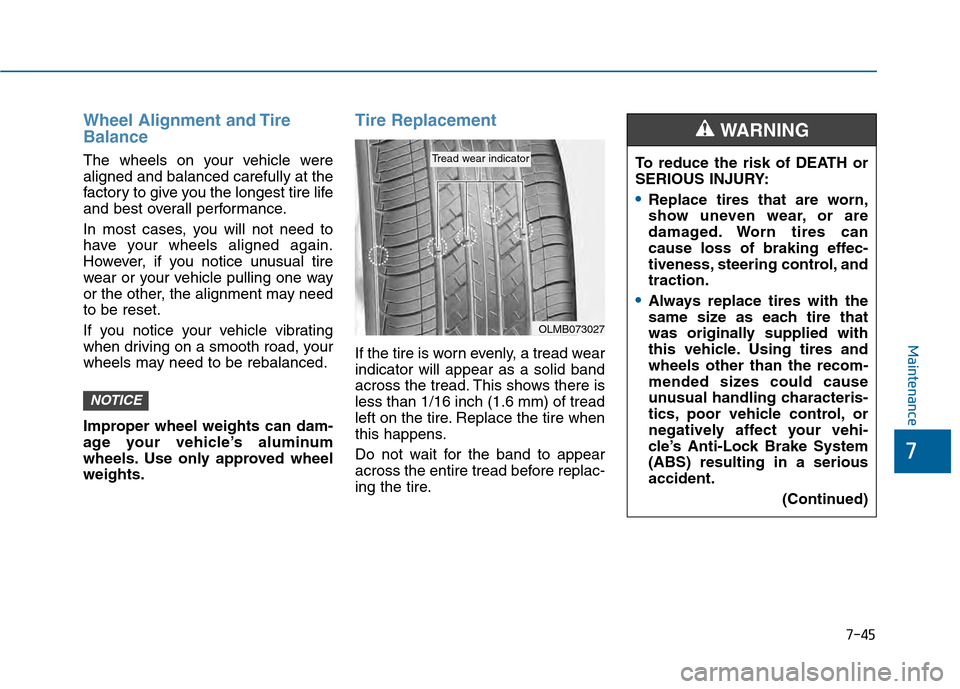
If the tire is worn evenly, a tread wear
indicator will appear as a solid band
across the tread. This shows there is
less than 1/16 inch (1.6 mm) of tread
left on the tire. Replace the tire when
this happens.
Do not wait for the band to appear
across the entire tread before replac-
ing the tire.
NOTICE
OLMB073027
Tread wear indicatorTo reduce the risk of DEATH or
SERIOUS INJURY:
Replace tires that are worn,
show uneven wear, or are
damaged. Worn tires can
cause loss of braking effec-
tiveness, steering control, and
traction.
Always replace tires with the
same size as each tire that
was originally supplied with
this vehicle. Using tires and
wheels other than the recom-
mended sizes could cause
unusual handling characteris-
tics, poor vehicle control, or
negatively affect your vehi-
cle’s Anti-Lock Brake System
(ABS) resulting in a serious
accident.(Continued)
WARNING
Page 545 of 603
7-59
7
Maintenance
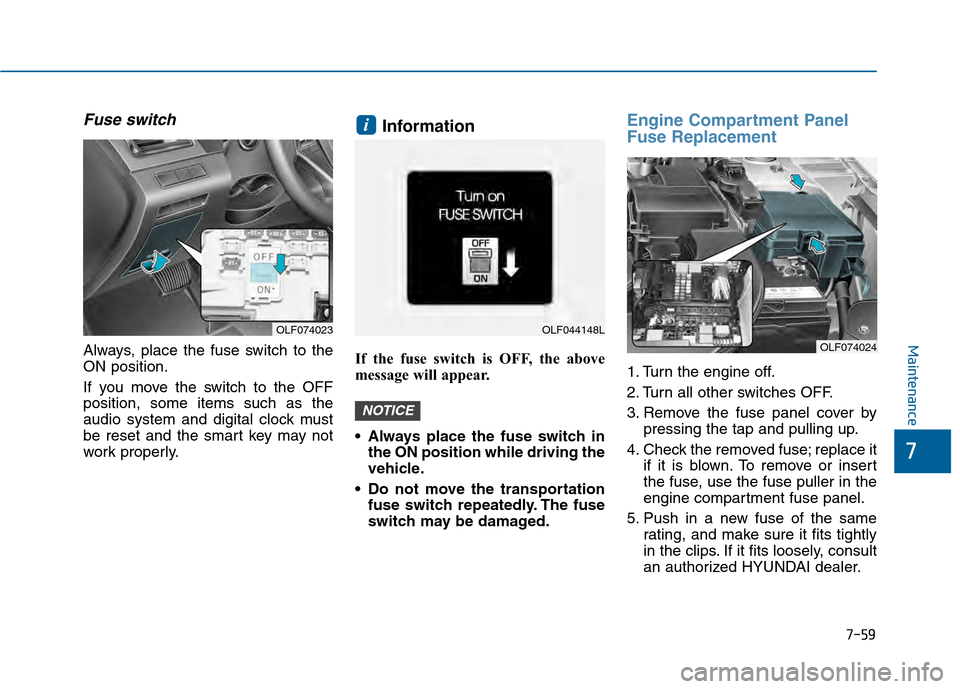
Fuse switch
Always, place the fuse switch to the
ON position.
If you move the switch to the OFF
position, some items such as the
audio system and digital clock must
be reset and the smart key may not
work properly.
Information
If the fuse switch is OFF, the above
message will appear.
Always place the fuse switch inthe ON position while driving the
vehicle.
Do not move the transportation fuse switch repeatedly. The fuse
switch may be damaged.
Engine Compartment Panel
Fuse Replacement
1. Turn the engine off.
2. Turn all other switches OFF.
3. Remove the fuse panel cover by pressing the tap and pulling up.
4. Check the removed fuse; replace it if it is blown. To remove or insert
the fuse, use the fuse puller in the
engine compartment fuse panel.
5. Push in a new fuse of the same rating, and make sure it fits tightly
in the clips. If it fits loosely, consult
an authorized HYUNDAI dealer.
NOTICE
i
OLF074023OLF044148L
OLF074024