2015 Hyundai Sonata Radio
[x] Cancel search: RadioPage 131 of 603
3-36
Convenient features of your vehicle
To adjust the Zone setting:
1. Determine the desired Zone Number based upon your current
location on the Zone Map.
2. Press and hold the button for more than 3 but less than 6 sec-
onds, the current Zone Number
will appear on the display.
3. Pressing and holding the button again will cause the numbers to
increment (Note: they will repeat
…13, 14, 15, 1, 2, …). Releasing
the button when the desired Zone
Number appears on the display
will set the new Zone.
4. Within about 5 seconds the com- pass will start displaying a com-
pass heading again.
There are some conditions that can
cause changes to the vehicle mag-
nets, such as installing a ski rack or
a CB antenna. Body repair work on
the vehicle can also cause changes
to the vehicle's magnetic field. In
these situations, the compass will
need to be re-calibrated to quickly
correct these changes. If you need to recalibrate the com-
pass:
1. Press and hold the button for
more than 6 seconds. When the
compass memory is cleared a "C"
will appear in the display.
2. Drive the vehicle in 2 complete cir- cles at less than 5 mph (8 km/h).
Integrated HomeLink®Wireless
Control System
The HomeLink®Wireless Control
System can replace up to three hand-
held radio-frequency (RF) transmit-
ters with a single built-in device. This
innovative feature will learn the radio
frequency codes of most current
transmitters to operate devices such
as gate operators, garage door open-
ers, entry door locks, security sys-
tems, even home lighting. Both stan-
dard and rolling code-equipped trans-
mitters can be programmed by fol-
lowing the outlined procedures.
Additional HomeLink
®information
can be found at: www.homelink.com
or by calling 1-800-355-3515.
Retain the original transmitter of the
RF device you are programming for
use in other vehicles as well as for
future HomeLink
®programming. It is
also suggested that upon the sale of
the vehicle, the programmed
HomeLink
®buttons be erased for
security purposes.
Page 132 of 603
3-37
Convenient features of your vehicle
3
Programming HomeLink®
Please note the following:
When programming a garage dooropener, it is advised to park the
vehicle outside of the garage.
It is recommended that a new bat- tery be placed in the hand-held
transmitter of the device being pro-
grammed to HomeLink
®for quicker
training and accurate transmission
of the radio-frequency signal.
Some vehicles may require the ignition switch to be placed in the
ACC (or "Accessories") position for
programming and/or operation of
HomeLink
®.
In the event that there are still pro- gramming difficulties or questions
after following the programming
steps listed below, contact
HomeLink
®at: www.homelink.com
or by calling 1-800-355-3515.
Rolling code programming
Rolling code devices which are
"code-protected" and manufactured
after 1996 may be determined by the
following:
Reference the device owner's manual for verification.
The handheld transmitter appears to program the HomeLink
®
Universal Transceiver but does not
activate the device.
Press and hold the trained HomeLink button. The device has
the rolling code feature if the indi-
cator light flashes rapidly and then
turns solid after 2 seconds.
Before programming HomeLink
®
to a garage door opener or gate
operator, make sure people and
objects are out of the way of the
device to prevent potential harm
or damage. Do not use the
HomeLink
®with any garage door
opener that lacks the safety stop
and reverse features required by
U.S. federal safety standards (this
includes any garage door opener
model manufactured before April
1, 1982). A garage door that can-
not detect an object - signaling
the door to stop and reverse -
does not meet current U.S. feder-
al safety standards. Using a
garage door opener without
these features increases the risk
of serious injury or death.
WARNING
Page 154 of 603
3-59
Convenient features of your vehicle
3
Information
• The Smart Trunk function will notwork if any of the following occurs:
- The smart key is close to a radiotransmitter such as a radio station
or an airport which can interfere
with normal operation of the
transmitter.
- The smart key is near a mobile two way radio system or a cellular
phone.
- Another vehicle's smart key is being operated close to your vehicle.
• The detecting range may decrease or increase when :
- One side of the tire is raised toreplace a tire or to inspect the vehi-
cle.
- The vehicle is parked on a slope or unpaved road, etc.
Fuel Filler Door
Opening the fuel filler door
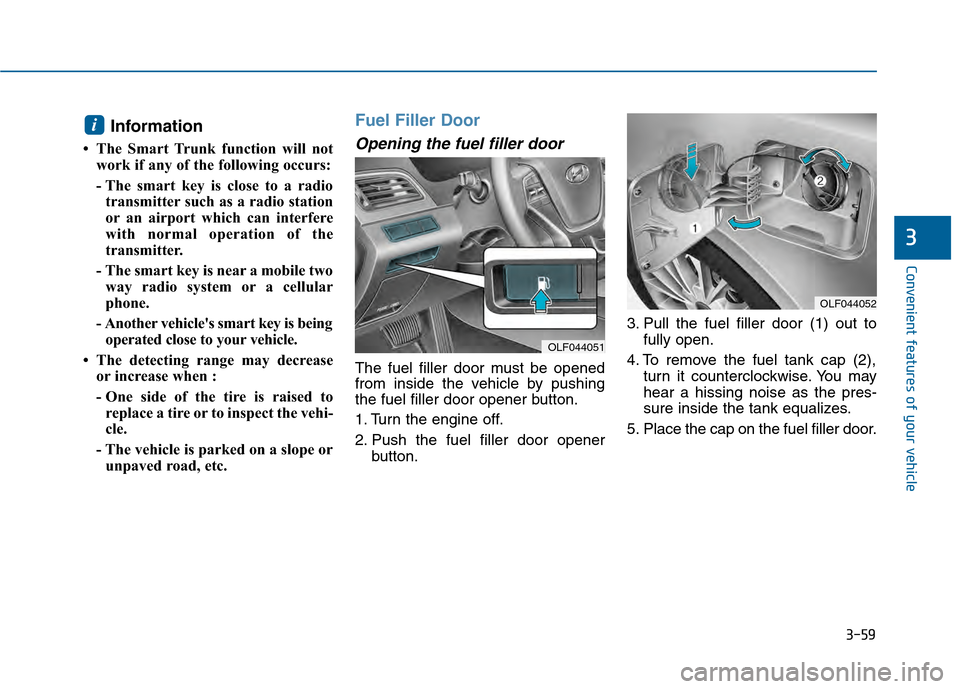
The fuel filler door must be opened
from inside the vehicle by pushing
the fuel filler door opener button.
1. Turn the engine off.
2. Push the fuel filler door opener button. 3. Pull the fuel filler door (1) out to
fully open.
4. To remove the fuel tank cap (2), turn it counterclockwise. You may
hear a hissing noise as the pres-
sure inside the tank equalizes.
5. Place the cap on the fuel filler door.
i
OLF044052
OLF044051
Page 254 of 603

Multimedia System
Multimedia System.................................................4-2
AUX, USB and iPod®Port ...............................................4-2
Antenna ........................................................................\
.......4-2
Steering Wheel Audio Control........................................4-3
Audio / Video / Navigation System (AVN) ..................4-4
Bluetooth®Wireless Technology Hands-Free ...........4-4
How Vehicle Audio Works ...............................................4-5
Features of Your Vehicle.................................................4-7
System Controllers and Functions
- 3.8 Inch Mono TFT ...........................................4-17
Audio Head Unit ..............................................................4-17
Setup ........................................................................\
..........4-19
Radio : FM, AM ................................................................4-22
XM
TMRADIO ......................................................................4-\
23
Basic Method of Use : Audio CD / MP3 CD / USB /
iPod
®/ My Music ...........................................................4-25
Bluetooth®Wireless Technology Audio ....................4-31
Making a Call Using the Steering Wheel Remote
Controller........................................................................\
...4-32
Bluetooth®Wireless Technology ................................4-33
Voice Recognition ...........................................................4-45
Ending Voice Recognition .............................................4-46
System Controllers and Functions
- 5 Inch Color TFT LCD .......................................4-52
Audio Head Unit ..............................................................4-52
Steering-Wheel Mounted Controls ............................4-54
Radio Mode.......................................................................4\
-56
XM
TMRadio Mode ...........................................................4-58
Media Mode......................................................................4-\
60
Audio CD Mode ................................................................4-61
MP3 CD Mode ..................................................................4-63
USB Mode ........................................................................\
.4-66
iPod
®Mode ......................................................................4-\
69
AUX Mode ........................................................................\
.4-71
MY Music Mode ..............................................................4-72
Bluetooth®Wireless Technology Audio Mode ........4-75
Voice Recognition ...........................................................4-91
Setup ........................................................................\
..........4-97
Rear View Camera ........................................................4-102
Blue Link
®.......................................................................4\
-102
4
Page 256 of 603
4-3
Multimedia System
Do not clean the inside of therear window glass with a cleaner
or scraper to remove foreign
deposits as this may cause dam-
age to the antenna elements.
Avoid adding metallic coatings such as Ni, Cd, and so on. These
can degrade the receiving AM
and FM broadcast signals.
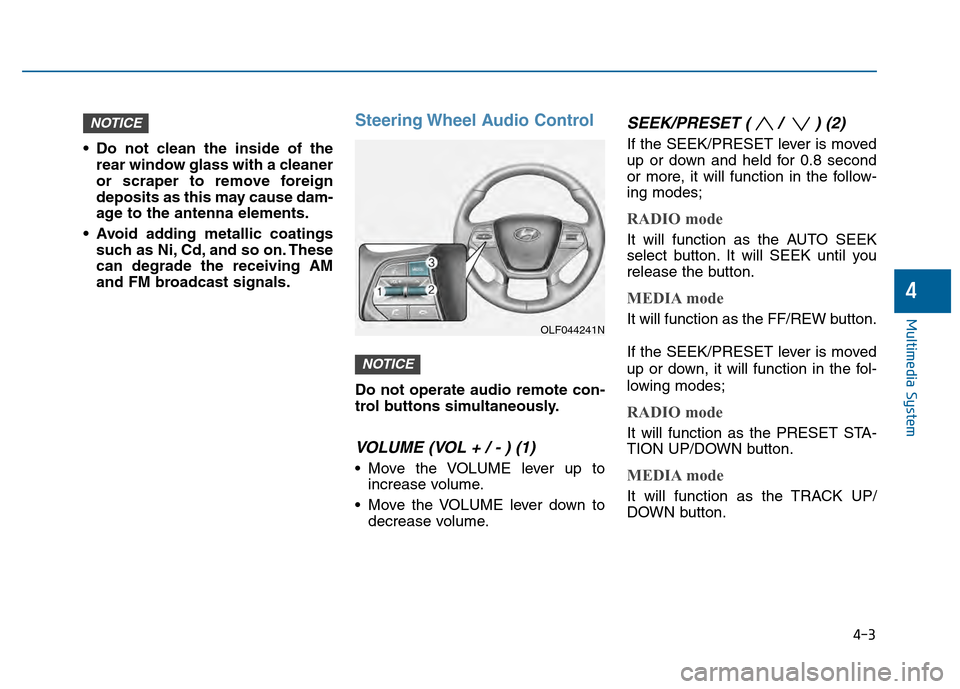
Steering Wheel Audio Control
Do not operate audio remote con-
trol buttons simultaneously.
VOLUME (VOL + / - ) (1)
Move the VOLUME lever up toincrease volume.
Move the VOLUME lever down to decrease volume.
SEEK/PRESET ( / ) (2)
If the SEEK/PRESET lever is moved
up or down and held for 0.8 second
or more, it will function in the follow-
ing modes;
RADIO mode
It will function as the AUTO SEEK
select button. It will SEEK until you
release the button.
MEDIA mode
It will function as the FF/REW button.
If the SEEK/PRESET lever is moved
up or down, it will function in the fol-
lowing modes;
RADIO mode
It will function as the PRESET STA-
TION UP/DOWN button.
MEDIA mode
It will function as the TRACK UP/
DOWN button.
NOTICE
NOTICE
4
OLF044241N
Page 257 of 603

4-4
MODE (3)
Press the MODE button to select
Radio, XM, Disc, or AUX.
Information
Detailed information for audio control
buttons are described in the following
pages in this chapter.
Audio / Video / Navigation
System (AVN)
Detailed information for the AVN sys-
tem is described in a separately sup-
plied manual.
Bluetooth®Wireless
Technology Hands-Free
You can use the phone wirelessly by
using the
Bluetooth®Wireless
Technology.
(1) Call / Answer button
(2) Call end button
(3) Microphone Detailed information for the
Bluetooth®Wireless Technology
hands-free is described in the follow-
ing pages in this chapter or in the
manual supplied separately.
i
Multimedia System
OLF044242N
OLF044276
Page 258 of 603
4-5
Multimedia System
4
How vehicle audio works
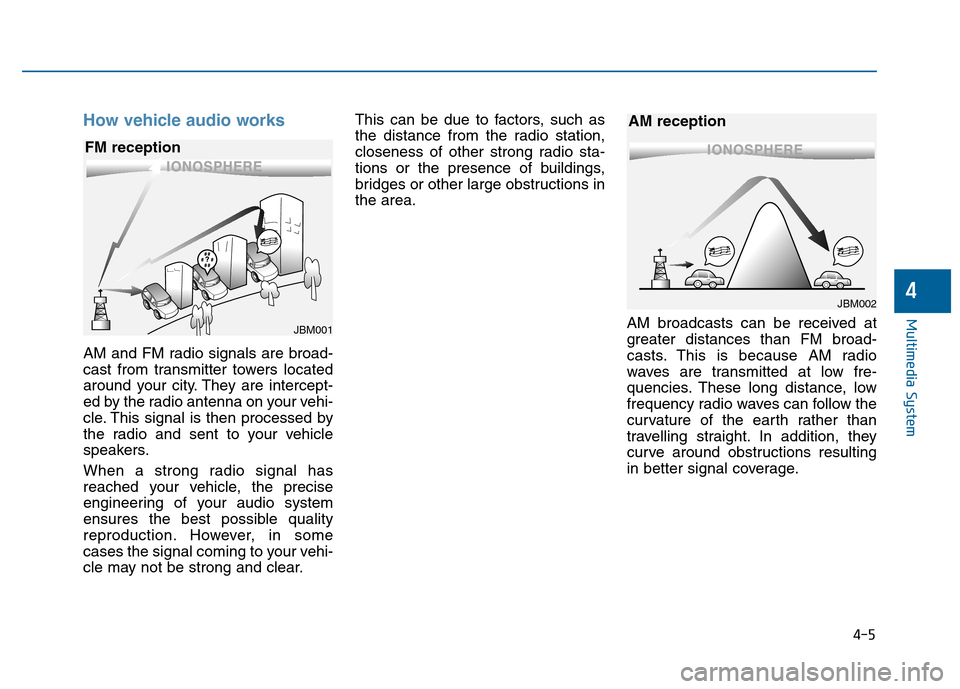
AM and FM radio signals are broad-
cast from transmitter towers located
around your city. They are intercept-
ed by the radio antenna on your vehi-
cle. This signal is then processed by
the radio and sent to your vehicle
speakers.
When a strong radio signal has
reached your vehicle, the precise
engineering of your audio system
ensures the best possible quality
reproduction. However, in some
cases the signal coming to your vehi-
cle may not be strong and clear.This can be due to factors, such as
the distance from the radio station,
closeness of other strong radio sta-
tions or the presence of buildings,
bridges or other large obstructions in
the area.
AM broadcasts can be received at
greater distances than FM broad-
casts. This is because AM radio
waves are transmitted at low fre-
quencies. These long distance, low
frequency radio waves can follow the
curvature of the earth rather than
travelling straight. In addition, they
curve around obstructions resulting
in better signal coverage.
JBM001
FM reception
JBM002
AM reception
Page 259 of 603
4-6
Multimedia System
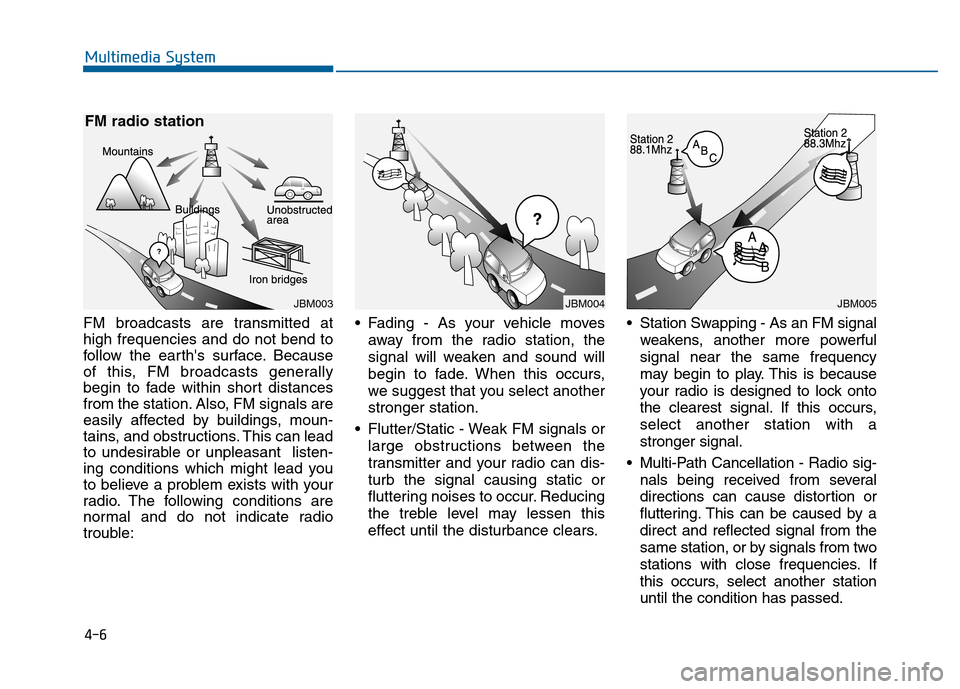
FM broadcasts are transmitted at
high frequencies and do not bend to
follow the earth's surface. Because
of this, FM broadcasts generally
begin to fade within short distances
from the station. Also, FM signals are
easily affected by buildings, moun-
tains, and obstructions. This can lead
to undesirable or unpleasant listen-
ing conditions which might lead you
to believe a problem exists with your
radio. The following conditions are
normal and do not indicate radio
trouble: Fading - As your vehicle moves
away from the radio station, the
signal will weaken and sound will
begin to fade. When this occurs,
we suggest that you select another
stronger station.
Flutter/Static - Weak FM signals or large obstructions between the
transmitter and your radio can dis-
turb the signal causing static or
fluttering noises to occur. Reducing
the treble level may lessen this
effect until the disturbance clears. Station Swapping - As an FM signal
weakens, another more powerful
signal near the same frequency
may begin to play. This is because
your radio is designed to lock onto
the clearest signal. If this occurs,
select another station with a
stronger signal.
Multi-Path Cancellation - Radio sig- nals being received from several
directions can cause distortion or
fluttering. This can be caused by a
direct and reflected signal from the
same station, or by signals from two
stations with close frequencies. If
this occurs, select another station
until the condition has passed.
JBM003
FM radio station
JBM004JBM005