Page 13 of 504
1-2
EXTERIOR OVERVIEW (I)
Your vehicle at a glance
1. Bonnet ...............................................3-42
2. Headlamp ..........................................7-64
3. Fog lamp............................................7-64
4. Tyres and wheels ...............................7-37
5. Outside rearview mirror .....................3-27
6. Panoramic sunroof* ...........................3-37
7. Front windscreen wiper blades ..........7-31
8. Windows ............................................3-32
* If equipped
OLF014001R
■Front view
The actual shape may differ from the illustration.
Page 110 of 504

3-26
Convenient features of your vehicle
MIRRORS
Inside rearview mirror
Before you start driving, adjust the
rearview mirror to the centre on the
view through the rear window.
When cleaning the mirror, use a
paper towel or similar material
dampened with glass cleaner. Do
not spray glass cleaner directly on
the mirror as that may cause the
liquid cleaner to enter the mirror
housing.
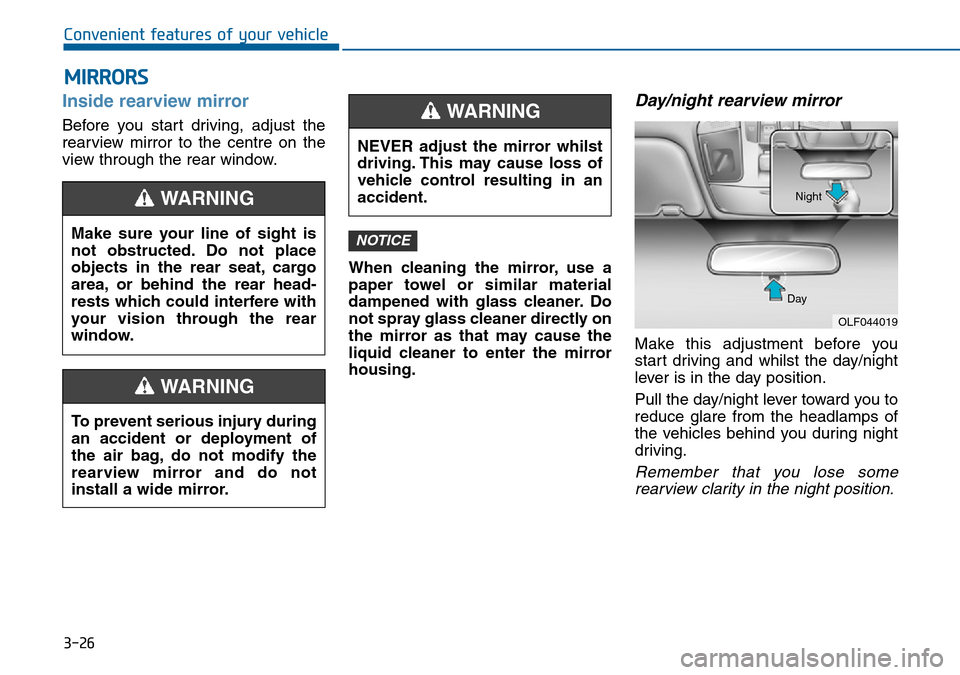
Day/night rearview mirror
Make this adjustment before you
start driving and whilst the day/night
lever is in the day position.
Pull the day/night lever toward you to
reduce glare from the headlamps of
the vehicles behind you during night
driving.
Remember that you lose some
rearview clarity in the night position.
NOTICEMake sure your line of sight is
not obstructed. Do not place
objects in the rear seat, cargo
area, or behind the rear head-
rests which could interfere with
your vision through the rear
window.
WARNING
To prevent serious injury during
an accident or deployment of
the air bag, do not modify the
rearview mirror and do not
install a wide mirror.
WARNING
NEVER adjust the mirror whilst
driving. This may cause loss of
vehicle control resulting in an
accident.
WARNING
OLF044019 DayNight
Page 138 of 504
3-54
Convenient features of your vehicle
Instrument panel control
Instrument panel illumination
When the vehicle's parking lights or
headlamps are on, press the illumi-
nation control button to adjust the
brightness of the instrument panel
illumination.
When pressing the illumination con-
trol button, the interior switch illumi-
nation intensity is also adjusted. The
selected brightness of illumination
can be saved in the Driver position
memory system(if equipped).For more information, refer to
“Driver position Memory System”
in this chapter.
• The brightness of the instrument
panel illumination is displayed.
• If the brightness reaches the maxi-
mum or minimum level, an alarm
will sound. Never adjust the instrument
panel control whilst driving. This
could result in loss of control
and lead to an accident that may
cause death, serious injury, or
property damage.
WARNING
OLF044142L
OLF044143L
■Type A
■Type B
OLF044102R
Page 150 of 504

3-66
Convenient features of your vehicle
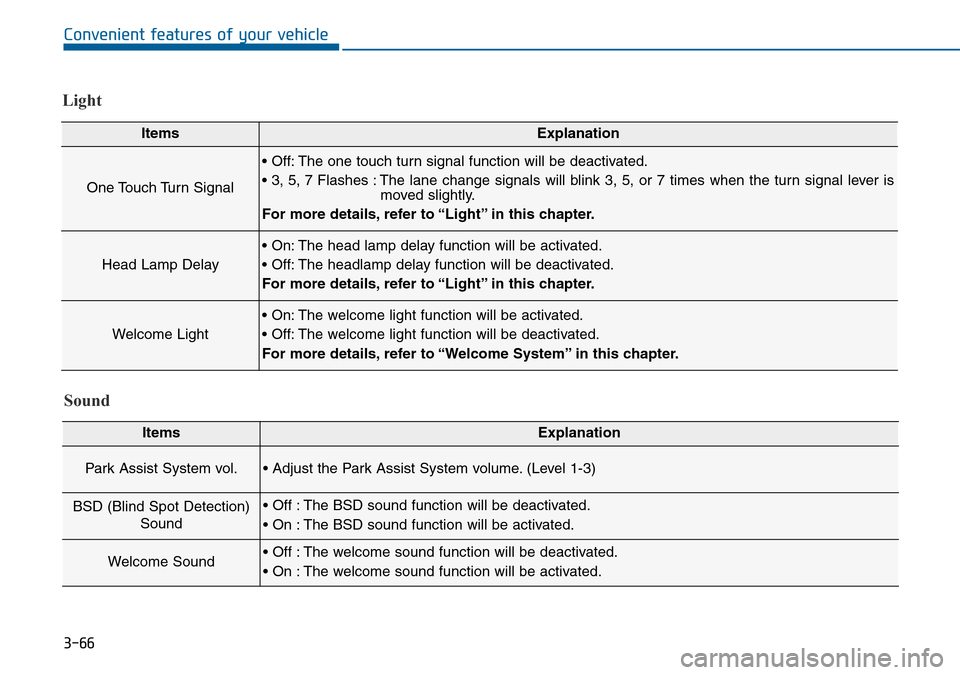
Light
ItemsExplanation
One Touch Turn Signal
• Off: The one touch turn signal function will be deactivated.
• 3, 5, 7 Flashes : The lane change signals will blink 3, 5, or 7 times when the turn signal lever is
moved slightly.
For more details, refer to “Light” in this chapter.
Head Lamp Delay
• On: The head lamp delay function will be activated.
• Off: The headlamp delay function will be deactivated.
For more details, refer to “Light” in this chapter.
Welcome Light
• On: The welcome light function will be activated.
• Off: The welcome light function will be deactivated.
For more details, refer to “Welcome System” in this chapter.
Sound
ItemsExplanation
Park Assist System vol.• Adjust the Park Assist System volume. (Level 1-3)
BSD (Blind Spot Detection)
Sound• Off : The BSD sound function will be deactivated.
• On : The BSD sound function will be activated.
Welcome Sound• Off : The welcome sound function will be deactivated.
• On : The welcome sound function will be activated.
Page 159 of 504
3-75
Convenient features of your vehicle
3
Low Fuel
• This warning message illuminates
if the fuel tank is nearly empty.
- When the low fuel level warning
light has illuminated.
- When the Trip Computer displays
“--- km” as distance to empty.
Add fuel as soon as possible.
Engine has overheated
• This warning message illuminates
when the engine coolant tempera-
ture is above 120°C (248°F). This
means that the engine is overheat-
ed and may be damaged.
If your vehicle is overheated, refer
to “Overheating” in chapter 6.
Check headlight (if equipped)
This warning message illuminates if
there is a malfunction (burned-out
bulb except LED lamp or circuit mal-
function) with the headlamp. In this
case, have your vehicle inspected by
an authorised HYUNDAI dealer.
OLF044160LOLF044158L
OLF044166L
OLF044167L
■Type A
■Type B
Page 174 of 504
3-90
Convenient features of your vehicle
Low Beam Indicator
Light (if equipped)
This indicator light illuminates:
• When the headlamps are on.
High Beam Indicator
Light
This indicator light illuminates:
• When the headlamps are on and in
the high beam position.
• When the turn signal lever is pulled
into the Flash-to-Pass position.
Light ON Indicator
Light
This indicator light illuminates:
• When the tail lights or headlamps
are on.
Front Fog Indicator
Light (if equipped)
This indicator light illuminates:
• When the front fog lamps are on.
Cruise Indicator Light
(if equipped)
This indicator light illuminates:
• When the cruise control system is
enabled.
For more details, refer to “Cruise
Control System” in chapter 5.
Cruise SET Indicator
Light (if equipped)
This indicator light illuminates:
• When the cruise control speed is
set.
For more details, refer to “Cruise
Control System” in chapter 5.
SET
CRUISE
Page 176 of 504

3-92
Convenient features of your vehicle
Exterior lights
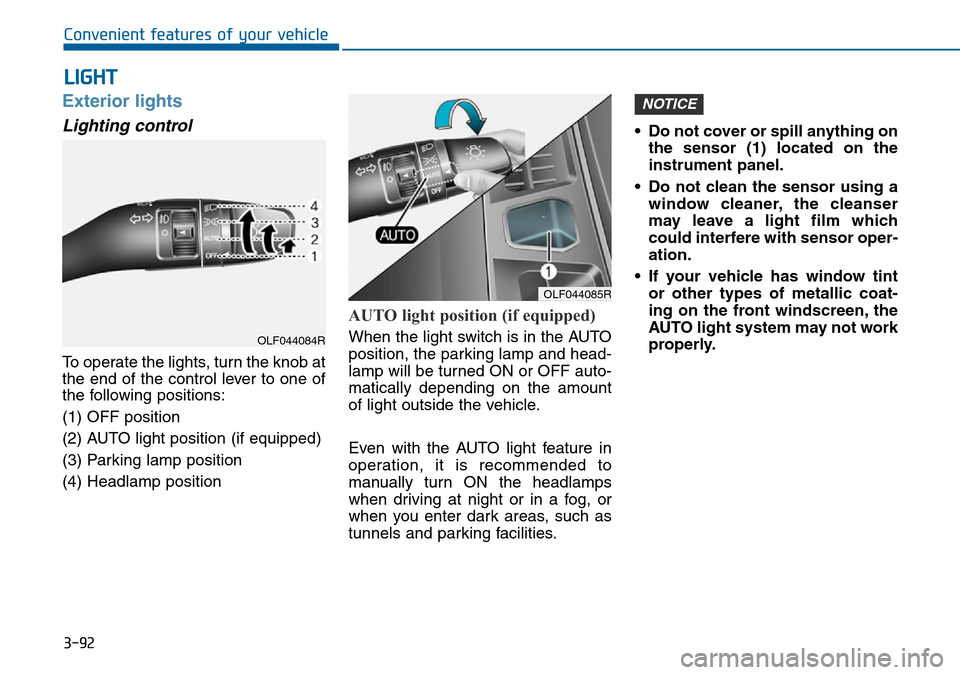
Lighting control
To operate the lights, turn the knob at
the end of the control lever to one of
the following positions:
(1) OFF position
(2) AUTO light position (if equipped)
(3) Parking lamp position
(4) Headlamp position
AUTO light position (if equipped)
When the light switch is in the AUTO
position, the parking lamp and head-
lamp will be turned ON or OFF auto-
matically depending on the amount
of light outside the vehicle.
Even with the AUTO light feature in
operation, it is recommended to
manually turn ON the headlamps
when driving at night or in a fog, or
when you enter dark areas, such as
tunnels and parking facilities.• Do not cover or spill anything on
the sensor (1) located on the
instrument panel.
• Do not clean the sensor using a
window cleaner, the cleanser
may leave a light film which
could interfere with sensor oper-
ation.
• If your vehicle has window tint
or other types of metallic coat-
ing on the front windscreen, the
AUTO light system may not work
properly.
NOTICE
LIGHT
OLF044085R
OLF044084R
Page 177 of 504
3-93
Convenient features of your vehicle
3
Parking lamp position ( )
The parking lamp, licence plate lamp
and instrument panel lamps are
turned ON.
Headlamp position ( )
The headlamp, parking lamp, licence
plate lamp and instrument panel
lamps are turned ON.
Information
The ignition switch button must be in
the ON position to turn on the head-
lamp.
High beam operation
To turn on the high beam headlamp,
push the lever away from you. The
lever will return to its original posi-
tion.
The high beam indicator will light
when the headlamp high beams are
switched on.
To turn off the high beam headlamp,
pull the lever towards you. The low
beams will turn on.
i
OLF044086ROLF044087R
OLF044192R