2015 Hyundai Sonata instrument panel
[x] Cancel search: instrument panelPage 82 of 504
2-65
Safety system of your vehicle
2
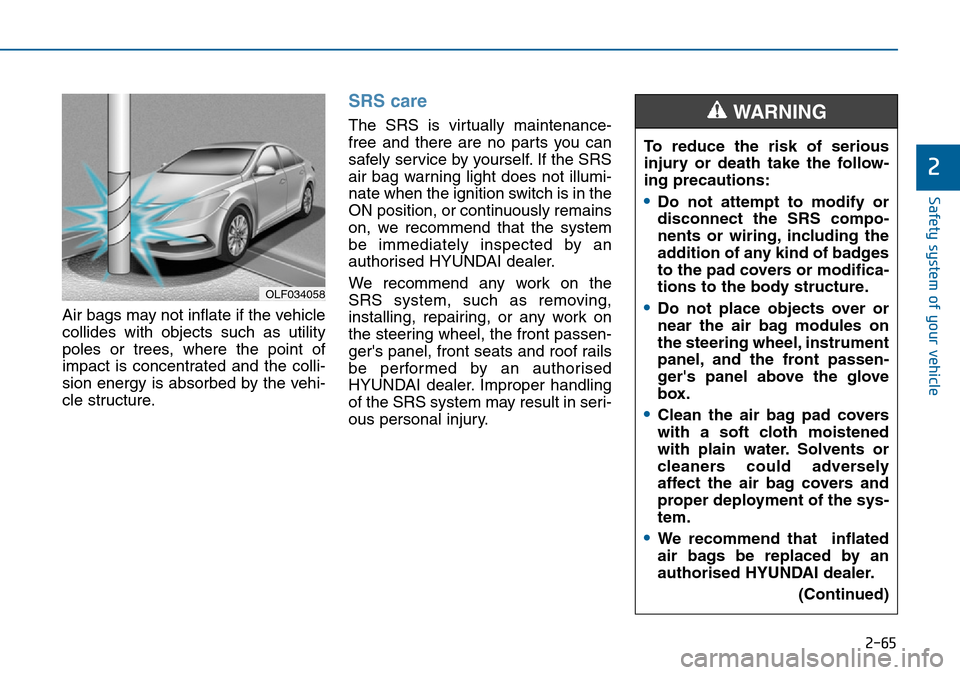
Air bags may not inflate if the vehicle
collides with objects such as utility
poles or trees, where the point of
impact is concentrated and the colli-
sion energy is absorbed by the vehi-
cle structure.
SRS care
The SRS is virtually maintenance-
free and there are no parts you can
safely service by yourself. If the SRS
air bag warning light does not illumi-
nate when the ignition switch is in the
ON position, or continuously remains
on, we recommend that the system
be immediately inspected by an
authorised HYUNDAI dealer.
We recommend any work on the
SRS system, such as removing,
installing, repairing, or any work on
the steering wheel, the front passen-
ger's panel, front seats and roof rails
be performed by an authorised
HYUNDAI dealer. Improper handling
of the SRS system may result in seri-
ous personal injury.
OLF034058
To reduce the risk of serious
injury or death take the follow-
ing precautions:
•Do not attempt to modify or
disconnect the SRS compo-
nents or wiring, including the
addition of any kind of badges
to the pad covers or modifica-
tions to the body structure.
•Do not place objects over or
near the air bag modules on
the steering wheel, instrument
panel, and the front passen-
ger's panel above the glove
box.
•Clean the air bag pad covers
with a soft cloth moistened
with plain water. Solvents or
cleaners could adversely
affect the air bag covers and
proper deployment of the sys-
tem.
•We recommend that inflated
air bags be replaced by an
authorised HYUNDAI dealer.
(Continued)
WARNING
Page 85 of 504
Convenient features of your vehicle
Accessing your vehicle .........................................3-4
Remote key .......................................................................3-4
Remote key precautions..................................................3-6
Smart key ...........................................................................3-8
Smart key precautions...................................................3-11
Battery replacement .....................................................3-12
Immobiliser system .........................................................3-13
Door locks .............................................................3-14
Operating door locks from outside the vehicle .....3-14
Operating door locks from inside the vehicle ........3-16
Auto door lock/unlock features ................................3-18
Child-protector rear door locks ..................................3-19
Theft-alarm system.............................................3-20
Driver position memory system .........................3-21
Storing memory positions .............................................3-21
Easy access function .....................................................3-22
Steering wheel......................................................3-23
Electric power steering (EPS) ......................................3-23
Tilt steering / Telescope steering...............................3-24
Heated steering wheel ...................................................3-25
Horn ....................................................................................3-25
Mirrors ...................................................................3-26
Inside rearview mirror....................................................3-26
Outside rearview mirror ................................................3-27
Reverse parking aid function.......................................3-30
Windows ................................................................3-32
Power windows ................................................................3-32
Panorama sunroof ...............................................3-37
Sunshade ...........................................................................3-38
Sliding the sunroof ........................................................3-38
Tilting the sunroof ........................................................3-39
Closing the sunroof ........................................................3-39
Resetting the sunroof ....................................................3-41
Exterior features .................................................3-42
Bonnet................................................................................3-42
Boot ....................................................................................3-43
Emergency boot safety release ..................................3-44
Boot lid control switch...................................................3-45
Smart boot ........................................................................3-46
Fuel filler door .................................................................3-49
Emergency fuel filler lid release .................................3-52
Instrument cluster................................................3-53
Instrument panel control ...............................................3-54
LCD display control.........................................................3-55
Gauges ...............................................................................3-55
LCD display ...........................................................3-60
LCD modes ........................................................................3-60
Trip computer mode .......................................................3-61
Turn By Turn (TBT) mode .............................................3-62
A/V mode ..........................................................................3-62
3
Page 105 of 504
3-21
Convenient features of your vehicle
3
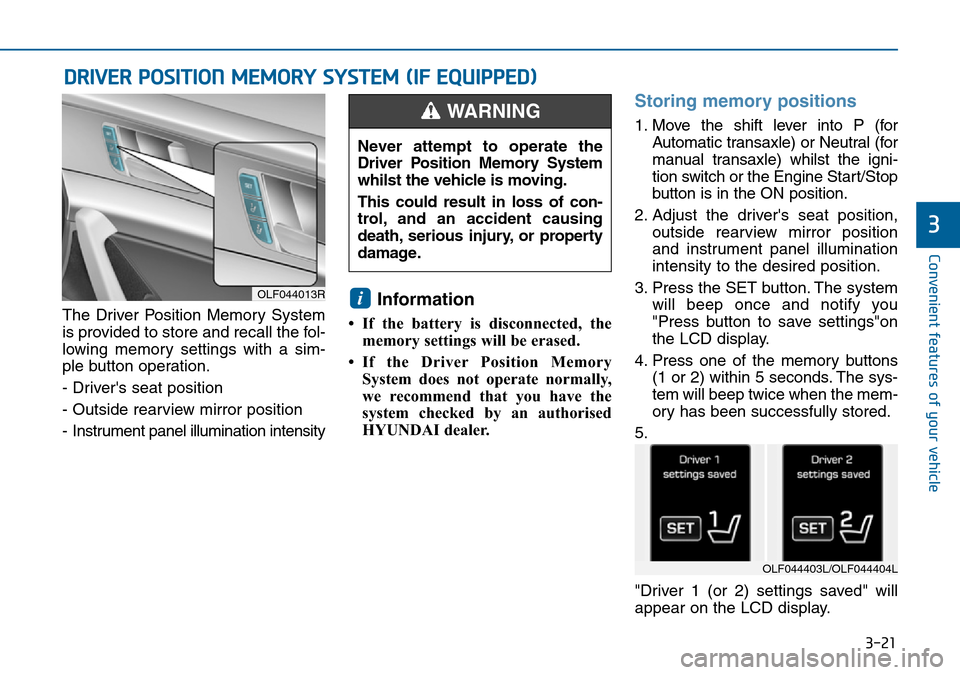
The Driver Position Memory System
is provided to store and recall the fol-
lowing memory settings with a sim-
ple button operation.
- Driver's seat position
- Outside rearview mirror position
- Instrument panel illumination intensityInformation
• If the battery is disconnected, the
memory settings will be erased.
• If the Driver Position Memory
System does not operate normally,
we recommend that you have the
system checked by an authorised
HYUNDAI dealer.
Storing memory positions
1. Move the shift lever into P (for
Automatic transaxle) or Neutral (for
manual transaxle) whilst the igni-
tion switch or the Engine Start/Stop
button is in the ON position.
2. Adjust the driver's seat position,
outside rearview mirror position
and instrument panel illumination
intensity to the desired position.
3. Press the SET button. The system
will beep once and notify you
"Press button to save settings"on
the LCD display.
4. Press one of the memory buttons
(1 or 2) within 5 seconds. The sys-
tem will beep twice when the mem-
ory has been successfully stored.
5.
"Driver 1 (or 2) settings saved" will
appear on the LCD display.
i
DRIVER POSITION MEMORY SYSTEM (IF EQUIPPED)
OLF044013R
Never attempt to operate the
Driver Position Memory System
whilst the vehicle is moving.
This could result in loss of con-
trol, and an accident causing
death, serious injury, or property
damage.
WARNING
OLF044403L/OLF044404L
Page 106 of 504
3-22
Convenient features of your vehicle
Recalling memory position
1. Move the shift lever into P (for
Automatic transaxle) or Neutral (for
manual transaxle) whilst the igni-
tion switch or the Engine Start/Stop
button is in the ON position.
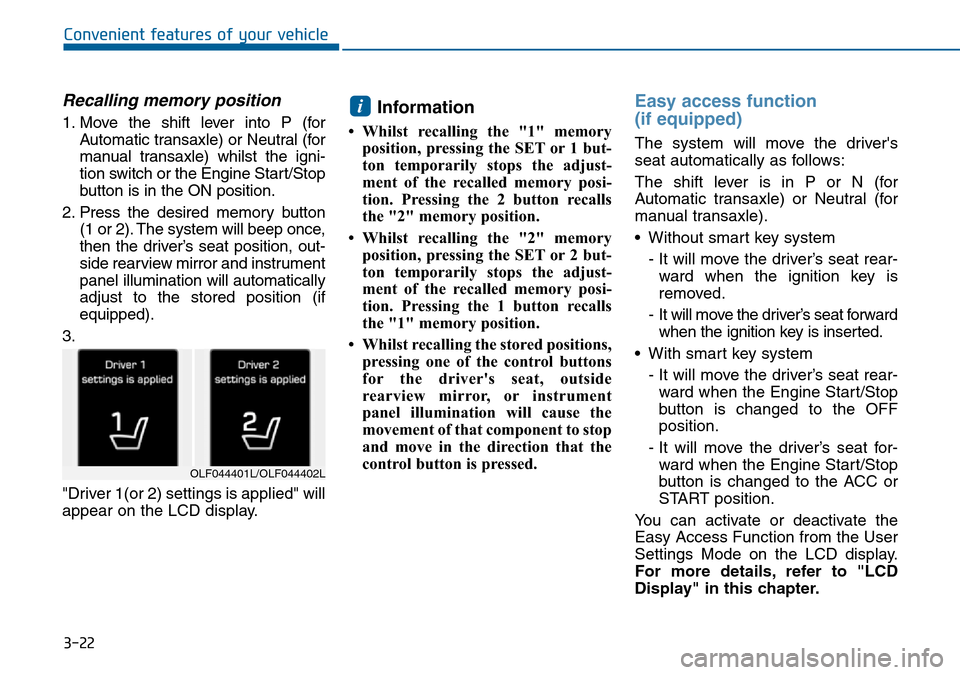
2. Press the desired memory button
(1 or 2). The system will beep once,
then the driver’s seat position, out-
side rearview mirror and instrument
panel illumination will automatically
adjust to the stored position (if
equipped).
3.
"Driver 1(or 2) settings is applied" will
appear on the LCD display.Information
• Whilst recalling the "1" memory
position, pressing the SET or 1 but-
ton temporarily stops the adjust-
ment of the recalled memory posi-
tion. Pressing the 2 button recalls
the "2" memory position.
• Whilst recalling the "2" memory
position, pressing the SET or 2 but-
ton temporarily stops the adjust-
ment of the recalled memory posi-
tion. Pressing the 1 button recalls
the "1" memory position.
• Whilst recalling the stored positions,
pressing one of the control buttons
for the driver's seat, outside
rearview mirror, or instrument
panel illumination will cause the
movement of that component to stop
and move in the direction that the
control button is pressed.
Easy access function
(if equipped)
The system will move the driver's
seat automatically as follows:
The shift lever is in P or N (for
Automatic transaxle) or Neutral (for
manual transaxle).
• Without smart key system
- It will move the driver’s seat rear-
ward when the ignition key is
removed.
- It will move the driver’s seat forward
when the ignition key is inserted.
• With smart key system
- It will move the driver’s seat rear-
ward when the Engine Start/Stop
button is changed to the OFF
position.
- It will move the driver’s seat for-
ward when the Engine Start/Stop
button is changed to the ACC or
START position.
You can activate or deactivate the
Easy Access Function from the User
Settings Mode on the LCD display.
For more details, refer to "LCD
Display" in this chapter.
i
OLF044401L/OLF044402L
Page 138 of 504
3-54
Convenient features of your vehicle
Instrument panel control
Instrument panel illumination
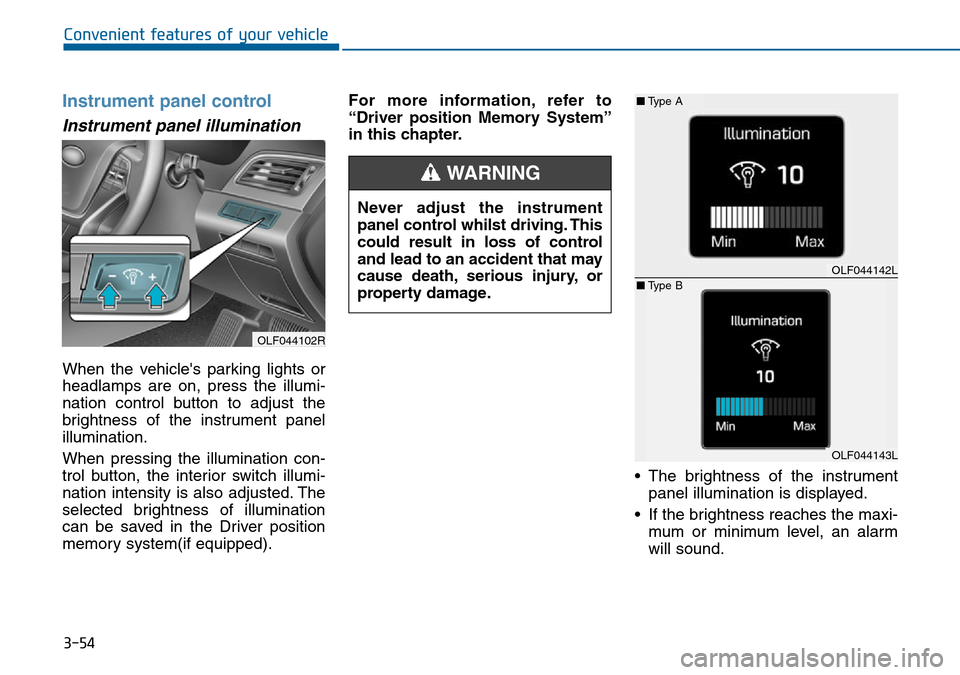
When the vehicle's parking lights or
headlamps are on, press the illumi-
nation control button to adjust the
brightness of the instrument panel
illumination.
When pressing the illumination con-
trol button, the interior switch illumi-
nation intensity is also adjusted. The
selected brightness of illumination
can be saved in the Driver position
memory system(if equipped).For more information, refer to
“Driver position Memory System”
in this chapter.
• The brightness of the instrument
panel illumination is displayed.
• If the brightness reaches the maxi-
mum or minimum level, an alarm
will sound. Never adjust the instrument
panel control whilst driving. This
could result in loss of control
and lead to an accident that may
cause death, serious injury, or
property damage.
WARNING
OLF044142L
OLF044143L
■Type A
■Type B
OLF044102R
Page 176 of 504
3-92
Convenient features of your vehicle
Exterior lights
Lighting control
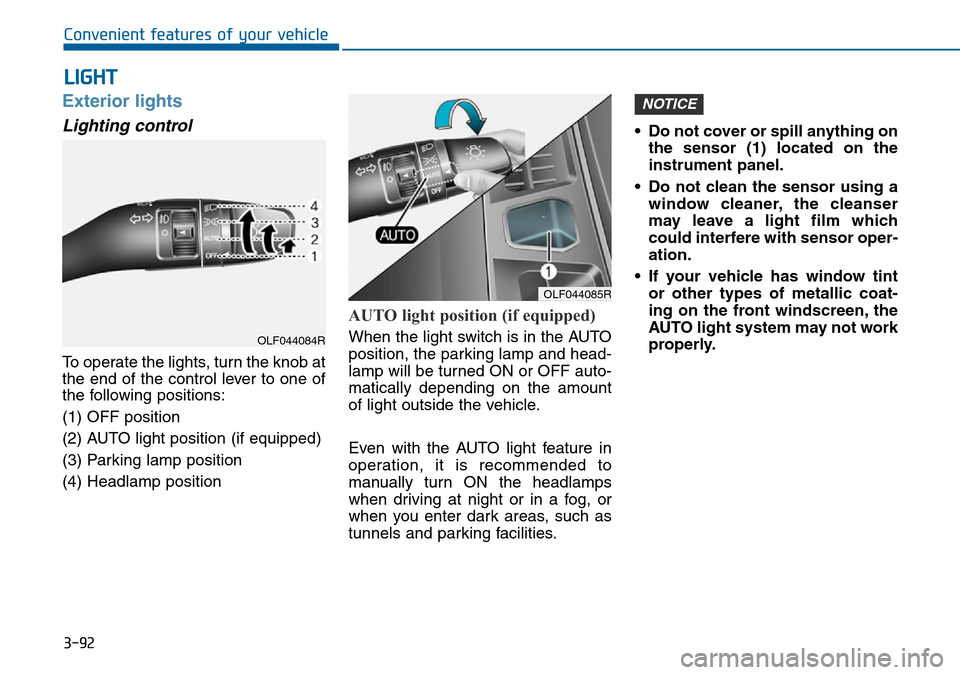
To operate the lights, turn the knob at
the end of the control lever to one of
the following positions:
(1) OFF position
(2) AUTO light position (if equipped)
(3) Parking lamp position
(4) Headlamp position
AUTO light position (if equipped)
When the light switch is in the AUTO
position, the parking lamp and head-
lamp will be turned ON or OFF auto-
matically depending on the amount
of light outside the vehicle.
Even with the AUTO light feature in
operation, it is recommended to
manually turn ON the headlamps
when driving at night or in a fog, or
when you enter dark areas, such as
tunnels and parking facilities.• Do not cover or spill anything on
the sensor (1) located on the
instrument panel.
• Do not clean the sensor using a
window cleaner, the cleanser
may leave a light film which
could interfere with sensor oper-
ation.
• If your vehicle has window tint
or other types of metallic coat-
ing on the front windscreen, the
AUTO light system may not work
properly.
NOTICE
LIGHT
OLF044085R
OLF044084R
Page 177 of 504
3-93
Convenient features of your vehicle
3
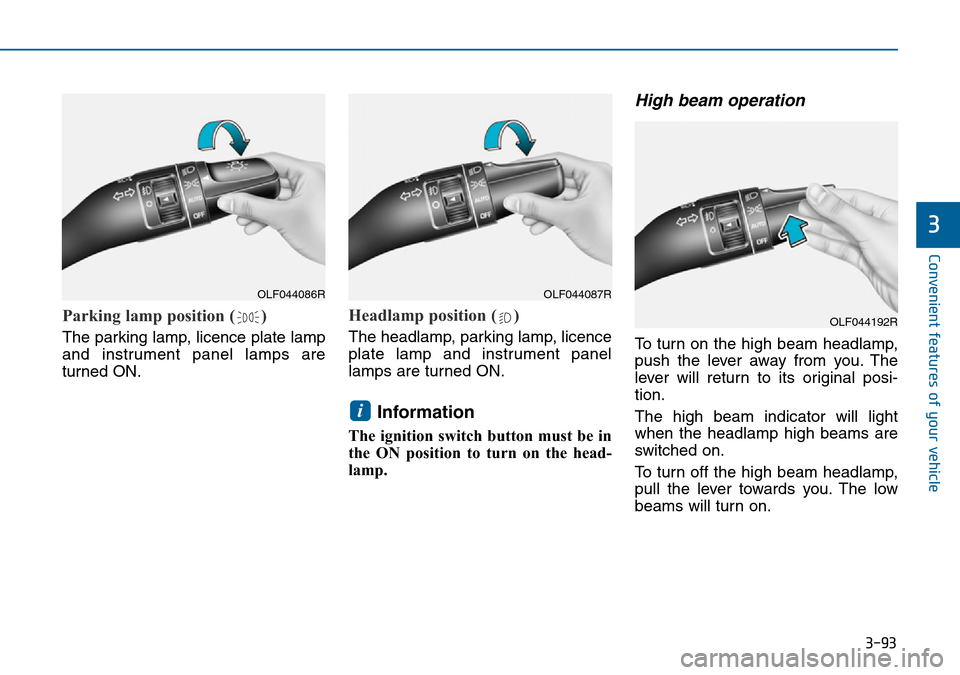
Parking lamp position ( )
The parking lamp, licence plate lamp
and instrument panel lamps are
turned ON.
Headlamp position ( )
The headlamp, parking lamp, licence
plate lamp and instrument panel
lamps are turned ON.
Information
The ignition switch button must be in
the ON position to turn on the head-
lamp.
High beam operation
To turn on the high beam headlamp,
push the lever away from you. The
lever will return to its original posi-
tion.
The high beam indicator will light
when the headlamp high beams are
switched on.
To turn off the high beam headlamp,
pull the lever towards you. The low
beams will turn on.
i
OLF044086ROLF044087R
OLF044192R
Page 199 of 504
3-115
Convenient features of your vehicle
3
DEFROSTER
To prevent damage to the conduc-
tors bonded to the inside surface
of the rear window, never use
sharp instruments or window
cleaners containing abrasives to
clean the window.
Information
If you want to defrost and defog the
front windscreen, refer to
“Windscreen Defrosting and
Defogging” in this chapter.
Rear window defroster
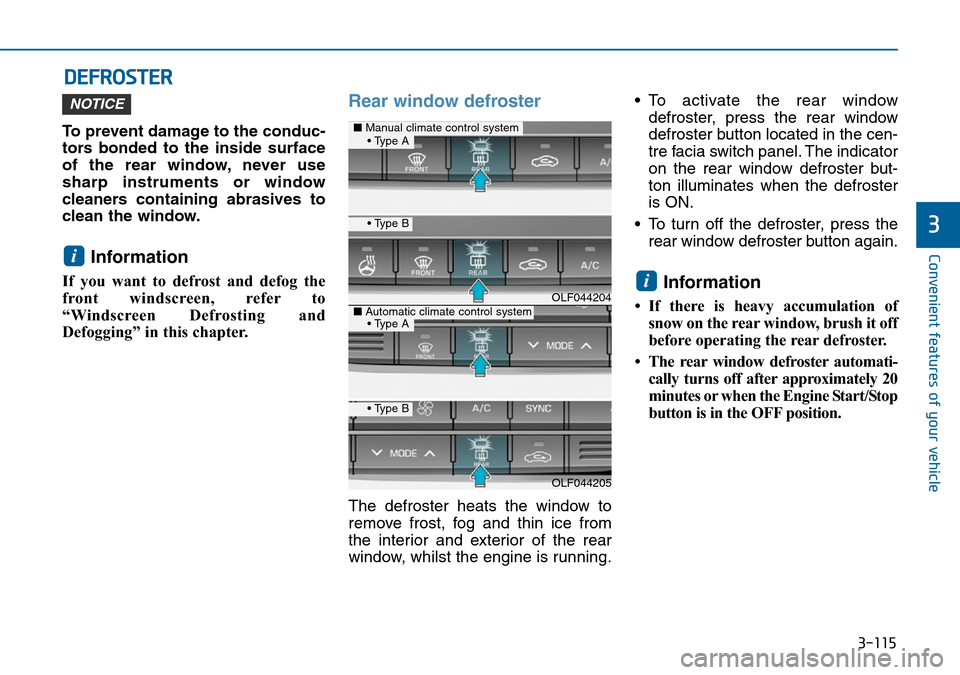
The defroster heats the window to
remove frost, fog and thin ice from
the interior and exterior of the rear
window, whilst the engine is running.• To activate the rear window
defroster, press the rear window
defroster button located in the cen-
tre facia switch panel. The indicator
on the rear window defroster but-
ton illuminates when the defroster
is ON.
• To turn off the defroster, press the
rear window defroster button again.
Information
• If there is heavy accumulation of
snow on the rear window, brush it off
before operating the rear defroster.
• The rear window defroster automati-
cally turns off after approximately 20
minutes or when the Engine Start/Stop
button is in the OFF position.
i
i
NOTICE
OLF044204
OLF044205
■Manual climate control system
■Automatic climate control system
• Type B
• Type B
• Type A
• Type A