2015 Hyundai Santa Fe Sport warning lights
[x] Cancel search: warning lightsPage 74 of 785
353
Safety features of your vehicle
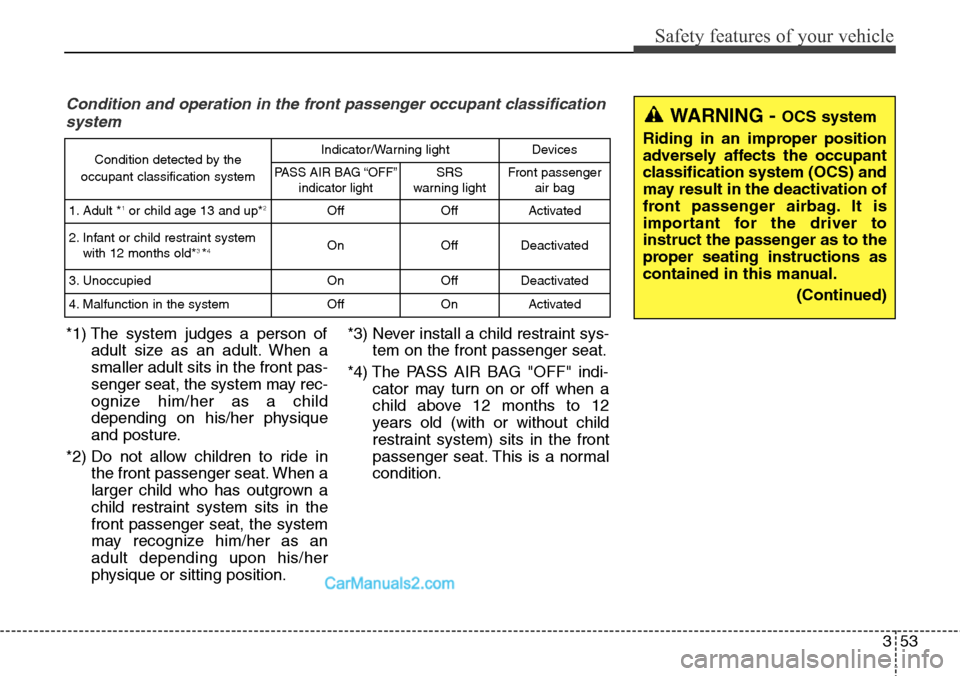
Condition and operation in the front passenger occupant classification
system
*1) The system judges a person of
adult size as an adult. When a
smaller adult sits in the front pas-
senger seat, the system may rec-
ognize him/her as a child
depending on his/her physique
and posture.
*2) Do not allow children to ride in
the front passenger seat. When a
larger child who has outgrown a
child restraint system sits in the
front passenger seat, the system
may recognize him/her as an
adult depending upon his/her
physique or sitting position.*3) Never install a child restraint sys-
tem on the front passenger seat.
*4) The PASS AIR BAG "OFF" indi-
cator may turn on or off when a
child above 12 months to 12
years old (with or without child
restraint system) sits in the front
passenger seat. This is a normal
condition.
WARNING - OCS system
Riding in an improper position
adversely affects the occupant
classification system (OCS) and
may result in the deactivation of
front passenger airbag. It is
important for the driver to
instruct the passenger as to the
proper seating instructions as
contained in this manual.
(Continued)
Condition detected by the
occupant classification systemIndicator/Warning lightDevices
PASS AIR BAG “OFF”
indicator lightSRS
warning lightFront passenger
air bag
1. Adult *1or child age 13 and up*2OffOffActivated
2. Infant or child restraint system
with 12 months old*3 *4OnOffDeactivated
3. Unoccupied OnOffDeactivated
4. Malfunction in the systemOffOnActivated
Page 95 of 785
Mirrors . . . . . . . . . . . . . . . . . . . . . . . . . . . . . . . . . . 4-62
• Inside rearview mirror . . . . . . . . . . . . . . . . . . . . . . . . 4-62
• Outside rearview mirror. . . . . . . . . . . . . . . . . . . . . . . 4-81
Instrument cluster . . . . . . . . . . . . . . . . . . . . . . . . . 4-84
• Instrument Cluster Control . . . . . . . . . . . . . . . . . . . . 4-85
• LCD Display Control . . . . . . . . . . . . . . . . . . . . . . . . . 4-85
• Gauges . . . . . . . . . . . . . . . . . . . . . . . . . . . . . . . . . . . . . 4-86
• Transaxle Shift Indicator . . . . . . . . . . . . . . . . . . . . . . 4-89
LCD display . . . . . . . . . . . . . . . . . . . . . . . . . . . . . . 4-90
• LCD Modes . . . . . . . . . . . . . . . . . . . . . . . . . . . . . . . . . 4-90
• Service Mode . . . . . . . . . . . . . . . . . . . . . . . . . . . . . . . . 4-91
• User Settings Mode . . . . . . . . . . . . . . . . . . . . . . . . . . . 4-92
• A/V Mode . . . . . . . . . . . . . . . . . . . . . . . . . . . . . . . . . . . 4-95
• Turn By Turn Mode . . . . . . . . . . . . . . . . . . . . . . . . . . 4-95
• Warning Messages . . . . . . . . . . . . . . . . . . . . . . . . . . . . 4-96
Trip computer . . . . . . . . . . . . . . . . . . . . . . . . . . . . 4-103
• Overview . . . . . . . . . . . . . . . . . . . . . . . . . . . . . . . . . . 4-103
• Trip A/B . . . . . . . . . . . . . . . . . . . . . . . . . . . . . . . . . . . 4-104
• Fuel Economy . . . . . . . . . . . . . . . . . . . . . . . . . . . . . . 4-105
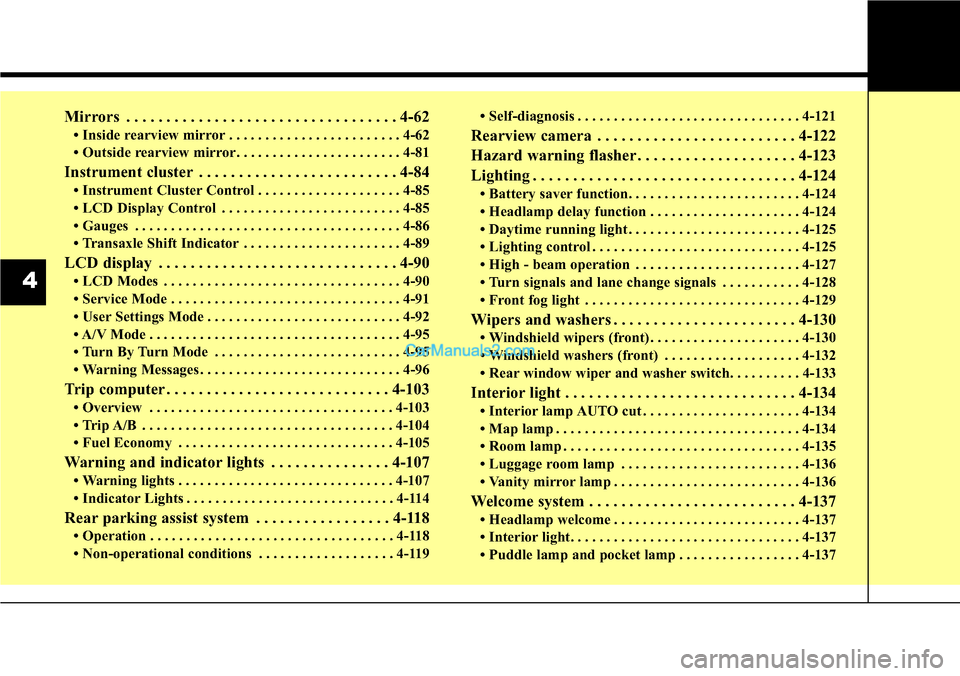
Warning and indicator lights . . . . . . . . . . . . . . . 4-107
• Warning lights . . . . . . . . . . . . . . . . . . . . . . . . . . . . . . 4-107
• Indicator Lights . . . . . . . . . . . . . . . . . . . . . . . . . . . . . 4-114
Rear parking assist system . . . . . . . . . . . . . . . . . 4-118
• Operation . . . . . . . . . . . . . . . . . . . . . . . . . . . . . . . . . . 4-118
• Non-operational conditions . . . . . . . . . . . . . . . . . . . 4-119• Self-diagnosis . . . . . . . . . . . . . . . . . . . . . . . . . . . . . . . 4-121
Rearview camera . . . . . . . . . . . . . . . . . . . . . . . . . 4-122
Hazard warning flasher . . . . . . . . . . . . . . . . . . . . 4-123
Lighting . . . . . . . . . . . . . . . . . . . . . . . . . . . . . . . . . 4-124
• Battery saver function. . . . . . . . . . . . . . . . . . . . . . . . 4-124
• Headlamp delay function . . . . . . . . . . . . . . . . . . . . . 4-124
• Daytime running light . . . . . . . . . . . . . . . . . . . . . . . . 4-125
• Lighting control . . . . . . . . . . . . . . . . . . . . . . . . . . . . . 4-125
• High - beam operation . . . . . . . . . . . . . . . . . . . . . . . 4-127
• Turn signals and lane change signals . . . . . . . . . . . 4-128
• Front fog light . . . . . . . . . . . . . . . . . . . . . . . . . . . . . . 4-129
Wipers and washers . . . . . . . . . . . . . . . . . . . . . . . 4-130
• Windshield wipers (front) . . . . . . . . . . . . . . . . . . . . . 4-130
• Windshield washers (front) . . . . . . . . . . . . . . . . . . . 4-132
• Rear window wiper and washer switch. . . . . . . . . . 4-133
Interior light . . . . . . . . . . . . . . . . . . . . . . . . . . . . . 4-134
• Interior lamp AUTO cut . . . . . . . . . . . . . . . . . . . . . . 4-134
• Map lamp . . . . . . . . . . . . . . . . . . . . . . . . . . . . . . . . . . 4-134
• Room lamp . . . . . . . . . . . . . . . . . . . . . . . . . . . . . . . . . 4-135
• Luggage room lamp . . . . . . . . . . . . . . . . . . . . . . . . . 4-136
• Vanity mirror lamp . . . . . . . . . . . . . . . . . . . . . . . . . . 4-136
Welcome system . . . . . . . . . . . . . . . . . . . . . . . . . . 4-137
• Headlamp welcome . . . . . . . . . . . . . . . . . . . . . . . . . . 4-137
• Interior light. . . . . . . . . . . . . . . . . . . . . . . . . . . . . . . . 4-137
• Puddle lamp and pocket lamp . . . . . . . . . . . . . . . . . 4-137
4
Page 98 of 785
45
Features of your vehicle
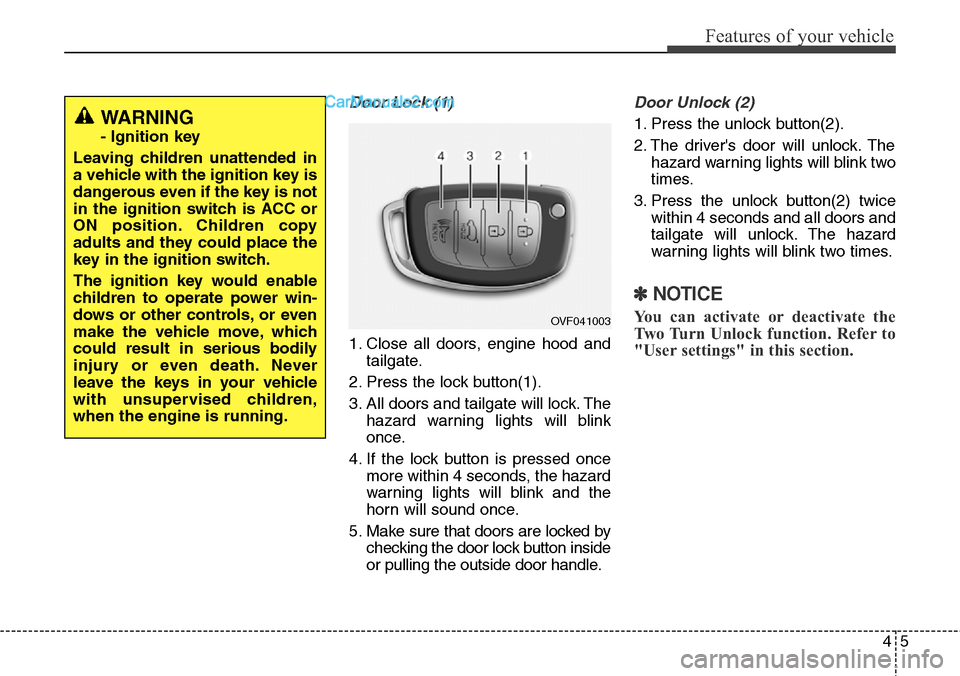
Door Lock (1)
1. Close all doors, engine hood and
tailgate.
2. Press the lock button(1).
3. All doors and tailgate will lock. The
hazard warning lights will blink
once.
4. If the lock button is pressed once
more within 4 seconds, the hazard
warning lights will blink and the
horn will sound once.
5. Make sure that doors are locked by
checking the door lock button inside
or pulling the outside door handle.
Door Unlock (2)
1. Press the unlock button(2).
2. The driver's door will unlock. The
hazard warning lights will blink two
times.
3. Press the unlock button(2) twice
within 4 seconds and all doors and
tailgate will unlock. The hazard
warning lights will blink two times.
✽NOTICE
You can activate or deactivate the
Two Turn Unlock function. Refer to
"User settings" in this section.
WARNING
- Ignition key
Leaving children unattended in
a vehicle with the ignition key is
dangerous even if the key is not
in the ignition switch is ACC or
ON position. Children copy
adults and they could place the
key in the ignition switch.
The ignition key would enable
children to operate power win-
dows or other controls, or even
make the vehicle move, which
could result in serious bodily
injury or even death. Never
leave the keys in your vehicle
with unsupervised children,
when the engine is running.
OVF041003
Page 105 of 785
Features of your vehicle
12 4
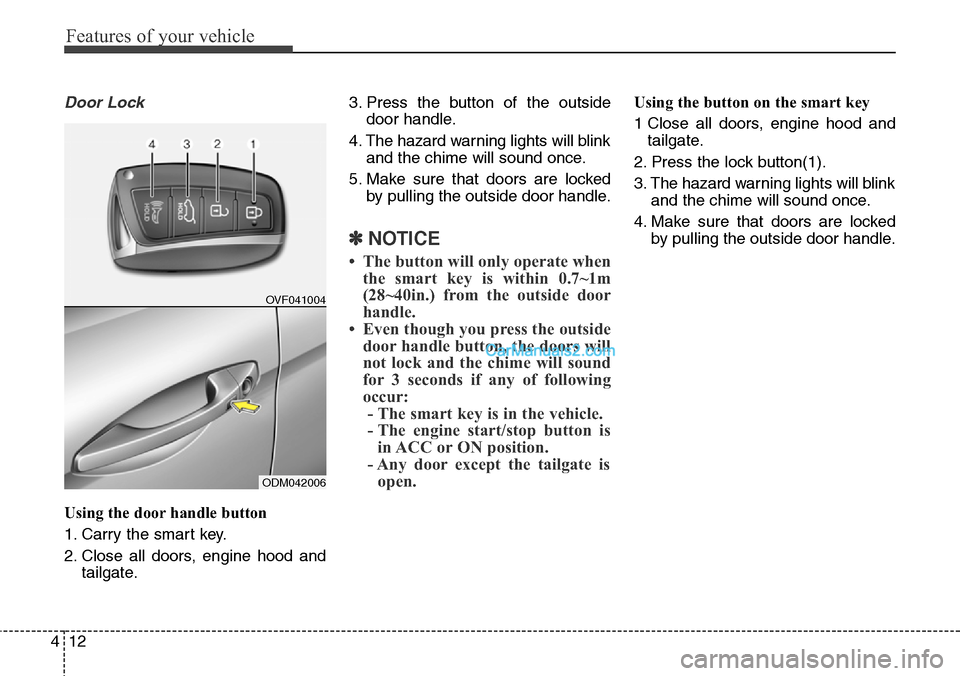
Door Lock
Using the door handle button
1. Carry the smart key.
2. Close all doors, engine hood and
tailgate.3. Press the button of the outside
door handle.
4. The hazard warning lights will blink
and the chime will sound once.
5. Make sure that doors are locked
by pulling the outside door handle.
✽NOTICE
• The button will only operate when
the smart key is within 0.7~1m
(28~40in.) from the outside door
handle.
• Even though you press the outside
door handle button, the doors will
not lock and the chime will sound
for 3 seconds if any of following
occur:
- The smart key is in the vehicle.
- The engine start/stop button is
in ACC or ON position.
- Any door except the tailgate is
open.
Using the button on the smart key
1 Close all doors, engine hood and
tailgate.
2. Press the lock button(1).
3. The hazard warning lights will blink
and the chime will sound once.
4. Make sure that doors are locked
by pulling the outside door handle.
ODM042006OVF041004
Page 106 of 785

413
Features of your vehicle
Unlocking
Using the door handle button
1. Carry the smart key.
2. Press the button of the driver's
outside door handle.
3. The driver’s door will unlock. The
hazard warning lights will blink and
the chime will sound two times.
4. Press the button twice within 4
seconds and all doors and the tail-
gate will unlock and the hazard
warning lights will blink and the
chime will sound two times.
❈If you press the button of the front
passenger’s outside door handle
while carrying the smart key, all
doors will unlock.
✽NOTICE
• The button will only operate when
the smart key is within 0.7~1m
(28~40in.) from the outside door
handle.
• When the smart key is recognized
in the area of 0.7~1m (28~40in.)
from the front outside door han-
dle, other people can also open the
doors.
• After unlocking the driver’s door
or all doors, the door(s) will lock
automatically unless the door is
opened.
Using the button on the smart key
1. Press the unlock button(2) of the
smart key.
2. The driver’s door will unlock. The
hazard warning lights will blink and
the chime will sound two times.
3. Press the unlock button(2) twice
within 4 seconds and all doors and
the tailgate will unlock. The hazard
warning lights will blink and the
chime will sound two times.
✽NOTICE
After pressing the button, the doors
will lock automatically unless any
door is opened within 30 seconds.
✽NOTICE
You can activate or deactivate the
Two Turn Unlock function. Refer to
"User settings" in this section.
Page 107 of 785
Features of your vehicle
14 4
Tailgate unlocking
Using the tailgate handle button
1. Carry the smart key.
2. Press the tailgate handle button.
3. When all doors are locked, the
hazard warning lights will blink two
times.
Once the tailgate is opened and
then closed, the tailgate will lock
automatically.
✽NOTICE
The button will only operate when
the smart key is within 0.7~1m
(28~40in.) from the tailgate handle.
Using the button on the smart key
1. Press the tailgate unlock button(3)
for more than 1 second.
2. When all doors are locked, the
hazard warning lights will blink two
times.
Panic
1. Press the panic button(4) for more
than 1 second.
2. The horn sounds and hazard
warning light flash for about 30
seconds.
✽NOTICE
To stop the horn and lights, press
any button on the smart key.
Start-up
You can start the engine without
inserting the key. For detailed infor-
mation refer to the “Engine start/stop
button” in section 5.
Loss of the smart key
A maximum of 2 smart keys can be
registered to a single vehicle.
If you happen to lose your smart key,
you will not be able to start the
engine. You should immediately take
the vehicle and remaining key to your
authorized HYUNDAI dealer(tow the
vehicle, if necessary) to protect it
from potential theft.
Page 112 of 785
419
Features of your vehicle
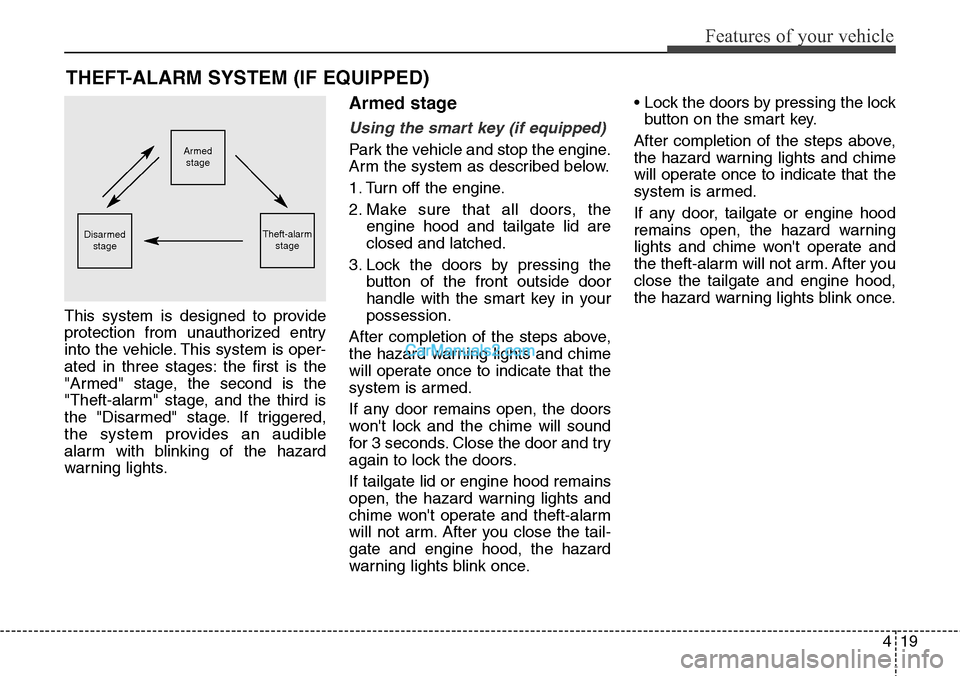
This system is designed to provide
protection from unauthorized entry
into the vehicle. This system is oper-
ated in three stages: the first is the
"Armed" stage, the second is the
"Theft-alarm" stage, and the third is
the "Disarmed" stage. If triggered,
the system provides an audible
alarm with blinking of the hazard
warning lights.
Armed stage
Using the smart key (if equipped)
Park the vehicle and stop the engine.
Arm the system as described below.
1. Turn off the engine.
2. Make sure that all doors, the
engine hood and tailgate lid are
closed and latched.
3. Lock the doors by pressing the
button of the front outside door
handle with the smart key in your
possession.
After completion of the steps above,
the hazard warning lights and chime
will operate once to indicate that the
system is armed.
If any door remains open, the doors
won't lock and the chime will sound
for 3 seconds. Close the door and try
again to lock the doors.
If tailgate lid or engine hood remains
open, the hazard warning lights and
chime won't operate and theft-alarm
will not arm. After you close the tail-
gate and engine hood, the hazard
warning lights blink once.• Lock the doors by pressing the lock
button on the smart key.
After completion of the steps above,
the hazard warning lights and chime
will operate once to indicate that the
system is armed.
If any door, tailgate or engine hood
remains open, the hazard warning
lights and chime won't operate and
the theft-alarm will not arm. After you
close the tailgate and engine hood,
the hazard warning lights blink once.
THEFT-ALARM SYSTEM (IF EQUIPPED)
Armed
stage
Theft-alarm
stageDisarmed
stage
Page 113 of 785
Features of your vehicle
20 4
Using the transmitter (if equipped)
Park the vehicle and stop the engine.
Arm the system as described below.
1. Turn off the engine and remove
the ignition key from the ignition
switch.
2. Make sure that all doors, the
engine hood and tailgate are
closed and latched.
3. Lock the doors by pressing the
lock button on the transmitter.
After completion of the steps above,
the hazard warning lights will blink
once to indicate that the system is
armed.
If any door, tailgate or engine hood
remains open, the hazard warning
lights won't operate and theft-alarm
will not arm. After you close all doors,
tailgate and engine hood, the hazard
warning lights blink once.
Using the mechanical key
Park the vehicle and stop the engine.
Arm the system as described below.
1. Turn off the engine and remove
the key from the ignition switch(if
equipped).
2. Make sure that all doors, the
engine hood and tailgate are
closed and latched.
3. Lock the doors by inserting the key
into the key hole on the front out-
side door handle and turning the
key toward the rear of the vehicle.
If any door, tailgate or engine hood
remains open, the theft-alarm will not
arm.
✽NOTICE
If you lock or unlock the doors by
using the mechanical key, the haz-
ard warning light won't operate.
Do not arm the system until all
passengers have left the vehicle. If
the system is armed while a pas-
senger(s) remains in the vehicle,
the alarm may be activated when
the remaining passenger(s) leave
the vehicle. If any door (or trunk)
or engine hood is opened within
30 seconds after the system
enters the armed stage, the sys-
tem is disarmed to prevent an
unnecessary alarm.