Page 559 of 785
Features of your vehicle
466 4
SETUP
Starting Mode
Press the key to display the
Setup screen.
You can select and control options
related to [Display], [Sound],
[Clock/Calendar], [Phone] and
[System].
Display Settings
Adjusting the Brightness
Press the key Select
[Display] Select [Brightness]
Use the , buttons to adjust the
screen brightness or set the
Brightness on Automatic, Daylight, or
Night mode.
Press the button to reset.
1) Automatic : Adjusts the brightness
automatically
2) Daylight : Always maintains the
brightness on high
3) Night : Always maintains the
brightness on low
Pop-up Mode
Press the key Select
[Display] Select [Mode Pop up]
This feature is used to display the
Pop-up Mode screen when entering
radio and media modes.
When this feature is turned on,
pressing the or key
will display the Pop-up Mode screen.
✽NOTICE
The media Pop-up Mode screen can
be displayed only when two or more
media modes have been connected.
MEDIA RADIO
SETUP
Default
SETUP SETUP
Page 560 of 785
4467
Features of your vehicle
Text Scroll
Press the key Select
[Display] Select [Text Scroll]
This feature is used to scroll text dis-
played on the screen when it is too
long to be displayed at once.
When turned on, the text is repeat-
edly scrolled. When turned off, the
text is scrolled just once.
MP3 Information Display
Press the key Select
[Display] Select [Media Display]
This feature is used to change the
information displayed within USB
and MP3 CD modes.
1) Folder File : Displays file name
and folder name
2) Album Artist Song : Displays
album name/artist name/song
Sound Settings
Sound Settings
Press the key Select
[Sound] Select [Sound Setting]
Use the , , , buttons to
adjust the Fader/Balance settings.
Use the , buttons to adjust the
Bass/Middle/Treble settings.
Press the button to reset.
Default
SETUP
SETUP SETUP
Page 563 of 785
Features of your vehicle
470 4
Calendar Setting
Press the key Select
[Clock/Calendar] Select [Calendar
Settings]
Use the , buttons to set the
Month, Day and Year setting.
Time Format
Press the key Select
[Clock/Calendar] Select [Time Format]
This feature is used to change the
clock format between 12hr or 24hr.
Clock Display
Press the key Select
[Clock/Calendar] Select [Clock Display
(Power off)].
This feature is used to display a clock
on the screen when the audio sys-
tem is turned off.
SETUP SETUP SETUP
Page 565 of 785
Features of your vehicle
472 4
Memory Information
Press the key Select
[System] Select [Memory Information]
This feature displays information
related to system memory.
1) Using : Displays capacity currently
in use
2) Capacity : Displays total capacity
REAR VIEW CAMERA
(if equipped)
• The system has been equipped
with a rear view camera for user
safety by allowing a wider rear
range of vision.
• The rear view camera will automat-
ically operate when the ignition key
is turned ON and the transmission
lever is set to R.
• The rear view camera will automat-
ically stop operating when set to a
different lever.
SETUP
CAUTION
The rear view camera has been
equipped with an optical lens to
provide a wider range of vision
and may appear different from
the actual distance. For safety,
directly check the rear and
left/right sides.
Page 567 of 785

Features of your vehicle
474 4
2. Save Destination
“Save Destination” VR command is
used to assign a voice tag to the last
downloaded destination and store it
in a destination directory.
✽NOTICE
The Turn by Turn(TBT) feature
supports the store of ten(10) destina-
tions in the TBT destinations direc-
tory.
3. Route Preview
“Route Preview” VR command allows
the user to preview the route instruc-
tions (upcoming maneuver instruc-
tions) at any time during the route
guidance.
4. Destinations List
“Destinations List” VR command
allows the user to preview and delete
the stored destinations with their
associated voice tags in the Turn by
Turn destinations directory.5. Voice Guidance
“Voice Guidance” VR command
allows the user to mute/unmute the
Turn by Turn(TBT) direction
announcements.
6. Suspend Route
“Suspend Route” VR command
allows the user to suspend and
pause Turn by Turn(TBT) route guid-
ance while in the guidance mode.
7. Resume Route
“Resume Route” VR command
allows the user to resume Turn by
Turn(TBT) route guidance.
➂ (Blue Link
®for SOS)
In the case of an emergency,
requests for help to the Blue Link
®
center.
Call is connected to the Blue Link
®
emergency rescue center. Re-press-
ing the key will end the call.
If already on a Bluetooth
®phone call,
the call will end to connect you to the
Blue Link
®Emergency Rescue Center.
CAUTION
• You cannot talk simultaneous-
ly on the Bluetooth®phone
and Blue Link®phone.
• While on a Bluetooth®call,
pressing the key or
key will display a message
indicating that you are cur-
rently on a call.
• A message will be displayed if
you receive a Bluetooth
®
Bluetooth®Wireless Technology
call while already on a Blue
Link
®call. At this time, press the
key on the steering wheel
remote controller to accept the
call. The phone bell will not ring.
Page 583 of 785

Driving your vehicle
14 5
For smooth operation, depress the
brake pedal when shifting from N
(Neutral) to a forward or reverse gear.Transaxle ranges
The indicator lights in the instrument
cluster displays the shift lever posi-
tion when the ignition switch is in the
ON position.
P (Park)
Always come to a complete stop
before shifting into P (Park). This
position locks the transaxle and pre-
vents the front wheels from rotating.
WARNING - Automatic
transaxle
• Always check the surrounding
areas near your vehicle for
people, especially children,
before shifting a vehicle into
D (Drive) or R (Reverse).
• Before leaving the driver’s
seat, always make sure the
shift lever is in the P (Park)
position; then set the parking
brake fully and shut the
engine off. Unexpected and
sudden vehicle movement
can occur if these precautions
are not followed in the order
identified.
CAUTION
• To avoid damage to your
transaxle, do not accelerate
the engine in R (Reverse) or
any forward gear position with
the brakes on.
• When stopped on an incline,
do not hold the vehicle sta-
tionary with engine power.
Use the service brake or the
parking brake.
• Do not shift from N (Neutral)
or P (Park) into D (Drive), or R
(Reverse) when the engine is
above idle speed.
Page 735 of 785

Maintenance
60 7
102 - Load Index, a numerical code
associated with the maximum
load the tire can carry.
H - Speed Rating Symbol. See the
speed rating chart in this section
for additional information.
Wheel size designation
Wheels are also marked with impor-
tant information that you need if you
ever have to replace one. The follow-
ing explains what the letters and
numbers in the wheel size designa-
tion mean.
Example wheel size designation:
7.0JX17
7.0 - Rim width in inches.
J - Rim contour designation.
17 - Rim diameter in inches.Tire speed ratings
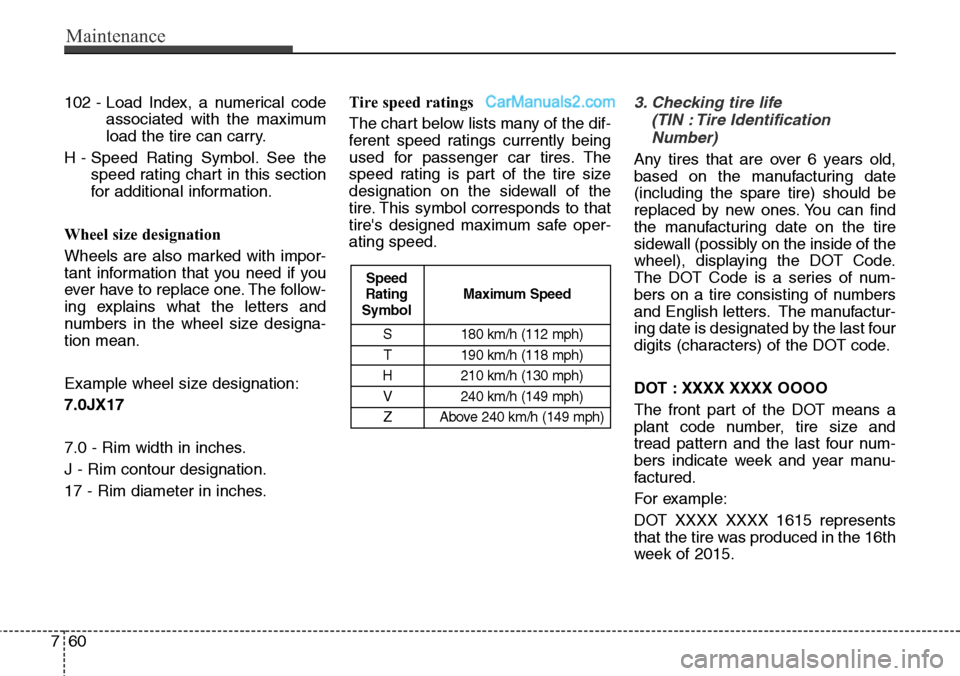
The chart below lists many of the dif-
ferent speed ratings currently being
used for passenger car tires. The
speed rating is part of the tire size
designation on the sidewall of the
tire. This symbol corresponds to that
tire's designed maximum safe oper-
ating speed.3. Checking tire life
(TIN : Tire Identification
Number)
Any tires that are over 6 years old,
based on the manufacturing date
(including the spare tire) should be
replaced by new ones. You can find
the manufacturing date on the tire
sidewall (possibly on the inside of the
wheel), displaying the DOT Code.
The DOT Code is a series of num-
bers on a tire consisting of numbers
and English letters. The manufactur-
ing date is designated by the last four
digits (characters) of the DOT code.
DOT : XXXX XXXX OOOO
The front part of the DOT means a
plant code number, tire size and
tread pattern and the last four num-
bers indicate week and year manu-
factured.
For example:
DOT XXXX XXXX 1615 represents
that the tire was produced in the 16th
week of 2015.
S 180 km/h (112 mph)
T 190 km/h (118 mph)
H 210 km/h (130 mph)
V 240 km/h (149 mph)
Z Above 240 km/h (149 mph)
Maximum Speed Speed
Rating
Symbol