Page 36 of 699

Safety features of your vehicle
16 3
Walk-in seat
(2nd row seat, if equipped)
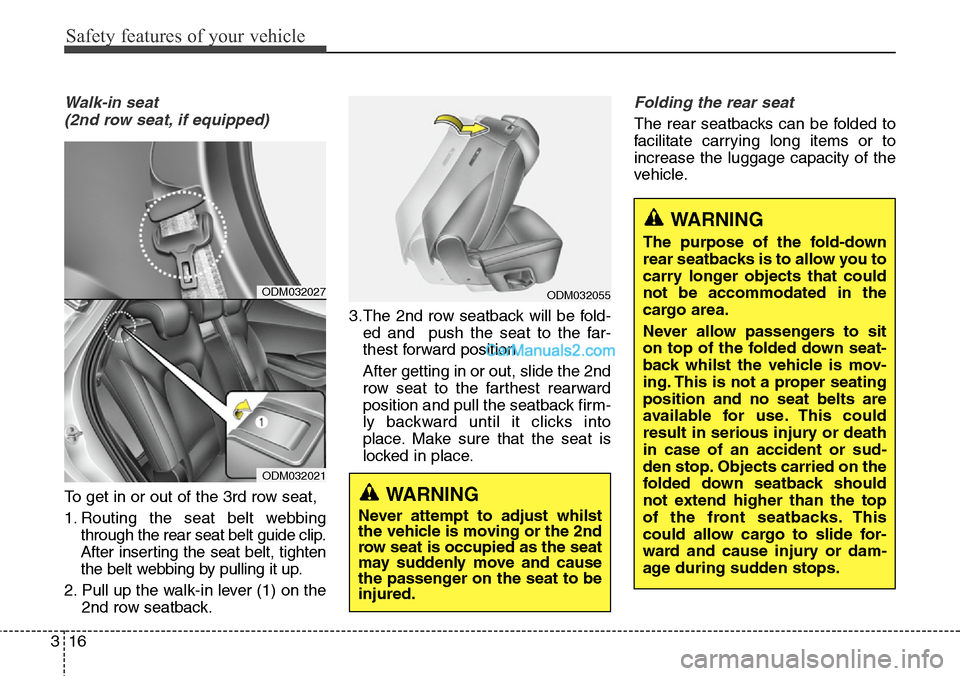
To get in or out of the 3rd row seat,
1. Routing the seat belt webbing
through the rear seat belt guide clip.
After inserting the seat belt, tighten
the belt webbing by pulling it up.
2. Pull up the walk-in lever (1) on the
2nd row seatback.3.The 2nd row seatback will be fold-
ed and push the seat to the far-
thest forward position.
After getting in or out, slide the 2nd
row seat to the farthest rearward
position and pull the seatback firm-
ly backward until it clicks into
place. Make sure that the seat is
locked in place.
Folding the rear seat
The rear seatbacks can be folded to
facilitate carrying long items or to
increase the luggage capacity of the
vehicle.
ODM032055
WARNING
The purpose of the fold-down
rear seatbacks is to allow you to
carry longer objects that could
not be accommodated in the
cargo area.
Never allow passengers to sit
on top of the folded down seat-
back whilst the vehicle is mov-
ing. This is not a proper seating
position and no seat belts are
available for use. This could
result in serious injury or death
in case of an accident or sud-
den stop. Objects carried on the
folded down seatback should
not extend higher than the top
of the front seatbacks. This
could allow cargo to slide for-
ward and cause injury or dam-
age during sudden stops.
WARNING
Never attempt to adjust whilst
the vehicle is moving or the 2nd
row seat is occupied as the seat
may suddenly move and cause
the passenger on the seat to be
injured.
ODM032027
ODM032021
Page 38 of 699
Safety features of your vehicle
18 3
4.Pull on the seatback folding lever,
then fold the seat toward the front
of the vehicle. When you return the
seatback to its upright position,
always be sure it has locked into
position by pushing on the top of
the seatback.
5.To use the rear seat, lift and pull
the seatback backward by pulling
on the folding lever.
Pull the seatback firmly until it
clicks into place.
Make sure the seatback is locked
in place.
6.Return the rear seat belt to the
proper position.■2nd row seat
ODM032028/ODM032029/ODM032030/ODM032031
■3rd row seat
Page 39 of 699
319
Safety features of your vehicle
2nd row seat folding
(from outside, if equipped)
Pull the 2nd row seat back folding
lever out.
The 2nd row seat back will be folded.
If you pull the left side lever (1) out,
left side seat back and centre seat
back will be folded.
If you pull the right side lever (2) out,
right side seat back will be folded.
To fold down the rear centre seat-
back (for 2nd row seat)
1. Lower the rear head restraints to
the lowest position.
2. Push the centre seatback folding
lever up, then fold the seat toward
the front of the vehicle.
When you return the seatback to its
upright position, always be sure it
has locked into position by pushing
on the top of the seatback.
ODM032033ODM032050
WARNING - Rear seat
folding
Do not fold the rear seats (2nd &
3rd row seats), if passengers,
pets or luggage are in the rear
seats.
It may cause injury or damage
to passengers, pets, luggage.
Page 43 of 699
323
Safety features of your vehicle
Armrest (2nd row seat)
To use the armrest, pull it forward
from the seatback.
OUN026140
WARNING
If the tailgate is pushed down to
close it when a passenger's
head is not against a properly
adjusted head restraint or a tall
person is seated, the tailgate
may hit the occupant's head,
which could cause injury.
ODM032025
WARNING
Make sure the head restraint
locks in position after adjusting
it to properly protect the occu-
pants.
Page 47 of 699

327
Safety features of your vehicle
If the driver's seat belt is not fastened
when the ignition switch is turned ON
or if it is unfastened after the ignition
switch is ON, the seat belt warning
chime will sound for approximately 6
seconds. At this time, if the seat belt
is fastened, the chime will stop at
once. (if equipped)Ty p e B
As a reminder to the driver, the dri-
ver’s seat belt warning lights will illu-
minate for approximately 6 seconds
each time you turn the ignition switch
ON regardless of belt fastening.
If the driver’s seat belt is not fastened
when the ignition switch is turned ON
or if it is disconnected after the igni-
tion switch is turned ON, the seat
belt warning light will illuminate until
the belt is fastened.
If you continue not to fasten the seat
belt and you drive over 5 mph (9
km/h), the illuminated warning light
will start to blink until you drive under
3 mph (6 km/h).
If you continue not to fasten the seat
belt and you drive over 12 mph (20
km/h) the seat belt warning chime
will sound for approximately 100 sec-
onds and the corresponding warning
light will blink.Lap/shoulder belt
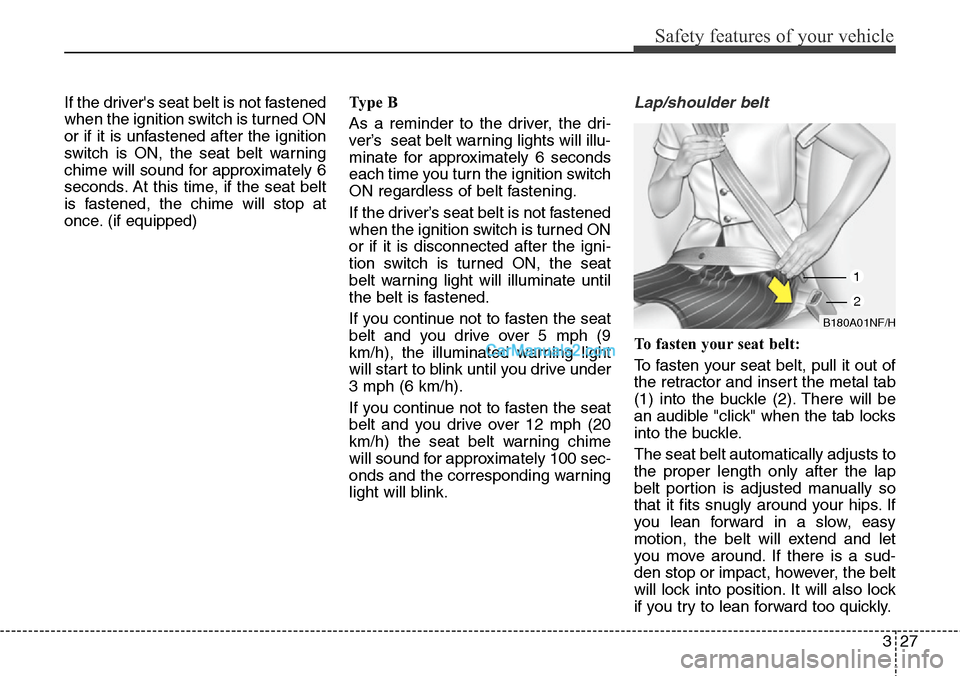
To fasten your seat belt:
To fasten your seat belt, pull it out of
the retractor and insert the metal tab
(1) into the buckle (2). There will be
an audible "click" when the tab locks
into the buckle.
The seat belt automatically adjusts to
the proper length only after the lap
belt portion is adjusted manually so
that it fits snugly around your hips. If
you lean forward in a slow, easy
motion, the belt will extend and let
you move around. If there is a sud-
den stop or impact, however, the belt
will lock into position. It will also lock
if you try to lean forward too quickly.
B180A01NF/H
1
2
Page 48 of 699

Safety features of your vehicle
28 3
✽NOTICE
If you are not able to pull out the
seat belt from the retractor, firmly
pull the belt out and release it. Then
you will be able to pull the belt out
smoothly.
Height adjustment
You can adjust the height of the shoul-
der belt anchor to one of 4 positions
for maximum comfort and safety.
If the height of the seat belt is too
near your neck, you will not be get-
ting the most effective protection.
The shoulder portion should be
adjusted so that it lies across your
chest and midway over your shoulder
nearest the door and not your neck.
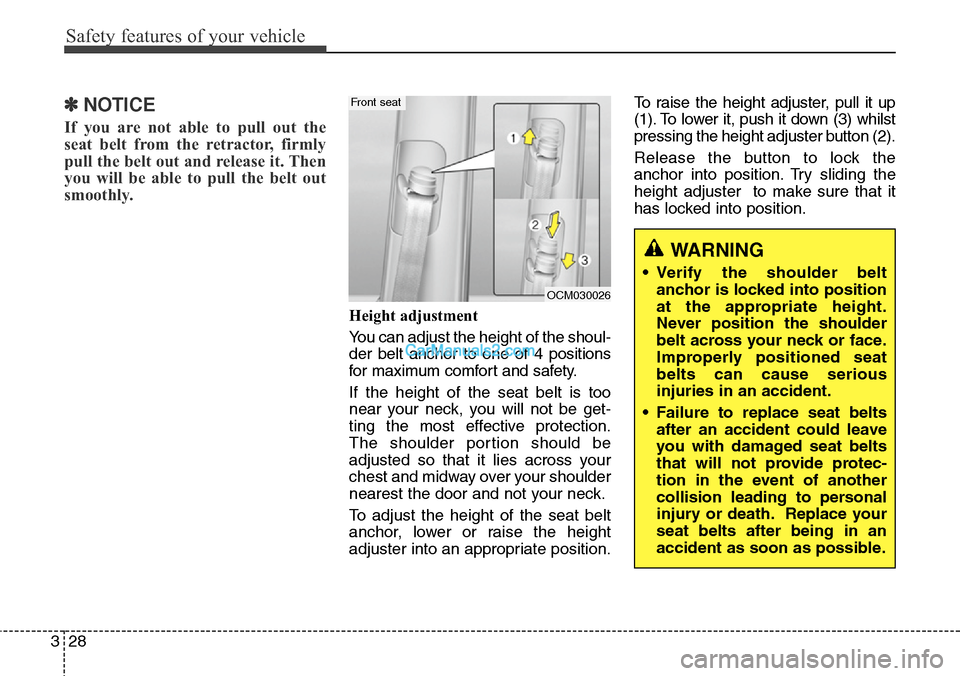
To adjust the height of the seat belt
anchor, lower or raise the height
adjuster into an appropriate position.To raise the height adjuster, pull it up
(1). To lower it, push it down (3) whilst
pressing the height adjuster button (2).
Release the button to lock the
anchor into position. Try sliding the
height adjuster to make sure that it
has locked into position.
OCM030026
Front seat
WARNING
• Verify the shoulder belt
anchor is locked into position
at the appropriate height.
Never position the shoulder
belt across your neck or face.
Improperly positioned seat
belts can cause serious
injuries in an accident.
• Failure to replace seat belts
after an accident could leave
you with damaged seat belts
that will not provide protec-
tion in the event of another
collision leading to personal
injury or death. Replace your
seat belts after being in an
accident as soon as possible.
Page 49 of 699
329
Safety features of your vehicle
When using the rear centre seat belt,
the buckle with the “CENTER” mark
must be used.To release the seat belt:
The seat belt is released by pressing
the release button (1) in the locking
buckle. When it is released, the belt
should automatically draw back into
the retractor.
If this does not happen, check the
belt to be sure it is not twisted, then
try again.
B200A01NF/H
WARNING
You should place the lap belt
portion as low as possible and
snugly across your hips, not on
your waist. If the lap belt is locat-
ed too high on your waist, it may
increase the chance of injury in
the event of a collision. Both
arms should not be under or
over the belt. Rather, one should
be over and the other under, as
shown in the illustration.
Never wear the seat belt under
the arm nearest the door.
ODM032051B210A01NF/H1
Page 51 of 699

331
Safety features of your vehicle
Pre-tensioner seat belt
(if equipped)
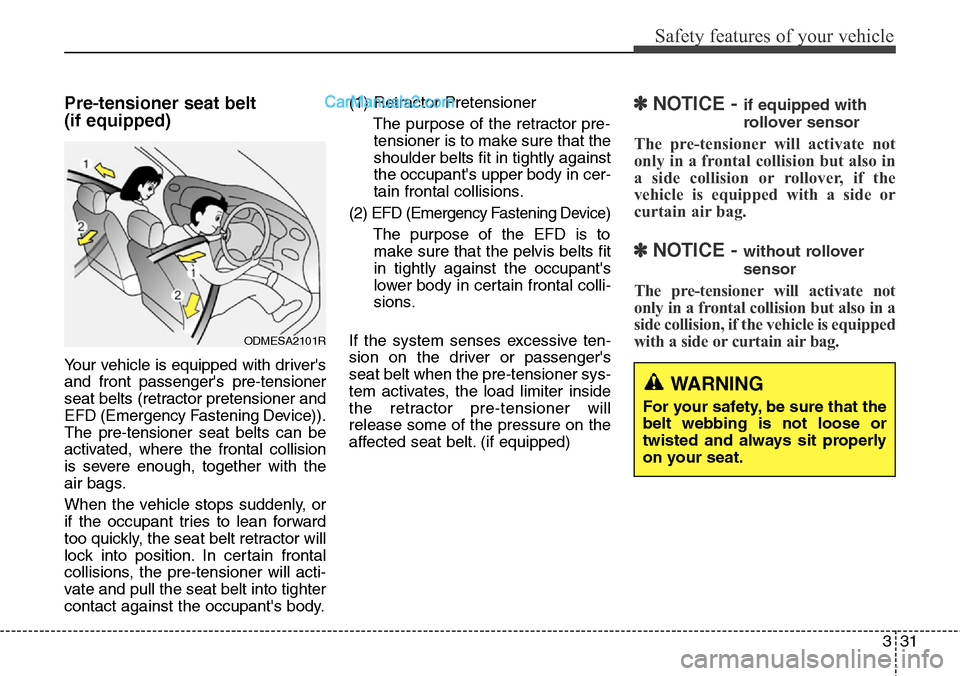
Your vehicle is equipped with driver's
and front passenger's pre-tensioner
seat belts (retractor pretensioner and
EFD (Emergency Fastening Device)).
The pre-tensioner seat belts can be
activated, where the frontal collision
is severe enough, together with the
air bags.
When the vehicle stops suddenly, or
if the occupant tries to lean forward
too quickly, the seat belt retractor will
lock into position. In certain frontal
collisions, the pre-tensioner will acti-
vate and pull the seat belt into tighter
contact against the occupant's body.(1) Retractor Pretensioner
The purpose of the retractor pre-
tensioner is to make sure that the
shoulder belts fit in tightly against
the occupant's upper body in cer-
tain frontal collisions.
(2) EFD (Emergency Fastening Device)
The purpose of the EFD is to
make sure that the pelvis belts fit
in tightly against the occupant's
lower body in certain frontal colli-
sions.
If the system senses excessive ten-
sion on the driver or passenger's
seat belt when the pre-tensioner sys-
tem activates, the load limiter inside
the retractor pre-tensioner will
release some of the pressure on the
affected seat belt. (if equipped)
✽NOTICE - if equipped with
rollover sensor
The pre-tensioner will activate not
only in a frontal collision but also in
a side collision or rollover, if the
vehicle is equipped with a side or
curtain air bag.
✽NOTICE - without rollover
sensor
The pre-tensioner will activate not
only in a frontal collision but also in a
side collision, if the vehicle is equipped
with a side or curtain air bag.
WARNING
For your safety, be sure that the
belt webbing is not loose or
twisted and always sit properly
on your seat.
ODMESA2101R