2015 HYUNDAI I40 light
[x] Cancel search: lightPage 114 of 534
Downloaded from www.Manualslib.com manuals search engine 427
Features of your vehicle
Power windows
The ignition switch must be in the ON
position for power windows to operate.
Each door has a power window switch
that controls the door’s window. The dri-
ver’s door has a master power window
switch that controls all the windows in the
vehicle. Also, the driver has a power win-
dow lock switch which can block the
operation of rear passenger windows.
The power windows can be operated for
approximately 30 seconds after the igni-
tion key is removed or turned to the ACC
or LOCK position. However, if the front
doors are opened, the power windows
cannot be operated even within the 30
seconds period.
✽ ✽NOTICE
While driving with the rear windows
down or with the sunroof (if equipped) in
an open (or partially open position), your
vehicle may demonstrate a wind buffet-
ing or pulsation noise. This noise is a
normal occurrence and can be reduced
or eliminated by taking the following
actions. If the noise occurs with one or
both of the rear windows down, partially
lower both front windows approximate-
ly one inch. If you experience the noise
with the sunroof open, slightly reduce the
size of the sunroof opening.
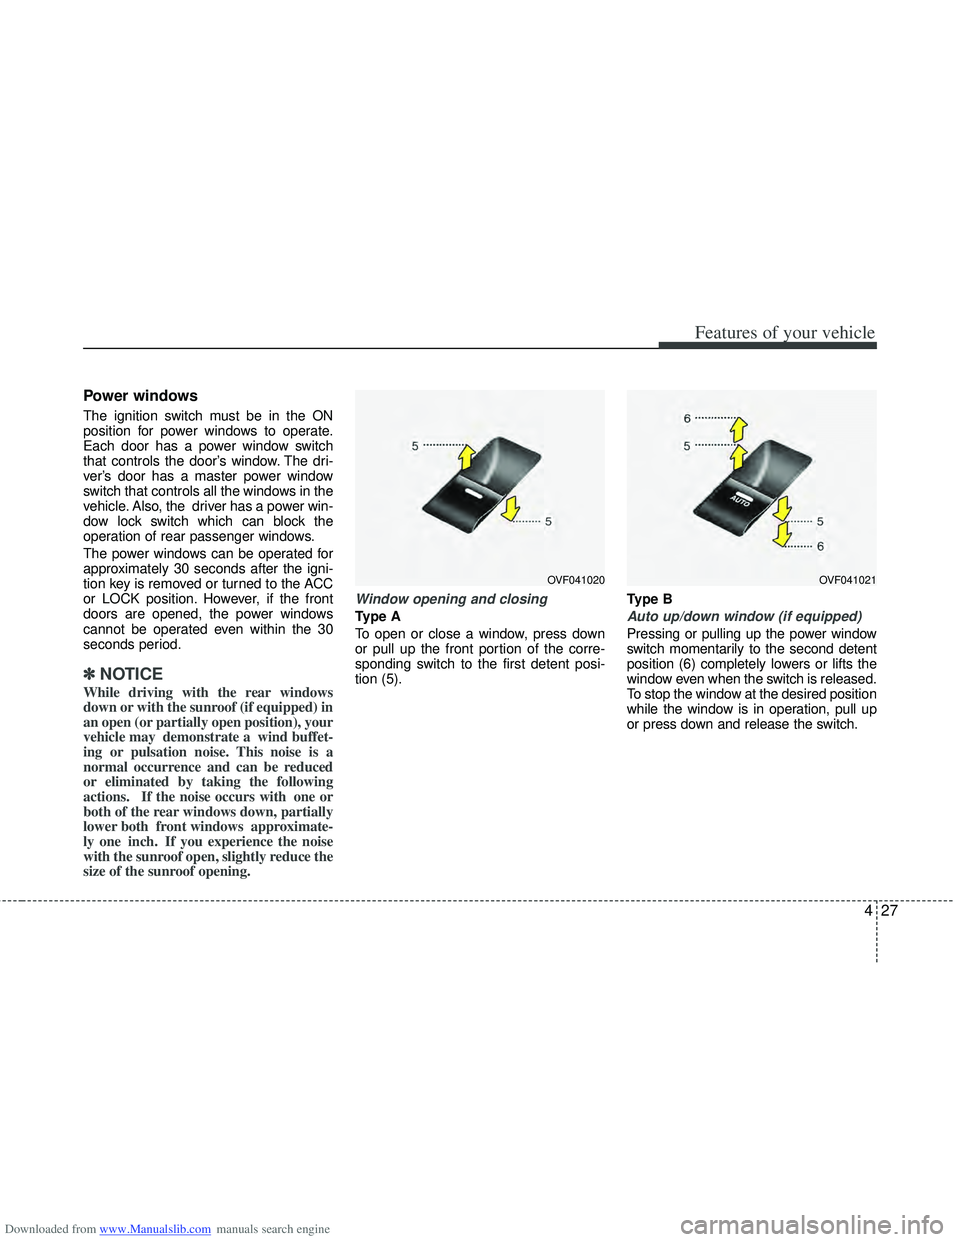
Window opening and closing
Type A
To open or close a window, press down
or pull up the front portion of the corre-
sponding switch to the first detent posi-
tion (5). Type BAuto up/down window (if equipped)
Pressing or pulling up the power window
switch momentarily to the second detent
position (6) completely lowers or lifts the
window even when the switch is released.
To stop the window at the desired position
while the window is in operation, pull up
or press down and release the switch.
OVF041020OVF041021
Page 117 of 534
Downloaded from www.Manualslib.com manuals search engine Features of your vehicle
30
4
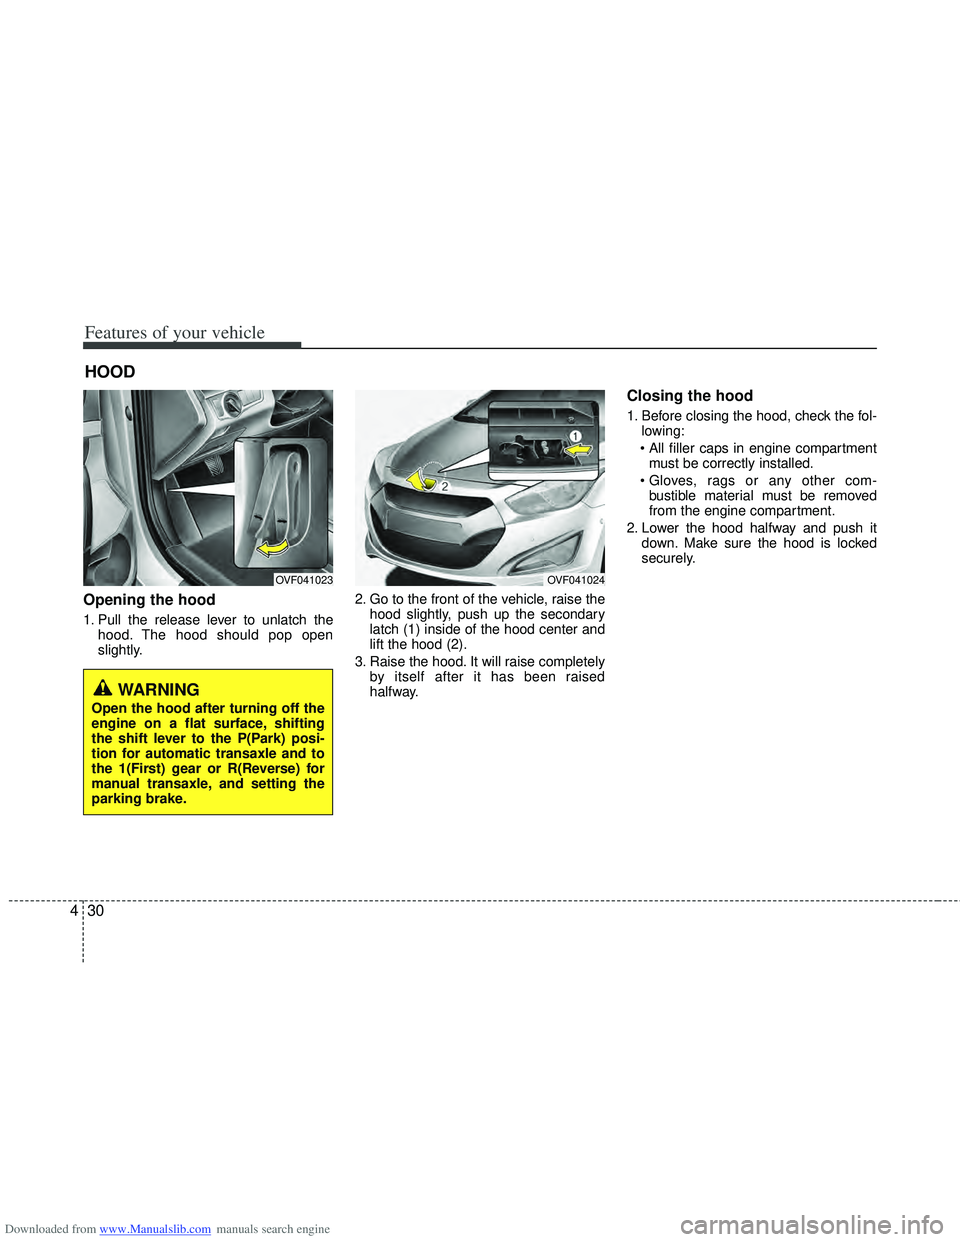
Opening the hood
1. Pull the release lever to unlatch the
hood. The hood should pop open
slightly. 2. Go to the front of the vehicle, raise the
hood slightly, push up the secondary
latch (1) inside of the hood center and
lift the hood (2).
3. Raise the hood. It will raise completely by itself after it has been raised
halfway.
Closing the hood
1. Before closing the hood, check the fol-lowing:
must be correctly installed.
bustible material must be removed
from the engine compartment.
2. Lower the hood halfway and push it down. Make sure the hood is locked
securely.
HOOD
OVF041023OVF041024
WARNING
Open the hood after turning off the
engine on a flat surface, shifting
the shift lever to the P(Park) posi-
tion for automatic transaxle and to
the 1(First) gear or R(Reverse) for
manual transaxle, and setting the
parking brake.
Page 119 of 534
Downloaded from www.Manualslib.com manuals search engine Features of your vehicle
32
4
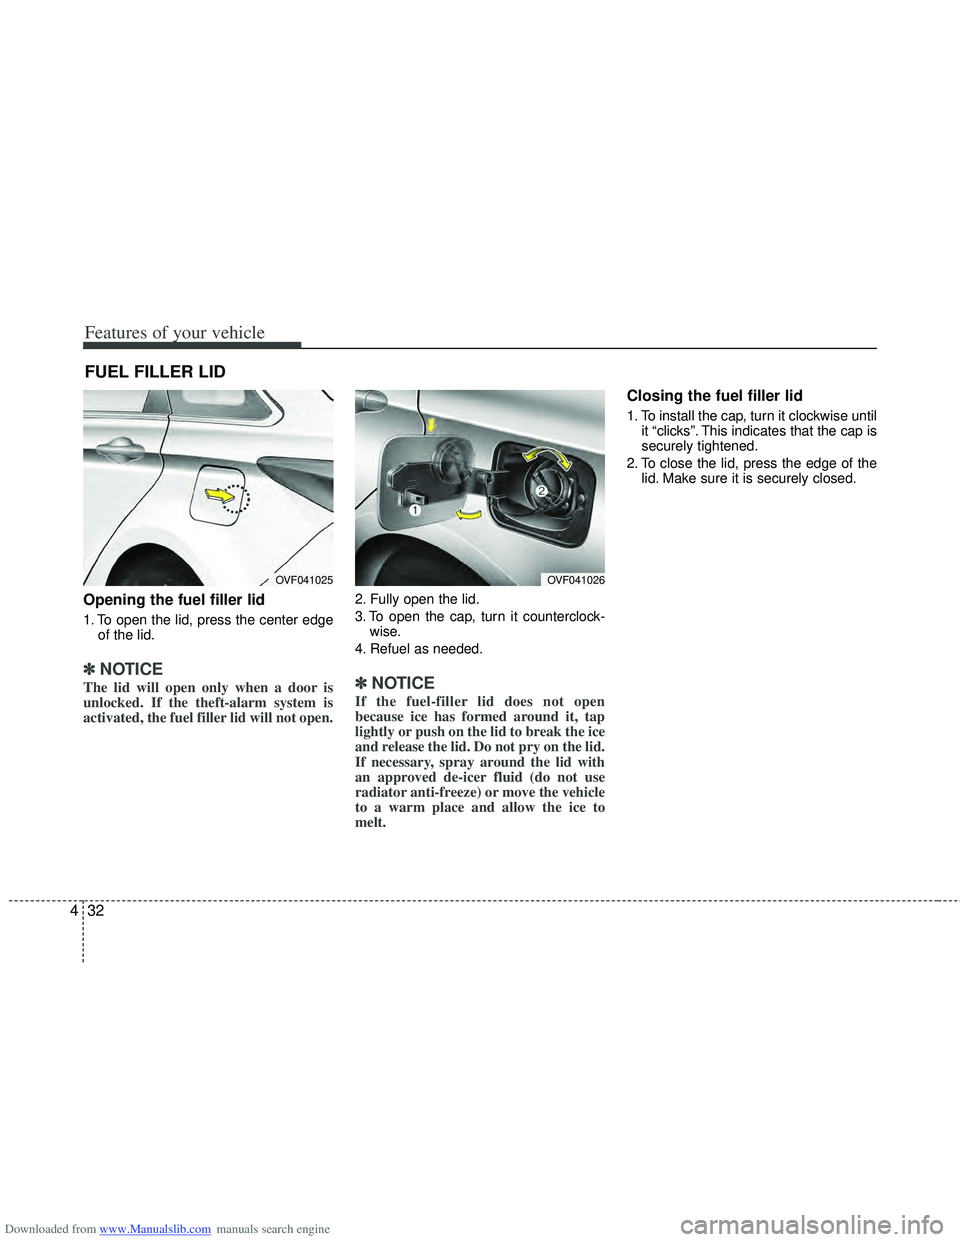
Opening the fuel filler lid
1. To open the lid, press the center edge
of the lid.
✽
✽NOTICE
The lid will open only when a door is
unlocked. If the theft-alarm system is
activated, the fuel filler lid will not open.
2. Fully open the lid.
3. To open the cap, turn it counterclock-
wise.
4. Refuel as needed.
✽ ✽ NOTICE
If the fuel-filler lid does not open
because ice has formed around it, tap
lightly or push on the lid to break the ice
and release the lid. Do not pry on the lid.
If necessary, spray around the lid with
an approved de-icer fluid (do not use
radiator anti-freeze) or move the vehicle
to a warm place and allow the ice to
melt.
Closing the fuel filler lid
1. To install the cap, turn it clockwise until
it “clicks”. This indicates that the cap is
securely tightened.
2. To close the lid, press the edge of the lid. Make sure it is securely closed.
FUEL FILLER LID
OVF041025OVF041026
Page 121 of 534
Downloaded from www.Manualslib.com manuals search engine Features of your vehicle
34
4
(Continued)
Use only portable plastic fuel
containers designed to carry and
store gasoline.
Do not use cellular phones while refueling. Electric current and/or
electronic interference from cel-
lular phones can potentially
ignite fuel vapors causing a fire.
When refueling, always shut the engine off. Sparks produced by
electrical components related to
the engine can ignite fuel vapors
causing a fire. Once refueling is
complete, check to make sure the
filler cap and filler door are
securely closed, before starting
the engine.
DO NOT use matches or a lighter and DO NOT SMOKE or leave a lit
cigarette in your vehicle while at
a gas station especially during
refueling. Automotive fuel is
highly flammable and can, when
ignited, result in fire.
(Continued)(Continued)
If a fire breaks out during refuel-ing, leave the vicinity of the vehi-
cle, and immediately contact the
manager of the gas station and
then contact the local fire depart-
ment. Follow any safety instruc-
tions they provide.CAUTION
Make sure to refuel your vehicle according to the "Fuel require-ments" suggested in section 1.
If the fuel filler cap requires replacement, use only a genuineHYUNDAI cap or the equivalentspecified for your vehicle. An incorrect fuel filler cap can resultin a serious malfunction of the fuel system or emission controlsystem.
Do not spill fuel on the exterior surfaces of the vehicle. Any typeof fuel spilled on painted surfaces may damage the paint.
After refueling, make sure the fuel cap is installed securely to pre-vent fuel spillage in the event of an accident.
Page 128 of 534
Downloaded from www.Manualslib.com manuals search engine 441
Features of your vehicle
Electronic power steering
Power steering uses the motor to assist
you in steering the vehicle. If the engine
is off or if the power steering system
becomes inoperative, the vehicle may
still be steered, but it will require
increased steering effort.
The motor driven power steering is con-
trolled by the power steering control unit
which senses the steering wheel torque
and vehicle speed to command the
motor.
The steering wheel becomes heavier as
the vehicle’s speed increases and
becomes lighter as the vehicle’s speed
decreases for better control of the steer-
ing wheel.
Should you notice any change in the
effort required to steer during normal
vehicle operation, have the power steer-
ing checked by an authorized HYUNDAI
dealer.
✽ ✽NOTICE
The following symptoms may occur dur-
ing normal vehicle operation:
• The EPS warning light does not illumi-
nate.
• The steering effort is high immediately after turning the ignition switch on.
This happens as the system performs
the EPS system diagnostics. When the
diagnostics is completed, the steering
wheel will return to its normal condi-
tion.
• A click noise may be heard from the EPS relay after the ignition switch is
turned to the ON or LOCK/OFF posi-
tion.
• Motor noise may be heard when the vehicle is at a stop or at a low driving
speed.
• The steering effort increases if the steering wheel is rotated continuously
when the vehicle is not in motion.
However, after a few minutes, it will
return to its normal conditions. (Continued)(Continued)
• If the Electronic Power Steering
System does not operate normally, the
warning light will illuminate on the
instrument cluster. The steering wheel
may become difficult to control or
operate abnormally. Take your vehicle
to an authorized HYUNDAI dealer
and have the vehicle checked as soon
as possible.
• When you operate the steering wheel in low temperature, abnormal noise
could occur. If temperature rises, the
noise will disappear. This is a normal
condition.
STEERING WHEEL
Page 129 of 534

Downloaded from www.Manualslib.com manuals search engine Features of your vehicle
42
4
Tilt steering A tilt steering wheel allows you to adjust
the steering wheel before you drive. You
can also raise it to give your legs more
room when you exit and enter the vehicle
(if equipped).
The steering wheel should be positioned
so that it is comfortable for you to drive,
while permitting you to see the instru-
ment panel warning lights and gauges.
To change the steering wheel angle, pull
down the lock release lever (1), adjust
the steering wheel to the desired angle
(2) and height (3), then pull up the lock-
release lever to lock the steering wheel in
place. Be sure to adjust the steering
wheel to the desired position before driv-
ing.
Heated steering wheel
(if equipped)
With the ignition switch in the ON posi-
tion, pressing the heated steering wheel
button warms the steering wheel. The
indicator on the button will illuminate and
notify you on the LCD display.
To turn the heated steering wheel off,
press the button once again. The indica-
tor on the button will turn off and notify
you on the LCD display.
✽ ✽NOTICE
The heated steering wheel will turn off
automatically approximately 30 minutes
after the heated steering wheel is turned
on.
WARNING
Never adjust the angle and height
of steering wheel while driving.
You may lose your steering con-
trol and cause severe personal
injury or accidents.
After adjusting, push the steering wheel both up and down to be
certain it is locked in position.
OVF041031OVF041032
Page 131 of 534

Downloaded from www.Manualslib.com manuals search engine Features of your vehicle
44
4
Inside rearview mirror
Adjust the rearview mirror so that the
center view through the rear window is
seen. Make this adjustment before you
start driving.
Day/night rearview mirror (if equipped)
Make this adjustment before you start
driving and while the day/night lever is in
the day position.
Pull the day/night lever toward you to
reduce glare from the headlights of vehi-
cles behind you during night driving.
Remember that you lose some rearview
clarity in the night position. Electric chromic mirror (ECM)
(if equipped)
The electric rearview mirror automatical-
ly controls the glare from the headlights
of the car behind you in nighttime or low
light driving conditions. The sensor
mounted in the mirror senses the light
level around the vehicle, and automati-
cally controls the headlight glare from
vehicles behind you.
When the engine is running, the glare is
automatically controlled by the sensor
mounted in the rearview mirror.
Whenever the shift lever is shifted into R
(Reverse), the mirror will automatically
go to the brightest setting in order to
improve the drivers view behind the vehi-
cle.
MIRRORS
WARNING - Rear visibility
Do not place objects in the rear
seat or cargo area which would
interfere with your vision out the
rear window.
OVF041034
CAUTION
When cleaning the mirror, use a paper towel or similar materialdampened with glass cleaner. Donot spray glass cleaner directly onthe mirror as that may cause the liq- uid cleaner to enter the mirror hous-ing.
Day
Night
WARNING
Do not adjust the rearview mirror
while the vehicle is moving. This
could result in loss of control, and
an accident which could cause
death, serious injury or property
damage.
WARNING
Do not modify the inside mirror and
do not install a wide mirror. It could
result in injury, during an accident
or deployment of the air bag.
Page 132 of 534
Downloaded from www.Manualslib.com manuals search engine 445
Features of your vehicle
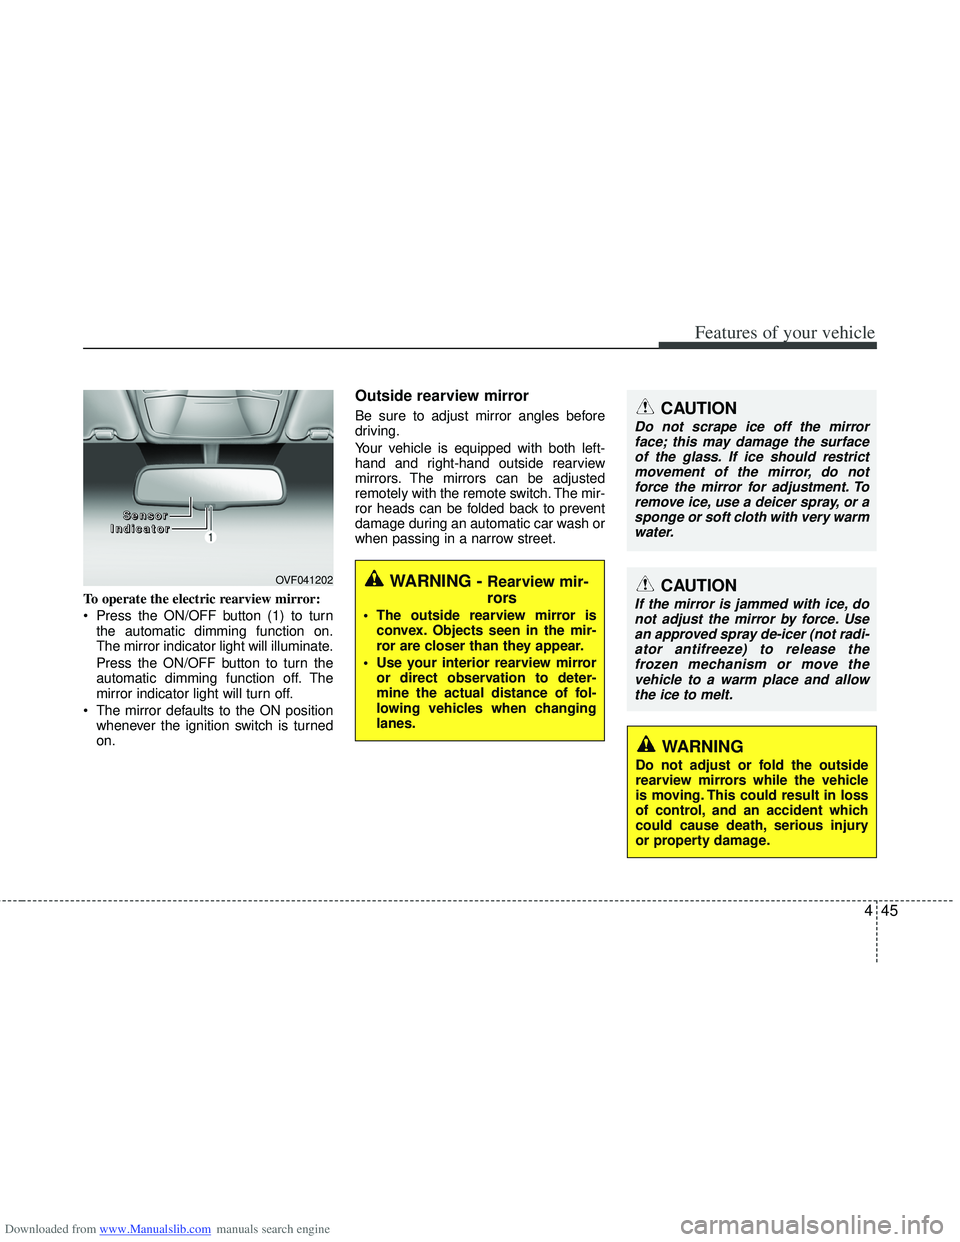
To operate the electric rearview mirror:
Press the ON/OFF button (1) to turnthe automatic dimming function on.
The mirror indicator light will illuminate.
Press the ON/OFF button to turn the
automatic dimming function off. The
mirror indicator light will turn off.
The mirror defaults to the ON position whenever the ignition switch is turned
on.
Outside rearview mirror
Be sure to adjust mirror angles before
driving.
Your vehicle is equipped with both left-
hand and right-hand outside rearview
mirrors. The mirrors can be adjusted
remotely with the remote switch. The mir-
ror heads can be folded back to prevent
damage during an automatic car wash or
when passing in a narrow street.CAUTION
Do not scrape ice off the mirrorface; this may damage the surfaceof the glass. If ice should restrict movement of the mirror, do notforce the mirror for adjustment. Toremove ice, use a deicer spray, or a sponge or soft cloth with very warmwater.
OVF041202WARNING - Rearview mir-
rors
The outside rearview mirror is convex. Objects seen in the mir-
ror are closer than they appear.
Use your interior rearview mirror or direct observation to deter-
mine the actual distance of fol-
lowing vehicles when changing
lanes.
CAUTION
If the mirror is jammed with ice, donot adjust the mirror by force. Usean approved spray de-icer (not radi- ator antifreeze) to release thefrozen mechanism or move thevehicle to a warm place and allow the ice to melt.
WARNING
Do not adjust or fold the outside
rearview mirrors while the vehicle
is moving. This could result in loss
of control, and an accident which
could cause death, serious injury
or property damage.
S S
S
S
e
e
e
e
n
n
n
n
s
s
s
s
o
o
o
o
r
r
r
r
I
I
I
I
n
n
n
n
d
d
d
d
i
i
i
i
c
c
c
c
a
a
a
a
t
t
t
t
o
o
o
o
r
r
r
r