2015 HYUNDAI I30 clock
[x] Cancel search: clockPage 567 of 635
495
Features of your vehicle
D280601AUN
Pressing the “H” button (2) with your
finger, a pencil or similar object will
advance the time displayed by one
hour.
D280602AUN
Pressing the “M” button (3) with your
finger, a pencil or similar object will
advance the time displayed by one
minute.
D280603AUN
To clear away minutes, press the “R”
button (1) with your finger, a pencil or
similar object. Then the clock will be
set precisely on the hour.
For example, if the “R” button is
pressed while the time is between 9:01
and 9:29, the display will be reset to9:00.
9:01 ~ 9:29 display changed to 9:00
9:30 ~ 9:59 display changed to 10:00 D280604AUN
To change the 12 hour format to the 24
hour format, press the “R” button (1) for
more than 4 seconds.
For example, if the “R” button is
pressed for more than 4 seconds while
the time is 10:15 p.m., the display willbe changed to 22:15.
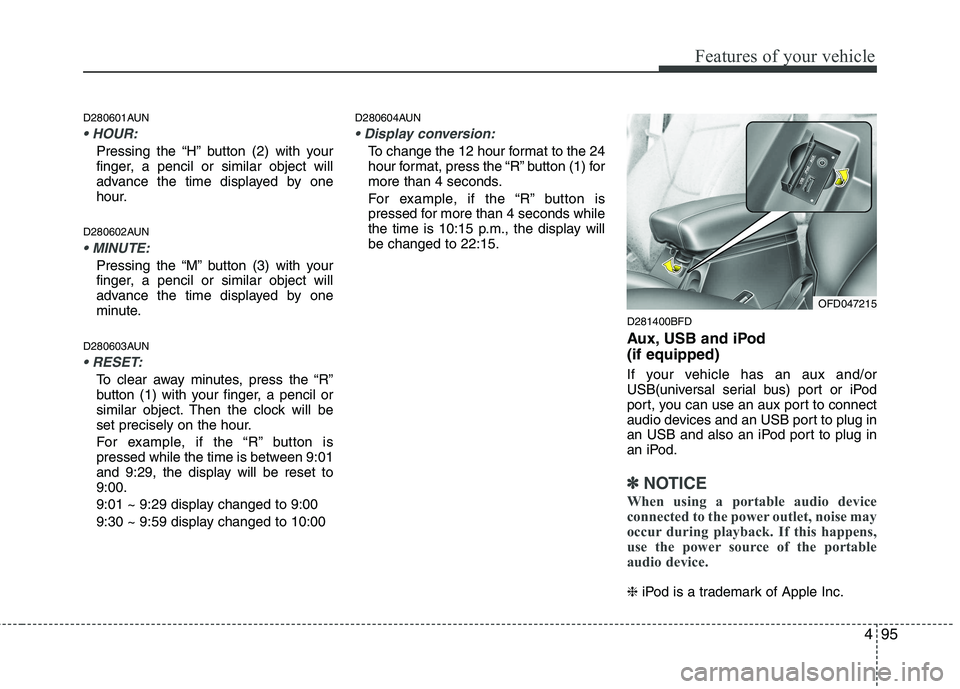
D281400BFD
Aux, USB and iPod (if equipped)
If your vehicle has an aux and/or
USB(universal serial bus) port or iPod
port, you can use an aux port to connect
audio devices and an USB port to plug in
an USB and also an iPod port to plug in
an iPod.
✽✽NOTICE
When using a portable audio device
connected to the power outlet, noise may
occur during playback. If this happens,
use the power source of the portable
audio device.
❈ iPod is a trademark of Apple Inc.
OFD047215
Page 575 of 635
4103
Features of your vehicle
✽✽NOTICE
If you install an aftermarket HID head
lamp, your vehicle’s audio and electron-
ic device may malfunction.
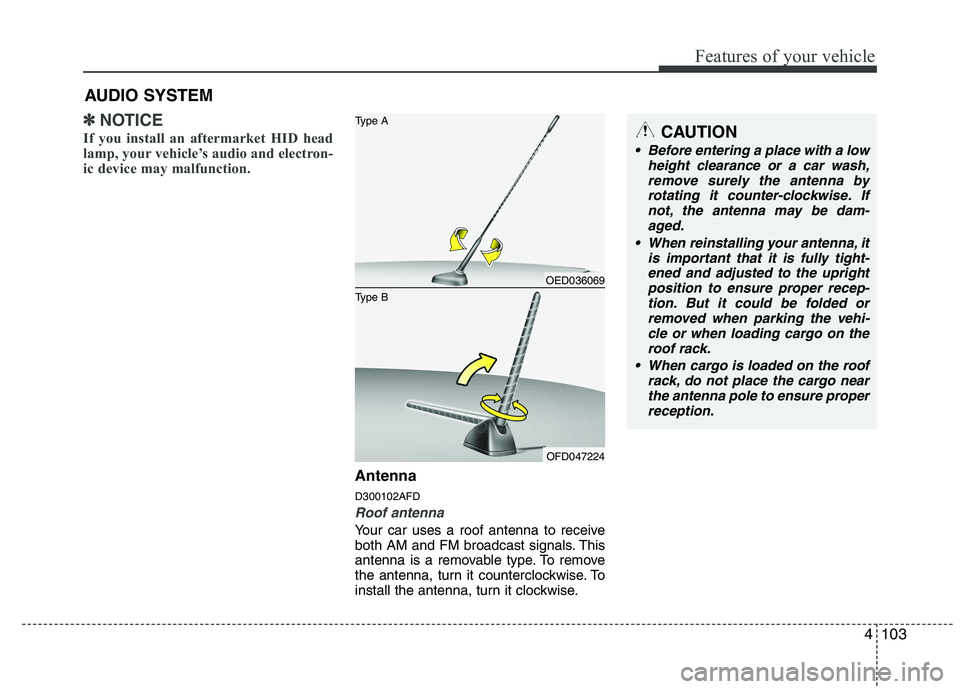
Antenna D300102AFD
Roof antenna
Your car uses a roof antenna to receive
both AM and FM broadcast signals. This
antenna is a removable type. To remove
the antenna, turn it counterclockwise. To
install the antenna, turn it clockwise.
AUDIO SYSTEM
CAUTION
• Before entering a place with a low
height clearance or a car wash,
remove surely the antenna by rotating it counter-clockwise. Ifnot, the antenna may be dam-aged.
When reinstalling your antenna, it is important that it is fully tight-ened and adjusted to the upright position to ensure proper recep-
tion. But it could be folded or removed when parking the vehi-cle or when loading cargo on the roof rack.
When cargo is loaded on the roof rack, do not place the cargo nearthe antenna pole to ensure properreception.
OED036069
OFD047224
Type B Type A
Page 581 of 635
4109
Features of your vehicle
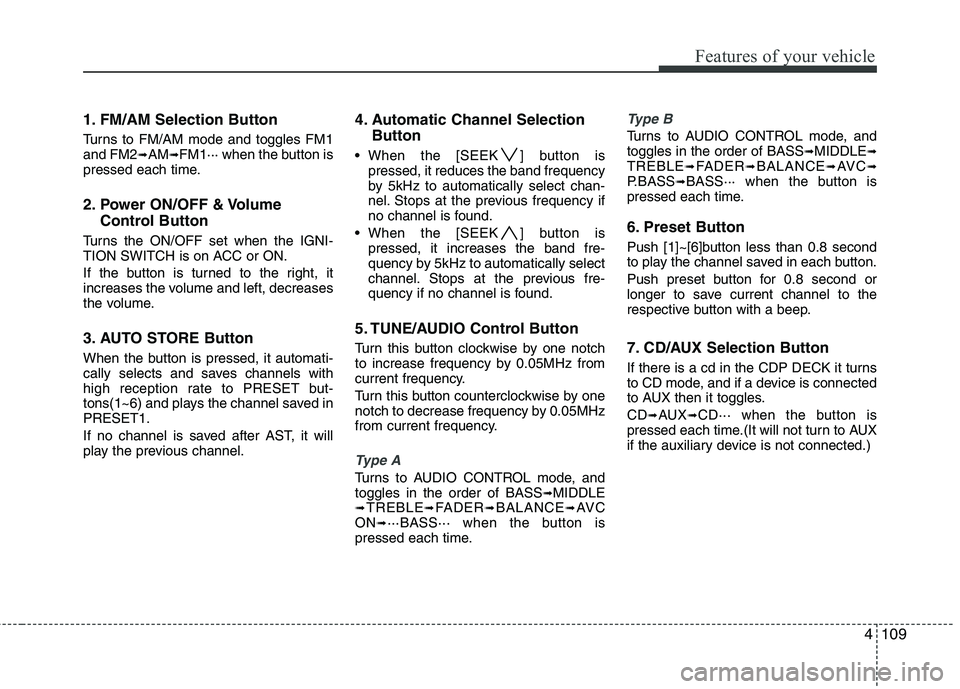
1. FM/AM Selection Button
Turns to FM/AM mode and toggles FM1 and FM2➟AM ➟FM1··· when the button is
pressed each time.
2. Power ON/OFF & Volume
Control Button
Turns the ON/OFF set when the IGNI-
TION SWITCH is on ACC or ON.
If the button is turned to the right, it
increases the volume and left, decreases
the volume.
3. AUTO STORE Button
When the button is pressed, it automati-
cally selects and saves channels with
high reception rate to PRESET but-
tons(1~6) and plays the channel saved inPRESET1.
If no channel is saved after AST, it will
play the previous channel. 4. Automatic Channel Selection
Button
When the [SEEK ] button is pressed, it reduces the band frequency
by 5kHz to automatically select chan-
nel. Stops at the previous frequency if
no channel is found.
When the [SEEK ] button is pressed, it increases the band fre-
quency by 5kHz to automatically select
channel. Stops at the previous fre-
quency if no channel is found.
5. TUNE/AUDIO Control Button
Turn this button clockwise by one notch
to increase frequency by 0.05MHz from
current frequency.
Turn this button counterclockwise by one
notch to decrease frequency by 0.05MHz
from current frequency.
Type A
Turns to AUDIO CONTROL mode, and toggles in the order of BASS ➟MIDDLE
➟ TREBLE ➟FADER ➟BALANCE ➟AV C
ON ➟···BASS··· when the button is
pressed each time.
Type B
Turns to AUDIO CONTROL mode, and toggles in the order of BASS ➟MIDDLE ➟
TREBLE ➟FADER ➟BALANCE ➟AV C ➟
P.BASS ➟BASS··· when the button is
pressed each time.
6. Preset Button
Push [1]~[6]button less than 0.8 second
to play the channel saved in each button.
Push preset button for 0.8 second or
longer to save current channel to the
respective button with a beep.
7. CD/AUX Selection Button
If there is a cd in the CDP DECK it turns
to CD mode, and if a device is connected
to AUX then it toggles. CD ➟AUX ➟CD··· when the button is
pressed each time.(It will not turn to AUX
if the auxiliary device is not connected.)
Page 586 of 635
Features of your vehicle
114
4
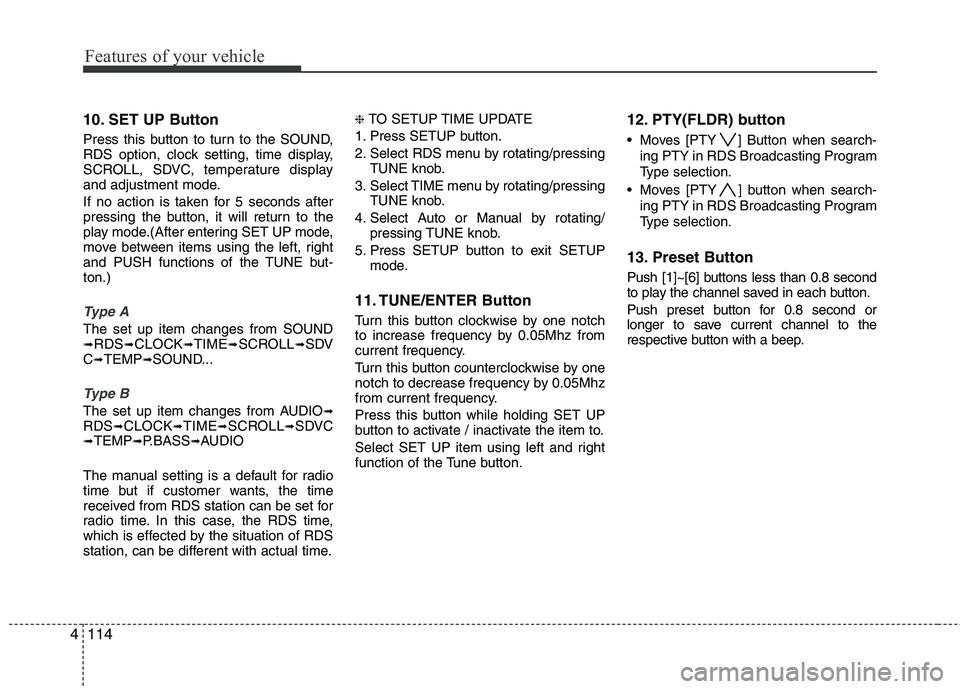
10. SET UP Button
Press this button to turn to the SOUND,
RDS option, clock setting, time display,
SCROLL, SDVC, temperature display
and adjustment mode.
If no action is taken for 5 seconds after
pressing the button, it will return to the
play mode.(After entering SET UP mode,
move between items using the left, right
and PUSH functions of the TUNE but-ton.)
Type A
The set up item changes from SOUND ➟ RDS ➟CLOCK ➟TIME ➟SCROLL ➟SDV
C ➟ TEMP ➟SOUND...
Type B
The set up item changes from AUDIO ➟
RDS ➟CLOCK ➟TIME ➟SCROLL ➟SDVC
➟ TEMP ➟P.BASS ➟AUDIO
The manual setting is a default for radio
time but if customer wants, the time
received from RDS station can be set for
radio time. In this case, the RDS time,
which is effected by the situation of RDS
station, can be different with actual time. ❈
TO SETUP TIME UPDATE
1. Press SETUP button.
2. Select RDS menu by rotating/pressing TUNE knob.
3. Select TIME menu by rotating/pressing TUNE knob.
4. Select Auto or Manual by rotating/ pressing TUNE knob.
5. Press SETUP button to exit SETUP mode.
11. TUNE/ENTER Button
Turn this button clockwise by one notch
to increase frequency by 0.05Mhz from
current frequency.
Turn this button counterclockwise by one
notch to decrease frequency by 0.05Mhz
from current frequency.
Press this button while holding SET UP
button to activate / inactivate the item to.
Select SET UP item using left and right
function of the Tune button. 12. PTY(FLDR) button
Moves [PTY ] Button when search-
ing PTY in RDS Broadcasting Program
Type selection.
Moves [PTY ] button when search- ing PTY in RDS Broadcasting Program
Type selection.
13. Preset Button
Push [1]~[6] buttons less than 0.8 second
to play the channel saved in each button.
Push preset button for 0.8 second or
longer to save current channel to the
respective button with a beep.
Page 588 of 635
Features of your vehicle
116
4
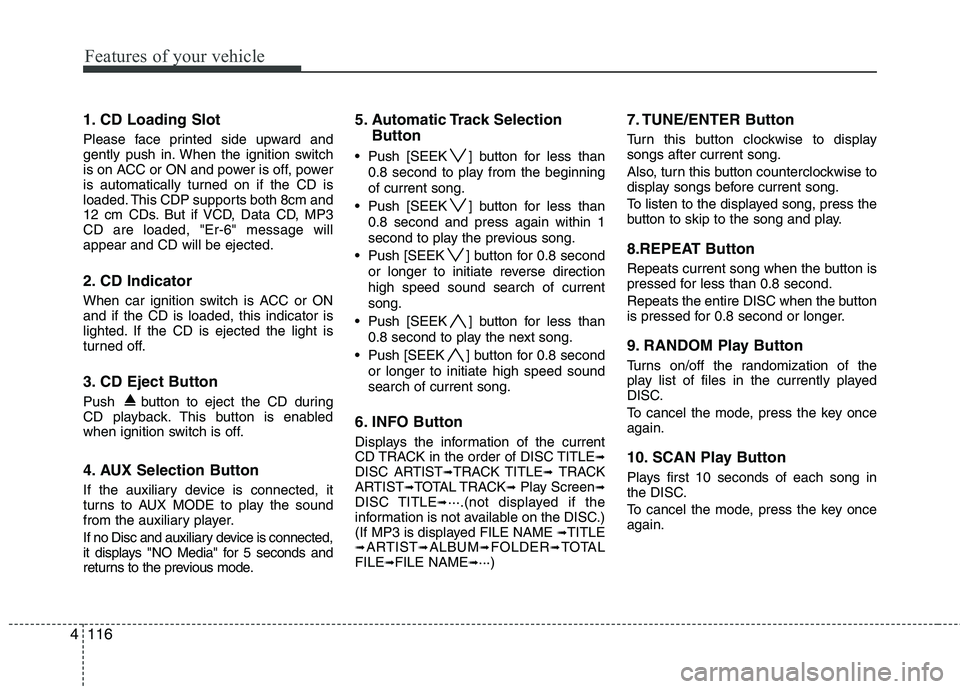
1. CD Loading Slot
Please face printed side upward and
gently push in. When the ignition switch
is on ACC or ON and power is off, power
is automatically turned on if the CD is
loaded. This CDP supports both 8cm and
12 cm CDs. But if VCD, Data CD, MP3CD are loaded, "Er-6" message willappear and CD will be ejected.
2. CD Indicator
When car ignition switch is ACC or ON and if the CD is loaded, this indicator is
lighted. If the CD is ejected the light is
turned off.
3. CD Eject Button
Push button to eject the CD during
CD playback. This button is enabled
when ignition switch is off.
4. AUX Selection Button
If the auxiliary device is connected, it
turns to AUX MODE to play the sound
from the auxiliary player.
If no Disc and auxiliary device is connected,
it displays "NO Media" for 5 seconds and
returns to the previous mode. 5. Automatic Track Selection
Button
Push [SEEK ] button for less than 0.8 second to play from the beginning of current song.
Push [SEEK ] button for less than 0.8 second and press again within 1
second to play the previous song.
Push [SEEK ] button for 0.8 second or longer to initiate reverse directionhigh speed sound search of currentsong.
Push [SEEK ] button for less than 0.8 second to play the next song.
Push [SEEK ] button for 0.8 second or longer to initiate high speed soundsearch of current song.
6. INFO Button
Displays the information of the current
CD TRACK in the order of DISC TITLE ➟
DISC ARTIST ➟TRACK TITLE ➟ TRACK
ARTIST ➟TOTAL TRACK ➟Play Screen ➟
DISC TITLE ➟···.(not displayed if the
information is not available on the DISC.)
(If MP3 is displayed FILE NAME ➟TITLE
➟ ARTIST ➟ALBUM ➟FOLDER ➟TOTAL
FILE ➟FILE NAME ➟···) 7. TUNE/ENTER Button
Turn this button clockwise to display songs after current song.
Also, turn this button counterclockwise to
display songs before current song.
To listen to the displayed song, press the
button to skip to the song and play.
8.REPEAT Button
Repeats current song when the button is
pressed for less than 0.8 second.
Repeats the entire DISC when the button
is pressed for 0.8 second or longer.
9. RANDOM Play Button
Turns on/off the randomization of the
play list of files in the currently played
DISC.
To cancel the mode, press the key once again.
10. SCAN Play Button
Plays first 10 seconds of each song in
the DISC.
To cancel the mode, press the key once again.
Page 591 of 635
4119
Features of your vehicle
In case USB is connected to the multi-
media jack inside the console on the right
hand side of the driver’s seat. When USB
is connected, the ‘USB’ icon will be dis-
played on the top right corner of the dis-
play screen.
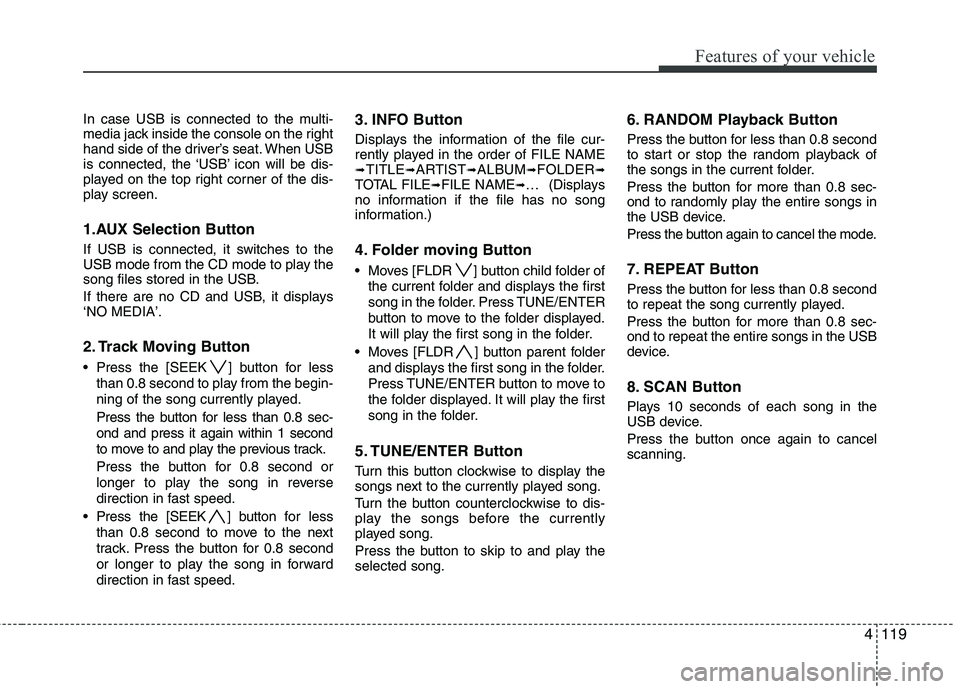
1.AUX Selection Button
If USB is connected, it switches to the
USB mode from the CD mode to play the
song files stored in the USB.
If there are no CD and USB, it displays ‘NO MEDIA’.
2. Track Moving Button
Press the [SEEK ] button for lessthan 0.8 second to play from the begin-
ning of the song currently played.
Press the button for less than 0.8 sec-
ond and press it again within 1 second
to move to and play the previous track.
Press the button for 0.8 second or
longer to play the song in reverse
direction in fast speed.
Press the [SEEK ] button for less
than 0.8 second to move to the next
track. Press the button for 0.8 second
or longer to play the song in forward
direction in fast speed. 3. INFO Button
Displays the information of the file cur-
rently played in the order of FILE NAME➟
TITLE ➟ARTIST ➟ALBUM ➟FOLDER ➟
TOTAL FILE ➟FILE NAME ➟… (Displays
no information if the file has no song
information.)
4. Folder moving Button
Moves [FLDR ] button child folder of
the current folder and displays the first
song in the folder. Press TUNE/ENTER
button to move to the folder displayed.
It will play the first song in the folder.
Moves [FLDR ] button parent folder and displays the first song in the folder.
Press TUNE/ENTER button to move to
the folder displayed. It will play the first
song in the folder.
5. TUNE/ENTER Button
Turn this button clockwise to display the
songs next to the currently played song.
Turn the button counterclockwise to dis-
play the songs before the currently
played song.
Press the button to skip to and play the selected song. 6. RANDOM Playback Button
Press the button for less than 0.8 second
to start or stop the random playback of
the songs in the current folder.
Press the button for more than 0.8 sec-
ond to randomly play the entire songs in
the USB device.
Press the button again to cancel the mode.
7. REPEAT Button
Press the button for less than 0.8 second
to repeat the song currently played.
Press the button for more than 0.8 sec-
ond to repeat the entire songs in the USB
device.
8. SCAN Button
Plays 10 seconds of each song in the
USB device.
Press the button once again to cancel scanning.
Page 595 of 635
4123
Features of your vehicle
In case the iPod exclusive cable is con-
nected to the multimedia jack inside the
console on the right hand side of the dri-
ver’s seat. When the iPod is connected,
the ‘iPod’ icon will be displayed on the top
right corner of the display screen.
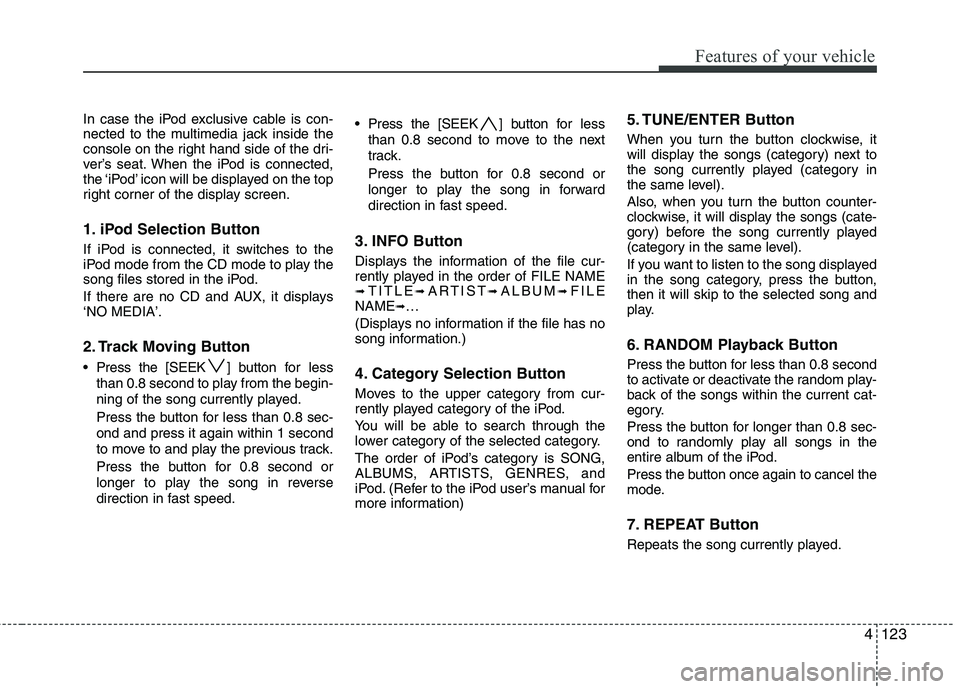
1. iPod Selection Button
If iPod is connected, it switches to the
iPod mode from the CD mode to play the
song files stored in the iPod.
If there are no CD and AUX, it displays ‘NO MEDIA’.
2. Track Moving Button
Press the [SEEK ] button for less
than 0.8 second to play from the begin-
ning of the song currently played.
Press the button for less than 0.8 sec-
ond and press it again within 1 second
to move to and play the previous track.
Press the button for 0.8 second or
longer to play the song in reverse
direction in fast speed. Press the [SEEK ] button for
less
than 0.8 second to move to the next
track.
Press the button for 0.8 second or
longer to play the song in forward
direction in fast speed.
3. INFO Button
Displays the information of the file cur-
rently played in the order of FILE NAME ➟ TITLE ➟ARTIST ➟ALBUM ➟FILE
NAME ➟…
(Displays no information if the file has no
song information.)
4. Category Selection Button
Moves to the upper category from cur-
rently played category of the iPod.
You will be able to search through the
lower category of the selected category.
The order of iPod’s category is SONG,
ALBUMS, ARTISTS, GENRES, and
iPod. (Refer to the iPod user’s manual for
more information) 5. TUNE/ENTER Button
When you turn the button clockwise, it
will display the songs (category) next to
the song currently played (category in
the same level).
Also, when you turn the button counter-
clockwise, it will display the songs (cate-
gory) before the song currently played
(category in the same level).
If you want to listen to the song displayed
in the song category, press the button,then it will skip to the selected song and
play.
6. RANDOM Playback Button
Press the button for less than 0.8 second
to activate or deactivate the random play-
back of the songs within the current cat-
egory.
Press the button for longer than 0.8 sec-
ond to randomly play all songs in the
entire album of the iPod.
Press the button once again to cancel the
mode.
7. REPEAT Button
Repeats the song currently played.
Page 599 of 635
4127
Features of your vehicle
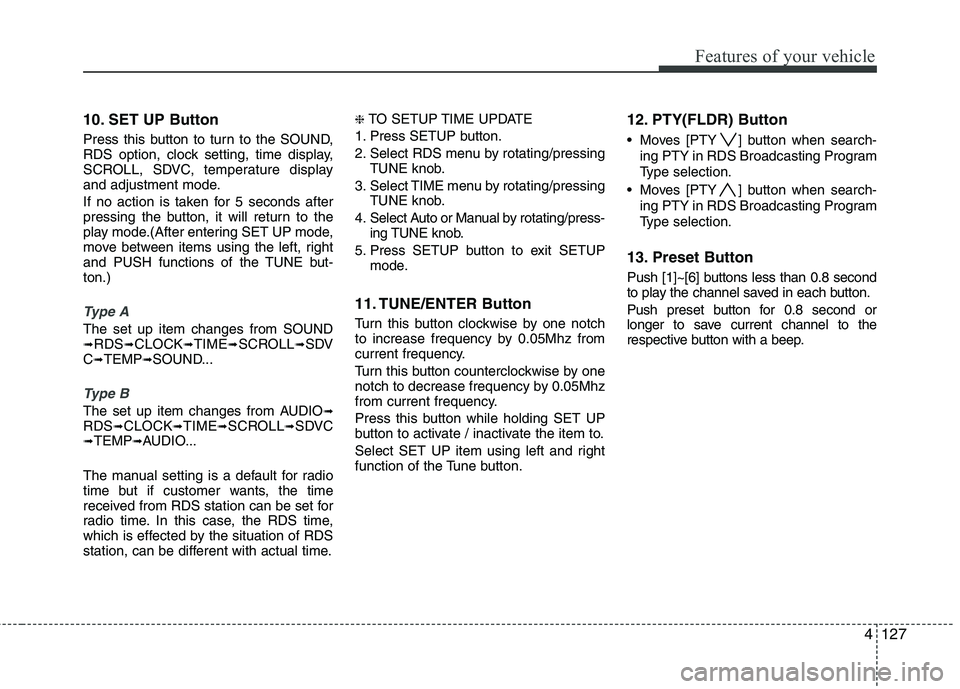
10. SET UP Button
Press this button to turn to the SOUND,
RDS option, clock setting, time display,
SCROLL, SDVC, temperature display
and adjustment mode.
If no action is taken for 5 seconds after
pressing the button, it will return to the
play mode.(After entering SET UP mode,
move between items using the left, right
and PUSH functions of the TUNE but-ton.)
Type A
The set up item changes from SOUND ➟RDS ➟CLOCK ➟TIME ➟SCROLL ➟SDV
C ➟ TEMP ➟SOUND...
Type B
The set up item changes from AUDIO ➟
RDS ➟CLOCK ➟TIME ➟SCROLL ➟SDVC
➟ TEMP ➟AUDIO...
The manual setting is a default for radio
time but if customer wants, the time
received from RDS station can be set for
radio time. In this case, the RDS time,
which is effected by the situation of RDS
station, can be different with actual time. ❈
TO SETUP TIME UPDATE
1. Press SETUP button.
2. Select RDS menu by rotating/pressing TUNE knob.
3. Select TIME menu by rotating/pressing TUNE knob.
4. Select Auto or Manual by rotating/press- ing TUNE knob.
5. Press SETUP button to exit SETUP mode.
11. TUNE/ENTER Button
Turn this button clockwise by one notch
to increase frequency by 0.05Mhz from
current frequency.
Turn this button counterclockwise by one
notch to decrease frequency by 0.05Mhz
from current frequency.
Press this button while holding SET UP
button to activate / inactivate the item to.
Select SET UP item using left and right
function of the Tune button. 12. PTY(FLDR) Button
Moves [PTY ] button when search-
ing PTY in RDS Broadcasting Program
Type selection.
Moves [PTY ] button when search- ing PTY in RDS Broadcasting Program
Type selection.
13. Preset Button
Push [1]~[6] buttons less than 0.8 second
to play the channel saved in each button.
Push preset button for 0.8 second or
longer to save current channel to the
respective button with a beep.