2015 HYUNDAI I30 clock
[x] Cancel search: clockPage 375 of 635

Maintenance
58
7
Driver's side fuse panel
Description Fuse rating Protected component
START 10A Ignition lock switch, Antitheft alarm, Transaxle range switch
A/CON SW 10A A/C control module
HTD MIRR 10A Outside heated mirror motor
SEAT HTR 15A Seat warmer (switch, power)
A/CON 10A Blower relay, A/C control module, Sunroof control module, Rain sensor
FR FOG 10A Front fog lamp relay
FR WIPER 25A Front wiper relay
REAR WIPER 15A Rear wiper relay
DRL 15A Daytime running lamp unit
RR FOG 10A Rear fog lamp relay
P/WDW LH 25A Front and rear power window switch(LH)
CLOCK 10A Digital clock, Audio
C/LIGHTER 15A Power outlet
DR LOCK 20A Sunroof control module, Door unlock/lock relay
DEICER 15A Front windshield deicer
STOP 15A Stop lamp switch
ROOM LP 15A Trunk room lamp, Dome lamp, Map lamp, Digital clock
AUDIO 15A Audio
T/GATE 15A Tail gate unlock relay
SAFETY P/WDW RH 25A Front and rear safety power window switch (RH)
SAFETY P/WDW LH 25A Front and rear safety power window switch (LH)
P/WDW RH 25A Front & rear power window switch(RH)
FR P/OUTLET 15A Power outlet
T/SIG 10A Hazard switch, Turn signal
A/BAG IND 10A Airbag indicator(instrument cluster), SBR (passenger, rear)
Page 381 of 635
Maintenance
64
7
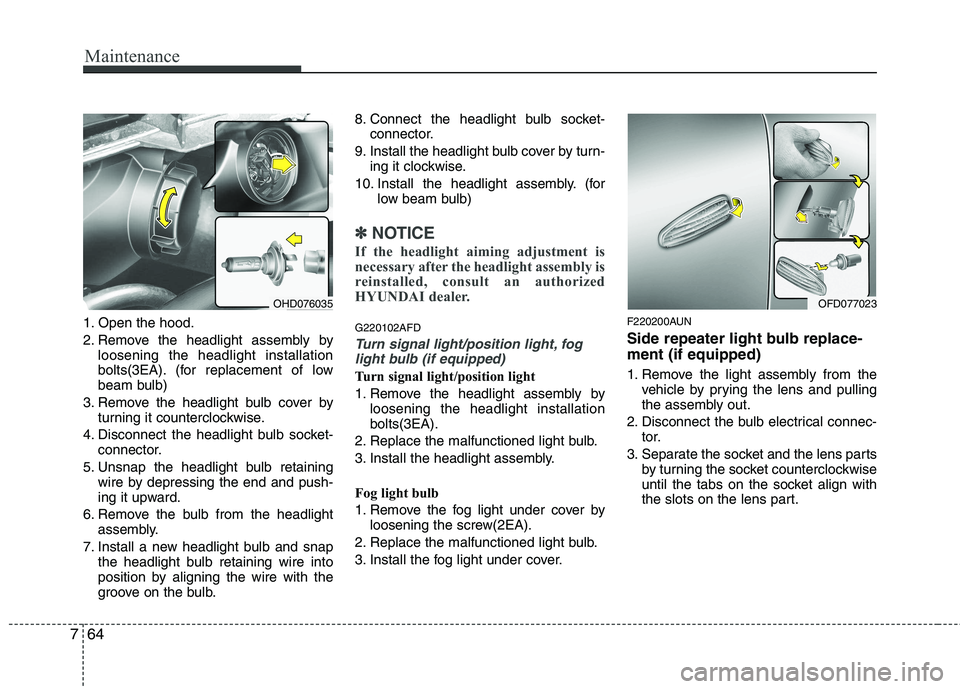
1. Open the hood.
2. Remove the headlight assembly by
loosening the headlight installation
bolts(3EA). (for replacement of low
beam bulb)
3. Remove the headlight bulb cover by turning it counterclockwise.
4. Disconnect the headlight bulb socket- connector.
5. Unsnap the headlight bulb retaining wire by depressing the end and push-
ing it upward.
6. Remove the bulb from the headlight assembly.
7. Install a new headlight bulb and snap the headlight bulb retaining wire into
position by aligning the wire with the
groove on the bulb. 8. Connect the headlight bulb socket-
connector.
9. Install the headlight bulb cover by turn- ing it clockwise.
10. Install the headlight assembly. (for low beam bulb)
✽✽NOTICE
If the headlight aiming adjustment is
necessary after the headlight assembly is
reinstalled, consult an authorized
HYUNDAI dealer.
G220102AFD
Turn signal light/position light, fog light bulb (if equipped)
Turn signal light/position light
1. Remove the headlight assembly by loosening the headlight installation bolts(3EA).
2. Replace the malfunctioned light bulb.
3. Install the headlight assembly.
Fog light bulb
1. Remove the fog light under cover by loosening the screw(2EA).
2. Replace the malfunctioned light bulb.
3. Install the fog light under cover. F220200AUN
Side repeater light bulb replace- ment (if equipped)
1. Remove the light assembly from the
vehicle by prying the lens and pulling
the assembly out.
2. Disconnect the bulb electrical connec- tor.
3. Separate the socket and the lens parts by turning the socket counterclockwise
until the tabs on the socket align with
the slots on the lens part.
OHD076035OFD077023
Page 383 of 635
Maintenance
66
7
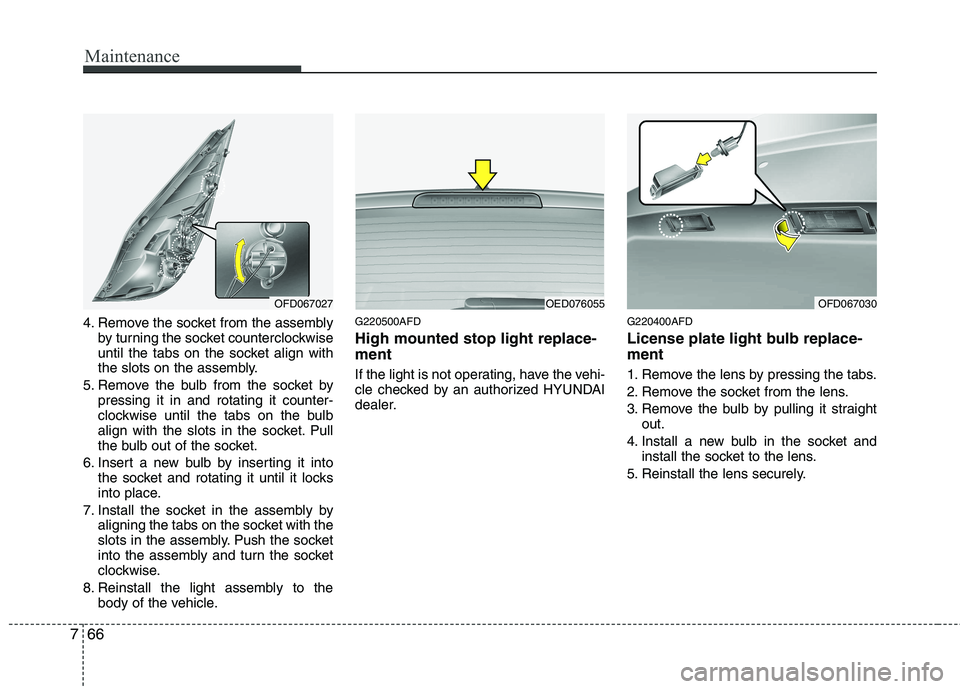
4. Remove the socket from the assembly
by turning the socket counterclockwise
until the tabs on the socket align with
the slots on the assembly.
5. Remove the bulb from the socket by pressing it in and rotating it counter-
clockwise until the tabs on the bulb
align with the slots in the socket. Pull
the bulb out of the socket.
6. Insert a new bulb by inserting it into the socket and rotating it until it locks
into place.
7. Install the socket in the assembly by aligning the tabs on the socket with the
slots in the assembly. Push the socket
into the assembly and turn the socket
clockwise.
8. Reinstall the light assembly to the body of the vehicle. G220500AFD High mounted stop light replace- ment
If the light is not operating, have the vehi-
cle checked by an authorized HYUNDAI
dealer.
G220400AFD
License plate light bulb replace- ment
1. Remove the lens by pressing the tabs.
2. Remove the socket from the lens.
3. Remove the bulb by pulling it straight
out.
4. Install a new bulb in the socket and install the socket to the lens.
5. Reinstall the lens securely.
OFD067027OED076055OFD067030
Page 406 of 635
I3
Index
Capacities (Lubricants) ·····················································9-4 Care
Exterior care ······························································7-68
Interior care ·······························································7-73
Tire care·····································································7-43
Cargo security screen ····················································4-100
Cargo weight ···································································5-49
Center console storage ····················································4-88
Central door lock switch ···················································4-9
Changing tires ·································································6-13Chains Tire chains ·································································5-38
Checking tire inflation pressure ······································7-45
Child restraint system ·····················································3-28 ISOFIX system ·························································3-34
Tether anchor system·················································3-32
Child-protector rear door lock ·······································4-11
Climate control system (Automatic)·······························4-76 Air conditioning ·······················································4-83Automatic heating and air conditioning ···················4-78
Manual heating and air conditioning ·······················4-79
Climate control system (Manual) ··································4-68 Air conditioning ························································4-73
Climate control air filter············································4-75
Heating and air conditioning ·····································4-69
Cigarette lighter ······························································4-92 Climate control air filter ········································4-75, 7-34
Clock (Digital) ·········································4-94, 4-114, 4-127
Clothes hanger ································································4-96
Combined instrument, see instrument cluster ················4-35
Compact spare tire ··························································6-18
Compact spare tire replacement ·····································7-48
Coolant ············································································7-25
Cooling fluid, see engine coolant ···································7-25
Crankcase emission control system ·······························7-74
Cruise control system ····················································5-27
Cup holder·······································································4-93
Curtain air bag ································································3-48
Dashboard, see instrument cluster ··································4-35
Dashboard illumination, see instrument
panel illumination ························································4-36
Deadlocks········································································4-10
Defogging (Windshield) ·················································4-84
Defogging logic (Windshield) ········································4-86
Defroster ·········································································4-66 Front windshield deicer·············································4-67
Rear window defroster ··············································4-67
Defrosting (Windshield) ·················································4-84
Digital clock ·············································4-94, 4-114, 4-127
Dimensions ·······································································9-2
Displays, see instrument cluster ·····································4-35
C
D
Page 409 of 635
Index
6
I
Ashtray ·····································································4-92
Aux, USB and iPod ··················································4-95
Barrier net··································································4-98
Cargo security screen ·············································4-100
Cigarette lighter ························································4-92
Clothes hanger···························································4-96
Cup holder ································································4-93
Digital clock ······································4-94, 4-114, 4-127
Floor mat anchor(s) ··················································4-96
Luggage net (holder) ················································4-97
Power outlet ·····························································4-94
Shopping bag holder ·················································4-96
Sunvisor ····································································4-93
Interior light ···································································4-64
Interior light bulb replacement ······································7-67
Interior overview ······························································2-2
Interlock system ·····························································5-15
ISOFIX system ·······························································3-34
Jack and tools ·································································6-12
Jump starting ····································································6-4
Key positions ···································································5-4
Keys ·················································································4-2 Label
Air bag warning label ···············································3-59
Tire sidewall labeling ···············································7-49
Tire specification and pressure label ··························8-3
Vehicle certification label ···········································8-3
Latch system, see ISOFIX system ·································3-34
License plate light bulb replacement ·····························7-66
Light bulbs ·····································································7-62 Front fog light bulb replacement·······························7-64
Headlight bulb replacement ······································7-63
High mounted stop light replacement ·······················7-66
Interior light bulb replacement··································7-67
License plate light bulb replacement ························7-66
Position light bulb replacement·································7-64
Rear combination light bulb replacement ·················7-65
Side repeater light bulb replacement·························7-64
Turn signal light bulb replacement ···························7-64
Lighting ··········································································4-54 Battery saver function ··············································4-54
Headlight escort function ·········································4-54
Headlight welcome function ····································4-55
Lubricants and capacities ·················································9-4
Luggage box ···································································4-90Luggage net (holder) ······················································4-97
Luggage rack, see roof rack ·········································4-102
Lumbar support ································································3-7L
K
J
Page 490 of 635
Features of your vehicle
18
4
D080200AFD
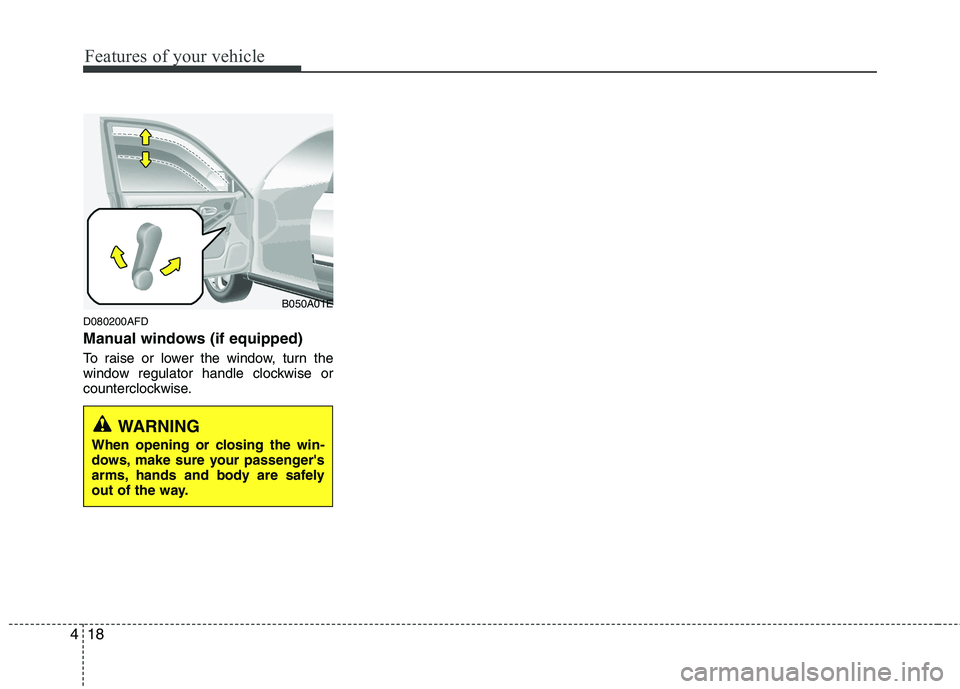
Manual windows (if equipped)
To raise or lower the window, turn the
window regulator handle clockwise or
counterclockwise.
WARNING
When opening or closing the win-
dows, make sure your passenger's
arms, hands and body are safely
out of the way.
B050A01E
Page 493 of 635
421
Features of your vehicle
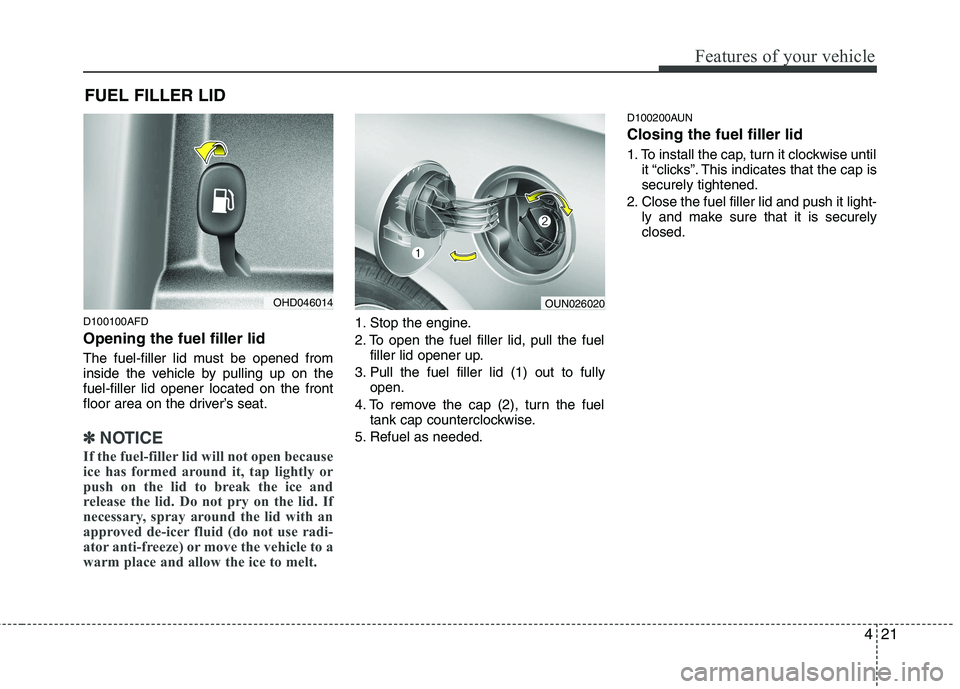
D100100AFD Opening the fuel filler lid
The fuel-filler lid must be opened from
inside the vehicle by pulling up on thefuel-filler lid opener located on the front
floor area on the driver’s seat.
✽✽NOTICE
If the fuel-filler lid will not open because
ice has formed around it, tap lightly or
push on the lid to break the ice and
release the lid. Do not pry on the lid. If
necessary, spray around the lid with an
approved de-icer fluid (do not use radi-
ator anti-freeze) or move the vehicle to a
warm place and allow the ice to melt.
1. Stop the engine.
2. To open the fuel filler lid, pull the fuel filler lid opener up.
3. Pull the fuel filler lid (1) out to fully open.
4. To remove the cap (2), turn the fuel tank cap counterclockwise.
5. Refuel as needed. D100200AUN Closing the fuel filler lid
1. To install the cap, turn it clockwise until
it “clicks”. This indicates that the cap is securely tightened.
2. Close the fuel filler lid and push it light- ly and make sure that it is securelyclosed.
FUEL FILLER LID
OHD046014OUN026020
Page 566 of 635

Features of your vehicle
94
4
D280500AUN
Power outlet
The power outlet is designed to provide
power for mobile telephones or other
devices designed to operate with vehicle
electrical systems. The devices should
draw less than 10 amps with the engine
running. D280600AUN
Digital clock (if equipped)
Whenever the battery terminals or relat-
ed fuses are disconnected, you must
reset the time.
When the ignition switch is in the ACC or
ON position, the clock buttons operate as
follows:
OFD047205
OFD047229
CAUTION
Use power outlet only when the
engine is running and remove the
accessory plug after use. Usingthe accessory plug for prolongedperiods of time with the engine off could cause the battery to dis-
charge.
Only use 12V electric accessories which are less than 10A in elec-tric capacity.
Adjust the air-conditioner or heater to the lowest operatinglevel when using the power outlet.
Close the cover when not in use. Some electronic devices can cause electronic interference
when plugged into a vehicle’spower outlet. These devices maycause excessive audio static andmalfunctions in other electronic
systems or devices used in yourvehicle.
Wagon (if equipped)OFD047217
WARNING
Do not adjust the clock while driv-
ing. You may lose your steering
control and cause severe personal
injury or accidents.