2015 Hyundai Genesis Front door lock
[x] Cancel search: Front door lockPage 136 of 501

3-42
Convenient features of your vehicle
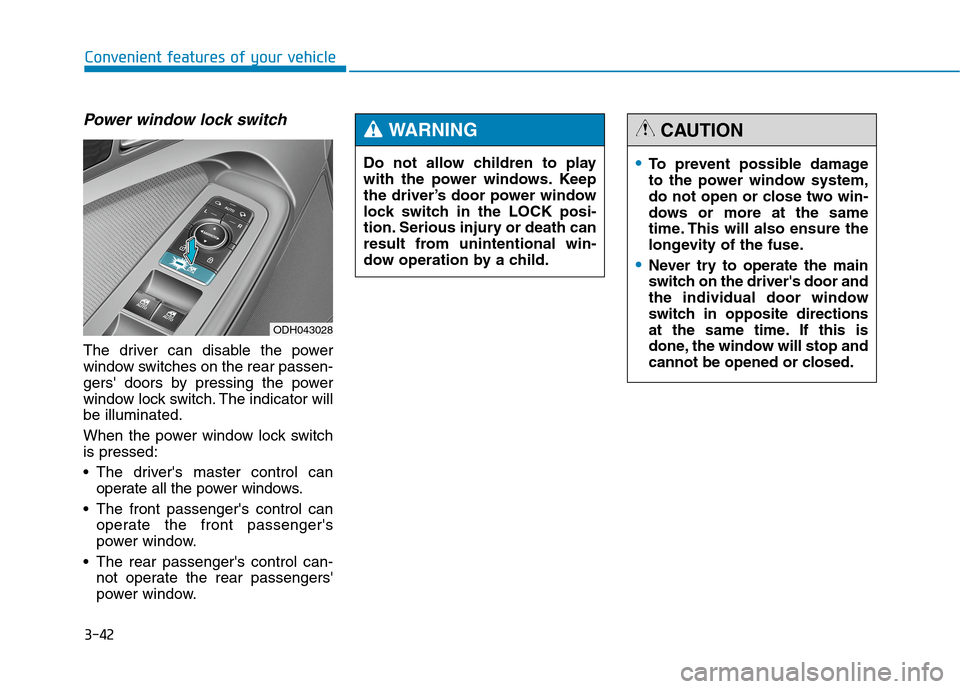
Power window lock switch
The driver can disable the power
window switches on the rear passen-
gers' doors by pressing the power
window lock switch. The indicator will
be illuminated.
When the power window lock switch
is pressed:
The driver's master control can
operate all the power windows.
The front passenger's control can
operate the front passenger's
power window.
The rear passenger's control can-
not operate the rear passengers'
power window.
ODH043028
To prevent possible damage
to the power window system,
do not open or close two win-
dows or more at the same
time. This will also ensure the
longevity of the fuse.
Never try to operate the main
switch on the driver's door and
the individual door window
switch in opposite directions
at the same time. If this is
done, the window will stop and
cannot be opened or closed.
CAUTION
Do not allow children to play
with the power windows. Keep
the driver’s door power window
lock switch in the LOCK posi-
tion. Serious injury or death can
result from unintentional win-
dow operation by a child.
WARNING
Page 149 of 501

3-55
Convenient features of your vehicle
3
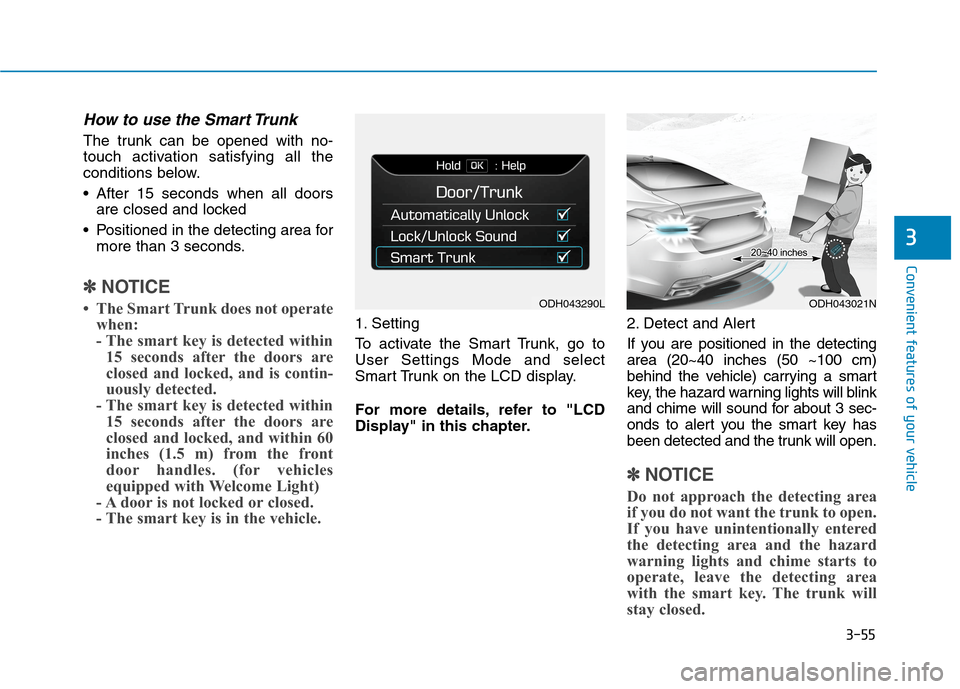
How to use the Smart Trunk
The trunk can be opened with no-
touch activation satisfying all the
conditions below.
After 15 seconds when all doors
are closed and locked
Positioned in the detecting area for
more than 3 seconds.
✽ ✽
NOTICE
• The Smart Trunk does not operate
when:
- The smart key is detected within
15 seconds after the doors are
closed and locked, and is contin-
uously detected.
- The smart key is detected within
15 seconds after the doors are
closed and locked, and within 60
inches (1.5 m) from the front
door handles. (for vehicles
equipped with Welcome Light)
- A door is not locked or closed.
- The smart key is in the vehicle. 1. Setting
To activate the Smart Trunk, go to
User Settings Mode and select
Smart Trunk on the LCD display.
For more details, refer to "LCD
Display" in this chapter.2. Detect and Alert
If you are positioned in the detecting
area (20~40 inches (50 ~100 cm)
behind the vehicle) carrying a smart
key, the hazard warning lights will blink
and chime will sound for about 3 sec-
onds to alert you the smart key has
been detected and the trunk will open.
✽ ✽
NOTICE
Do not approach the detecting area
if you do not want the trunk to open.
If you have unintentionally entered
the detecting area and the hazard
warning lights and chime starts to
operate, leave the detecting area
with the smart key. The trunk will
stay closed.
ODH043290LODH043021N
Page 208 of 501

3-114
Convenient features of your vehicle
Front fog lamp (if equipped)
Use the switch next to the headlamp
switch to turn the Fog Lights ON and
OFF. The fog lamps will turn on when
the fog lamp switch (1) is turned to
the ON position after the headlamps
are turned on.
To turn off the fog lamps, turn the
switch to the OFF position.
You can use the fog lamps only when
the headlamps are on low beam.
When the light switch is in the AUTO
position, you can also use the fog
lamps when the headlamps turn on
automatically. The fog lamps will go
OFF when the headlamps turn OFF.
✽ ✽
NOTICE
When in operation, the fog lamps
consume large amounts of vehicle
electrical power. Only use the fog
lamps when visibility is poor.
Battery saver function
The purpose of this feature is to pre-
vent the battery from being dis-
charged. The system automatically
turns off the parking lamp when the
driver turns the engine off and opens
the driver-side door.
With this feature, the parking lamps
will turn off automatically if the driver
parks on the side of road at night.
If necessary, to keep the lamps on
when the engine is turned off, perform
the following:
1) Open the driver-side door.
2) Turn the parking lamps OFF and
ON again using the light switch on
the steering column.
Headlamp delay function
(if equipped)
If you place the Engine Start/Stop
button in to the ACC or OFF position
with the headlamps ON, the head-
lamps (and/or parking lamps) remain
on for about 5 minutes. However,
with the engine off if the driver’s door
is opened and closed, the head-
lamps (and/or parking lamps) are
turned off after 15 seconds.
The headlamps (and/or parking
lamps) can be turned off by pressing
the lock button on the smart key
twice or turning the light switch to the
OFF or AUTO position. However, if
you turn the light switch to the AUTO
position when it is dark outside, the
headlamps will not be turned off.
You can activate or deactivate the
Headlamp Delay function from the
User Settings Mode (Light) on the
LCD display.
For more details, refer to "LCD
Display" in this chapter.
ODH043177N
Page 212 of 501

3-118
Convenient features of your vehicle
Interior lamp AUTO cut
The interior lamps will automatically
go off approximately 20 minutes after
the engine is turned off and the
doors closed. If a door is opened, the
lamp will go off 40 minutes after the
engine is turned off. If the doors are
locked by the smart key and the vehi-
cle enters the armed stage of the
theft alarm system, the lamps will go
off five seconds later.
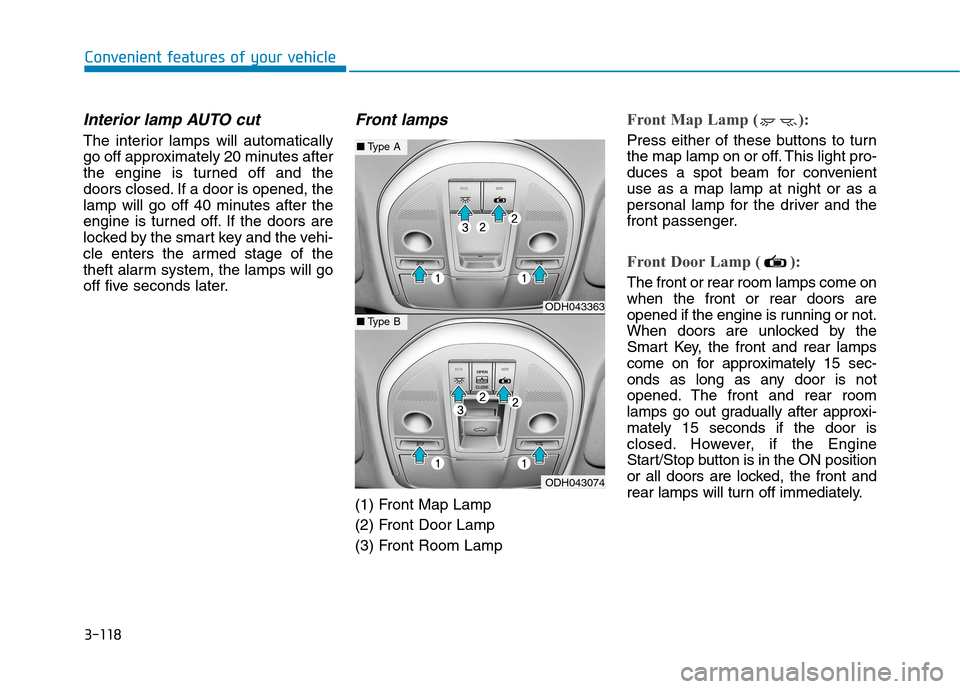
Front lamps
(1) Front Map Lamp
(2) Front Door Lamp
(3) Front Room Lamp
Front Map Lamp ( ):
Press either of these buttons to turn
the map lamp on or off. This light pro-
duces a spot beam for convenient
use as a map lamp at night or as a
personal lamp for the driver and the
front passenger.
Front Door Lamp ( ):
The front or rear room lamps come on
when the front or rear doors are
opened if the engine is running or not.
When doors are unlocked by the
Smart Key, the front and rear lamps
come on for approximately 15 sec-
onds as long as any door is not
opened. The front and rear room
lamps go out gradually after approxi-
mately 15 seconds if the door is
closed. However, if the Engine
Start/Stop button is in the ON position
or all doors are locked, the front and
rear lamps will turn off immediately.
ODH043363
ODH043074
■Type A
■Type B
Page 318 of 501

5-58
Driving your vehicle
Cancelled automatically
The driver's door is opened.
The shift lever is shifted to N
(Neutral), R (Reverse) or D (Drive).
The EPB (Electric Parking Brake)
is applied.
The vehicle speed is over 120 mph
(190 km/h)
The vehicle stops on a steep
incline.
The ESC (Electronic Stability
Control), TCS (Traction Control
System) or ABS is operating.
The ESC is turned off.
The sensor or the cover is dirty or
blocked with foreign matter.
When the vehicle is stopped for
more than 5 minutes.
The vehicle stops and goes repeat-
edly for a long period of time.
The driver starts driving by pushing
the lever up (RES +) or down
(SET -), approximately 3 seconds
after the vehicle is stopped by the
Smart Cruise Control System with
no other vehicle ahead. The driver starts driving by pushing
the lever up (RES +) or down
(SET -), after stopping the vehicle
with a vehicle stopped far away in
front.
The accelerator pedal is continu-
ously depressed for more than one
minute.
Each of these actions will cancel
the Smart Cruise Control opera-
tion. (The Set Speed and Vehicle-
to-Vehicle Distance on the LCD
display will go off.)
In a condition the Smart Cruise
Control is cancelled automatically,
the Smart Cruise Control will not
resume even though the RES+ or
SET- lever is pushed. Also, the
EPB will be applied when the vehi-
cle is stopped.
✽ ✽
NOTICE
If the Smart Cruise Control is can-
celled by other than the reasons men-
tioned, have your vehicle checked by
an authorized HYUNDAI dealer.
If the system is cancelled, the warn-
ing chime will sound and a message
will appear for a few seconds.
You must adjust the vehicle speed by
depressing the accelerator or brake
pedal according to the road condition
ahead and driving condition.
Always check the road conditions.
Do not rely on the warning chime.
ODH053076L
Page 388 of 501

7-6
Maintenance
O OW
WN
NE
ER
R
M
MA
AI
IN
NT
TE
EN
NA
AN
NC
CE
E
The following lists are vehicle checks
and inspections that should be per-
formed by the owner or an author-
ized HYUNDAI dealer at the frequen-
cies indicated to help ensure safe,
dependable operation of your vehi-
cle.
Any adverse conditions should be
brought to the attention of your deal-
er as soon as possible.
These Owner Maintenance vehicle
checks are generally not covered by
warranties and you may be charged
for labor, parts and lubricants used. Performing maintenance work
on a vehicle can be dangerous.
If you lack sufficient knowledge
and experience or the proper
tools and equipment to do the
work, have it done by an author-
ized HYUNDAI dealer. ALWAYS
follow these precautions for
performing maintenance work:
Park your vehicle on level
ground, move the shift lever
into the P (Park, for automatic
transmission vehicle) posi-
tion, apply the parking brake,
place the Engine Start/Stop
button in the OFF position.
Block the tires (front and
back) to prevent the vehicle
from moving.
Remove loose clothing or jew-
elry that can become entan-
gled in moving parts.
(Continued)
WARNING (Continued)
If you must run the engine
during maintenance, do so
out doors or in an area with
plenty of ventilation.
Keep flames, sparks, or smok-
ing materials away from the
battery and fuel-related parts.
Page 450 of 501

7-68
Maintenance
Fuse NameFuse ratingCircuit Protected
10MODULE10A BCM
2MULTI MEDIA 10A Keyboard, I-Box, Front Monitor
1MEMORY10A Steering Tilt & Telescopic Module, External Buzzer, BCM, Analog Clock A/C Control Module, Tire
Pressure Monitoring Module, Security Indicator Head-Up Display, Instrument Cluster, Driver/Passenger
Door Module Rear Door Module LH/RH, Power Trunk Lid Control Module
1 SMART KEY10A Start/Stop Button Switch
8MODULE10A BCM, Smart Key Control Module
A/CON 10A Metal Core Block (PCB #1 - Blower Relay), Ionizer Co2 Sensor, A/C Control Module
P/DOOR PASS 15A Passenger Door Latch
DOOR LAMP 10A Driver/Passenger Door Module, Rear Door Module LH/RH
7MODULE 10A Parking Guide Unit, Head-Up Display Sunroof, Passenger Lumbar Support Unit Clock Spring (Steering
Wheel Remote Control Switch)
PRESAFETY
SEAT BELT 10A Pre-Safe Seat Belt Module
3POWER OUTLET 20A Not Used
STOP LAMP 15A Stop Signal Electronic Module
1MODULE10A Gateway (B+ (MCU)), Rain Sensor, Hazard Switch Trunk Lid Main Switch, Electric Parking Brake Switch
A/BAG 15A SRS Control Module
1P/SEAT PASS 30A Passenger Power Seat Relay Box
INTERIOR LAMP 10A Room Lamp, Room Lamp LH/RH, Overhead Console Lamp, Glove Box Front Vanity Lamp LH/RH,
Driver/Passenger Foot Lamp, Trunk Room Lamp LH/RH
Page 451 of 501

7-69
7
Maintenance
Fuse NameFuse ratingCircuit Protected
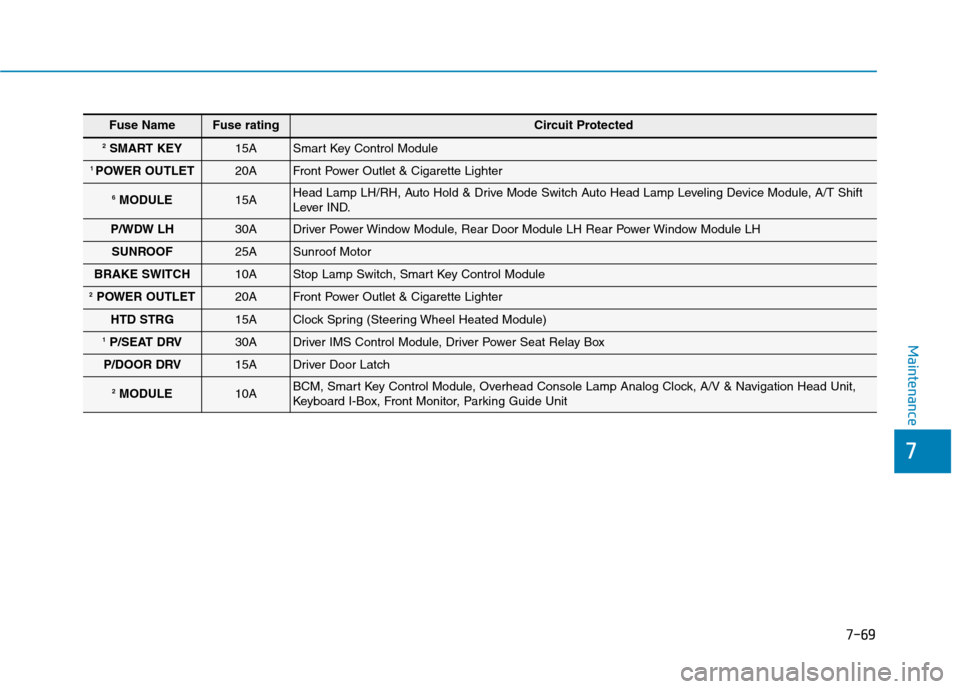
2SMART KEY15A Smart Key Control Module
1 POWER OUTLET 20A Front Power Outlet & Cigarette Lighter
6MODULE 15A Head Lamp LH/RH, Auto Hold & Drive Mode Switch Auto Head Lamp Leveling Device Module, A/T Shift
Lever IND.
P/WDW LH 30A Driver Power Window Module, Rear Door Module LH Rear Power Window Module LH
SUNROOF 25A Sunroof Motor
BRAKE SWITCH 10A Stop Lamp Switch, Smart Key Control Module
2POWER OUTLET 20A Front Power Outlet & Cigarette Lighter
HTD STRG 15A Clock Spring (Steering Wheel Heated Module)
1P/SEAT DRV 30A Driver IMS Control Module, Driver Power Seat Relay Box
P/DOOR DRV 15A Driver Door Latch
2MODULE10A BCM, Smart Key Control Module, Overhead Console Lamp Analog Clock, A/V & Navigation Head Unit,
Keyboard I-Box, Front Monitor, Parking Guide Unit