Page 19 of 438

Your vehicle at a glance
4 2
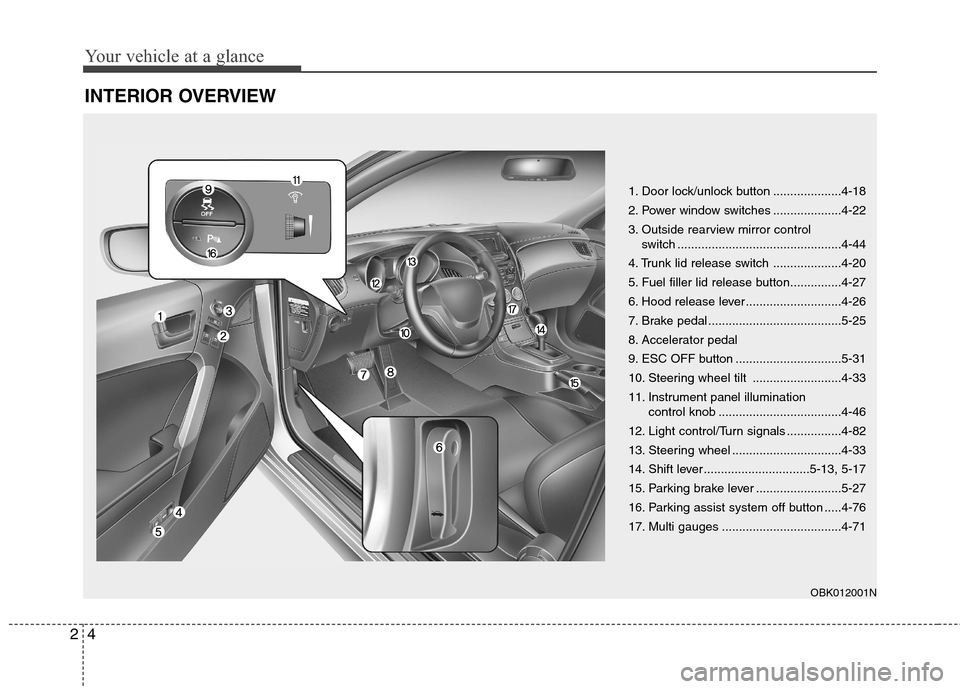
INTERIOR OVERVIEW
1. Door lock/unlock button ....................4-18
2. Power window switches ....................4-22
3. Outside rearview mirror control
switch ................................................4-44
4. Trunk lid release switch ....................4-20
5. Fuel filler lid release button...............4-27
6. Hood release lever ............................4-26
7. Brake pedal .......................................5-25
8. Accelerator pedal
9. ESC OFF button ...............................5-31
10. Steering wheel tilt ..........................4-33
11. Instrument panel illumination
control knob ....................................4-46
12. Light control/Turn signals ................4-82
13. Steering wheel ................................4-33
14. Shift lever ...............................5-13, 5-17
15. Parking brake lever .........................5-27
16. Parking assist system off button .....4-76
17. Multi gauges ...................................4-71
OBK012001N
Page 21 of 438
Your vehicle at a glance
6 2
ENGINE COMPARTMENT
1. Negative battery terminal..................7-38
2. Positive battery terminal ...................7-38
3. Fuse and relay box ...........................7-55
4. Windshield washer fluid reservoir .....7-30
5. Power steering fluid reservoir ...........7-29
6. Air cleaner.........................................7-32
7. Radiator cap .....................................7-27
8. Engine oil dipstick .............................7-23
9. Engine oil filler cap ...........................7-23
10. Brake/clutch fluid reservoir .............7-28
11. Engine coolant reservoir .................7-26
* The actual engine room in the vehicle may differ from the illustration.
OBK012004
Page 26 of 438

35
Safety features of your vehicle
Seatback angle
To recline the seatback:
1. Lean forward slightly and lift up the
seatback recline lever.
2. Carefully lean back on the seat
and adjust the seatback of the
seat to the position you desire.
3. Release the lever and make sure
the seatback is locked in place.
(The lever MUST return to its orig-
inal position for the seatback to
lock.)
Seat cushion height
(for driver’s seat)
To change the height of the seat
cushion, push the lever upwards or
downwards.
• To lower the seat cushion, push the
lever down several times.
To raise the seat cushion, pull the
lever up several times.
Front seat adjustment - power
(for driver’s seat) (if equipped)
The front seat can be adjusted by
using the control knob located on the
outside of the seat cushion. Before
driving, adjust the seat to the proper
position so as to easily control the
steering wheel, pedals and switches
on the instrument panel.
OBK032003OBK032004WARNING
The power seat is operable with
the ignition OFF, therefore, chil-
dren should never be left unat-
tended in the car.
Page 117 of 438

433
Features of your vehicle
❈For more detailed information,
contact an authorized HYUNDAI
dealer.Power steering
Power steering uses energy from the
engine to assist you in steering the
vehicle. If the engine is off or if the
power steering system becomes
inoperative, the vehicle may still be
steered, but it will require increased
steering effort.
Should you notice any change in the
effort required to steer during normal
vehicle operation, have the power
steering checked by an authorized
HYUNDAI dealer.
✽ ✽
NOTICE
If the power steering drive belt
breaks or if the power steering
pump malfunctions, the steering
effort will greatly increase.
✽ ✽
NOTICE
If the vehicle is parked for extended
periods outside in cold weather
(below -14°F/10°C), the power steer-
ing may require increased effort
when the engine is first started. This
is caused by increased fluid viscosity
due to the cold weather and does not
indicate a malfunction.
When this happens, increase the
engine RPM by depressing accelera-
tor until the RPM reaches 1,500 rpm
then release or let the engine idle for
two or three minutes to warm up the
fluid.
CAUTION
Never hold the steering wheel
against a stop (extreme right or
left turn) for more than 5 sec-
onds with the engine running.
Holding the steering wheel for
more than 5 seconds in either
position may cause damage to
the power steering pump.
CAUTION
If the sunroof is not reset when
the vehicle battery is discon-
nected or discharged, or related
fuse is blown, the sunroof may
operate improperly.
STEERING WHEEL
Page 208 of 438

Features of your vehicle
124 4
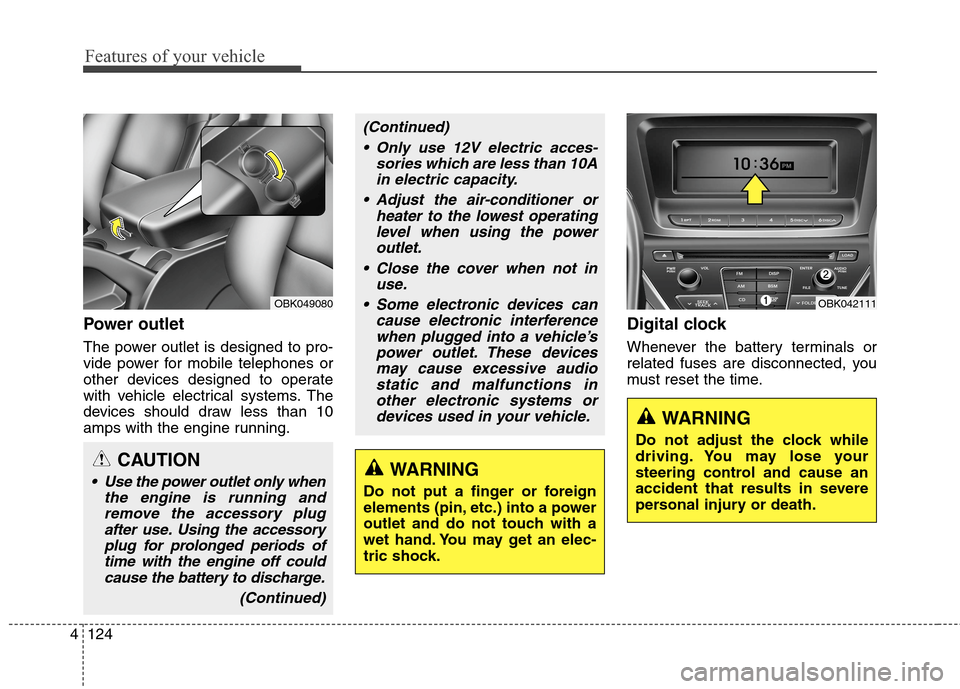
Power outlet
The power outlet is designed to pro-
vide power for mobile telephones or
other devices designed to operate
with vehicle electrical systems. The
devices should draw less than 10
amps with the engine running.
Digital clock
Whenever the battery terminals or
related fuses are disconnected, you
must reset the time.
WARNING
Do not adjust the clock while
driving. You may lose your
steering control and cause an
accident that results in severe
personal injury or death.
OBK042111OBK049080
CAUTION
Use the power outlet only when
the engine is running and
remove the accessory plug
after use. Using the accessory
plug for prolonged periods of
time with the engine off could
cause the battery to discharge.
(Continued)
(Continued)
Only use 12V electric acces-
sories which are less than 10A
in electric capacity.
Adjust the air-conditioner or
heater to the lowest operating
level when using the power
outlet.
Close the cover when not in
use.
Some electronic devices can
cause electronic interference
when plugged into a vehicle’s
power outlet. These devices
may cause excessive audio
static and malfunctions in
other electronic systems or
devices used in your vehicle.
WARNING
Do not put a finger or foreign
elements (pin, etc.) into a power
outlet and do not touch with a
wet hand. You may get an elec-
tric shock.
Page 250 of 438
Features of your vehicle
166 4
■ Key matrix
No.
Disconnected(BT Icon off) Connected (BT Icon On)
Paired H/P
EmptyPaired H/P
Exist
1SHORT
LONG
SHORT
LONG
STEERING
MODE KEY
AUDIO
POWER KEYIncoming Call
Outgoing Call
Active CallTRANSFER
CALL Connected KEY
--Reject Call End Call End Call End Call
-------
No phone
paired Please
pair a phoneNo phone
connected Please
connect phonePlease say a
command
Call/Dial/Redial/Help----
-------
-------
-------
No phone
paired Please
pair a phoneNo phone
connected Please
connect phonePlease say a
commandAccept Call---
4
5 2
3
SHORT
LONG
--Transfer Call
(Handsfree <->Phone)
Page 270 of 438
Driving your vehicle
20 5
D (Drive)
This is the normal forward driving
position. The transmission will auto-
matically shift through a 8-gear
sequence, providing the best fuel
economy and power.
For extra power when passing anoth-
er vehicle or climbing grades,
depress the accelerator fully, at
which time the transmission will
automatically downshift to the next
lower gear (or gears, as appropri-
ate).
✽ ✽
NOTICE
Always come to a complete stop
before shifting into D (Drive).
Sport mode
Whether the vehicle is stationary or
in motion, sport mode is selected by
pushing the shift lever from the D
(Drive) position into the manual gate.
To return to D (Drive) range opera-
tion, push the shift lever back into the
main gate.In sport mode, it is possible to shift
the gear by using either the shift
lever or the steering wheel shift pad-
dles (dynamic shift).
OBK054007
+ (UP)
- (DOWN)
Sport
mode
OBK052036
Page 275 of 438

525
Driving your vehicle
Power brakes
Your vehicle has power-assisted
brakes that adjust automatically
through normal usage.
In the event that the power-assisted
brakes lose power because of a
stalled engine or some other reason,
you can still stop your vehicle by
applying greater force to the brake
pedal than you normally would. The
stopping distance, however, will be
longer.
When the engine is not running, the
reserve brake power is partially
depleted each time the brake pedal
is applied. Do not pump the brake
pedal when the power assist has
been interrupted.
Pump the brake pedal only when
necessary to maintain steering con-
trol on slippery surfaces.
BRAKE SYSTEM
WARNING - Brakes
Do not drive with your foot
resting on the brake pedal.
This will create abnormal high
brake temperatures, exces-
sive brake lining and pad
wear, and increased stopping
distances.
When descending a long or
steep hill, shift to a lower gear
and avoid continuous applica-
tion of the brakes. Continuous
brake application will cause
the brakes to overheat and
could result in a temporary
loss of braking performance.
Wet brakes may impair the
vehicle’s ability to safely slow
down; the vehicle may also
pull to one side when the
brakes are applied. Applying
the brakes lightly will indicate
whether they have been
affected in this way. Always
test your brakes in this fash-
ion after driving through deep
water.
(Continued)(Continued)
To dry the brakes, apply them
lightly while maintaining a safe
forward speed until brake per-
formance returns to normal.
Always, confirm the position of
the brake and accelerator
pedal before driving. If you
don't check the position of the
accelerator and brake pedal
before driving, you may
depress the accelerator
instead of the brake pedal. It
may cause a serious accident.