Page 176 of 425
Features of your vehicle
106 4
Automatic ventilation
(if equipped)
When the recirculated air intake position
is selected for a certain period of time,
the air intake position will be automatical-
ly changed to the outside (fresh) air posi-
tion. To cancel or reset the automatic
ventilation, do the following.
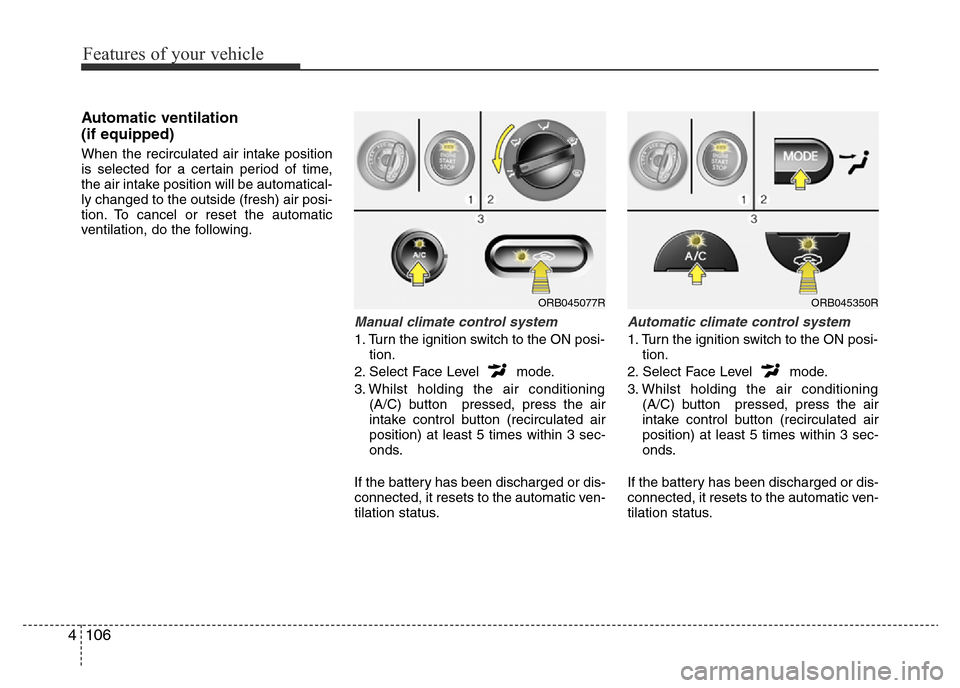
Manual climate control system
1. Turn the ignition switch to the ON posi-
tion.
2. Select Face Level mode.
3. Whilst holding the air conditioning
(A/C) button pressed, press the air
intake control button (recirculated air
position) at least 5 times within 3 sec-
onds.
If the battery has been discharged or dis-
connected, it resets to the automatic ven-
tilation status.
Automatic climate control system
1. Turn the ignition switch to the ON posi-
tion.
2. Select Face Level mode.
3. Whilst holding the air conditioning
(A/C) button pressed, press the air
intake control button (recirculated air
position) at least 5 times within 3 sec-
onds.
If the battery has been discharged or dis-
connected, it resets to the automatic ven-
tilation status.
ORB045077RORB045350R
Page 178 of 425
Features of your vehicle
108 4
Glove box
To open the glove box, push the button
and the glove box will automatically
open. Close the glove box after use.
Cool box (if equipped)
You can keep beverage cans or other
items cool in the glove box.
1. Turn on the air conditioning.
2. Slide the open/close lever (1) of the
vent installed in the glove box to the
open position.
3. When the cool box is not used, slide
the lever (1) to the closed position.
✽NOTICE
If some items in the cool box block the
vent, the cooling effectiveness of the cool
box is reduced.
ORB042080R
WARNING
To reduce the risk of injury in an
accident or sudden stop, always
keep the glove box door closed
whilst driving.
CAUTION
Do not keep food in the glove box
for a long time.
ORB045374R
WARNING
Do not put perishable food in the
cool box because it may not main-
tain the necessary consistent tem-
perature to keep the food fresh.
Page 292 of 425
555
Driving your vehicle
• Remember, your vehicle does not
require extended warm-up. After the
engine has started, allow the engine to
run for 10 to 20 seconds prior to plac-
ing the vehicle in gear. In very cold
weather, however, give your engine a
slightly longer warm-up period.
• Don't "lug" or "over-rev" the engine.
Lugging is driving too slowly in too high
a gear resulting in the engine bucking.
If this happens, shift to a lower gear.
Over-revving is racing the engine
beyond its safe limit. This can be avoid-
ed by shifting at the recommended
speeds.• Use your air conditioning sparingly.
The air conditioning system is operat-
ed by engine power so your fuel econ-
omy is reduced when you use it.
• Open windows at high speeds can
reduce fuel economy.
• Fuel economy is reduced in cross-
winds and headwinds. To help offset
some of this loss, slow down when
driving in these conditions.
Keeping a vehicle in good operating con-
dition is important both for economy and
safety. Therefore, have an authorised
HYUNDAI dealer perform scheduled
inspections and maintenance.
WARNING - Engine off dur-
ing motion
Never turn the engine off to coast
down hills or anytime the vehicle is
in motion. The power steering and
power brakes will not function
properly without the engine run-
ning. Instead, keep the engine on
and downshift to an appropriate
gear for engine braking effect. In
addition, turning off the ignition
whilst driving could engage the
steering wheel lock resulting in
loss of vehicle steering which
could cause serious injury or
death.
Page 335 of 425
77
Maintenance
• Check parking brake.
• Check for fluid leaks under your vehicle
(water dripping from the air condition-
ing system during or after use is nor-
mal).
At least monthly:
• Check coolant level in the engine
coolant reservoir.
• Check the operation of all exterior
lights, including the stoplights, turn sig-
nals and hazard warning flashers.
• Check the inflation pressures of all
tyres including the spare.
At least twice a year
(i.e., every Spring and Autumn):
• Check radiator, heater and air condi-
tioning hoses for leaks or damage.
• Check windscreen washer spray and
wiper operation. Clean wiper blades
with clean cloth dampened with wash-
er fluid.
• Check headlight alignment.
• Check muffler, exhaust pipes, shields
and clamps.
• Check the lap/shoulder belts for wear
and function.
• Check for worn tyres and loose wheel
nuts.
At least once a year:
• Clean body and door drain holes.
• Lubricate door hinges and checks, and
bonnet hinges.
• Lubricate door and bonnet locks and
latches.
• Lubricate door rubber weatherstrips.
• Check the air conditioning system.
• Inspect and lubricate automatic
transaxle/Continuously Variable
Transaxle/Dual clutch transmission
linkage and controls.
• Clean battery and terminals.
• Check the brake (and clutch) fluid
level.
Page 349 of 425
721
Maintenance
Brake hoses and lines
Visually check for proper installation,
chafing, cracks, deterioration and any
leakage. Replace any deteriorated or
damaged parts immediately.
Brake fluid
Check brake fluid level in the brake fluid
reservoir. The level should be between
“MIN” and “MAX” marks on the side of
the reservoir. Use only hydraulic brake
fluid conforming to DOT 3 or DOT 4
specification.
Parking brake
Inspect the parking brake system includ-
ing the parking brake lever and cables.
Brake discs, pads, calipers and
rotors
Check the pads for excessive wear, discs
for run out and wear, and calipers for fluid
leakage.
For more information on checking the
pads or lining wear limit, refer to the
Hyundai web site.
(http://brakeman
ual.hmc.co.kr)
Suspension mounting bolts
Check the suspension connections for
looseness or damage. Retighten to the
specified torque.
Steering gear box, linkage &
boots/lower arm ball joint
With the vehicle stopped and engine off,
check for excessive free-play in the
steering wheel.
Check the linkage for bends or damage.
Check the dust boots and ball joints for
deterioration, cracks, or damage.
Replace any damaged parts.
Drive shafts and boots
Check the drive shafts, boots and clamps
for cracks, deterioration, or damage.
Replace any damaged parts and, if nec-
essary, repack the grease.
Air conditioning refrigerant
(if equipped)
Check the air conditioning lines and con-
nections for leakage and damage.
Page 393 of 425
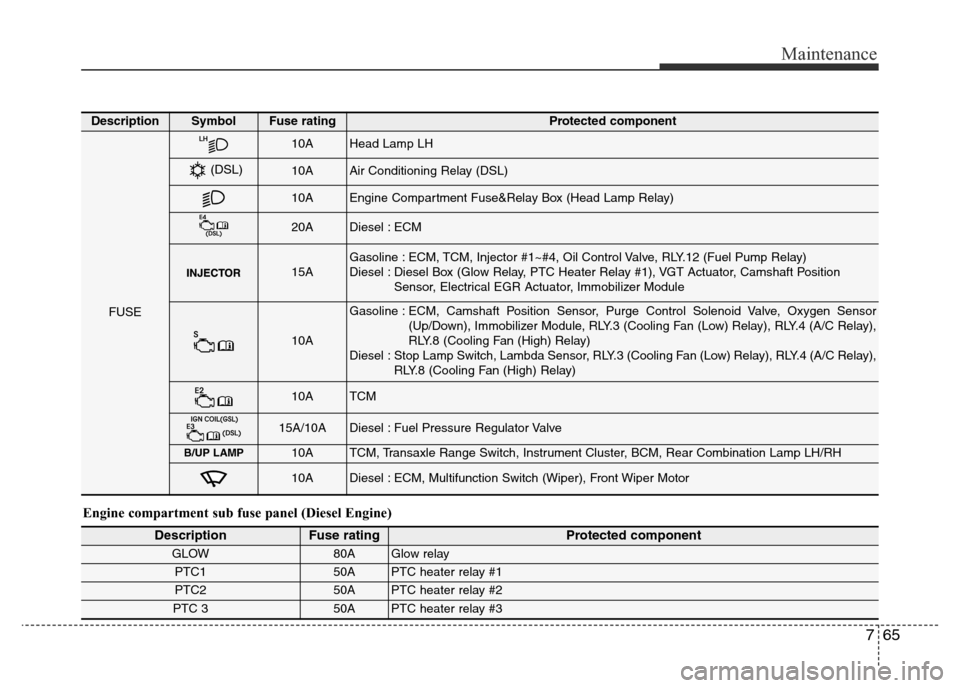
765
Maintenance
Engine compartment sub fuse panel (Diesel Engine)
DescriptionFuse ratingProtected component
GLOW80A Glow relay
PTC150A PTC heater relay #1
PTC250A PTC heater relay #2
PTC 350A PTC heater relay #3
DescriptionSymbolFuse ratingProtected component
FUSE
10AHead Lamp LH
10AAir Conditioning Relay (DSL)
10AEngine Compartment Fuse&Relay Box (Head Lamp Relay)
20ADiesel : ECM
15AGasoline : ECM, TCM, Injector #1~#4, Oil Control Valve, RLY.12 (Fuel Pump Relay)
Diesel : Diesel Box (Glow Relay, PTC Heater Relay #1), VGT Actuator, Camshaft Position
Sensor, Electrical EGR Actuator, Immobilizer Module
10A
Gasoline : ECM, Camshaft Position Sensor, Purge Control Solenoid Valve, Oxygen Sensor
(Up/Down), Immobilizer Module, RLY.3 (Cooling Fan (Low) Relay), RLY.4 (A/C Relay),
RLY.8 (Cooling Fan (High) Relay)
Diesel : Stop Lamp Switch, Lambda Sensor, RLY.3 (Cooling Fan (Low) Relay), RLY.4 (A/C Relay),
RLY.8 (Cooling Fan (High) Relay)
10ATCM
15A/10ADiesel : Fuel Pressure Regulator Valve
B/UP LAMP10ATCM, Transaxle Range Switch, Instrument Cluster, BCM, Rear Combination Lamp LH/RH
10ADiesel : ECM, Multifunction Switch (Wiper), Front Wiper Motor
(DSL)
Page:
< prev 1-8 9-16 17-24