Page 149 of 425
479
Features of your vehicle
Daytime running light
(if equipped)
The Daytime Running Lights (DRL) can
make it easier for others to see the front
of your vehicle during the day. DRL can
be helpful in many different driving condi-
tions, and it is especially helpful after
dawn and before sunset.
The daytime running lights turn off when:
Type A
1. The parking light switch is ON.
2. The engine stops.
3. The parking brake is engaged.
Type B
1. The headlight switch is ON.
2. The front fog light switch is ON.
3. The engine stops.
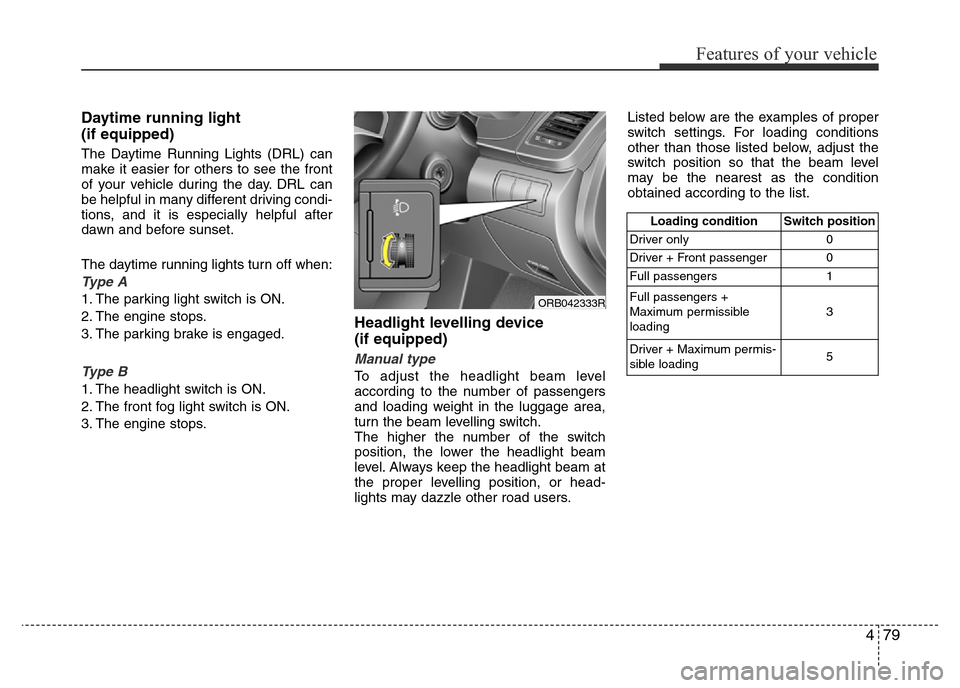
Headlight levelling device
(if equipped)
Manual type
To adjust the headlight beam level
according to the number of passengers
and loading weight in the luggage area,
turn the beam levelling switch.
The higher the number of the switch
position, the lower the headlight beam
level. Always keep the headlight beam at
the proper levelling position, or head-
lights may dazzle other road users.Listed below are the examples of proper
switch settings. For loading conditions
other than those listed below, adjust the
switch position so that the beam level
may be the nearest as the condition
obtained according to the list.
Loading condition Switch position
Driver only 0
Driver + Front passenger 0
Full passengers 1
Full passengers +
Maximum permissible
loading3
Driver + Maximum permis-
sible loading 5
ORB042333R
Page 173 of 425
4103
Features of your vehicle
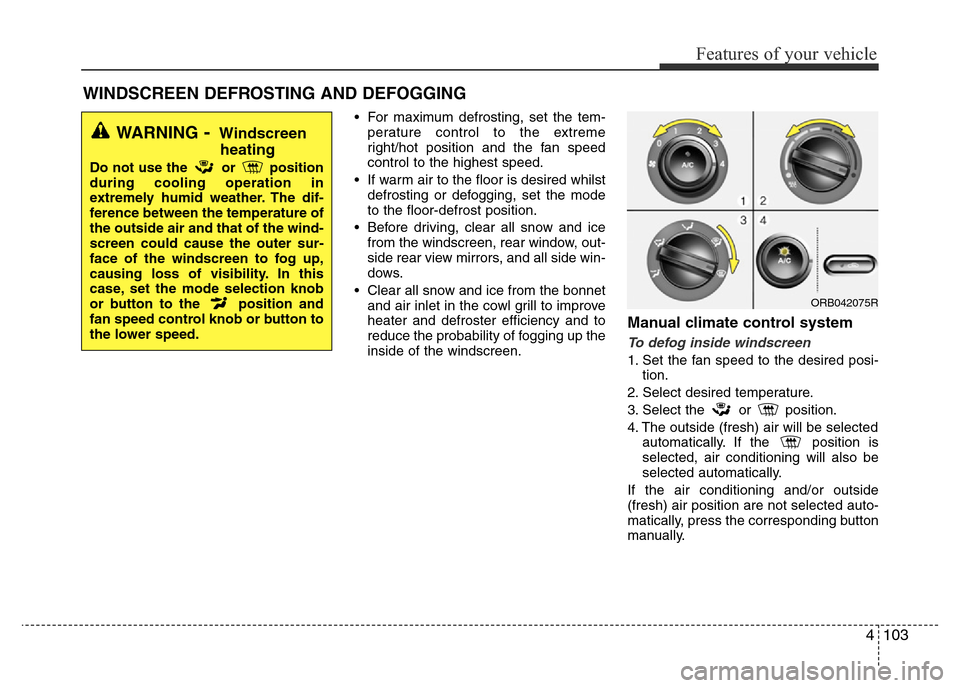
• For maximum defrosting, set the tem-
perature control to the extreme
right/hot position and the fan speed
control to the highest speed.
• If warm air to the floor is desired whilst
defrosting or defogging, set the mode
to the floor-defrost position.
• Before driving, clear all snow and ice
from the windscreen, rear window, out-
side rear view mirrors, and all side win-
dows.
• Clear all snow and ice from the bonnet
and air inlet in the cowl grill to improve
heater and defroster efficiency and to
reduce the probability of fogging up the
inside of the windscreen.
Manual climate control system
To defog inside windscreen
1. Set the fan speed to the desired posi-
tion.
2. Select desired temperature.
3. Select the or position.
4. The outside (fresh) air will be selected
automatically. If the position is
selected, air conditioning will also be
selected automatically.
If the air conditioning and/or outside
(fresh) air position are not selected auto-
matically, press the corresponding button
manually.
WINDSCREEN DEFROSTING AND DEFOGGING
WARNING- Windscreen
heating
Do not use the or position
during cooling operation in
extremely humid weather. The dif-
ference between the temperature of
the outside air and that of the wind-
screen could cause the outer sur-
face of the windscreen to fog up,
causing loss of visibility. In this
case, set the mode selection knob
or button to the position and
fan speed control knob or button to
the lower speed.
ORB042075R
Page 174 of 425
Features of your vehicle
104 4
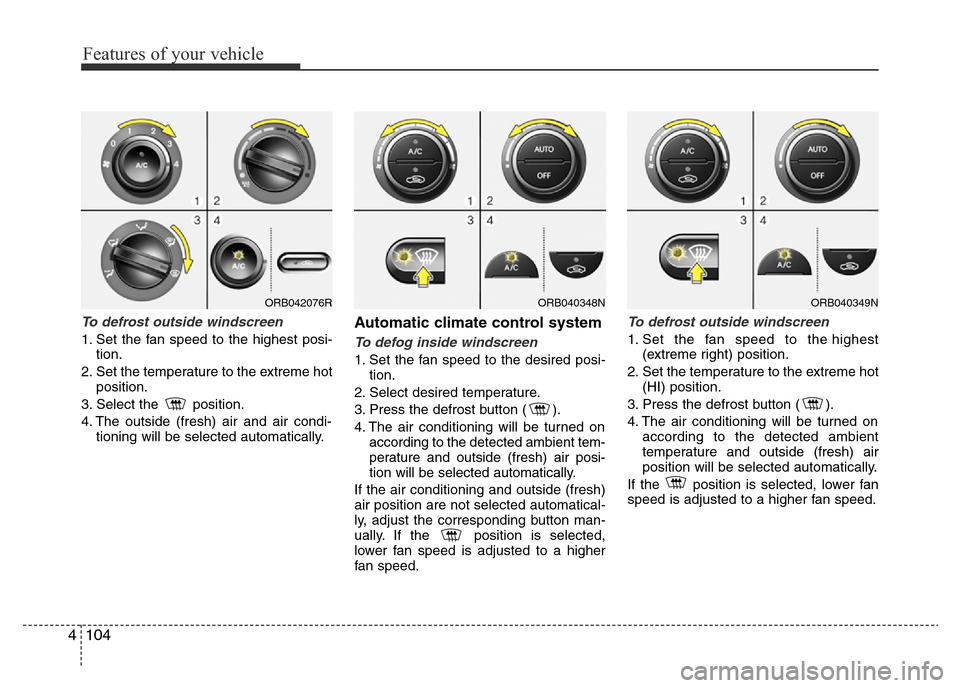
To defrost outside windscreen
1. Set the fan speed to the highest posi-
tion.
2. Set the temperature to the extreme hot
position.
3. Select the position.
4. The outside (fresh) air and air condi-
tioning will be selected automatically.
Automatic climate control system
To defog inside windscreen
1. Set the fan speed to the desired posi-
tion.
2. Select desired temperature.
3. Press the defrost button ( ).
4. The air conditioning will be turned on
according to the detected ambient tem-
perature and outside (fresh) air posi-
tion will be selected automatically.
If the air conditioning and outside (fresh)
air position are not selected automatical-
ly, adjust the corresponding button man-
ually. If the position is selected,
lower fan speed is adjusted to a higher
fan speed.
To defrost outside windscreen
1. Set the fan speed to the highest
(extreme right) position.
2. Set the temperature to the extreme hot
(HI) position.
3. Press the defrost button ( ).
4. The air conditioning will be turned on
according to the detected ambient
temperature and outside (fresh) air
position will be selected automatically.
If the position is selected, lower fan
speed is adjusted to a higher fan speed.
ORB040348NORB040349NORB042076R
Page 188 of 425
Features of your vehicle
118 4
WARNING
• The vehicle centre of gravity will
be higher when items are loaded
onto the roof. Avoid sudden
starts, braking, sharp turns,
abrupt maneuvers or high speeds
that may result in loss of vehicle
control or rollover resulting in an
accident.
• Always drive slowly and turn cor-
ners carefully when carrying
items on the roof. Severe wind
updrafts, caused by passing
vehicles or natural causes, can
cause sudden upward pressure
on items loaded on the roof. This
is especially true when carrying
large, flat items such as wood
panels or mattresses. This could
cause the items to fall off the roof
and cause damage to your vehi-
cle or others around you.
• To prevent damage or loss of
cargo whilst driving, check fre-
quently before or whilst driving to
make sure the items on the roof
are securely fastened.
Page 194 of 425
Features of your vehicle
124 4
WARNING
• Do not stare at the screen while
driving. Staring at the screen for
prolonged periods of time could
lead to traffic accidents.
• Do not disassemble, assemble, or
modify the audio system. Such
acts could result in accidents,
fire, or electric shock.
• Using the phone while driving
may lead to a lack of attention of
traffic conditions and increase
the likelihood of accidents. Use
the phone feature after parking
the vehicle.
• Heed caution not to spill water or
introduce foreign objects into the
device. Such acts could lead to
smoke, fire, or product malfunc-
tion.
(Continued)
(Continued)
• Driving while distracted can result in
a loss of vehicle control that may
lead to an accident, severe personal
injury, and death. The driver’s pri-
mary responsibility is in the safe and
legal operation of a vehicle, and use
of any handheld devices, other
equipment, or vehicle systems
which take the driver’s eyes, atten-
tion and focus away from the safe
operation of a vehicle or which are
not permissible by law should never
be used during operation of the
vehicle.(Continued)
• Please refrain from use if the
screen is blank or no sound can
be heard as these signs may indi-
cate product malfunction.
Continued use in such conditions
could lead to accidents(fires,
electric shock) or product mal-
functions.
• Do not touch the antenna during
thunder or lightening as such
acts may lead to lightning
induced electric shock.
• Do not stop or park in parking-
restricted areas to operate the
product. Such acts could lead to
traffic accidents.
• Use the system with the vehicle
ignition turned on. Prolonged use
with the ignition turned off could
result in battery discharge.
(Continued)
Page 220 of 425
Features of your vehicle
150 4
RADIO (for RDS model)
Changing RADIO mode
SEEK
Press the , key
• Shortly pressing the key (under 0.8
seconds): Changes the frequency.
• Pressing and holding the key (over 0.8
seconds): Automatically searches for
the next frequency.
Preset SEEK
Press the ~ key
• Shortly pressing the key (under 0.8
seconds): Plays the frequency saved in
the corresponding key.
• Pressing and holding the key (over 0.8
seconds): Pressing and holding the
desired key from ~ will
save the currently playing broadcast to
the selected key and sound a BEEP.
SCAN
Press the key
• Pressing and holding the key (over 0.8
seconds): The broadcast frequency
increases and previews each broad-
cast for 5 seconds each. After scan-
ning all frequencies, returns and plays
the current broadcast frequency.TA/SCAN
61
61
TRACKSEEK
Page 222 of 425
Features of your vehicle
152 4
RADIO
Changing RADIO mode
Changing RADIO mode
SEEK
Press the , key
• Shortly pressing the key (under 0.8
seconds): Changes the frequency.
• Pressing and holding the key (over 0.8
seconds): Automatically searches for the
next frequency.
Preset SEEK
Press the ~ key
• Shortly pressing the key (under 0.8
seconds): Plays the frequency saved in
the corresponding key.
• Pressing and holding the key (over 0.8
seconds): Pressing and holding the
desired key from ~ will
save the currently playing broadcast to
the selected key and sound a BEEP.
SCAN
Press the key
• Shortly pressing the key (under 0.8
seconds): The broadcast frequency
increases and previews each broad-
cast for 5 seconds each. After scan-
ning all frequencies, returns and plays
the current broadcast frequency.
• Pressing and holding the key (over 0.8
seconds): Previews the broadcasts
saved in Preset ~ for
5 seconds each.
61
TA/SCAN
61
61
TRACKSEEK
Page 231 of 425
4161
Features of your vehicle
Bluetooth®Wireless
Technology AUDIO
(If equipped)
What is Bluetooth®Wireless
Technology?
Bluetooth®Wireless Technology allows
devices to be connected in a short dis-
tance, including hands-free devices,
stereo headsets, wireless remote con-
trollers, etc. For more information, visit
the
Bluetooth®Wireless Technology web-
site at
www.Bluetooth.com
Before using Bluetooth®Wireless
Technology audio features
•
Bluetooth® Wireless Technology audio
may not be supported depending on
the compatibility of your
Bluetooth®
Wireless Technology mobile phone.
• In order to use
Bluetooth® Wireless
Technology audio, you must first pair
and connect the
Bluetooth®Wireless
Technology mobile phone.• The
Bluetooth®word mark and logos
are registered trademarks owned by
Bluetooth®SIG, Inc. and any use of
such marks is under license. Other
trademarks and trade names are those
of their respective owners. A
Bluetooth®
enabled cell phone is required to useBluetooth®Wireless Technology
•
Bluetooth®Wireless Technology audio
can be used only when the [Audio
Streaming] of Phone is turned On.
❈Setting
Bluetooth®Wireless Technology
Audio Streaming : Press the
key Select [Phone] through the tune
knob Select [Audio Streaming]
through the TUNE knob Set
/Starting
Bluetooth®Wireless
Technology Audio
• Press the key to change the
mode in order of CD ➟USB ➟AUX ➟
My Music ➟BT Audio.
• If BT Audio is selected,
Bluetooth®
Wireless Technology audio will start
playing.
❈Audio may not automatically start
playing in some mobile phones.
MEDIA
Off
On
SETUPCLOCK