Page 384 of 425

Maintenance
56 7
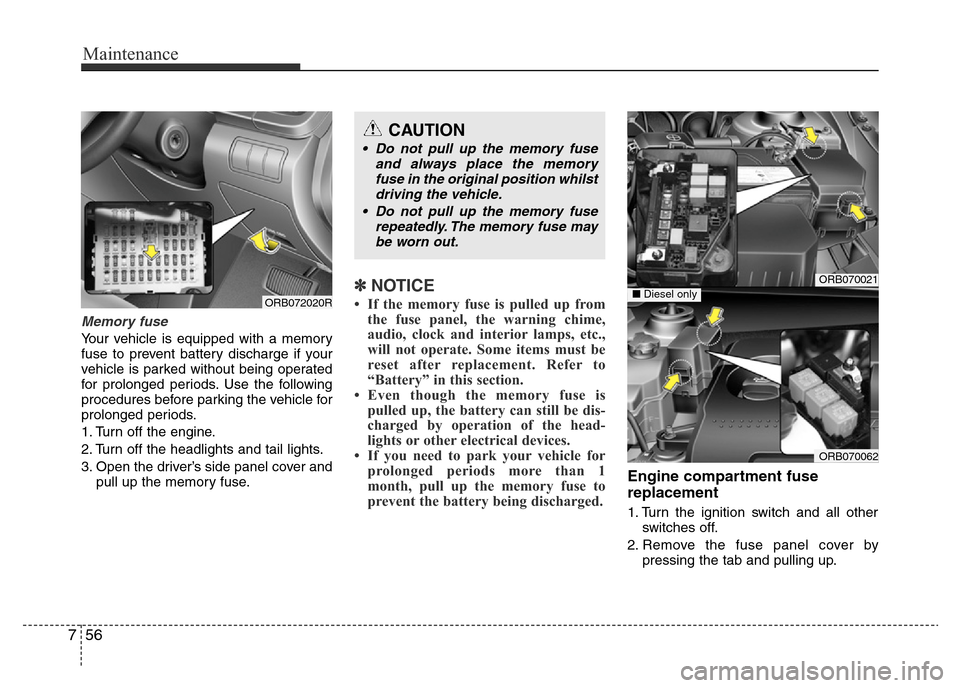
Memory fuse
Your vehicle is equipped with a memory
fuse to prevent battery discharge if your
vehicle is parked without being operated
for prolonged periods. Use the following
procedures before parking the vehicle for
prolonged periods.
1. Turn off the engine.
2. Turn off the headlights and tail lights.
3. Open the driver’s side panel cover and
pull up the memory fuse.
✽NOTICE
• If the memory fuse is pulled up from
the fuse panel, the warning chime,
audio, clock and interior lamps, etc.,
will not operate. Some items must be
reset after replacement. Refer to
“Battery” in this section.
• Even though the memory fuse is
pulled up, the battery can still be dis-
charged by operation of the head-
lights or other electrical devices.
• If you need to park your vehicle for
prolonged periods more than 1
month, pull up the memory fuse to
prevent the battery being discharged.
Engine compartment fuse
replacement
1. Turn the ignition switch and all other
switches off.
2. Remove the fuse panel cover by
pressing the tab and pulling up.
ORB072020R
ORB070021
ORB070062
■Diesel only
CAUTION
• Do not pull up the memory fuse
and always place the memory
fuse in the original position whilst
driving the vehicle.
• Do not pull up the memory fuse
repeatedly. The memory fuse may
be worn out.
Page 385 of 425
757
Maintenance
3. Check the removed fuse; replace it if it
is blown. To remove or insert the fuse,
use the fuse puller in the engine com-
partment fuse panel.
4. Push in a new fuse of the same rating,
and make sure it fits tightly in the clips.
If it fits loosely, consult an authorised
HYUNDAI dealer.
Multi fuse
If the multi fuse is blown, replace the fuse
with a new one of the same rating when
the ignition switch and all other switches
are off.
CAUTION
After checking the fuse panel in the
engine compartment, securely
install the fuse panel cover. If not,
electrical failures may occur from
water contact.
ORB070022
CAUTION
• Before removing the multi fuse,
disconnect the (-) terminal of bat-
tery.
• Do not disassemble or assemble
the multi fuse fastened with bolts
or nuts. The fuse may be fastened
incompletely, and it may cause a
possible fire. If the multi fuse is
blown, we recommend that you
consult an authorised HYUNDAI
dealer.
Page 387 of 425
759
Maintenance
ORB070024
Engine compartment
ORB075075L
Page 391 of 425

763
Maintenance
DescriptionSymbolFuse ratingProtected component
SAFETY POWER
WINDOW25ADriver Safety Power Window Module
2SPARE2SPARE15A-1SPARE1SPARE10A-
ROOM LAMP10AInstrument Cluster, Tyre Pressure Monitoring Module, BCM, A/C Control Module, Luggage
Lamp, Front Room Lamp
AUDIO20AAudio
TAIL LAMP LH10ARear Combination Lamp LH, Head Lamp LH, License Lamp LH/RH (4DOOR), License
Lamp (5DOOR)
TAIL LAMP RH10A
Head Lamp RH, Rear Combination Lamp RH, Rheostat, Head Lamp Levelling Device
Switch, Hazard Switch, Audio, AUX & USB Jack, ESC Off Switch, Instrument Cluster,
Multifunction Switch (Remote Control), A/C Switch, Rear Defogger Switch, A/C Control
Module, Front Wiper Deicer Switch, ATM Shift Lever Switch ILL.
START10AE/R Fuse & Relay Box (RLY. 7), ECM, Ignition Lock Switch, Transaxle Range Switch
H/LAMP10AInstrument Cluster, Engine Compartment Fuse & Relay Box (Head Lamp Relay)
P/WDW LH25APower Window Main Switch, Rear Power Window Switch LH
P/WDW RH25APower Window Main Switch, Rear Power Window Switch RH, Passenger Power Window
Switch
HTD MIRR10AECM (Petrol), Rear Defogger Switch, Driver/ Passenger Power Outside Mirror
A/CON10AA/C Control Module (Auto)
BLOWER10AECM, Blower Switch, Blower Resistor
Page 392 of 425
Maintenance
64 7
DescriptionSymbolFuse ratingProtected component
MULTI FUSE
80AEPS Control Module
40ARLY.10 (Blower Relay)
40AI/P Junction Box (Rear Defogger Relay)
40AABS Control Module, ESC Module
40AABS Control Module, ESC Module, Multipurpose Check Connector
ALT (GSL)
ALT (DSL)125A (GSL)
150A (DSL)Alternator, Diesel Box (GLOW 80A, PTC 1/2/3 50A),
E/R Fuse & Relay Box (Multi Fuse F1~F5, Fuse F20)
30ADiesel : RLY.12 (Fuel Filter Heater Relay)
50AI/P Junction Box (Power Connector Fuse : F35/F36, Fuse : F12~F15, Tail Lamp Relay)
FUSE
40ARLY.7 (Start Relay), Ignition Switch
40AIgnition Switch
30ARLY.1 (Engine Control Relay), Fuse F25
40ARLY.3 (Cooling Fan (Low) Relay), RLY.8 (Cooling Fan (High) Relay)
50AI/P Junction Box (Relay : Power Window, Hazard, Door Lock/Unlock, Tail Gate Unlock,
Fuse : F23~F25, F31, F32)
10ARLY.5 (Horn Relay)
F/PUMP
(GSL)15APetrol: RLY.2 (Fuel Pump Relay)
10AHead Lamp RH
Engine compartment main fuse panel
Page 393 of 425

765
Maintenance
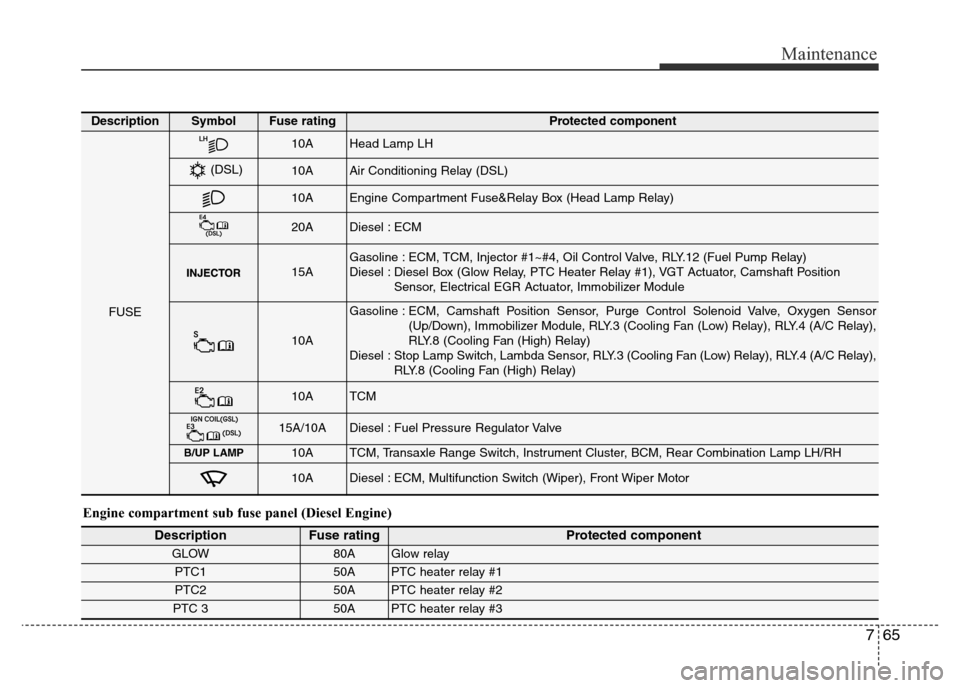
Engine compartment sub fuse panel (Diesel Engine)
DescriptionFuse ratingProtected component
GLOW80A Glow relay
PTC150A PTC heater relay #1
PTC250A PTC heater relay #2
PTC 350A PTC heater relay #3
DescriptionSymbolFuse ratingProtected component
FUSE
10AHead Lamp LH
10AAir Conditioning Relay (DSL)
10AEngine Compartment Fuse&Relay Box (Head Lamp Relay)
20ADiesel : ECM
15AGasoline : ECM, TCM, Injector #1~#4, Oil Control Valve, RLY.12 (Fuel Pump Relay)
Diesel : Diesel Box (Glow Relay, PTC Heater Relay #1), VGT Actuator, Camshaft Position
Sensor, Electrical EGR Actuator, Immobilizer Module
10A
Gasoline : ECM, Camshaft Position Sensor, Purge Control Solenoid Valve, Oxygen Sensor
(Up/Down), Immobilizer Module, RLY.3 (Cooling Fan (Low) Relay), RLY.4 (A/C Relay),
RLY.8 (Cooling Fan (High) Relay)
Diesel : Stop Lamp Switch, Lambda Sensor, RLY.3 (Cooling Fan (Low) Relay), RLY.4 (A/C Relay),
RLY.8 (Cooling Fan (High) Relay)
10ATCM
15A/10ADiesel : Fuel Pressure Regulator Valve
B/UP LAMP10ATCM, Transaxle Range Switch, Instrument Cluster, BCM, Rear Combination Lamp LH/RH
10ADiesel : ECM, Multifunction Switch (Wiper), Front Wiper Motor
(DSL)
Page 398 of 425
Maintenance
70 7
Turn signal light
1. Turn off the engine and open the bon-
net.
2. Remove the socket from the assembly
by turning the socket counterclockwise
until the tabs on the socket align with
the slots on the assembly.3. Remove the bulb from the socket by
pressing it in and rotating it counter-
clockwise until the tabs on the bulb
align with the slots in the socket. Pull
the bulb out of the socket
4. Insert a new bulb by inserting it into
the socket and rotating it until it locks
into place.
5. Install the socket in the assembly by
aligning the tabs on the socket with the
slots in the assembly. Push the socket
into the assembly and turn the socket
clockwise.
Front fog light bulbs (if equipped)
1. Remove the front bumper under cover.
2. Reach your hand into the back of the
front bumper.
3. Disconnect the power connector from
the socket.
ORBC070030
ORBC070031
ORBC070049
ORB073049
■MFR (Multi Focus Reflector) Headlamp
■Bi-Function Projection Headlamp
Page 409 of 425

781
Maintenance
Waxing
Wax the vehicle when water will no
longer bead on the paint.
Always wash and dry the vehicle before
waxing. Use a good quality liquid or
paste wax, and follow the manufacturer’s
instructions. Wax all metal trim to protect
it and to maintain its luster.
Removing oil, tar, and similar materials
with a spot remover will usually strip the
wax from the finish. Be sure to re-wax
these areas even if the rest of the vehicle
does not yet need waxing.Finish damage repair
Deep scratches or stone chips in the
painted surface must be repaired
promptly. Exposed metal will quickly rust
and may develop into a major repair
expense.
✽NOTICE
If your vehicle is damaged and requires
any metal repair or replacement, be sure
the body shop applies anti-corrosion
materials to the parts repaired or
replaced.
CAUTION
• Wiping dust or dirt off the body
with a dry cloth will scratch the
finish.
• Do not use steel wool, abrasive
cleaners, or strong detergents
containing highly alkaline or
caustic agents on chrome-plated
or anodized aluminum parts. This
may result in damage to the pro-
tective coating and cause discol-
oration or paint deterioration.
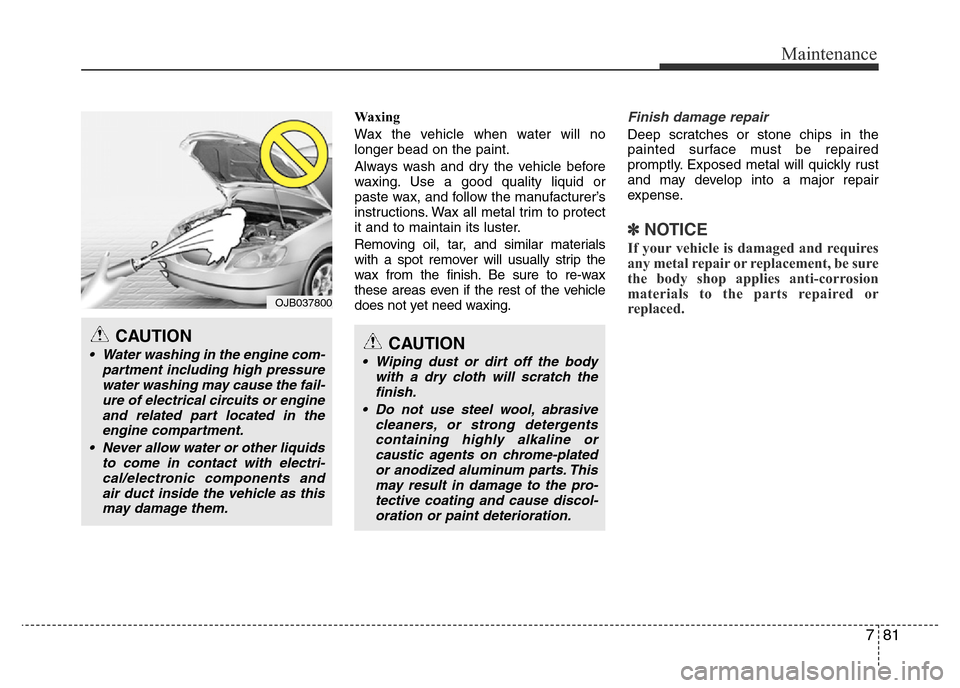
CAUTION
• Water washing in the engine com-
partment including high pressure
water washing may cause the fail-
ure of electrical circuits or engine
and related part located in the
engine compartment.
• Never allow water or other liquids
to come in contact with electri-
cal/electronic components and
air duct inside the vehicle as this
may damage them.
OJB037800